


1 Overview
Distributed architecture has been all the rage this past year. As programmers get frustrated with the troubled monoliths that are their legacy projects, Micro Services and Service Oriented Architecture (SOA) seem to promise a cure for all of their woes.
True or not, SOA does come with some serious challenges, the first of which is how do organize communication between totally decoupled systems? How does your accounting service know about a customer purchase? What about the shipping, or inventory services? Real-time updates, canceled orders, and time-sensitive communication become a lot more difficult as you introduce more pieces to the puzzle.
Developed by a social-media blue chip, Kafka has become one of the key technologies to answering this question of how to broadcast real-time messages and event logs to a massively scaled and distributed system. In this project, we’ll be taking a look at Kafka, comparing it to some other message brokers out there, and getting our hands dirty with a little video streaming project. And if you’re thinking, “But wait! Kafka was built for message streaming, not video,” you’re right on the money. Kafka’s not gonna be your best bet for video streaming, but web cam feeds are a lot more fun to publish than a ho-hum CSV file.
Kafka
So what’s the deal with Kafka anyway?
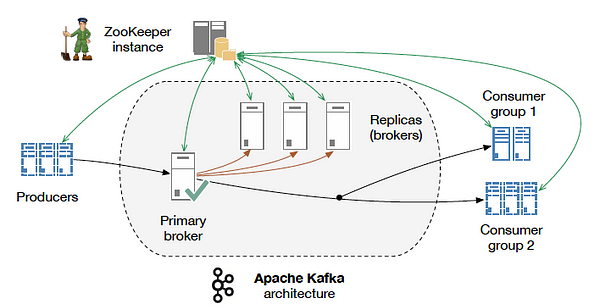
Kafka is Apache’s platform for distributed message streaming. It was originally developed by the LinkedIn team to handle their shift to SOA. Kafka is notoriously resilient to node failures, and supports automatic recovery out of the box. It is intended to serve as the mail room of any project, a central spot to publish and subscribe to events.
The Kafka pipeline excels in delivering high-volume payloads; ideal for messaging, website activity tracking, system-health metrics monitoring, log aggregation, event sourcing (for state changes), and stream processing. Its built-in persistence layer provides Consumers with a full log history, taking the pressure off in failure-prone environments.
Kafka vs other Message Brokers
eing, at its core, a distributed messaging system, Kafka reminded me immediately of the RabbitMQ Message Broker (Kafka even noticed the similarities). They both use topic-based pub-sub, and they both boast truly asynchronous event messaging. So, what’s the real difference anyway?
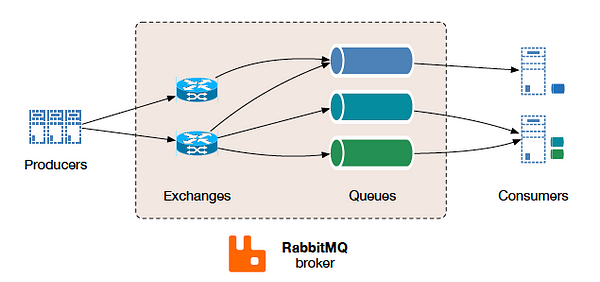
As previously mentioned, Kafka is all about the large payload game. It’s built to expect stream interruptions and provides durable message log at its core. If a Consumer goes down in the middle of reading the stream, it just spins back up, and picks up where it left off. The exact opposite is true for RabbitMQ’s fire-and-forget system, where the broker is (by default) not responsible for log retention. Built as an all-purpose broker, Rabbit does come with some basic ACK protocols to let the Queue know when a message has been received. However, once out of its hands, Rabbit doesn’t accept any responsibility for persistence; fault tolerance is on the Consumer.
RabbitMQ focuses instead on taking care of the complexities of routing and resource access. Clients only have to subscribe to a particular topic or message queue and that’s it; messages start flowing without much thought to what came before or who else is consuming the feed. On the other hand, Kafka Consumers are given access to the entire stream and must decide for themselves which partitions (or sections of the stream) they want to access. Because only one Consumer can access a given partition at a time, managing resource availability becomes an important part of any Kafka solution.
In terms of setup, both require a bit of effort. To run Rabbit, you must fist install erlang, then the erlang RabbitMQ client, then finally the Python client you include in your project. A lot, right? Well, Kafka’s got it beat. In addition to needing Java, and the JDK, Kafka can’t even run without another Apache system, the ZooKeeper, which essentially handles cluster management. With all this overhead, Kafka makes Rabbit look positively slim. If you’re running an online platform like LinkedIn, you might not bat an eye at this considering the exceptional throughput and resilience provided. It really only makes sense to use Kafka if you’ve got some seriously massive payloads. Otherwise it might be a bit of overkill.
Finally, adoptability. RabbitMQ Clients ship in just about every language under the sun (Python, Java, C#, JavaScript, PHP, …). Kafka only supports one official client written in Java. What this means for us is either:
- Learn Java, or
- Use a community-built, Python-wrapped client instead.
While none of the Python tools out there will give us nearly all of the features the official Java client has, the Kafka-Python client maintained on GitHub works for our purposes.
With a better understanding of the Kafka ecosystem, let’s get our own set up and start streaming some video!
2 Setup Development Enviorment
Install JDK and Python including Python virtual enviorment
Install Kafka (Download Confluent Kafka Quickstart)
Create a new topic named testing:
bin/kafka-topics.sh --create --zookeeper localhost:2181 --replication-factor 1 --partitions 1 --topic testing
3 Setup Streaming Project
Project source code available on GitHub.
First off we’ll create a new directory for our project.
mkdir kafkaDemo
cd kafkaDemo
Then it’s time for our virtual environment. Don’t forget to activate it.
virtualenv env
. env/bin/activate
To get our Kafka clients up and running, we’ll need the Kafka-Python project mentioned earlier.
And, while we’re at it, we’ll also need OpenCV for video rendering, as well as Flask for our “distributed” Consumer.
pip install kafka-python opencv-contrib-python Flask
The Kafka Server we set up in the last section is bound to port 9092. We’ll use this value when setting up our two Kafka clients.
Producer
The first of our Kafka clients will be the message Producer. Here it will be responsible for converting video to a stream of JPEG images.
As you can see, the Producer defaults by streaming video directly from the web cam — assuming you have one. If pulling from a video file is more your style (I recommend 5MB and smaller), the Producer accepts a file name as a command-line argument.
Consumer
To read our newly published stream, we’ll need a Consumer that accesses our Kafka topic. Since our message streamer was intended for a distributed system, we’ll keep our project in that spirit and launch our Consumer as a Flask service.
As I mentioned before, Kafka gives a lot of the stream-access discretion to the Consumer. Here we are deploying is pretty #basic, but if you’re interested, the Kafka-Python Documentation provides an in-depth look at everything that’s available.
4. Running the Project
Time to put everything together. In order, we’ll need to start up Kafka, the Consumer, and finally the Producer — each in their own terminal.
As demonstrated previously, we start Kafka with a simple
cd /opt/Kafka/kafka_2.11-1.0.1/
sudo  bin/kafka-server-start.sh config/server.properties
In a new terminal, we’ll start up the our virtual environment and Consumer project with
cd ~/KafkaDemo
. env/bin/activate
python consumer.py
If everything is working, your terminal should read
* Running on http://0.0.0.0:5000/ (Press CTRL+C to quit)
In the browser, go to http://0.0.0.0:5000/video . You won’t see anything here yet, but keep it open cuz it’s about to come to life.
For the Producer, it’s more of the same. First, open a new terminal. Here, we’ll be streaming from the web cam, so no additional arguments are needed.
cd ~/KafkaDemo
. env/bin/activate
python producer.py
If, however, we wanted to stream a short video, we might write that last command as
python producer.py videos/my_awesome_video.mp4
And voilà, the browser comes to life with our Kafka video stream.
5 Final Thoughts
What a barrel of laughs, right? Though not exactly the use case the Kafka team had in mind, we got a great first look at the tools this platform can provide — as well as some of its drawbacks.
Depending on the messages, extra overhead might be worth it.
The the big takeaway is really the considerable weight of Kafka. With the Kafka Server, ZooKeeper, and client-wrappers, creating this message pipeline is anything but a plug-n-play option. It takes considerable, sophisticated setup, and requires a whole team of services to run even the simplest demonstrations. A team deciding whether or not to use Kafka needs to really think hard about all that overhead they’re introducing.
Once it’s up and running, Kafka does boast an impressive delivery system that will scale to whatever size your business requires. It’s unparalleled throughput is what makes it the first choice of many million-user sites.
As decentralized applications become more common place, Kafka and message brokers like it will continue to play a central role in keeping decoupled services connected. Whether or not your current projects require this type of message-delivery pipeline, Kafka is, without a doubt, an important technology to keep your eye on.
For Video Streaming see also:
https://blog.miguelgrinberg.com/post/video-streaming-with-flask/page/5


 561
561

 被折叠的 条评论
为什么被折叠?
被折叠的 条评论
为什么被折叠?
 到【灌水乐园】发言


