


一、闲聊:
图片轮播,一个你再熟悉不过的小东西了。或许在你刚开始学习web的时候就能做出来得到效果。但是你会发现当面对不同的需求的时候又要重新写一个轮播。很是麻烦的对吧。LZ也是这样学习过来的,发现自己写的很多轮播的思路都不一样了。这次写出的下一次也许就写不出来了,或者说是用更好的方式来实现了。下面一起来总结下都有什么样的需求。
二、需求:
1) 首先是要能循环显示出来(不考虑循环效果)。
2)鼠标移到图片上时停止切换,移开之后又自动开始循环。
3)带有图片标记,两个作用(1、可以给用户提示一共多少张,2、可以知道当前展示得到是第几张)。
4)带有切换按钮,当用按钮点击的时候就取消自动循环。让用户自由操作(切换按钮需要以上后出现,移开消失)。
三、思路:
以前再最开始的时候做轮播是直接改变的图片 url 地址,但是现在不能这样做了。为什么?因为没当变化一下url地址浏览器就会发送一个请求道服务器区拉取这个图片,这样对于性能来说是很不好的。所以不能这样做。Now 那就通过移动图片吧。我的思路(也是在借鉴的基础上)将所有的图片联合成一副大的图片,这样只需要移动一副大的图片就可以实现轮播了。下面一起来看看怎样实现吧!
四、实现步骤:
HTML:
<!--picture-loop-wrapper-->
<div class="picture-loop-wrapper"> //外部循环显示盒子
<ul class="imgBox"> //组合长图盒子
<li id="img1"><a href="#"><img src="img/1.jpg"></a></li>
<li id="img2"><a href="#"><img src="img/2.jpg"></a></li>
<li id="img3"><a href="#"><img src="img/3.jpg"></a></li>
<li id="img4"><a href="#"><img src="img/4.jpg"></a></li>
<li id="img5"><a href="#"><img src="img/5.jpg"></a></li>
</ul>
<div class="currentNum"> //显示标记盒子
<span class="imgNum mark-color"></span>
<span class="imgNum"></span>
<span class="imgNum"></span>
<span class="imgNum"></span>
<span class="imgNum"></span>
</div>
<div class="control to-left"><img src="img/left-arrow.png"/></div> //切换按钮组
<div class="control to-right"><img src="img/right-arrow.png"/></div>
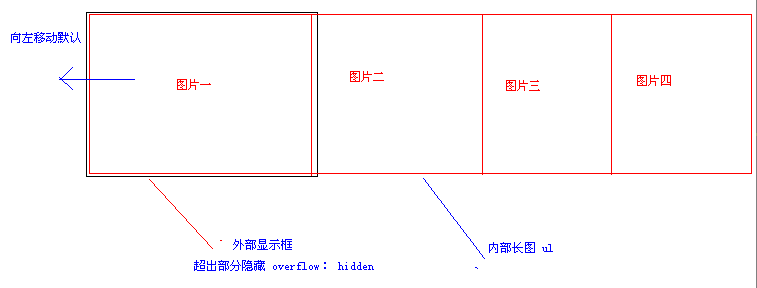
</div> 分析:首先是外部的(picture-loop-wrapper)一个显示的盒子,控制显示的窗口大小。里面的 ul 这个就是把所有的图片组合起来作为一张长图。
CSS:
ul{
    margin: 0;    //消除自带的间距
    padding: 0;
}
/*picture-loop-wrapper*/
.picture-loop-wrapper{    //外部显示区域
    position: relative;
    width: 520px;
    height: 280px;
    overflow: hidden;    /*这里很重要,控制显示的范围*/
}
.imgBox{
    position: absolute;    //这里因为后面使用的是 left 属性
    width: 2600px;    /*组合长图,因为我是5张图,每张520px,所以长图就是5*520 = 2600px*/
    list-style-type: none;
}
.imgBox > li{
    float: left;     /*实现一排显示,因为li是块元素,所以采取浮动*/
    width: 520px;
}
.imgBox a{
    display: inline-block;     /*这里是为了避免悬空,因为a是内联元素不会被撑开*/
}
.control{
    position: absolute;     /*绝对与wrapper盒子定位,实现在上面浮动*/
    top: 50%;
    margin-top: -20px;     /*锤子居中*/
    left: 20px;
    background: #000;
    opacity: .3;
    text-align: center;
    width: 40px;
    height: 40px;
    display: none;
    cursor: pointer;
}
.control img{
    margin-top: 8px;   /*图片居中*/
}
.control:hover{
    opacity: .8;
}
.to-right{
    left: 450px;
}
/*currentNum*/
.currentNum{
    position: absolute;
    left: 50%;
    top: 250px;
    margin-left: -35px;
    width: 70px;
    height: 11px;
}
/*spanNum*/
.imgNum{
    display: inline-block;
    float: left;
    width: 9px;
    height: 9px;
    margin-right: 4px;
    border-radius: 9px;
    background: #b7b7b7;
    cursor: pointer;
}

.mark-color{
    background: #f40;
}
分析:css代码没什么可说的,主要就是注意 定位的使用。补充(在Position属性值为absolute的同时,如果有一级父对象(无论是父对象还是祖父对象,或者再高的辈分,一样)的Position属性值为Relative时,则上述的相对浏览器窗口定位将会变成相对父对象定位,这对精确定位是很有帮助的。)和 overflow 的使用。
JS:
$(document).ready(function(){
    var $iBox = $('.imgBox'),
        $iNum = $('.imgNum'),  //缓存优化
        indexImg = 1,          //初始下标
        totalImg = 5,          //图片总数量
        imgSize = 520,         //图片尺寸 宽度
        moveTime = 1100,        //切换动画时间
        setTime = 2500,        //中间暂停时间
        clc = null;

    function moveImg(){
        if(indexImg != totalImg){
            $iBox.animate({
                left: -(indexImg*imgSize) + 'px'
            }, moveTime);
            $iNum.removeClass('mark-color')
                .eq(indexImg)
                .addClass('mark-color');
            indexImg++;
        }
        else{
            indexImg = 1;
            $iNum.removeClass('mark-color')
                .eq(indexImg - 1)
                .addClass('mark-color');
            $iBox.animate({
                left: 0
            }, moveTime);
        }
    }
    $iNum.hover(function(){              //鼠标放在下方标记上面
        $iBox.stop();                    //结束当前动画
        clearInterval(clc);              //暂停循环
        $iNum.removeClass('mark-color');
        $(this).addClass('mark-color');
        indexImg = $(this).index();
        $iBox.animate({
            left: -(indexImg*imgSize) + 'px'
        }, 500);
    },function(){
        clc = setInterval(moveImg, setTime);
    });

    //鼠标放在图片上停止动画
    $iBox.hover(function(){
        $('.control').fadeIn(200);       //出现切换按钮
        clearInterval(clc);              //暂停循环
    },function(){
        $('.control').hide();            //隐藏切换
        clc = setInterval(moveImg, setTime);
    });
    //显示左右
    $('.control').hover(function(){       //放在切换按钮上停止动画和循环
        clearInterval(clc);
        $('.control').show();
//        return false;允许传播
    });
    //向右边前进
    $('.to-right').click(function(){
        if(indexImg != totalImg){
            $iBox.animate({
                left: -(indexImg*imgSize) + 'px'
            }, moveTime);
            $iNum.removeClass('mark-color')
                .eq(indexImg)
                .addClass('mark-color');
            indexImg++;
        }
        else{
            indexImg = 1;
            $iNum.removeClass('mark-color')
                .eq(indexImg - 1)
                .addClass('mark-color');
            $iBox.animate({
                left: 0
            }, moveTime);
        }
    });
    //向左边前进
    $('.to-left').click(function(){
        indexImg--;              //下标减一
        if(indexImg != 0){
            $iBox.animate({
                left: -((indexImg - 1)*imgSize) + 'px'
            }, moveTime);
            $iNum.removeClass('mark-color')
                .eq((indexImg - 1))
                .addClass('mark-color');
        }
        else{
            indexImg = totalImg;
            $iNum.removeClass('mark-color')
                .eq(indexImg - 1)
                .addClass('mark-color');
            $iBox.animate({
                left: -((indexImg - 1)*imgSize) + 'px'
            }, moveTime);
        }
    });
    clc = setInterval(moveImg, setTime);   //自动循环图片切换
});
示意图:
这里对js代码做点说明: 基本参数是可以随意改动的。就在最上面的初始。css代码和js代码都可以很好的兼容。勇气来也很方便。
五、总结:
这个例子能做到上面的所有需求,但是有一个问题就是: 当最后一张的时候它会又重新到第一张。如果你不喜欢这样的话,那么没关系。我已经做出来了,一直向前不回到第一张的例子。下面会继续写出来的。(发现用这个写博客真心不好写啊,有些不好说。很简单,但是又很关键的。不过应该思路你是明白了。值了!)
效果演示: http://www.jiuni.com.cn/myworks/picture-loop/index.html
(本篇完)


 574
574

 被折叠的 条评论
为什么被折叠?
被折叠的 条评论
为什么被折叠?
 到【灌水乐园】发言


