一、准备反向代理环境
1、环境介绍
2、同步时间
[root@proxy ~]#  ntpdate 202.120.2.101
[root@node1 ~]# ntpdate 202.120.2.101
[root@node2 ~]# ntpdate 202.120.2.101
3、node1、node2节点安装启动httpd并提供测试页
[root@node1 ~]# rpm -q httpd
httpd-2.2.15-45.el6.centos.x86_64
[root@node1 ~]# cat /www/a.com/htdoc/index.html
<h1>This is node1 !</h1>
[root@node1 ~]# service httpd start
正在启动 httpd:                                           [确定]
[root@node2 ~]# rpm -q httpd
httpd-2.2.15-45.el6.centos.x86_64
[root@node2 ~]# cat /www/a.com/htdoc/index.html
<h1>This is node2 !</h1>
[root@node2 ~]# service httpd start
正在启动 httpd:                                           [确定]
4、测试各节点是否正常启动
[root@proxy ~]# curl http://192.168.1.9
<h1>This is node1 !</h1>
[root@proxy ~]# curl http://192.168.1.10
<h1>This is node2 !</h1>
5、安装haproxy
[root@proxy ~]# rpm -q haproxy
haproxy-1.5.4-2.el6_7.1.x86_64
[root@proxy ~]# rpm -ql haproxy
/etc/haproxy
/etc/haproxy/haproxy.cfg
/etc/logrotate.d/haproxy
/etc/rc.d/init.d/haproxy
/etc/sysconfig/haproxy
/usr/bin/halog
/usr/bin/iprange
/usr/sbin/haproxy
6、haproxy常用选项
语法:
haproxy [-f < 配置文件>] [ -vdVD ] [-n 最大并发连接总数] [-N 每个侦听的最大并发数] [ -p <当前的PID文件> ] [-m <内存限制M>]
-v 显示当前版本信息;-vv 显示已知的创建选项
-d 前台,debug模式;-db 禁用后台模式,程序跑在前台
-V 详细模式
-D daemon模式启动
-q 安静模式,不输出信息
-c 对配置文件进行语法检查
-n 最大并发连接总数
-m 限制的可用内存大小
-N 设置默认的连接数
-p 设置当前的PID文件
-de 不使用epoll
-ds 不使用speculative epoll
-dp 不使用poll
-sf 程序启动后向pidlist里的进程发送FINISH信号,这个参数放在命令行的最后
-st 程序启动后向pidlist里的进程发送TERMINATE信号,这个参数放在命令行的最后
7、查看rpm包提供的配置文件
[root@proxy ~]# cat /etc/haproxy/haproxy.cfg
#---------------------------------------------------------------------
# Example configuration for a possible web application.  See the
# full configuration options online.
#
#   http://haproxy.1wt.eu/download/1.4/doc/configuration.txt
#
#---------------------------------------------------------------------
#---------------------------------------------------------------------
# Global settings #全局配置文件
#---------------------------------------------------------------------
global
    # to have these messages end up in /var/log/haproxy.log you will
    # need to:  #配置日志
    #
    # 1) configure syslog to accept network log events.  This is done
    #    by adding the '-r' option to the SYSLOGD_OPTIONS in
    #    /etc/sysconfig/syslog #修改syslog配置文件
    #
    # 2) configure local2 events to go to the /var/log/haproxy.log
    #   file. A line like the following can be added to
    #   /etc/sysconfig/syslog  #定义日志设备
    #
    #    local2.*                       /var/log/haproxy.log
    #
    log         127.0.0.1 local2 #
#全局的日志配置 其中日志级别是[err warning info debug]
#local0 是日志设备,必须为如下24种标准syslog设备的一种:
#kern user mail daemon auth syslog lpr news
#uucp cron auth2 ftp ntp audit alert cron2
#local0 local1 local2 local3 local4 local5 local6 local7
    chroot      /var/lib/haproxy
    pidfile     /var/run/haproxy.pid #将所有进程的pid写入文件启动进程的用户必须有权限访问此文件。
    maxconn     4000 #最大连接数,默认4000
    user        haproxy #用户
    group       haproxy #组
    daemon ##创建1个进程进入deamon模式运行。此参数要求将运行模式设置为"daemon"
    # turn on stats unix socket  #unix socket 文件
    stats socket /var/lib/haproxy/stats
#---------------------------------------------------------------------
# common defaults that all the 'listen' and 'backend' sections will
# use if not designated in their block  #默认的全局设置,这些参数可以被利用配置到frontend,backend,listen组件
#---------------------------------------------------------------------
defaults
    mode                    http  #默认的模式mode { tcp|http|health },tcp是4层,http是7层,health只会返回OK
    log                     global #采用全局定义的日志
    option                  httplog #日志类别http日志格式
    option                  dontlognull #不记录健康检查的日志信息
    option http-server-close #每次请求完毕后主动关闭http通道
    option forwardfor       except 127.0.0.0/8 #不记录本机转发的日志
    option                  redispatch #serverId对应的服务器挂掉后,强制定向到其他健康的服务器
    retries                 3 #3次连接失败就认为服务不可用,也可以通过后面设置
    timeout http-request    10s  #请求超时
    timeout queue           1m #队列超时
    timeout connect         10s #连接超时
    timeout client          1m #客户端连接超时
    timeout server          1m #服务器连接超时
    timeout http-keep-alive 10s #长连接超时
    timeout check           10s  #检查超时
    maxconn                 3000 #最大连接数
#---------------------------------------------------------------------
# main frontend which proxys to the backends #frontend 与backends  代理配置
#---------------------------------------------------------------------
frontend  main *:5000
#acl策略配置
    acl url_static       path_beg       -i /static /p_w_picpaths /javascript /stylesheets
    acl url_static       path_end       -i .jpg .gif .png .css .js
    use_backend static          if url_static  #满足策略要求,则响应策略定义的backend页面
    default_backend             app #不满足则响应backend的默认页面
#---------------------------------------------------------------------
# static backend for serving up p_w_picpaths, stylesheets and such #定义使用静态后端图像,样式表等
#---------------------------------------------------------------------
backend static
    balance     roundrobin #负载均衡模式轮询
    server      static 127.0.0.1:4331 check #服务器定义
#---------------------------------------------------------------------
# round robin balancing between the various backends
#---------------------------------------------------------------------
backend app
    balance     roundrobin #负载均衡模式轮询
    server  app1 127.0.0.1:5001 check #服务器定义,check进行健康检查
    server  app2 127.0.0.1:5002 check
    server  app3 127.0.0.1:5003 check
    server  app4 127.0.0.1:5004 check
二、负载均衡Web服务器案例
1、更改配置文件
[root@proxy ~]# cp /etc/haproxy/haproxy.cfg{,.bak}
[root@proxy ~]# cat /etc/haproxy/haproxy.cfg
#---------------------------------------------------------------------
# Global settings
#---------------------------------------------------------------------
global
    # to have these messages end up in /var/log/haproxy.log you will
    # need to:
    #
    # 1) configure syslog to accept network log events.  This is done
    #    by adding the '-r' option to the SYSLOGD_OPTIONS in
    #    /etc/sysconfig/syslog
    #
    # 2) configure local2 events to go to the /var/log/haproxy.log
    #   file. A line like the following can be added to
    #   /etc/sysconfig/syslog
    #
    #    local2.*                       /var/log/haproxy.log
    #
    log         127.0.0.1 local2
    chroot      /var/lib/haproxy
    pidfile     /var/run/haproxy.pid
    maxconn     4000
    user        haproxy
    group       haproxy
    daemon
defaults
    mode                    http
    log                     global
    option                  httplog
    option                  dontlognull
    option http-server-close
    option forwardfor       except 127.0.0.0/8
    option                  redispatch
    retries                 3
    timeout http-request    10s
    timeout queue           1m
    timeout connect         10s
    timeout client          1m
    timeout server          1m
    timeout http-keep-alive 10s
    timeout check           10s
    maxconn                 30000
listen stats
    mode http
    bind 0.0.0.0:1080
    stats enable
    stats hide-version
    stats uri     /haproxyadmin?stats
    stats realm   Haproxy\ Statistics
    stats auth    admin:admin
    stats admin if TRUE
frontend http-in
    bind *:80
    mode http
    log global
    option httpclose
    option logasap
    option dontlognull
    capture request  header Host len 20
    capture request  header Referer len 60
    default_backend servers
frontend healthcheck
    bind :1099
    mode http
    option httpclose
    option forwardfor
    default_backend servers
backend servers
    balance roundrobin
    server node1 192.168.1.9:80 check maxconn 2000
    server node2 192.168.1.10:80 check maxconn 2000
2、配置haproxy日志
[root@proxy ~]# vim /etc/sysconfig/rsyslog
# Options for rsyslogd
# Syslogd options are deprecated since rsyslog v3.
# If you want to use them, switch to compatibility mode 2 by "-c 2"
# See rsyslogd(8) for more details
SYSLOGD_OPTIONS="-c 2 -r"
[root@proxy ~]# vim /etc/rsyslog.conf
#将下面四项取消注释
# Provides UDP syslog reception
$ModLoad imudp
$UDPServerRun 514
# Provides TCP syslog reception
$ModLoad imtcp
$InputTCPServerRun 514
#增加一行
local2.*                                                /var/log/haproxy.log
重启日志服务:
[root@proxy ~]# service rsyslog restart
3、查检一下配置文件
[root@proxy ~]# haproxy -c -f /etc/haproxy/haproxy.cfg
Configuration file is valid
4、启动haproxy
[root@proxy ~]# service haproxy start
5、查看服务端口
[root@proxy ~]# ss -tunlp |grep haproxy
udp    UNCONN     0      0                      *:49442                 *:*      users:(("haproxy",1506,5))
tcp    LISTEN     0      128                    *:1080                  *:*      users:(("haproxy",1506,4))
tcp    LISTEN     0      128                    *:1099                  *:*      users:(("haproxy",1506,7))
tcp    LISTEN     0      128                    *:80                    *:*      users
6、浏览器测试
7、配置文件说明
#---------------------------------------------------------------------
# Global settings 全局配置
#---------------------------------------------------------------------
global
    # to have these messages end up in /var/log/haproxy.log you will
    # need to:
    #
    # 1) configure syslog to accept network log events.  This is done
    #    by adding the '-r' option to the SYSLOGD_OPTIONS in
    #    /etc/sysconfig/syslog
    #
    # 2) configure local2 events to go to the /var/log/haproxy.log
    #   file. A line like the following can be added to
    #   /etc/sysconfig/syslog
    #
    #    local2.*                       /var/log/haproxy.log
    #
#上面的注释是告诉我们怎么配置日志的
    log         127.0.0.1  local2 #定义日志
    chroot      /var/lib/haproxy #安全模式
    pidfile     /var/run/haproxy.pid #pid文件
    maxconn     4000 #最大连接数
    user        haproxy #用户
    group       haproxy #组合
    daemon
 #---------------------------------------------------------------------
# Proxy settings 代理配置,下面全是代理配置
#---------------------------------------------------------------------
defaults #配置默认参数的,这些参数可以被利用配置到frontend,backend,listen组件
    mode                    http #默认的模式mode { tcp|http|health },tcp是4层,http是7层,health只会返回OK(注,health已经废弃)
    log                     global #采用全局定义的日志
    option                  httplog #日志类别http日志格式
    option                  dontlognull #不记录健康检查的日志信息
    option http-server-close #每次请求完毕后主动关闭http通道
    option forwardfor       except 127.0.0.0/8 #不记录本机转发的日志
    option                  redispatch #serverId对应的服务器挂掉后,强制定向到其他健康的服务器
    retries                 3 #3次连接失败就认为服务不可用,也可以通过后面设置
    timeout http-request    10s  #请求超时
    timeout queue           1m #队列超时
    timeout connect         10s #连接超时
    timeout client          1m #客户端连接超时
    timeout server          1m #服务器连接超时
    timeout http-keep-alive 10s #长连接超时
    timeout check           10s  #检查超时
    maxconn                 30000 #最大连接数
listen stats #listen是Frontend和Backend的组合体。这里定义的是haproxy监控!
    mode http #模式http
    bind 0.0.0.0:1080 #绑定的监控ip与端口
    stats enable #启用监控
    stats hide-version #隐藏haproxy版本
    stats uri     /haproxyadmin?stats #定义的uri
    stats realm   Haproxy\ Statistics #定义显示文字
    stats auth    admin:admin #认证
    stats admin if TRUE
frontend http-in #接收请求的前端虚拟节点,Frontend可以根据规则直接指定具体使用后端的 backend(可动态选择)。这里定义的是http服务!
    bind *:80   #绑定的监控ip与端口
    mode http #模式http
    log global #定义日志
    option httpclose #每次请求完毕后主动关闭http通道
    option logasap #
    option dontlognull ##不记录健康检查的日志信息
    capture request  header Host len 20
    capture request  header Referer len 60
    default_backend servers #定义的默认backend
frontend healthcheck
    bind :1099
    mode http
    option httpclose
    option forwardfor
    default_backend servers #定义的默认backend
backend servers #后端服务集群的配置,是真实的服务器,一个Backend对应一个或者多个实体服务器。
    balance roundrobin #负载均衡方式为轮询
    server websrv1 192.168.18.201:80 check maxconn 2000 #定义server,check 健康检查,maxconn 定义最大连接数
    server websrv2 192.168.18.202:80 check maxconn 2000
三、haproxy 监控功能详解
上面的配置文件已经配置使用的监控功能
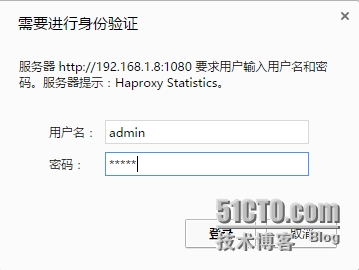
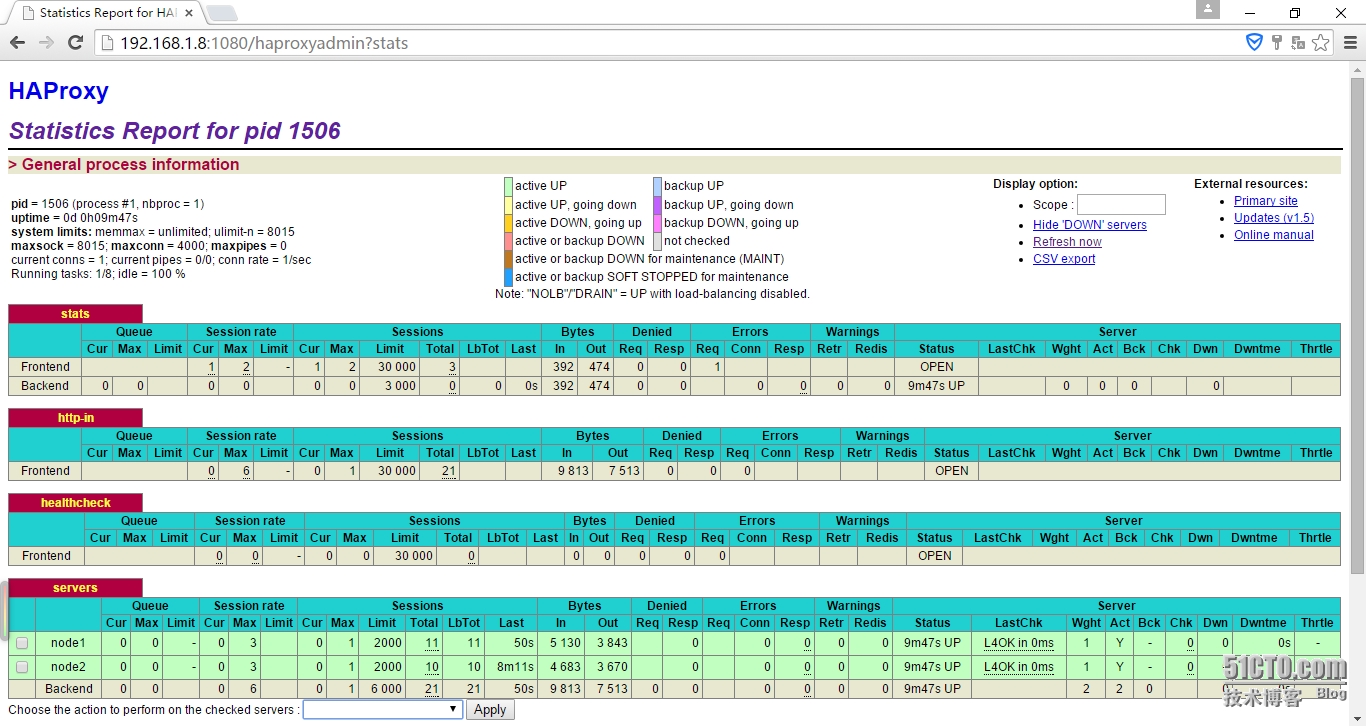
1、浏览器访问一下 http://192.168.1.8:1080/haproxyadmin?stats
输入帐号密码,注意帐号及密码是在配置文件中定义的,
监控的web接口,注意此窗口能关闭后端的机器很危险,故密码设置一定要复杂。
2、模拟故障
[root@node1 ~]# service httpd stop
3、恢复故障
[root@node1 ~]# service httpd start
四、haproxy的配置举例
1、uri算法使用举例
修改配置文件:
backend servers
    balance uri
    server node1 192.168.1.9:80 check maxconn 2000
    server node2 192.168.1.10:80 check maxconn 2000
提供测试文件:
[root@node1 htdoc]# for i in {1..10};do echo "<h1>node1.test$i</h1>" > test$i.html;done
[root@node1 htdoc]# cat test4.html
<h1>node1.test4</h1>
[root@node2 htdoc]# for i in {1..10};do echo "<h1>node2.test$i</h1>" > test$i.html;done
[root@node2 htdoc]# cat test6.html
<h1>node2.test6</h1>
从新载入配置文件:
浏览器测试:
2、前面我们已经基本配置了haproxy服务了,但是在算法上我使用的是轮询方法,下面就配置如何使用cookie会话保持。
修改配置文件:
backend servers
    balance roundrobin
    cookie  node  insert nocache
    server node1 192.168.1.9:80 check cookie node1
    server node2 192.168.1.10:80 check cookie node2
从新载入配置文件:
浏览器测试:
3、让后端web服务器记录真实的访问客户端IP地址
更改后端web服务器的日志格式:
[root@node1 htdoc]# vim /etc/httpd/conf/httpd.conf
LogFormat "%{X-Forwarded-For}i %l %u %t \"%r\" %>s %b \"%{Referer}i\" \"%{User-Agent}i\"" combined
重新启动web服务器后进行测试访问后查看日志:
[root@node1 htdoc]# tail /var/log/httpd/access_log
192.168.1.103 - - [12/Sep/2015:21:13:03 +0800] "GET / HTTP/1.1" 200 42 "-" "Mozilla/5.0 (Windows NT 10.0; WOW64) AppleWebKit/537.36 (KHTML, like Gecko) Chrome/45.0.2454.85 Safari/537.36"
4、通过ACL实现网站访问的动静分离
我通过ACL将动态资源的访问到node1,而静态资源的访问定位到node2。先在node1安装php,实现php动态资源和httpd服务器的结合:
[root@node1 ~]# yum install -y php
创建测试页并将php服务启动:
[root@node1 ~]# cat /www/a.com/index.php
<h1>This is node1 !</h1>
<?php
    phpinfo();
?>
修改配置文件:
[root@proxy ~]# cat /etc/haproxy/haproxy.cfg
global
    # to have these messages end up in/var/log/haproxy.log you will
    #need to:
    #
    #1) configure syslog to accept network log events.  This is done
   #    by adding the '-r' option tothe SYSLOGD_OPTIONS in
   #    /etc/sysconfig/syslog
    #
    #2) configure local2 events to go to the /var/log/haproxy.log
   #   file. A line like thefollowing can be added to
   #   /etc/sysconfig/syslog
    #
   #    local2.*                       /var/log/haproxy.log
    #
   log         127.0.0.1 local2

   chroot      /var/lib/haproxy
   pidfile     /var/run/haproxy.pid
   maxconn     4000
   user        haproxy
   group       haproxy
   daemon

    #turn on stats unix socket
   stats socket /var/lib/haproxy/stats

defaults
   mode                    http
   log                     global
   option                  httplog
   option                 dontlognull
   option http-server-close
   option forwardfor       except 127.0.0.0/8
   option                  redispatch
   retries                 3
   timeout http-request    10s
   timeout queue           1m
   timeout connect         10s
   timeout client          1m
   timeout server          1m
   timeout http-keep-alive 10s
   timeout check           10s
    maxconn                 3000

listen stats
   bind :1080
   mode http
   stats enable
   stats uri /haproxy?stats
   stats realm HAProxy\ Status
   stats auth admin:admin
   stats admin if TRUE

frontend http-in
   bind *:80
   mode http
   log global
   option httpclose
   option logasap
   option dontlognull
   capture request header Host len 20
   capture request header Referer len 60
   acl url_static path_beg -i /static /p_w_picpaths /javascript /stylesheets
   acl url_static path_end -i  .html .jpg .jpeg .gif .png .css .js
   acl url_dynamic path_end -i .php .jsp
   use_backend static_servers if  url_static
   use_backend dynamic_servers if url_dynamic
   default_backend           dynamic_servers

backend static_servers
    balance    roundrobin
   server  node2 192.168.1.10:80 check maxconn 1000

backend dynamic_servers
   balance     roundrobin
   cookie srv insert nocache
   server node1 192.168.1.6:80 check maxconn 1000 cookie node1
从新载入haproxy配置文件并在浏览器中测试:
转载于:https://blog.51cto.com/cuchadanfan/1694860


 262
262


 被折叠的 条评论
为什么被折叠?


