


一、安装ASM之前,首先要检查一下linux操作系统的版本
[root@yft ~]# lsb_release -a
LSB Version:    :core-3.1-ia32:core-3.1-noarch:graphics-3.1-ia32:graphics-3.1-noarch
Distributor ID:    RedHatEnterpriseServer
Description:    Red Hat Enterprise Linux Server release 5.4 (Tikanga)
Release:    5.4
Codename:    Tikanga
[root@yft ~]# uname -rm
2.6.18-164.el5 i686
此时可以到oracle官网去下载相应的rpm包,链接地址:http://www.oracle.com/technetwork/server-storage/linux/downloads/rhel5-084877.html
根据本机的配置,需要下载并安装如下3个rpm包:
[root@yft 1234]# ls
oracleasm-2.6.18-164.el5-2.0.5-1.el5.i686.rpm
oracleasmlib-2.0.4-1.el5.i386.rpm
oracleasm-support-2.1.7-1.el5.i386.rpm
[root@yft 1234]# rpm -ivh oracleasm*
warning: oracleasm-2.6.18-164.el5-2.0.5-1.el5.i686.rpm: Header V3 DSA signature: NOKEY, key ID 1e5e0159
Preparing...                ########################################### [100%]
   1:oracleasm-support      ########################################### [ 33%]
   2:oracleasm-2.6.18-164.el########################################### [ 67%]
   3:oracleasmlib           ########################################### [100%]
二、配置ASMlib,再使用ASMlib之前,必须运行配置脚本准备驱动程序:
使用root执行:/etc/init.d/oracleasm configure
[root@yft 1234]# /etc/init.d/oracleasm configure
Configuring the Oracle ASM library driver.

This will configure the on-boot properties of the Oracle ASM library
driver.  The following questions will determine whether the driver is
loaded on boot and what permissions it will have.  The current values
will be shown in brackets ('[]').  Hitting <ENTER> without typing an
answer will keep that current value.  Ctrl-C will abort.

Default user to own the driver interface []: oracle
Default group to own the driver interface []: dba
Start Oracle ASM library driver on boot (y/n) [n]: y
Scan for Oracle ASM disks on boot (y/n) [y]: y
Writing Oracle ASM library driver configuration: done
Initializing the Oracle ASMLib driver:                     [  OK  ]
Scanning the system for Oracle ASMLib disks:               [  OK  ]

[root@yft 1234]# /etc/init.d/oracleasm enable
Writing Oracle ASM library driver configuration: done
Initializing the Oracle ASMLib driver:                     [  OK  ]
Scanning the system for Oracle ASMLib disks:               [  OK  ]
三、配置ASM磁盘:
[root@yft 1234]# fdisk /dev/sdf
Device contains neither a valid DOS partition table, nor Sun, SGI or OSF disklabel
Building a new DOS disklabel. Changes will remain in memory only,
until you decide to write them. After that, of course, the previous
content won't be recoverable.

Warning: invalid flag 0x0000 of partition table 4 will be corrected by w(rite)

Command (m for help): p

Disk /dev/sdf: 4294 MB, 4294967296 bytes
255 heads, 63 sectors/track, 522 cylinders
Units = cylinders of 16065 * 512 = 8225280 bytes

   Device Boot      Start         End      Blocks   Id  System

Command (m for help): n
Command action
   e   extended
   p   primary partition (1-4)
p
Partition number (1-4): 1
First cylinder (1-522, default 1):
Using default value 1
Last cylinder or +size or +sizeM or +sizeK (1-522, default 522):
Using default value 522

Command (m for help): w
The partition table has been altered!

Calling ioctl() to re-read partition table.
Syncing disks.
[root@yft 1234]# partprobe
[root@yft 1234]# /etc/init.d/oracleasm createdisk vol1 /dev/sdf1
Marking disk "vol1" as an ASM disk:                        [  OK  ]
四、创建需要的用户和用户组:
使用root用户执行:
/usr/sbin/groupadd -g 501 oinstall
/usr/sbin/groupadd -g 502 dba
/usr/sbin/groupadd -g 503 oper
/usr/sbin/groupadd -g 504 asmadmin
/usr/sbin/groupadd -g 505 asmoper
/usr/sbin/groupadd -g 506 asmdba
/usr/sbin/useradd -g oinstall -G dba,asmdba,oper oracle
/usr/sbin/useradd -g oinstall -G asmadmin,asmdba,asmoper,oper,dba grid
mkdir -p /u01/app/oracle/product/11.2.0/dbhome_1
mkdir -p /u01/app/oracle/grid/product/11.2.0/grid
chown -R oracle:oinstall /u01/app/
chown -R grid:oinstall /u01/app/grid
chomod -R 775 /u01
 1 [oracle@yft ~]$ vi .bash_profile
 2
 3 if [ -f ~/.bashrc ]; then
 4         . ~/.bashrc
 5 fi
 6
 7 # User specific environment and startup programs
 8
 9 PATH=$PATH:$HOME/bin
10
11 export PATH
12 #
13 #ORACLE_11G
14 ORACLE_BASE=/u01/app/oracle
15 ORACLE_HOME=$ORACLE_BASE/product/11.2.0/db_1
16 ORACLE_SID=yft
17 PATH=$PATH:$ORACLE_HOME/bin
18 export ORACLE_BASE ORACLE_HOME ORACLE_SID PATH
19 #end
20
21 [grid@yft ~]$ view .bash_profile
22
23 # .bash_profile
24
25 # Get the aliases and functions
26 if [ -f ~/.bashrc ]; then
27         . ~/.bashrc
28 fi
29 # .bash_profile
30
31 # Get the aliases and functions
32 if [ -f ~/.bashrc ]; then
33         . ~/.bashrc
34 fi
35
36 # User specific environment and startup programs
37
38 PATH=$PATH:$HOME/bin
39
40 export PATH
41
42 #ORACLE_11G
43 ORACLE_BASE=/u01/app/grid
44 ORACLE_HOME=$ORACLE_BASE/product/11.2.0/grid
45 ORACLE_SID=+ASM
46 PATH=$PATH:$ORACLE_HOME/bin
47 export ORACLE_BASE ORACLE_HOME ORACLE_SID PATH
48 #end
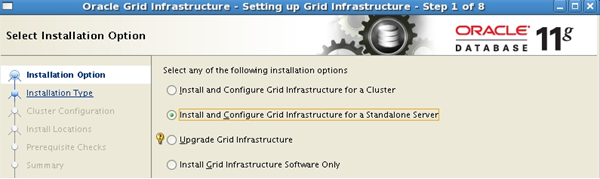
五、配置grid infrastructure:
[grid@yft u01]$ cd grid/
[grid@yft grid]$ ls
doc      response  runcluvfy.sh  sshsetup  welcome.html
install  rpm       runInstaller  stage
[grid@yft grid]$ ./runInstaller
Starting Oracle Universal Installer...

Checking Temp space: must be greater than 80 MB.   Actual 1031 MB    Passed
Checking swap space: must be greater than 150 MB.   Actual 2047 MB    Passed
Checking monitor: must be configured to display at least 256 colors.    Actual 16777216    Passed
Preparing to launch Oracle Universal Installer from /tmp/OraInstall2013-03-20_10-36-24PM. Please wait ...
安装顺带配置ASM,当然也可以选最后一个只安装软件,随后手工配置(具体请自行查看文档):
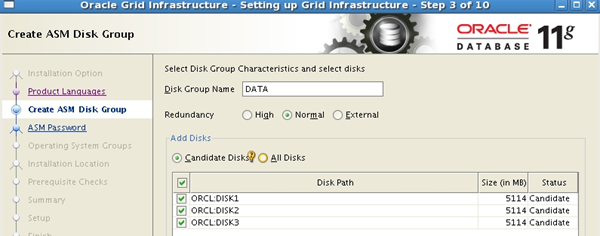
ASM磁盘配置正常的话会直接显示下面的内容:
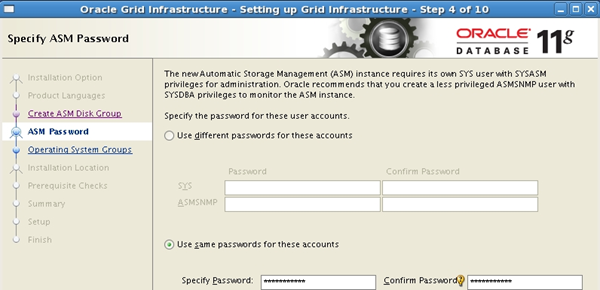
Oracle会要求密码强度,当然可以忽略过去,这里使用Oracle1234:
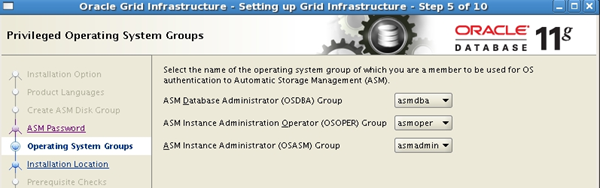
下面选择组的话可以保持默认:
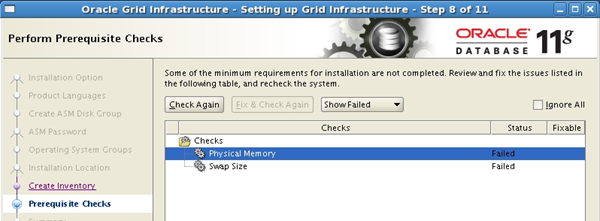
需要配置1.5G以上物理内存:
最后确认安装:

在76%处会卡住属于正常,随机会跳出下面的画面,使用root用户运行一下就可以了:

[root@yft 1234]# /u01/app/grid/product/11.2.0/grid/root.sh
Running Oracle 11g root.sh script...

The following environment variables are set as:
    ORACLE_OWNER= grid
    ORACLE_HOME=  /u01/app/grid/product/11.2.0/grid

Enter the full pathname of the local bin directory: [/usr/local/bin]:
The file "dbhome" already exists in /usr/local/bin.  Overwrite it? (y/n)
[n]: n
The file "oraenv" already exists in /usr/local/bin.  Overwrite it? (y/n)
[n]: n
The file "coraenv" already exists in /usr/local/bin.  Overwrite it? (y/n)
[n]: n

Entries will be added to the /etc/oratab file as needed by
Database Configuration Assistant when a database is created
Finished running generic part of root.sh script.
Now product-specific root actions will be performed.
2013-03-20 23:11:13: Checking for super user privileges
2013-03-20 23:11:13: User has super user privileges
2013-03-20 23:11:13: Parsing the host name
Using configuration parameter file: /u01/app/grid/product/11.2.0/grid/crs/install/crsconfig_params
Creating trace directory
LOCAL ADD MODE
Creating OCR keys for user 'grid', privgrp 'oinstall'..
Operation successful.
CRS-4664: Node yft successfully pinned.
Adding daemon to inittab
CRS-4123: Oracle High Availability Services has been started.
ohasd is starting

yft     2013/03/20 23:12:30     /u01/app/grid/product/11.2.0/grid/cdata/yft/backup_20130320_231230.olr
Successfully configured Oracle Grid Infrastructure for a Standalone Server
Updating inventory properties for clusterware
Starting Oracle Universal Installer...

Checking swap space: must be greater than 500 MB.   Actual 1816 MB    Passed
The inventory pointer is located at /etc/oraInst.loc
The inventory is located at /u01/app/oraInventory
'UpdateNodeList' was successful.


[grid@yft ~]$ sqlplus /nolog

SQL*Plus: Release 11.2.0.1.0 Production on Thu Mar 21 16:00:41 2013

Copyright (c) 1982, 2009, Oracle.  All rights reserved.

SQL> conn /as sysdba
Connected.
SQL> select name,state from v$asm_diskgroup;

NAME                   STATE
------------------------------ -----------
DATA                   MOUNTED


 1640
1640


 被折叠的 条评论
为什么被折叠?
被折叠的 条评论
为什么被折叠?
 到【灌水乐园】发言


