


来源地址:http://www.wpwebhost.com/create-custom-share-buttons-to-increase-traffic/
先收藏着,以后可以用的着
邮件分享自定义分享代码:<a href="mailto:?subject=Pt%20Bridal%20Collection&body=http%3A%2F%2F2Fwp%2Flukfook%2Fen%2Fcategory%2Fproducts%2Fjewellery%2Fjewellery-series%2Fpt-bridal%2F">adsdas</a>
If you own a website or blog, you probably use buttons like, Tweet, Like, +1, etc. to let users share the content easily (if you don’t, please start using them now! They are very useful). But usually people use plugins or java-scripts to display these social sharing buttons, which increases your website’s loading time – not good for SEO purposes and also readers don’t like to wait for a page to load. You can use static images instead. Let’s take a look at the advantages of using static images instead of plugins and java-scripts.
1. Increase page loading time: No extra plugins and java-scripts will improve the loading time of your site. Hence, better SEO and readers’ engagement.
2. Huge availability of choices: You can choose how your button will look like, its color, design, shape, size, anything! Many people design them and allow you to download without any restriction.
3. Create your own button: If you don’t get anything charming on the internet, you can create your own button too.
4. Increase traffic: Usually readers don’t notice the tweet, like, share, etc. because they see the same everywhere on the internet (Normal human behavior). Once you create your own custom share buttons and insert it in your posts, readers will definitely notice it because they haven’t seen anything like that anywhere else!

Now you know the advantages of having your own unique set of custom share buttons, lets start the tutorial. This step-by-step guide is so easy to understand that even a person with absolutely no programming knowledge can get it. These steps will help you to create Tweet, Facebook Share, Digg, LinkedIn, Google Plus Share, Orkut and StumbleUpon button, but there is a bonus tip for you at the end that can help you to create almost any custom share buttons.
Steps To Create Your Own Custom Share Buttons:
Step 1. Find/Create Them:
The very first thing you need to do is find the images you want to use as buttons, many blogs have posted about it. Just Google it and download the one you like (please, check the copyrights and any other restrictions before downloading). If you don’t get anything good there, you can create your own images too! Make sure the set you select:
1. Suits your blog (color, size, etc.),
2. Not too big,
3. Can attract readers’ attention,
4. Does not violate any copyright and,
5. One can easily recognize for what purpose the button is!
Step 2. Rename And Upload:
Once you got the images you like, rename them so that you can easily recognize them (like, facebook.jpg, twitter.png, etc.). Now, upload them on your server via FileZilla or any other file manager. I would recommend to upload them at one place in a new folder. Let’s suppose, you upload it to “public_html/wp-content/uploads/mybuttons/” (I will use this path to explain the process, you can upload it anywhere you want on your server).
Step 3. The Code Part:
This is the main step! First, lets understand how the basic syntax looks like.
<a href=”WEBSITE’S SHARE URL” title=”HYPERLINK TITLE” target=”_blank”><img src=”IMAGE LOCATION” style=”border:0px” alt=”IMAGE ALT TAG” title=”IMAGE TITLE”></a>
The “style” part is optional, if your WordPress theme creates a border around images then you may like to put this part to remove the border. This is a basic HTML code, if you know a bit of CSS then you can edit it to make your buttons look more attractive and eye-catching. Now, here are some ready-made code to put on your site with a little bit of editing (of course):
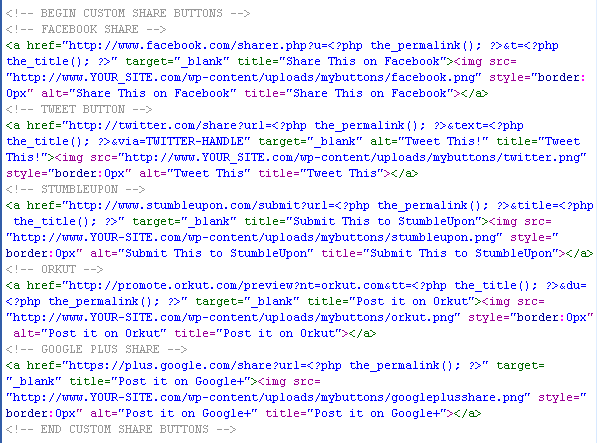
Facebook Share Button:
<a href=”http://www.facebook.com/sharer.php?u=<?php the_permalink(); ?>&t=<?php the_title(); ?>” target=”_blank” title=”Share This on Facebook”><img style=”border: 0px none;” title=”Share This on Facebook” src=”http://www.YOUR_SITE.com/wp-content/uploads/mybuttons/facebook.png” alt=”Share This on Facebook” /></a>
“the_permalink()” is a WordPress function which will put the permalink of the post/page in the hyperlink and “the_title()” will put the title of the post/page. All you need to do is replace the URL in ‘src’ tag with the location of the image (of the Facebook image you uploaded). Follow the same procedure in every code below.
Tweet Button:
<a href=”http://twitter.com/share?url=<?php the_permalink(); ?>&text=<?php the_title(); ?>&via=TWITTER-HANDLE” target=”_blank” alt=”Tweet This!” title=”Tweet This!”><img src=”http://www.YOUR_SITE.com/wp-content/uploads/mybuttons/</code>twitter.png” style=”border:0px” alt=”Tweet This” title=”Tweet This”></a>
Replace TWITTER-HANDLE with your twitter handle, it will appear the end of the tweet as “Via @handle”. For example, if you put “wpwebhost” (without quotes) in the code, it will put “Via @wpwebhost” at the end of the tweet.
Digg:
<a href=”http://digg.com/submit?url=<?php the_permalink(); ?>&title=<?php the_title(); ?>” target=”_blank” title=”Digg This”><img style=”border: 0px none;” title=”Digg This” src=”http://www.YOUR-SITE.com/wp-content/uploads/mybuttons/digg.png” alt=”Digg This” /></a>
StumbleUpon:
<a href=”http://www.stumbleupon.com/submit?url=<?php the_permalink(); ?>&title=<?php the_title(); ?>” target=”_blank” title=”Submit This to StumbleUpon”><img style=”border: 0px none;” title=”Submit This to StumbleUpon” src=”http://www.YOUR-SITE.com/wp-content/uploads/mybuttons/stumbleupon.png” alt=”Submit This to StumbleUpon” /></a>
LinkedIn:
<a href=”http://www.linkedin.com/shareArticle?mini=true&url=<?php the_permalink(); ?>&title=<?php the_title(); ?>” target=”_blank” title=”Share This on LinkedIn”><img style=”border: 0px none;” title=”Share This on LinkedIn” src=”http://www.YOUR-SITE.com/wp-content/uploads/mybuttons/linkedin.png” alt=”Share This on LinkedIn” /></a>
Orkut:
<a href=”http://promote.orkut.com/preview?nt=orkut.com&tt=<?php the_title(); ?>&du=<?php the_permalink(); ?>” target=”_blank” title=”Post it on Orkut”><img style=”border: 0px none;” title=”Post it on Orkut” src=”http://www.YOUR-SITE.com/wp-content/uploads/mybuttons/orkut.png” alt=”Post it on Orkut” /></a></code>
Google Plus Share:
<a href=”https://plus.google.com/share?url=<?php the_permalink(); ?>” target=”_blank” title=”Post it on Google+”><img style=”border: 0px none;” title=”Post it on Google+” src=”http://www.YOUR-SITE.com/wp-content/uploads/mybuttons/googleplusshare.png” alt=”Post it on Google+” /></a>
Step 4. Put The Code And Remove Plugins!
When you are done with editing the code for your site, it’s time to put it at the right place. Now there are two ways to do it:
– Difficult One:
This one is difficult only if you’re afraid of ‘programming’ stuff. Open your theme’s single.php file in an editor, paste the code after “” (If you want to show the buttons before the post, paste it before this line).
– Easy One:
In your WordPress admin panel go to “Appearance >> Theme Options” and if it supports code integration then paste the code wherever you want, before the post or after (your choice).
What next? Get rid of the plugins! Just deactivate them, you don’t need them anymore. Save loading time, better SEO and traffic.
Your syntax may look something like this:
Bonus Tip:
You can make custom share buttons of any social networking site, you just need the link used to share something on that site. For example, Facebook’s URL is:
http://www.facebook.com/sharer.php?u=URL&t=TITLE
You just need to replace the URL with<?php the_permalink(); ?>and TITLE with<?php the_title(); ?>and replace the “href” URL with this one, in Step 3 (remaining procedure is the same).
Here is a sample for you, test it… It works!


 1287
1287

 被折叠的 条评论
为什么被折叠?
被折叠的 条评论
为什么被折叠?
 到【灌水乐园】发言


