


注:文章里我使用的是root这个账户,这不是个好习惯,建议使用一般账号操作。
经过前两篇文章的工作后,大家已经很累了吧。不过,要想使客户机成功地使用AoE 协议在SAN 环境中启动windows XP我们还要满足下列条件:
1. 客户机的network bootloader支持AoE协议
2. 存在AoE target
下面分别介绍
客户机的network bootloader支持AoE协议
Vmware Workstation 的network bootloader是不支持AoE协议的。我们要做的是利用用gPXE(这个东西支持AoE ,它还有很多特性,我把网址贴出来大家自己去看吧http://etherboot.org/dokuwiki-2009-02-14/start)来替代pxe,我选用gPXE诸多部署方法中的“chainloading gPXE from an existing PXE ROM”。在这里假设大家已经掌握了linux下DHCP、TFTP服务器的配置,我们需要做的是对相应的配置文件做点“小修改”。
首先有必要介绍一下 UNDI Driver(出处: etherboot.org/wiki/pxechaining)
Universal Network Device Interface (UNDI) is an application programming interface (API) for
network interface cards (NIC) used by the Preboot Execution Environment (PXE) protocol. When chainloading gPXE from PXE, gPXE can use this API (instead of loading an hardware driver). This way, you're getting support for network controllers that are not natively supported by gPXE. some network controllers have improved performance when using the UNDI driver over the vendor specific gPXE driver (forcedeth for example). To use the UNDI driver, select the UNDI driver (undionly) when generating the gPXE ROM
l 下载 gpxe
这里是官方的下载及构建信息,英文的,大家可以去看一下。
http://etherboot.org/dokuwiki-2009-02-14/download
我使用的gpxe的版本是1.0.1。
l 构建PXE-chainloadable gPXE 镜像
将下载好的gPXE的tar包解压,我放到了/usr/src下也解压到此目录下了。
我输入 tar -zxvf gpxe-1.0.1解压到当前目录下
输入cd gpxe-1.0.1/src/ 进入gpxe-1.0.1/src/目录下
输入make bin/undionly.kpxe 回车,等待编译完成。(这里需要make gcc 否则会失败的呦)
我们编译生成的undionly.kpxe文件在这儿
将文件复制到/tftpboot 下:cp bin/undionly.kpxe /tftpboot
配置tftp服务器
由于在CentOS下tftp 不是一个stand alone daemon 他是有xinetd这个super daemon来管理的,因此我们需要修改一下xinetd的一个配置文件/etc/xinetd.d/tftp:
用vim打开/etc/xinetd.d/tftp,修改成下面的样子:
配置dhcp服务器
dhcp服务器的配置文件/etc/dhcpd.conf 修改成下图的模样,具体说明我在图中已经标出:
|
ddns-update-style interim;
ignore client-updates;
allow booting;
allow
bootp;
option space
gpxe;
option
gpxe-encap-opts code 175 = encapsulate gpxe;
option
gpxe.bus-id code 177 = string;
subnet 192.168.1.0
netmask 255.255.255.0 {
option routers
192.168.1.1;
option subnet-mask 255.255.255.0;
option domain-name-servers 192.168.1.1;
default-lease-time 21600;
max-lease-time 43200;
if not exists gpxe.bus-id {
filename "undionly.kpxe";
}
}
group {
host Clinet1{ hardware
ethernet 00:0c:29:73:1b:b5; fixed-address 192.168.1.7;option root-path "aoe:e0.7";}
host Clinet2{ hardware
ethernet 00:0c:29:34:b5:21; fixed-address 192.168.1.8;option root-path "aoe:e0.8";}
}
|
存在AoE target
如果你不打算使用硬件实现AoE target,那么你需要安装vblade来软件实现。你可以从下面地址下载最新的版本。
http://sourceforge.net/projects/aoetools/files/vblade/
安装vblade
1. 解压:tar -zxvf vblade-20.gz
2. 编译安装:
a) 进入源代码目录cd vblade-20
b) 编译:make 见下图

c) 安装:make install

好了,vblade也安装完毕,我们可以把客户机的系统镜像通过vblade发布了。大家还记得我在“2-将磁盘镜像传送到SAN target上”这篇文章中创建好的两个LVM快照磁盘镜像吧,/dev/DiskLessVG/Client1和/dev/DiskLessVG/Client2。我们用下面的命令将其发布出去。
vbladed 0 7 eth0 /dev/DiskLessVG/Client1IMG
vbladed 0 8 eth0 /dev/DiskLessVG/Client2IMG
验证一下是否启动成功:

好了,大功告成。剩下的就是启动dhcp和tftp服务来验证windows XP 是否从AoE SAN 中成功启动了。
启动dhcp:/etc/init.d/dhcpd start
启动tftp :/etc/init.d/xinetd restart 这里要注意的是客户机和服务器要放到同一个虚拟局域网中,我使用的是“Host-only”,如果大家使用的是“Host-only”记得一定要把Vmware WorkStation自带的dhcp服务关闭,若使用其他的如”Vmnet3“,则不用关闭,因为它默认关闭dhcp服务,具体关闭步骤如下:
Edit-à“Virtual Network Editor“ 打开“Virtual Network Editor“。

在 Virtual Network Editor中选中Vmnet1 并取消选中“Use local DHCP service to distribute IP address to VMs“。
 点击“OK“。
Client1和Client2的硬件情况如下图
:Clent1:

Client2:

打开Client1和Client2的电源,开始验证!
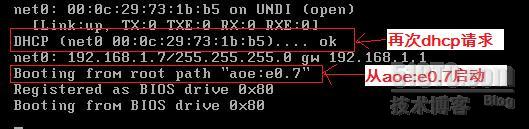
chainloading gPXE from an existing PXE ROM 成功!

gPXE接手,再次dhcp请求,从aoe:e0.7启动
Window XP 启动中… …

成功启动起来!

再贴一张Client2启动成功的图片:

全部工作结束!
转载于:https://blog.51cto.com/flymanhi/493782


 5831
5831

 被折叠的 条评论
为什么被折叠?
被折叠的 条评论
为什么被折叠?
 到【灌水乐园】发言


