


之前两篇介绍了如何基本的使用SpringBatch,但是企业应用从来都不是单一的,一大堆看起来可气的需求和一堆难以理清的关系.也有可能你的项目还没有Release原始需求已经被改了一大半.而我们又不愿意更改我们写的像艺术品一样的代码,最好的情况也就是在上面加上一些逻辑,然后以热插拔的方式达到要求.
对于前面介绍的流程也就一个Step,流程图:

其实SpringBatch是可以支持多个Step的.如:
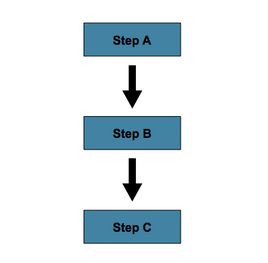
对于上面的流程,我们只需要多定义几个Step,使用next联系起来就可以工作了.
<job id="exampleJob">
    <step id="StepA" next="StepB"/>
    <step id="StepB" next="StepC"/>
    <step id="StepC"/>
</job>
每个Step都一个parent属性,它和Ant的depend有点类似,相当与在执行该Step前执行parent指定的Step.如:
<job id="exampleJob">
    <step id="StepA"/>
    <step id="StepB" parent=”StepA” next="StepC"/>
    <step id="StepC"/>
</job>
好了,顺序的执行永远是最简单的,我们写程序不可能总顺序的,可不可以来个选择呢?如:
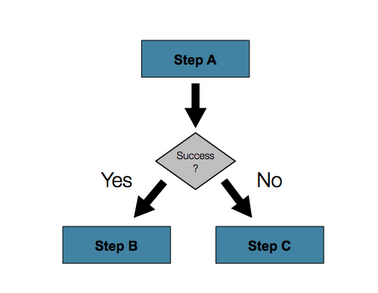
这个是肯定没有问题的.我们有两种方式来进行选择,一种是使用Decision标记,一种添加Listener.他们都可以凭返回值包含的字符串进行区分来进行选择流程.
下面我使用Decision做个例子.
Tasklet是Step中被执行的一个单元,Tasklet类:
public class DecisionTasklet  implements Tasklet {

    private String message;

    public DecisionTasklet() {

    }

    @Override
    public RepeatStatus execute(StepContribution contribution, ChunkContext chunkContext) throws Exception {
        System.out.println("message is: " + message);
        return RepeatStatus.FINISHED;
    }

    /**
     * @param message
     *            the message to set
     */
    public void setMessage(String message) {
        this.message = message;
    }
Decisor是Step选择执行的:
public class JobDecider implements JobExecutionDecider {

    public JobDecider() {
    }

    @Override
    public FlowExecutionStatus decide(JobExecution jobExecution, StepExecution stepExecution) {
        if(stepExecution.getReadCount() < 1) {
            return FlowExecutionStatus.FAILED;
        }
        return FlowExecutionStatus.COMPLETED;
    }
}
上面的代码中我 stepExecution.getReadCount() < 1,很明显,这个示例中我没有使用任何Reader,因此getReadCount()只会返回0,这里我只让他返回FAILED.一会儿我们在注释掉这段代码用于测试结果.
Spring Schama:
<?xml version="1.0" encoding="UTF-8"?>
<beans xmlns="http://www.springframework.org/schema/beans"
       xmlns:batch="http://www.springframework.org/schema/batch"
       xmlns:xsi="http://www.w3.org/2001/XMLSchema-instance"
       xsi:schemaLocation="http://www.springframework.org/schema/beans
       http://www.springframework.org/schema/beans/spring-beans.xsd
       http://www.springframework.org/schema/batch
	   http://www.springframework.org/schema/batch/spring-batch-2.1.xsd">

    <import resource="applicationBatch.xml"/>

    <bean id="hello" class="net.dbatch.myexample.DecisionTasklet">
        <property name="message" value="hello" />
    </bean>

    <bean id="failed" class="net.dbatch.myexample.DecisionTasklet">
        <property name="message" value="failed" />
    </bean>

    <bean id="success" class="net.dbatch.myexample.DecisionTasklet">
        <property name="message" value="success" />
    </bean>

    <bean id="jobDecider" class="net.dbatch.decision.JobDecider" />

    <batch:job id="decisionJob">
        <batch:step id="step1" next="decision">
            <batch:tasklet ref="hello" transaction-manager="transactionManager" />
        </batch:step>
        <batch:decision id="decision" decider="jobDecider">
            <batch:next on="FAILED" to="step2" />
            <batch:next on="COMPLETED" to="step3" />
        </batch:decision>
        <batch:step id="step2">
            <batch:tasklet ref="failed" transaction-manager="transactionManager" />
        </batch:step>
        <batch:step id="step3">
            <batch:tasklet ref="success" transaction-manager="transactionManager" />
        </batch:step>
    </batch:job>
</beans>
请注意,我把Tasklet类在spring中注册了3次.
测试类:
public static void main(String[] args) {
        ApplicationContext c = new ClassPathXmlApplicationContext("decision_job.xml");
        SimpleJobLauncher launcher = new SimpleJobLauncher();
        launcher.setJobRepository((JobRepository) c.getBean("jobRepository"));
        launcher.setTaskExecutor(new SyncTaskExecutor());
        try {
            JobExecution je = launcher.run((Job) c.getBean("decisionJob"),
                    new JobParametersBuilder().toJobParameters());
            System.out.println(je);
            System.out.println(je.getJobInstance());
            System.out.println(je.getStepExecutions());
        } catch (Exception e) {
            e.printStackTrace();
        }
    }
输出:
10-22 19:47:13 INFO [job.SimpleStepHandler] - <Executing step: [step1]>
message is: hello
10-22 19:47:13 INFO [job.SimpleStepHandler] - <Executing step: [step2]>
message is: failed
由日志我们可以看出由step1->step2,我们注释掉 JobDecider类中的:
if(stepExecution.getReadCount() < 1) {
    return FlowExecutionStatus.FAILED;
}
重新运行测试类.输出:
10-22 19:53:17 INFO [job.SimpleStepHandler] - <Executing step: [step1]>
message is: hello
10-22 19:53:17 INFO [job.SimpleStepHandler] - <Executing step: [step3]>
message is: success
很明显它走了step1->step3的流程.
上面讲的还有一种执行选择的流程是添加1个Listener,因为Listener只能使用chunk的方式配置Tasklet,因此示例逻辑上有点罗嗦,我不细述.
假如我们这样的Listener:
public class SkipCheckingListener extends StepExecutionListenerSupport {

    public ExitStatus afterStep(StepExecution stepExecution) {
        String exitCode = stepExecution.getExitStatus().getExitCode();
        if (!exitCode.equals(ExitStatus.FAILED.getExitCode()) &&
              stepExecution.getSkipCount() > 0) {
            return new ExitStatus("COMPLETED WITH SKIPS");
        }
        else {
            return null;
        }
    }
}
<bean id="payStepCheckingListener" class="net.dbatch.sample.PayStepCheckingListener" />

<job id="job">
    <step id="stepA">
        <next on="COMPLETED WITH SKIPS" to="stepB" />
        <next on="FAILED" to="stepC" />
        <next on="*" to="otherStep" />
        <listeners>
            <listener ref="payStepCheckingListener" />
        </listeners>
    </step>
    <step id="stepB" next="stepC" />
    <step id="stepC" />
</job>
next的on属性可以匹配简单的正则表达式.如:
? 可以匹配0个或一个字符
* 可以匹配0个或者多个字符
例如:"c*t"将会匹配"cat"和"count", "c?t"只能匹配"cat"但是不能匹配"count".
由Listener的返回值 ExitStatus返回的状态可以按照我们的意愿决定下一步执行哪个Step.


 796
796


 被折叠的 条评论
为什么被折叠?
被折叠的 条评论
为什么被折叠?
 到【灌水乐园】发言


