


ReactJS 是一个JavaScript库,由facebook开源和维护。下面的教程摘要来源于官方网站的Quick Start,有什么不明白的可以对比一下官网完整教程。
安装与新建工程
npm install -g create-react-app
create-react-app my-app

cd my-app
npm start
It uses build tools like Babel and webpack under the hood, but works with zero configuration. 它使用Babel(javascript预处理器,其他类似的有TypeScript,CoffeeScript,LiveScript)和webpack构建项目,零配置。
开发完成后运行以下命令打包,将进行必要的优化。
npm run buildcreate-react-app创建一个项目工程花了比较久的时间(如果有用淘宝的镜像应该会快些),可能是墙的问题,创建工程后有以下提示
Success! Created my-app at /Volumes/disk2/projects/react/helloworld/my-app
Inside that directory, you can run several commands:

  npm start
    Starts the development server.

  npm run build
    Bundles the app into static files for production.

  npm test
    Starts the test runner.

  npm run eject
    Removes this tool and copies build dependencies, configuration files
    and scripts into the app directory. If you do this, you can’t go back!

We suggest that you begin by typing:

  cd my-app
  npm start

Happy hacking!
my-app目录结构
README.md node_modules package.json public srcpackage.json
{
  "name": "my-app",
  "version": "0.1.0",
  "private": true,
  "dependencies": {
    "react": "^15.6.1",
    "react-dom": "^15.6.1",
    "react-scripts": "1.0.11"
  },
  "scripts": {
    "start": "react-scripts start",
    "build": "react-scripts build",
    "test": "react-scripts test --env=jsdom",
    "eject": "react-scripts eject"
  }
}
运行 npm start 有以下输出
Compiled successfully!

You can now view my-app in the browser.

  Local:            http://localhost:3000/
  On Your Network:  http://192.168.1.102:3000/

Note that the development build is not optimized.
To create a production build, use npm run build.
修改App.js后,网页会自动刷新。
一个例子:App.js
import React, {Component} from 'react';
import logo from './logo.svg';
import './App.css';

class ToDoLabel extends Component {
    constructor(props) {
        super(props);

        this.uploadClick = this.uploadClick.bind(this);
        this.state = {clicks: 0}
    }

    uploadClick(e) {
        this.setState((prevState) => ({
                clicks: ++prevState.clicks
            }
        ));
    }

    render() {
        return (
            <p>
                <button onClick={this.uploadClick}>Click me {(this.state.clicks)} times.</button>
            </p>
        );
    }
}
class App extends Component {
    render() {
        return (
            <div className="App">
                <div className="App-header">
                    <img src={logo} className="App-logo" alt="logo"/>
                    <h2>Welcome to React!</h2>
                </div>
                <p className="App-intro">
                    <ToDoLabel />
                    To get started, edit <code>src/App.js</code> and save to reload.
                </p>
            </div>
        );
    }
}

export default App;
JFX模板语法介绍
ReactJS使用JFX语法代替DOM来描述页面,类似一个模板库。一些注意事项:
- 变量或方法要放到{}里才可动态识别;
- 创建一个控件,React.createElement()的简洁写法是();
- JSX中一些DOM的标签、属性名称替换成标准的驼峰式写法了,如class换成className了;
- 如果你的编辑式要支持JSX和最新的ES6语法高亮,可尝试找找Babel语法描述文件,如Sublime的;
函数与组件
- function(){} component(一个函数即一个组件)或class Btn extends React.Component{}均可表示为一个组件(class为ES6语法);
- 返回的代码必须包含在DOM tag里作为root;如 return (<div>aaa</div>);
- 组件尽量小分离到最小化,这样可以提供复用;
- 组件里属性的命名尽量通用化,只跟这个组件有关,而跟引用它的组件没有关系;
- 组件的属性Pros是只读的;要修改,只能通过State
状态State和生命周期
- state和props很像,但它是私有的且对组件是完全可读写的;
- 组件的声明标准格式
class Btn extends React.Component(){
constructor(props){
super(props);

}
render(){
return (<div>Hello World</div>);
}
}- 组件在DOM显示时会调用组件的componentDidMount()方法;当删除时会调用componentWillUnmount(),这样可以做一定的初始化/清理工作;它俩叫做生产周期钩子;
- 如果变量不会在render()方法中使用,则没必要声明到this.state里;
- 通过this.setState()更新本地状态;注意不能直接赋值方式去修改state,如this.state.comment = 'Hello';
- this.setState如果同时多线程异步调用多次,React为了性能将打包只更新一次;所以,因为state的更新是异步的,不能依赖this.props和this.state的值进行判断的依据,而要根据上一个值做判断,如
this.setState((prevState, props) => ({
  counter: prevState.counter + props.increment
}));

//或常规写法

// Correct
this.setState(function(prevState, props) {
  return {
    counter: prevState.counter + props.increment
  };
});- this.state里的属性可以分别更新;
- 有父子关系的组件里(子组件套在父组件的Render方法里),组件的状态是由上至下类似瀑布一样单向传递的;
事件操作
- 事件语法跟DOM很像,除了使用驼峰命名或使用JFX引用事件方法,如
<button onClick={activateLasers}>
  Activate Lasers
</button>- 不能使用return false来阻止事件,而必须使用e.preventDefault()方法;
class Toggle extends React.Component {
  constructor(props) {
    super(props);
    this.state = {isToggleOn: true};

    // This binding is necessary to make `this` work in the callback
    this.handleClick = this.handleClick.bind(this);
  }

  handleClick() {
    this.setState(prevState => ({
      isToggleOn: !prevState.isToggleOn
    }));
  }

  render() {
    return (
      <button onClick={this.handleClick}>
        {this.state.isToggleOn ? 'ON' : 'OFF'}
      </button>
    );
  }
}

ReactDOM.render(
  <Toggle />,
  document.getElementById('root')
);


//2 事件绑定this还可以使用这种方法
// This syntax ensures `this` is bound within handleClick.
// Warning: this is *experimental* syntax.
  handleClick = () => {
    console.log('this is:', this);
  }

//3 还可以这样绑定事件。为避免性能问题,推荐第一种在构造器里bind(this)的方法
render() {
    // This syntax ensures `this` is bound within handleClick
    return (
      <button onClick={(e) => this.handleClick(e)}>
        Click me
      </button>
    );
}- 在DOM里声明事件时,引用的方法后面如果没加(),即只用方法名引用时,则Component的构造器里要使用bind(this)将this传入方法(如上例);
- ReactJS通过对事件封装成SyntheticEvent来实现跨平台;
条件渲染
根据不同的state条件,组件显示不同内容。
    render(){
        const isLogin = this.state.isLogin;
        let button;
        if(isLogin){
            button = <p><button onClick={this.handleLogout}>Logout</button></p>
        }else{
            button = <p><button onClick={this.handleLogin}>Login</button></p>
        }
        return (
            <div>
                {button}
            </div>
        );
    }
或
function Mailbox(props) {
  const unreadMessages = props.unreadMessages;
  return (
    <div>
      <h1>Hello!</h1>
      {unreadMessages.length > 0 &&
        <h2>
          You have {unreadMessages.length} unread messages.
        </h2>
      }
    </div>
  );
}
或
render() {
  const isLoggedIn = this.state.isLoggedIn;
  return (
    <div>
      {isLoggedIn ? (
        <LogoutButton onClick={this.handleLogoutClick} />
      ) : (
        <LoginButton onClick={this.handleLoginClick} />
      )}
    </div>
  );
}
Lists和Keys
{[1,2,3,4,5,6].map((number,idx)=><span key={idx}>{number}</span>)}key作为属性是传不进组件里的,如果想同样的值,需要声明另外一个自定义属性,如id。下例
const content = posts.map((post) =>
  <Post
    key={post.id}
    id={post.id}
    title={post.title} />
);
表单Form
表单元素分两类Controlled Component和Uncontrolled Component,前面一类操作比较麻烦,要随时跟踪控件状态并更新state才能实现随时记录表单的值。
下表为Controlled Form Component默认值属性和回调方法表(来源)。
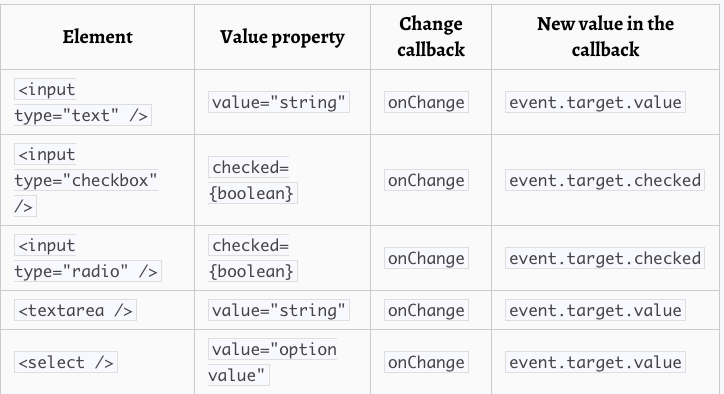
#textarea也使用value来表示值
<textarea value={this.state.value} onChange={this.handleChange} />

#select亦如此
<select value={this.state.value} onChange={this.handleChange}>
如果有多个input,可以分另取不同name区分。在event.name可识别不同Input。
 handleInputChange(event) {
    const target = event.target;
    const value = target.type === 'checkbox' ? target.checked : target.value;
    const name = target.name;

    this.setState({
      [name]: value
    });
  }

####注意####
this.setState({
  [name]: value
});

是ES5语法,与下面代码等价
var partialState = {};
partialState[name] = value;
this.setState(partialState);
多组件共享状态
共享状态一般的方式是将子组件的状态移到最近的一个父组件里,这叫“状态提升”。
子组件的state要变成props。
例子:
function tryConvert(temperature, convert) {
  const input = parseFloat(temperature);
  if (Number.isNaN(input)) {
    return '';
  }
  const output = convert(input);
  const rounded = Math.round(output * 1000) / 1000;
  return rounded.toString();
}

class TemperatureInput extends React.Component {
  constructor(props) {
    super(props);
    this.handleChange = this.handleChange.bind(this);
  }

  handleChange(e) {
    this.props.onTemperatureChange(e.target.value);
  }

  render() {
    const temperature = this.props.temperature;
    const scale = this.props.scale;
    return (
      <fieldset>
        <legend>Enter temperature in {scaleNames[scale]}:</legend>
        <input value={temperature}
               onChange={this.handleChange} />
      </fieldset>
    );
  }
}

class Calculator extends React.Component {
  constructor(props) {
    super(props);
    this.handleCelsiusChange = this.handleCelsiusChange.bind(this);
    this.handleFahrenheitChange = this.handleFahrenheitChange.bind(this);
    this.state = {temperature: '', scale: 'c'};
  }

  handleCelsiusChange(temperature) {
    this.setState({scale: 'c', temperature});
  }

  handleFahrenheitChange(temperature) {
    this.setState({scale: 'f', temperature});
  }

  render() {
    const scale = this.state.scale;
    const temperature = this.state.temperature;
    const celsius = scale === 'f' ? tryConvert(temperature, toCelsius) : temperature;
    const fahrenheit = scale === 'c' ? tryConvert(temperature, toFahrenheit) : temperature;

    return (
      <div>
        <TemperatureInput
          scale="c"
          temperature={celsius}
          onTemperatureChange={this.handleCelsiusChange} />
        <TemperatureInput
          scale="f"
          temperature={fahrenheit}
          onTemperatureChange={this.handleFahrenheitChange} />
        <BoilingVerdict
          celsius={parseFloat(celsius)} />
      </div>
    );
  }
}
类的组合与继承
推荐使用组合方式。主要就是一般化组件如果添加自定义的能力,可以通过组件props传递定制化内容,或通过props.children。
包括没UI的类,也建议使用组合模式,将间单独功能的文件分散到不同模块里,然后通过import导入来使用。不要使用扩展方式。
实战例子
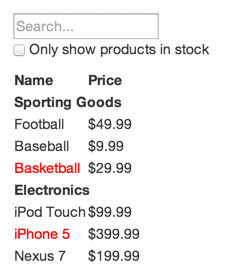
- 将UI分解成各个组件。分解的方法就是保持组件单一职责原则,不要混合。同时,参与接口返回的数据模型,UI一般也要能反映数据模型。
- 构建所有组件的静态页面。写静态代码码字多但思考少,写交互是码字少但思考多。静态数据要通过props来传递,而非state,state是在交互中运行时变化的。简单应用从顶往下开发容易,大项目从底往上更容易些。ReactJS的单向数据流(单向绑定)保证了模块化开发比较容易和快速。
- 找出最少(但最全)组件需要用状态来表示的地方。不要重复造轮子,只要最少的可以表示该组件状态的内容就行,不要多一点其他干扰的内容。如果是这些情况,可能不需要用state来表示:通过父组件的传递给Props值?运行一段时间后状态不会变化?可能通过其他依赖组件计算出自己的状态?
- 识别出状态要在哪些地方保持活跃。一般是把子组件要用到的状态移到共有的父组件(Owner Component)中实现共享。如果不好找共有父组件,就创建一个新的用来保持状态。
- 添加反向数据流。因为共享状都在父组件里设置的,所有子数组输入的数据流,都要先将事件传导到父组件,由父组件修改state来修改子组件的props属性,这是ReactJS的特点,数据流是单向传递(绑定)的(例子多组件共享状态章节)。(有点绕)
高级话题
深入了解JFX
import React from 'react';
import CustomButton from './CustomButton';
必须react代码才能引入自定义组件。
如果有多个组件定义在一个导出的模块里,可以使用.描述符号引用组件,如
import React from 'react';

const MyComponents = {
  DatePicker: function DatePicker(props) {
    return <div>Imagine a {props.color} datepicker here.</div>;
  }
}

function BlueDatePicker() {
  return <MyComponents.DatePicker color="blue" />;
}
自定义组件第一个字母必须大写。
变量方式引用组件的正确姿式。
import React from 'react';
import { PhotoStory, VideoStory } from './stories';

const components = {
  photo: PhotoStory,
  video: VideoStory
};

function Story(props) {
  // Correct! JSX type can be a capitalized variable.
  const SpecificStory = components[props.storyType];
  return <SpecificStory story={props.story} />;
}
简便方式传递props。下面这两种方式是等价的(...props叫Spread attributes)。
function App1() {
  return <Greeting firstName="Ben" lastName="Hector" />;
}

function App2() {
  const props = {firstName: 'Ben', lastName: 'Hector'};
  return <Greeting {...props} />;
}
标签子元素.props.childern,默认会删除里所有的换行符、空白符等。
Javascript表达式描述子元素,如
function Item(props) {
  return <li>{props.message}</li>;
}

function TodoList() {
  const todos = ['finish doc', 'submit pr', 'nag dan to review'];
  return (
    <ul>
      {todos.map((message) => <Item key={message} message={message} />)}
    </ul>
  );
}
根据条件输出
<div>
  {props.messages.length &&
    <MessageList messages={props.messages} />
  }
</div>
直接输使用css
<div style={{ width: 400, margin: '100px auto' }}>
ReactJS与第三方库的整合使用
#与某个jQuery库somPlugin的整合使用。通过ref传递原始DOM(ref是定义在DOM的属性)
class SomePlugin extends React.Component {
  componentDidMount() {
    this.$el = $(this.el);
    this.$el.somePlugin();
  }

  componentWillUnmount() {
    this.$el.somePlugin('destroy');
  }

  render() {
    return <div ref={el => this.el = el} />;
  }
}
jQuery代码与ReactJS混编
function Button() {
  return <button id="btn">Say Hello</button>;
}

ReactDOM.render(
  <Button />,
  document.getElementById('container'),
  function() {
    $('#btn').click(function() {
      alert('Hello!');
    });
  }
);


 612
612

 被折叠的 条评论
为什么被折叠?
被折叠的 条评论
为什么被折叠?
 到【灌水乐园】发言


