一)Rsync简介
rsync数据镜像备份工具,通过rsync可以将本地数据通过网络备份到任何远程主机上。
rsync常用的工作模式:
1)shell模式,本地模式
2)远程shell模式,可利用ssh协议承载其数据传输过程。
3)列表模式。
4)服务器模式,rsync工作为守护进程,能够接收客户端的数据传输请求,在使用时,可使用rsync命令把文件发送给守护进程,也可向服务器请求获取文件。
二)inotify简介
Inotify是一种强大的、细粒度的、异步的文件系统事件监控机制,Linux内核从2.6.13起,加入了对Inotify的支持,通过Inotify可以监控文件系统中的添加、删除、修改、移动等各种事件。
三)rsync常见选项
-n, --dry-run     perform a trial run with no changes made
在不确定命令是否能按意愿执行时,务必要事先测试,-n可以完成此功能。
rsync etc/passwd test/ -n
-v:--verbose详细输出模式
-q:--quiet,静默模式
-c:--checksum,开启文件校验。强制对文件传输进行校验。
-r:--recursive,递归复制;
-a:--archives归档,保留文件的原有属性
-p:--perms保留文件的权限
-t:--times保留文件的时间戳
-l:--links保留文件的属组
-g:--group保留文件的属组
-o:--owner保留文件的属主
-D:--devices保留设备文件
-e ssh :表示使用ssh协议作承载
-z:对文件压缩后传输
--progress  显示进度条
--stats:显示如何执行压缩和传输
注意:rsync命令使用中,如果源参数的末尾有斜杠,就会复制指定目录的内容,而不复制目录本身。没有斜线,则会复制目录本身,目标参数末尾的斜线没有作用
三)环境介绍
| 服务器作用 | IP地址 | 服务器版本 |
| rsync接收更新端1 | 172.16.251.189 | CentOS release 6.4 64位 |
| rsync接收更新端2 | 172.16.251.235 | CentOS release 6.4 64位 |
| Rsync+inotify发送更新源端 | 172.16.251.99 | CentOS release 6.4 64位 |
四)rsync1接收端配置如下
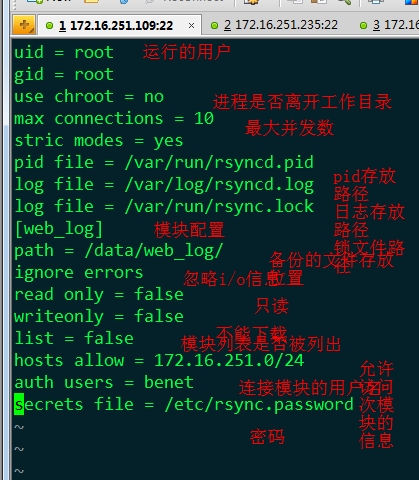
vim /etc/rsyncd.conf自己定义,默认不存在
mkdir -p /data/web_log/
echo "benet:123456" >> /etc/rsync.password
chmod 6000 /etc/rsync.password
/usr/bin/rsync --daemon &
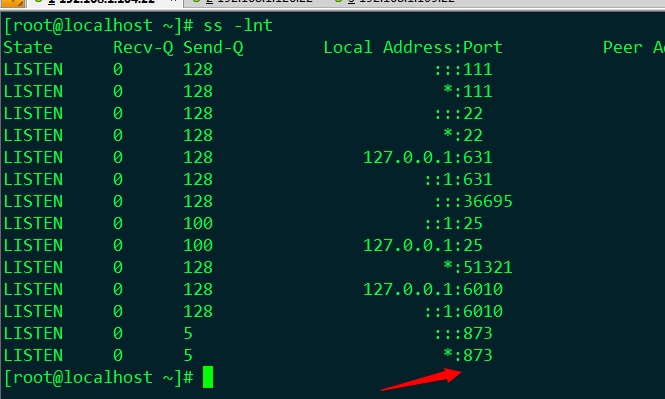
ss -lnt
查看端口873是否启动
五)rsync2配置
uid = root
gid = root
use chroot = no
max connections = 10
stric modes = yes
pid file = /var/run/rsyncd.pid
log file = /var/log/rsyncd.log
log file = /var/run/rsync.lock
[web_log]
path = /data/web_log/
ignore errors
read only = false
writeonly = false
list = false
hosts allow = 172.16.251.0/24
auth users = benet
secrets file = /etc/rsync.password
mkdir -p /data/web_log/
echo "benet:123456" >> /etc/rsync.password
chmod 6000 /etc/rsync.password
/usr/bin/rsync --daemon &
ss -lnt
六)Rsync+inotify发送更新源端
inotify下载路径
wget http://cloud.github.com/downloads/rvoicilas/inotify-tools/inotify-tools-3.14.tar.gz
tar xf inotify-tools-3.14.tar.gz
cd inotify-tools-3.14
./configure
make
make install
设置密码安装rsync,密码需要和接受端的rsync一样。
echo "123" > /etc/rsync.password
测试访问同步下
rsync -vzrtopg --progress /mnt/ benet@172.16.251.109::web_log --password-file=/etc/rsync.password
rsync1查看是否同步过来了
echo "123456" > /etc/rsync.password
chmod 600 /etc/rsync.password
七)写个不间断的脚本放在inotify上,随时更新随时同步过去。
#!/bin/bash
share=/mnt/
/usr/local/bin/inotifywait -mr -e modify,delete,create,attrib $share \
|while read file;do
rsync -vzrtopg --progress /mnt/ benet@172.16.251.189::web_log --password-file=/etc/rsync.password
rsync -vzrtopg --progress /mnt/ benet@172.16.251.235::web_log --password-file=/etc/rsync.password
done
chmod +x inotify.sh
nohup ./inotify.sh & 把脚本放到后台运行。
nohup是不间断的运行
八)把脚本加入到开机自启动
echo "/root/inotify.sh" >> /etc/rc.local
添加到计划任务中
* * * * * /root/inotify.sh &> /dev/null
PS:
通过rsync+inotify实现数据的时刻同步传输。
转载于:https://blog.51cto.com/shunzi/1386220


 199
199


 被折叠的 条评论
为什么被折叠?


