


| 人称: | 露哥 |
| QQ: | 408365330 |
| N01.编程就是验证学习的最好方式 | |
| N02.为了挣钱所以编程,为了挣大钱所以写好代码,为了写好代码所以学习 | |
| N03.好好学习天天编程 | |
springboot启动代码如下:
SpringApplication.run(SpringBootApp.class, args);SpringApplication静态方法run分析
实际调用的是SpringApplication实例方法run因此我们分两步分别分析SpringApplication构造函数和实例方法run
1.springApplication构造方法
    public SpringApplication(Class<?>... primarySources) {
        this(null, primarySources);
    }

    public SpringApplication(ResourceLoader resourceLoader, Class<?>... primarySources)     {
        this.resourceLoader = resourceLoader;
        Assert.notNull(primarySources, "PrimarySources must not be null");
        this.primarySources = new LinkedHashSet<>(Arrays.asList(primarySources));
        this.webApplicationType = deduceWebApplicationType();
        setInitializers((Collection) getSpringFactoriesInstances(
                ApplicationContextInitializer.class));
        setListeners((Collection) getSpringFactoriesInstances(ApplicationListener.class));
        this.mainApplicationClass = deduceMainApplicationClass();
    }
可以看到真正的调用方法是第二个构造函数;
- 第一步:设置 primarySources
- 第二步:设置webApplicationType 也就是web类型
    public enum WebApplicationType {
    /**
     * The application should not run as a web application and should not start an
     * embedded web server.
     */
    NONE,

    /**
     * The application should run as a servlet-based web application and should start an
     * embedded servlet web server.
     */
    SERVLET,

    /**
     * The application should run as a reactive web application and should start an
     * embedded reactive web server.
     */
    REACTIVE
    }
默认的web类型是SERVLET 也就是基础servlet类型web,会启动一个嵌入式servlet web服务器
- 第三步:设置初始化器
通过读取“META-INF/spring.factories” 文件获取 ApplicationContextInitializer子类实例;看到这里我们可以通过了解这个特性实现自己的ApplicationContextInitializer初始化器,在此基础上做自己的事情
通过spring-boot的jar包中的spring.factories文件可以看到其中有下面内容
# Application Context Initializers
org.springframework.context.ApplicationContextInitializer=\
org.springframework.boot.context.ConfigurationWarningsApplicationContextInitializer,\
org.springframework.boot.context.ContextIdApplicationContextInitializer,\
org.springframework.boot.context.config.DelegatingApplicationContextInitializer,\
org.springframework.boot.web.context.ServerPortInfoApplicationContextInitializer
由此可以看出spring boot程序默认至少设置了四个初始化器
- 第四步: 设置监听器ApplicationListener
也是通过读取“META-INF/spring.factories” 文件获取ApplicationListener,我们再去spring-boot的源码中可以看到spring.factories中配置的listerner 达到9个
# Application Listeners
org.springframework.context.ApplicationListener=\
org.springframework.boot.ClearCachesApplicationListener,\
org.springframework.boot.builder.ParentContextCloserApplicationListener,\
org.springframework.boot.context.FileEncodingApplicationListener,\
org.springframework.boot.context.config.AnsiOutputApplicationListener,\
org.springframework.boot.context.config.ConfigFileApplicationListener,\
org.springframework.boot.context.config.DelegatingApplicationListener,\
org.springframework.boot.context.logging.ClasspathLoggingApplicationListener,\
org.springframework.boot.context.logging.LoggingApplicationListener,\
org.springframework.boot.liquibase.LiquibaseServiceLocatorApplicationListener
宗上所述,再构建我的项目时候可以通过spring.factories的方式做很多有意义的事情
2.springApplication的实例方法run
首先看下面源码
public ConfigurableApplicationContext run(String... args) {
        StopWatch stopWatch = new StopWatch();
        stopWatch.start();
        ConfigurableApplicationContext context = null;
        Collection<SpringBootExceptionReporter> exceptionReporters = new ArrayList<>();
        configureHeadlessProperty();//设置headless模式,设置SystemProperty java.awt.headless默认设置为true
        SpringApplicationRunListeners listeners = getRunListeners(args);
        listeners.starting();
        try {
            ApplicationArguments applicationArguments = new DefaultApplicationArguments(
                    args);
            ConfigurableEnvironment environment = prepareEnvironment(listeners,
                    applicationArguments);//准备环境
            configureIgnoreBeanInfo(environment);
            Banner printedBanner = printBanner(environment);
            context = createApplicationContext();
            exceptionReporters = getSpringFactoriesInstances(
                    SpringBootExceptionReporter.class,
                    new Class[] { ConfigurableApplicationContext.class }, context);
            prepareContext(context, environment, listeners, applicationArguments,
                    printedBanner);
            refreshContext(context);
            afterRefresh(context, applicationArguments);
            stopWatch.stop();
            if (this.logStartupInfo) {
                new StartupInfoLogger(this.mainApplicationClass)
                        .logStarted(getApplicationLog(), stopWatch);
            }
            listeners.started(context);
            callRunners(context, applicationArguments);
        }
        catch (Throwable ex) {
            handleRunFailure(context, ex, exceptionReporters, listeners);
            throw new IllegalStateException(ex);
        }

        try {
            listeners.running(context);
        }
        catch (Throwable ex) {
            handleRunFailure(context, ex, exceptionReporters, null);
            throw new IllegalStateException(ex);
        }
        return context;
    }
执行流程
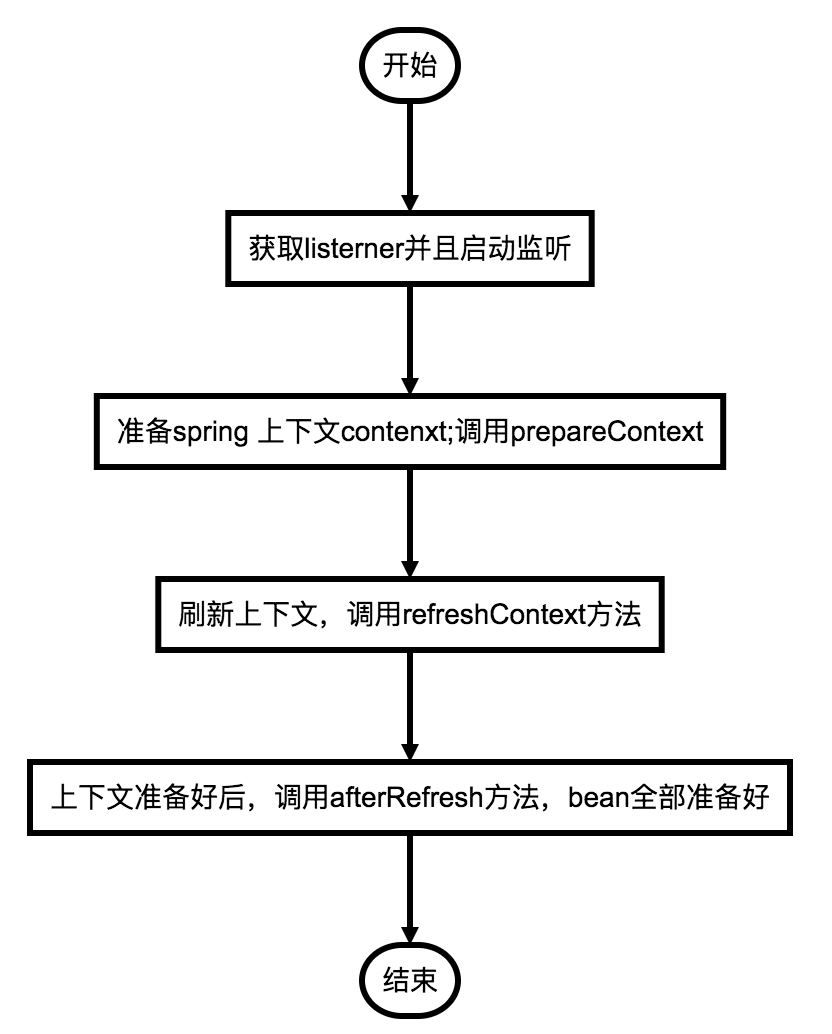
以下是重点说明
- 1.SpringApplicationRunListeners获取
SpringApplicationRunListeners listeners = getRunListeners(args);
listeners.starting();通过从spring.factories中获取实现了SpringApplicationRunListener接口的类实例,此处我们知道实现类是EventPublishingRunListener- 2.启动过程
prepareContext(context, environment, listeners, applicationArguments,printedBanner);//准备Context
refreshContext(context);//Context
afterRefresh(context, applicationArguments);//完成Context刷新后
以上代码体现context的处理过程;充分理解这个过程能很好的利用springboot的特性和context的初始化过程
- 2.1prepareContext准备
此方法中准备context加载环境,例如资源Resources和日志配置 - 2.2refreshContext刷新
此方法刷新context通过各种途径去加载bean(扫描包通过注解加载bean……);查看源码我们能知道根据webtype 使用的是AnnotationConfigServletWebServerApplicationContext 作为context的;


 4879
4879


 被折叠的 条评论
为什么被折叠?
被折叠的 条评论
为什么被折叠?
 到【灌水乐园】发言


