


Java SPI机制详解
1、什么是SPI?
SPI 全称为 (Service Provider Interface) ,是JDK内置的一种服务提供发现机制。SPI是一种动态替换发现的机制, 比如有个接口,想运行时动态的给它添加实现,你只需要添加一个实现。我们经常遇到的就是java.sql.Driver接口,其他不同厂商可以针对同一接口做出不同的实现,mysql和postgresql都有不同的实现提供给用户,而Java的SPI机制可以为某个接口寻找服务实现。
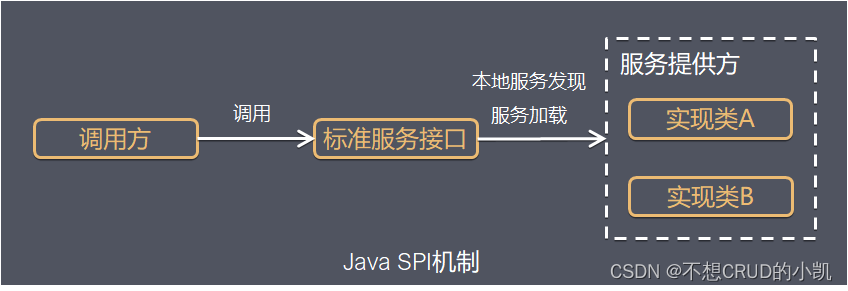
如上图所示,接口对应的抽象SPI接口;实现方实现SPI接口;调用方依赖SPI接口。
SPI接口的定义在调用方,在概念上更依赖调用方;组织上位于调用方所在的包中,实现位于独立的包中。
当服务的提供者提供了一种接口的实现之后,需要在classpath下的META-INF/services/目录里创建一个以服务接口命名的文件,这个文件里的内容就是这个接口的具体的实现类。当其他的程序需要这个服务的时候,就可以通过查找这个jar包(一般都是以jar包做依赖)的META-INF/services/中的配置文件,配置文件中有接口的具体实现类名,可以根据这个类名进行加载实例化,就可以使用该服务了。JDK中查找服务实现的工具类是:java.util.ServiceLoader。
2、SPI的用途
数据库DriverManager、Spring、ConfigurableBeanFactory等都用到了SPI机制,这里以数据库DriverManager为例,看一下其实现的内幕。
DriverManager是jdbc里管理和注册不同数据库driver的工具类。针对一个数据库,可能会存在着不同的数据库驱动实现。我们在使用特定的驱动实现时,不希望修改现有的代码,而希望通过一个简单的配置就可以达到效果。 在使用mysql驱动的时候,会有一个疑问,DriverManager是怎么获得某确定驱动类的?我们在运用Class.forName(“com.mysql.jdbc.Driver”)加载mysql驱动后,就会执行其中的静态代码把driver注册到DriverManager中,以便后续的使用。
Driver实现
package com.mysql.jdbc;

import java.sql.DriverManager;
import java.sql.SQLException;

public class Driver extends NonRegisteringDriver implements java.sql.Driver {
    public Driver() throws SQLException {
    }

    static {
        try {
            DriverManager.registerDriver(new Driver());
        } catch (SQLException var1) {
            throw new RuntimeException("Can't register driver!");
        }
    }
}
驱动的类的静态代码块中,调用DriverManager的注册驱动方法new一个自己当参数传给驱动管理器。
Mysql DriverManager实现
    /**
     * Load the initial JDBC drivers by checking the System property
     * jdbc.properties and then use the {@code ServiceLoader} mechanism
     */
    static {
        loadInitialDrivers();
        println("JDBC DriverManager initialized");
    }
可以看到其内部的静态代码块中有一个loadInitialDrivers方法,loadInitialDrivers用法用到了上文提到的spi工具类ServiceLoader:
private static void loadInitialDrivers() {
        String drivers;
        try {
            drivers = AccessController.doPrivileged(new PrivilegedAction<String>() {
                public String run() {
                    return System.getProperty("jdbc.drivers");
                }
            });
        } catch (Exception ex) {
            drivers = null;
        }
        // If the driver is packaged as a Service Provider, load it.
        // Get all the drivers through the classloader
        // exposed as a java.sql.Driver.class service.
        // ServiceLoader.load() replaces the sun.misc.Providers()

        AccessController.doPrivileged(new PrivilegedAction<Void>() {
            public Void run() {

                ServiceLoader<Driver> loadedDrivers = ServiceLoader.load(Driver.class);
                Iterator<Driver> driversIterator = loadedDrivers.iterator();

                /* Load these drivers, so that they can be instantiated.
                 * It may be the case that the driver class may not be there
                 * i.e. there may be a packaged driver with the service class
                 * as implementation of java.sql.Driver but the actual class
                 * may be missing. In that case a java.util.ServiceConfigurationError
                 * will be thrown at runtime by the VM trying to locate
                 * and load the service.
                 *
                 * Adding a try catch block to catch those runtime errors
                 * if driver not available in classpath but it's
                 * packaged as service and that service is there in classpath.
                 */
                try{
                    while(driversIterator.hasNext()) {
                        driversIterator.next();
                    }
                } catch(Throwable t) {
                // Do nothing
                }
                return null;
            }
        });
    println("DriverManager.initialize: jdbc.drivers = " + drivers);

        if (drivers == null || drivers.equals("")) {
            return;
        }
        String[] driversList = drivers.split(":");
        println("number of Drivers:" + driversList.length);
        for (String aDriver : driversList) {
            try {
                println("DriverManager.Initialize: loading " + aDriver);
                Class.forName(aDriver, true,
                        ClassLoader.getSystemClassLoader());
            } catch (Exception ex) {
                println("DriverManager.Initialize: load failed: " + ex);
            }
        }
先查找jdbc.drivers属性的值,然后通过SPI机制查找驱动
public final class ServiceLoader<S>
    implements Iterable<S>
{

    private static final String PREFIX = "META-INF/services/";
private boolean hasNextService() {
            if (nextName != null) {
                return true;
            }
            if (configs == null) {
                try {
                    String fullName = PREFIX + service.getName();
                    if (loader == null)
                        configs = ClassLoader.getSystemResources(fullName);
                    else
                        configs = loader.getResources(fullName);
                } catch (IOException x) {
                    fail(service, "Error locating configuration files", x);
                }
            }
            while ((pending == null) || !pending.hasNext()) {
                if (!configs.hasMoreElements()) {
                    return false;
                }
                pending = parse(service, configs.nextElement());
            }
            nextName = pending.next();
            return true;
        }
可以看到加载META-INF/services/ 文件夹下类名为文件名(这里相当于Driver.class.getName())的资源,然后将其加载到虚拟机。
注释有这么一句“Load these drivers, so that they can be instantiated.” 意思是加载SPI扫描到的驱动来触发他们的初始化。即触发他们的static代码块
/**
     * Registers the given driver with the {@code DriverManager}.
     * A newly-loaded driver class should call
     * the method {@code registerDriver} to make itself
     * known to the {@code DriverManager}. If the driver is currently
     * registered, no action is taken.
     *
     * @param driver the new JDBC Driver that is to be registered with the
     *               {@code DriverManager}
     * @param da     the {@code DriverAction} implementation to be used when
     *               {@code DriverManager#deregisterDriver} is called
     * @exception SQLException if a database access error occurs
     * @exception NullPointerException if {@code driver} is null
     * @since 1.8
     */
    public static synchronized void registerDriver(java.sql.Driver driver,
            DriverAction da)
        throws SQLException {

        /* Register the driver if it has not already been added to our list */
        if(driver != null) {
            registeredDrivers.addIfAbsent(new DriverInfo(driver, da));
        } else {
            // This is for compatibility with the original DriverManager
            throw new NullPointerException();
        }

        println("registerDriver: " + driver);

    }
将自己注册到驱动管理器的驱动列表中
public class DriverManager {
    // List of registered JDBC drivers
    private final static CopyOnWriteArrayList<DriverInfo> registeredDrivers = new CopyOnWriteArrayList<>();
当获取连接的时候调用驱动管理器的连接方法从列表中获取。
@CallerSensitive
public static Connection getConnection(String url,
                                       String user, String password) throws SQLException {
    java.util.Properties info = new java.util.Properties();

    if (user != null) {
        info.put("user", user);
    }
    if (password != null) {
        info.put("password", password);
    }

    return (getConnection(url, info, Reflection.getCallerClass()));
}
private static Connection getConnection(
    String url, java.util.Properties info, Class<?> caller) throws SQLException {
    /*
         * When callerCl is null, we should check the application's
         * (which is invoking this class indirectly)
         * classloader, so that the JDBC driver class outside rt.jar
         * can be loaded from here.
         */
    ClassLoader callerCL = caller != null ? caller.getClassLoader() : null;
    synchronized(DriverManager.class) {
        // synchronize loading of the correct classloader.
        if (callerCL == null) {
            callerCL = Thread.currentThread().getContextClassLoader();
        }
    }

    if(url == null) {
        throw new SQLException("The url cannot be null", "08001");
    }

    println("DriverManager.getConnection(\"" + url + "\")");

    // Walk through the loaded registeredDrivers attempting to make a connection.
    // Remember the first exception that gets raised so we can reraise it.
    SQLException reason = null;

    for(DriverInfo aDriver : registeredDrivers) {
        // If the caller does not have permission to load the driver then
        // skip it.
        if(isDriverAllowed(aDriver.driver, callerCL)) {
            try {
                println("    trying " + aDriver.driver.getClass().getName());
                Connection con = aDriver.driver.connect(url, info);
                if (con != null) {
                    // Success!
                    println("getConnection returning " + aDriver.driver.getClass().getName());
                    return (con);
                }
            } catch (SQLException ex) {
                if (reason == null) {
                    reason = ex;
                }
            }

        } else {
            println("    skipping: " + aDriver.getClass().getName());
        }

    }

    // if we got here nobody could connect.
    if (reason != null)    {
        println("getConnection failed: " + reason);
        throw reason;
    }

    println("getConnection: no suitable driver found for "+ url);
    throw new SQLException("No suitable driver found for "+ url, "08001");
}
private static boolean isDriverAllowed(Driver driver, ClassLoader classLoader) {
    boolean result = false;
    if(driver != null) {
        Class<?> aClass = null;
        try {
            aClass =  Class.forName(driver.getClass().getName(), true, classLoader);
        } catch (Exception ex) {
            result = false;
        }

        result = ( aClass == driver.getClass() ) ? true : false;
    }

    return result;
}
《SpringBoot 2.x》入门:框架介绍与HelloWorld
- MVC架构思想
- 使用STS构建SpringBoot项目
- 使用SpringBoot构建Mvc web项目
- MVCWeb项目中的注入
- 热部署
介绍
SpringBoot主要解决的是在微服务的架构下简化配置(有快速配置)、前后端分离、快速开发
优点:
-
提供了快速启动入门
-
开箱即用、提供默认配置
-
内嵌容器化web项目
-
没有冗余代码生成和xml配置要求
2.运行Demo
创建项目
创建SpringBoot项目的几种方式:
-
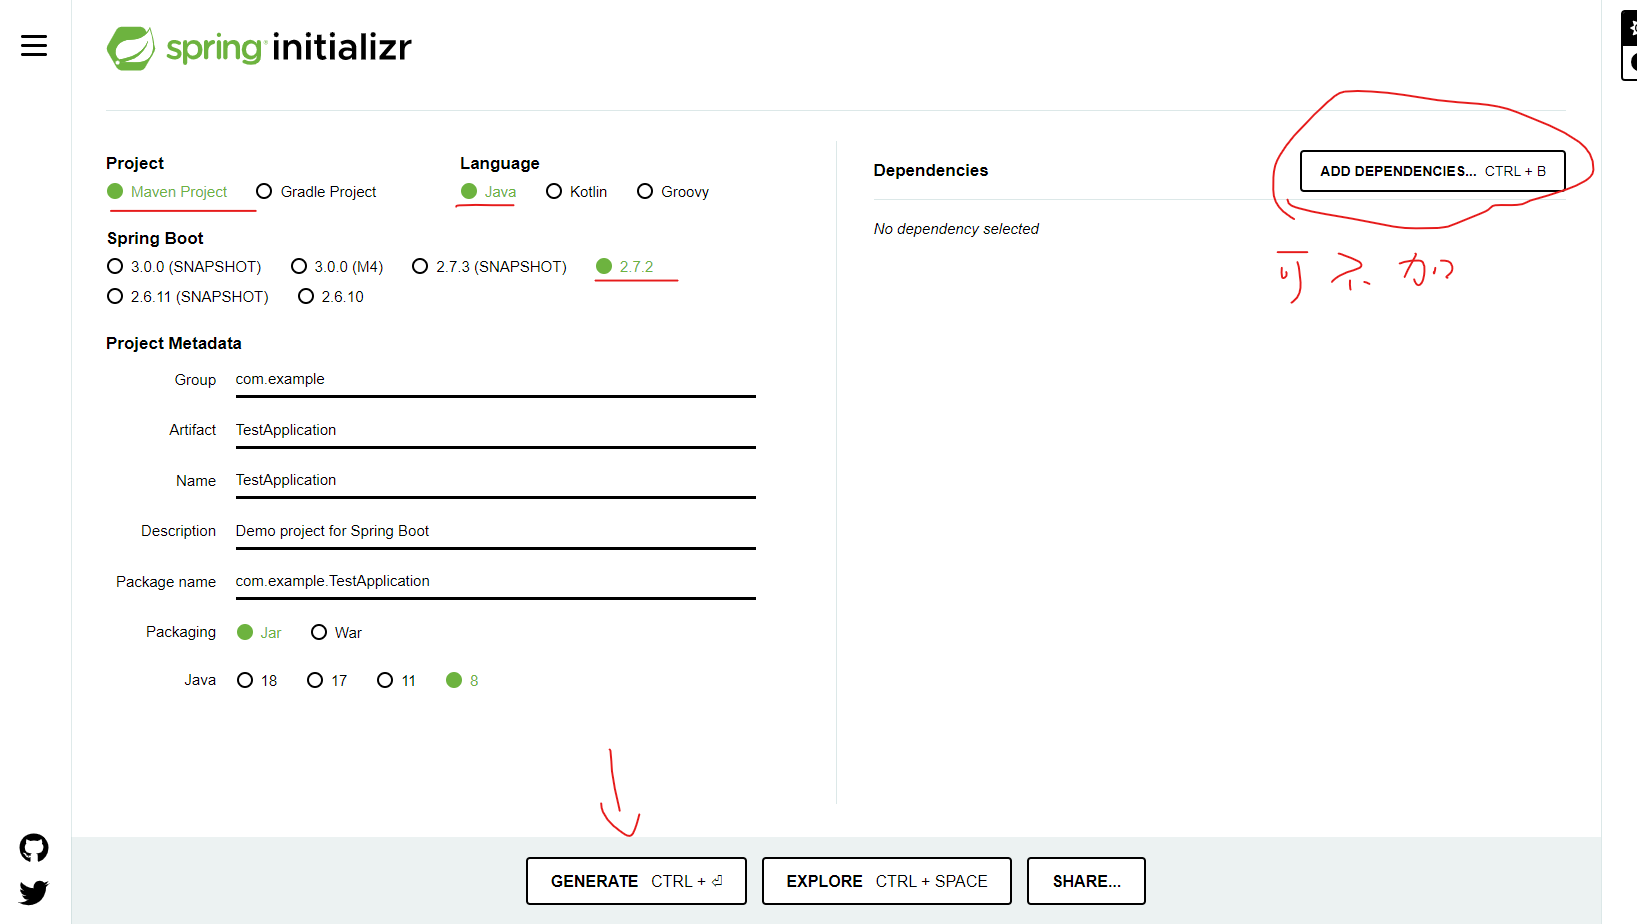
官网的Initializr
-
使用Eclipse、STS、Idea等IDE创建Maven项目并引入依赖
-
使用STS插件的Spring Initializr创建项目

访问http://start.spring.io/ 进入Spring项目Initializr
生成下载demo.zip
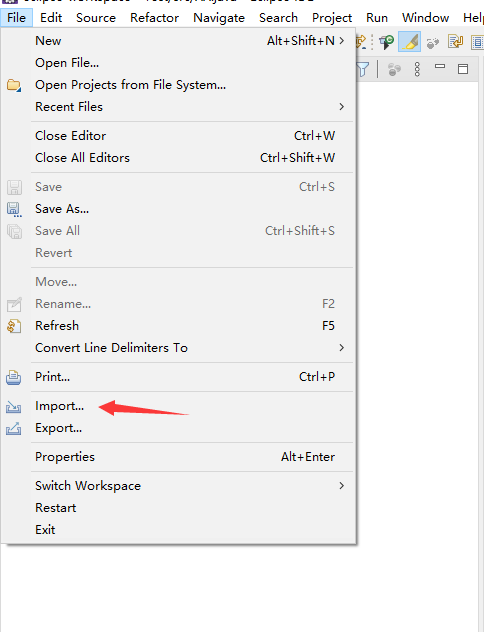
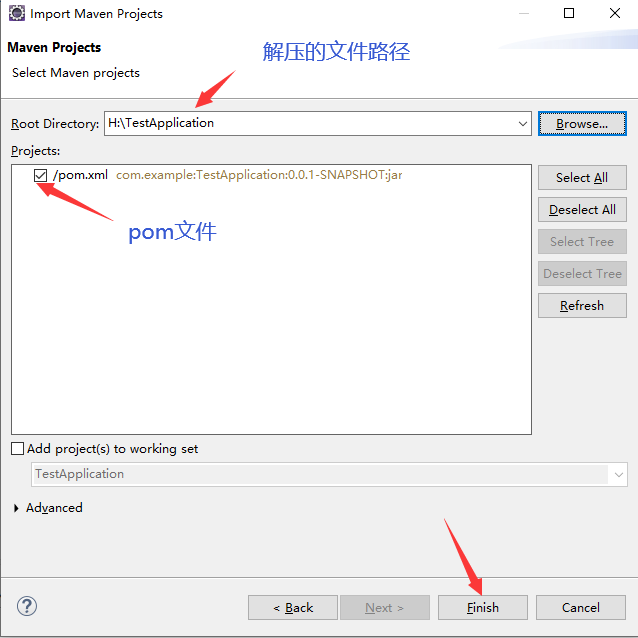
Eclipse导入项目
1.Import一个Maven项目
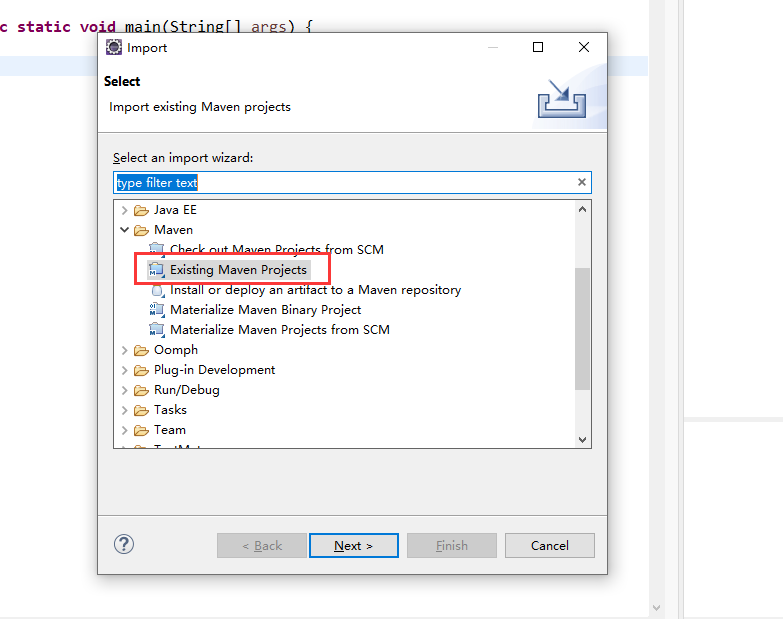
2.选择要导入的文件
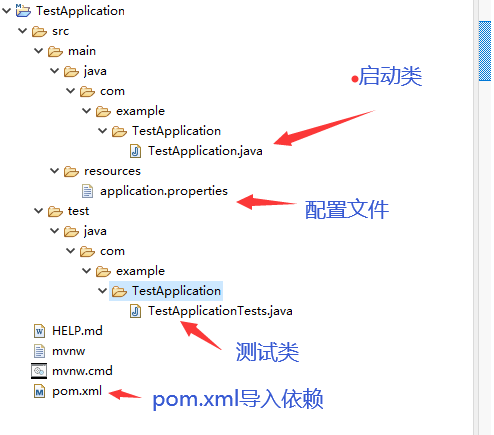
3.项目骨架
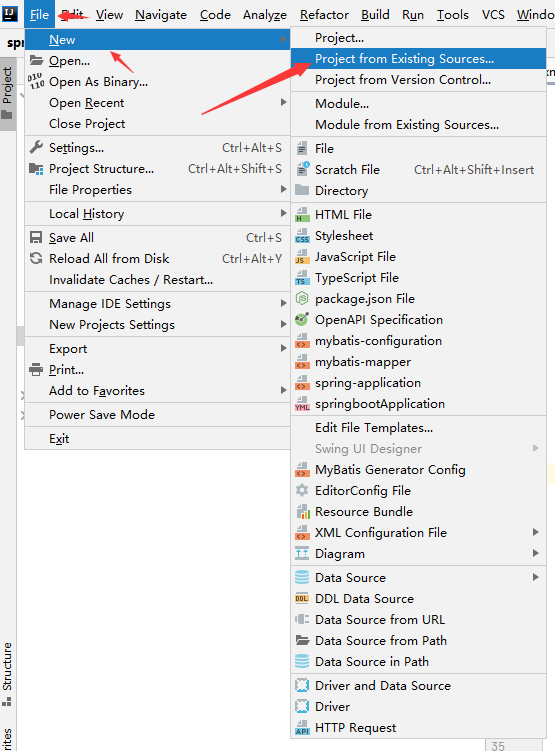
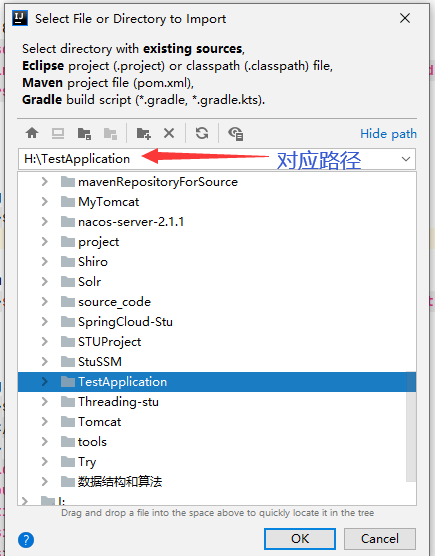
IDEA导入项目
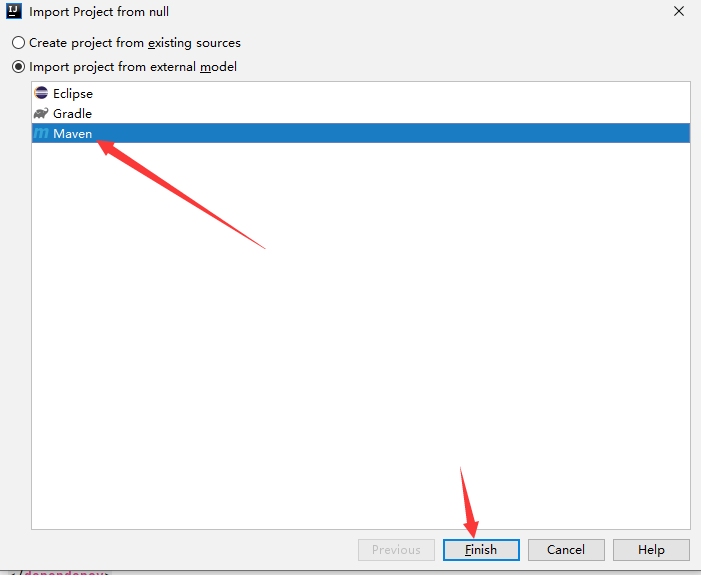
等待依赖下载完毕即可
启动项目
-
直接run启动程序里的Main()方法
-
安装过STS插件或使用STS可以在项目上右键RunAS->Spring Boot APP
运行成功提示信息:

如果运行报错,请参照常见问题。
个性化
修改启动banner
在resources目录下新建banner.txt
http://www.network-science.de/ascii/ 英文
https://www.degraeve.com/img2txt.php 图片
简单使用
application.properties
把所有的配置全放在这个文件里,方便统一管理,maven也可以做到
修改tomcat端口
server.port=90
修改项目路径
server.servlet.context-path=/demo
多个入口main方法,打包之后找不到入库类
<build>
   <plugins>
      <plugin>
          <groupId>org.springframework.boot</groupId>
          <artifactId>spring-boot-maven-plugin</artifactId>
                <configuration>
                    <mainClass>com.xujiakai.MyApp</mainClass>
                </configuration>
            </plugin>
        </plugins>
</build>
HelloWorld
@RestController注解
@RestController = @Controller+@ResponseBody
@Controller
public class MyController{
 @RequestMapping("/hello")
 @ResponseBody
 public Map<String,String> hello(){
     Map<String, String> map = new HashMap<>();
 	map.put("hello", "Hello");
 	map.put("aaa", "bbb");
 	return map;
 }
}
与下面效果一致
@RestController
public class MyAppController {
	@RequestMapping("/")
	public Map<String,String> hello(){
        Map<String, String> map = new HashMap<>();
		map.put("hello", "Hello");
		map.put("aaa", "bbb");
		return map;
    }
}
使用thymeleaf模板引擎
pom.xml引用
<dependency>
    <groupId>org.springframework.boot</groupId>
    <artifactId>spring-boot-starter-thymeleaf</artifactId>
</dependency>
Controller代码
@Controller
public class IndexController {

	@RequestMapping("/")
	public String index(ModelMap map) {
		// 加入一个属性,用来在模板中读取
		map.addAttribute("msg", "nihao~");
		// return模板文件的名称,对应src/main/resources/templates/index.html
		return "index";
	}
模板文件代码
<h1 th:text="${msg}">hi!</h1>
稍微复杂的Restful风格的api应用
UserRestfulController.java
@RequestMapping("/")
@RestController
public class UserRestfulController {

	static Map<Long, User> users = Collections.synchronizedMap(new HashMap<Long,User>());
	@RequestMapping(value="/User",method=RequestMethod.GET)
	public List<User> getUserList(){
		ArrayList<User> list = new ArrayList<>(users.values());
		return 	list;

	}

	@RequestMapping(value="User",method=RequestMethod.POST)
	public String addUser(@ModelAttribute User user) {
		users.put(user.getId(), user);
		return "addUser Success";

	}
}
User.java
public class User {
	private Long id;
	private String loginName;
	private String password;
	private String nickName;
    // 构造方法,Set,Get,toString...
}
注入Service
UserRestfulController.java
@RequestMapping("/")
@RestController
public class UserRestfulController {

    @Autowired
	private UserService userSrv;

	@RequestMapping(value="/User",method=RequestMethod.GET)
	public List<User> getUserList(){

		return 	userSrv.getUserList();
	}

	@RequestMapping(value="User",method=RequestMethod.POST)
	public String addUser(@ModelAttribute User user) {
		String msg = userSrv.addUser(user);
		return msg;

	}
}
UserService.java
@Service
public class UserService {
	static Map<Long, User> users = Collections.synchronizedMap(new HashMap<Long,User>());

	public List<User> getUserList() {
		ArrayList<User> list = new ArrayList<>(users.values());
		return list;
	}

	public String addUser(User user) {
		users.put(user.getId(), user);
		return "addUser Success";
		}
}
前端模板显示
  <h1>User list</h1>

  <table>
    <tr>
      <th>NAME</th>
      <th>loginName</th>
      <th>nickName</th>
    </tr>
    <tr th:each="user : ${list}">
      <td th:text="${user.id}">id</td>
      <td th:text="${user.loginName}">loginName</td>
      <td th:text="${user.nickName}">nickName</td>
    </tr>
  </table>

  <p>
    <a href="../home.html" th:href="@{/}">Return to home</a>
  </p>
常见问题
pom.xml
Springboot项目必须要继承的parent 注意版本尽量一致

缺少或包错误

先删掉然后再重新update
找不到主类

所有错误都解决后
Jar方式运行 首先得有这个jar包
先clean package 生成jar文件,然后再run main方法
找不到jdk
eclipse解决方案:


把jre的路径换成jdk的
IDEA解决方案:

修改Project SDK为自己指定的jdk版本,一般是JDK1.8
启动后自动停止
大概率是你没有引入web的starter

idea 热部署插件JRebel
当开始开发web项目的时候,需要频繁的修改web页面,此时如果频繁的重启变得很麻烦,因此,可以在idea中集成JRebel插件,改动代码之后不需要重新启动应用程序。
1、安装JRebel
(1)在IDEA中一次点击 File->Settings->Plugins->Brows Repositories
(2)在搜索框中输入JRebel进行搜索
(3)找到JRebel for intellij
(4)install
(5)安装好之后需要restart IDEA
2、激活JRebel
JRebel并非是免费的插件,需要激活之后才可以使用
(1)生成一个GUID:https://www.guidgen.com/
(2)根据反向代理服务器地址拼接激活地址: https://jrebel.qekang.com/{GUID}
(3)打开JRebel激活面板,选择Connect to online licensing service.
(4)点击work offline
springboot web开发
springboot在开发web项目的时候具备天然的优势,现在的很多企业级开发都是依托于springboot的。
使用springboot的步骤:
1、创建一个SpringBoot应用,选择我们需要的模块,SpringBoot就会默认将我们的需要的模块自动配置好
2、手动在配置文件中配置部分配置项目就可以运行起来了
3、专注编写业务代码,不需要考虑以前那样一大堆的配置了。
1、springboot整合servlet
很多同学在刚接触web开发的时候第一个接触的都是servlet,下面我们来使用springboot整合servlet
(1)编写servlet类
@WebServlet(name = "myServlet",urlPatterns = "/srv")
public class MyServlet extends HttpServlet {
    @Override
    protected void doGet(HttpServletRequest req, HttpServletResponse resp) throws ServletException, IOException {
        System.out.println("111");
        super.doGet(req, resp);
    }
}
(2)在启动类上添加如下配置
@SpringBootApplication
@ServletComponentScan
public class ConfigApplication {

    public static void main(String[] args) {
        SpringApplication.run(ConfigApplication.class, args);
    }
	/* 或者启动如下方式,servlet上不需要添加注解
    @Bean
    public ServletRegistrationBean<MyServlet> getServletRegistrationBean(){
        ServletRegistrationBean<MyServlet> bean = new ServletRegistrationBean<>(new MyServlet());
         ArrayList<String> url = new ArrayList<>();
        url.add("/srv");
        bean.setUrlMappings(url);
        bean.setLoadOnStartup(1);
        return bean;
    }
    */
}
(3)编写filter类
@WebFilter(filterName = "MyFilter", urlPatterns = "/filter")
public class MyFilter implements Filter {
    @Override
    public void init(FilterConfig filterConfig) throws ServletException {
        System.out.println("init");
    }

    @Override
    public void doFilter(ServletRequest request, ServletResponse response, FilterChain chain) throws IOException, ServletException {
        System.out.println("filter");
        chain.doFilter(request,response);
    }

    @Override
    public void destroy() {
        System.out.println("destory");
    }
}
(4)编写监听器
listener是servlet规范定义的一种特殊类,用于监听servletContext,HttpSession和ServletRequest等域对象的创建和销毁事件。监听域对象的属性发生修改的事件,用于在事件发生前、发生后做一些必要的处理。可用于以下方面:1、统计在线人数和在线用户2、系统启动时加载初始化信息3、统计网站访问量4、记录用户访问路径。
编写监听器类
package com.xujiakai.config;

import javax.servlet.http.HttpSessionEvent;
import javax.servlet.http.HttpSessionListener;

public class MyHttpSessionListener implements HttpSessionListener {

    public static int online=0;

    @Override
    public void sessionCreated(HttpSessionEvent se) {
        System.out.println("创建session");
        online++;
    }

    @Override
    public void sessionDestroyed(HttpSessionEvent se) {
        System.out.println("销毁session");
    }
}
添加到配置类
package com.xujiakai.config;

import org.springframework.boot.web.servlet.ServletListenerRegistrationBean;
import org.springframework.context.annotation.Bean;
import org.springframework.context.annotation.Configuration;
import org.springframework.web.servlet.LocaleResolver;
import org.springframework.web.servlet.config.annotation.EnableWebMvc;
import org.springframework.web.servlet.config.annotation.ViewControllerRegistry;
import org.springframework.web.servlet.config.annotation.WebMvcConfigurer;

@Configuration
public class MyMvcConfig implements WebMvcConfigurer {
    @Bean
    public ServletListenerRegistrationBean listenerRegist(){
        ServletListenerRegistrationBean srb = new ServletListenerRegistrationBean();
        srb.setListener(new MyHttpSessionListener());
        System.out.println("listener");
        return srb;
    }
}
添加控制层代码
package com.xujiakai.controller;

import com.xujiakai.config.MyHttpSessionListener;
import org.springframework.stereotype.Controller;
import org.springframework.web.bind.annotation.RequestMapping;
import org.springframework.web.bind.annotation.ResponseBody;

import javax.servlet.http.HttpServletRequest;
import javax.servlet.http.HttpSession;


@Controller
public class ThymeleafController {
    @RequestMapping("/login")
    public String login(HttpServletRequest request){
        HttpSession session = request.getSession(true);
        return "login";
    }

    @RequestMapping("online")
    @ResponseBody
    public String online(){
        return "当前在线人数:"+MyHttpSessionListener.online +"人";
    }
}
先发送login请求,然后再发送online的请求
2、静态资源的配置
默认情况下,Spring Boot 将在 classpath 或者 ServletContext 根目录下从名为 /static (/public、/resources 或 /META-INF/resources)目录中服务静态内容。它使用了 Spring MVC 的 ResourceHttpRequestHandler,因此您可以通过添加自己的 WebMvcConfigurerAdapter 并重写 addResourceHandlers 方法来修改此行为。
@Override
		public void addResourceHandlers(ResourceHandlerRegistry registry) {
			if (!this.resourceProperties.isAddMappings()) {
				logger.debug("Default resource handling disabled");
				return;
			}
			Duration cachePeriod = this.resourceProperties.getCache().getPeriod();
			CacheControl cacheControl = this.resourceProperties.getCache().getCachecontrol().toHttpCacheControl();
			if (!registry.hasMappingForPattern("/webjars/**")) {
				customizeResourceHandlerRegistration(registry.addResourceHandler("/webjars/**")
						.addResourceLocations("classpath:/META-INF/resources/webjars/")
						.setCachePeriod(getSeconds(cachePeriod)).setCacheControl(cacheControl));
			}
			String staticPathPattern = this.mvcProperties.getStaticPathPattern();
			if (!registry.hasMappingForPattern(staticPathPattern)) {
				customizeResourceHandlerRegistration(registry.addResourceHandler(staticPathPattern)
						.addResourceLocations(getResourceLocations(this.resourceProperties.getStaticLocations()))
						.setCachePeriod(getSeconds(cachePeriod)).setCacheControl(cacheControl));
			}
		}
(1)加载webjars文件
在pom文件中添加jquery的相关依赖,直接可以通过浏览器访问到http://localhost:8080/webjars/jquery/3.4.1/jquery.js
<dependency>
    <groupId>org.webjars</groupId>
    <artifactId>jquery</artifactId>
    <version>3.4.1</version>
</dependency>
(2)加载静态资源
当查找静态资源的时候能够发现静态资源的路径是/**,会去ResourceProperties这个类,可以看到对应的资源目录。
@ConfigurationProperties(prefix = "spring.resources", ignoreUnknownFields = false)
public class ResourceProperties {

	private static final String[] CLASSPATH_RESOURCE_LOCATIONS = { "classpath:/META-INF/resources/",
			"classpath:/resources/", "classpath:/static/", "classpath:/public/" };

	/**
	 * Locations of static resources. Defaults to classpath:[/META-INF/resources/,
	 * /resources/, /static/, /public/].
	 */
	private String[] staticLocations = CLASSPATH_RESOURCE_LOCATIONS;
	private String[] appendSlashIfNecessary(String[] staticLocations) {
		String[] normalized = new String[staticLocations.length];
		for (int i = 0; i < staticLocations.length; i++) {
			String location = staticLocations[i];
			normalized[i] = location.endsWith("/") ? location : location + "/";
		}
		return normalized;
	}
可以看到静态资源的目录一共有如下几个:
“classpath:/resources/”
“classpath:/static/”
“classpath:/public/”
(3)首页的配置信息
@Bean
public WelcomePageHandlerMapping welcomePageHandlerMapping(ApplicationContext applicationContext,
				FormattingConversionService mvcConversionService, ResourceUrlProvider mvcResourceUrlProvider) {
			WelcomePageHandlerMapping welcomePageHandlerMapping = new WelcomePageHandlerMapping(
					new TemplateAvailabilityProviders(applicationContext), applicationContext, getWelcomePage(),
					this.mvcProperties.getStaticPathPattern());
			welcomePageHandlerMapping.setInterceptors(getInterceptors(mvcConversionService, mvcResourceUrlProvider));
			return welcomePageHandlerMapping;
		}

		private Optional<Resource> getWelcomePage() {
			String[] locations = getResourceLocations(this.resourceProperties.getStaticLocations());
			return Arrays.stream(locations).map(this::getIndexHtml).filter(this::isReadable).findFirst();
		}
private Resource getIndexHtml(String location) {
			return this.resourceLoader.getResource(location + "index.html");
		}
3、springmvc的扩展
springmvc框架是一个mvc的web框架,springmvc允许创建@controller和@RestController bean来处理传入的HTTP请求,控制器种的方法通过@RequestMapping注解映射到HTTP。
Springboot提供了适用于大多数Springmvc应用的自动配置。
引入 ContentNegotiatingViewResolver 和 BeanNameViewResolver bean视图解析器。
支持服务静态资源,包括对 WebJar 的支持。
自动注册 Converter(网页传入的数据封装成对象,完成数据类型的转化)、GenericConverter 和 Formatter bean(将日期转换成规定的格式)。
支持 HttpMessageConverter,用来转换http请求和响应。
自动注册 MessageCodesResolver,定义错误代码生成规则。
支持静态 index.html。
支持自定义 Favicon。
自动使用 ConfigurableWebBindingInitializer bean,将请求树绑定到javaBean中。
自动配置了ViewResolver,就是我们之前学习的SpringMVC的视图解析器:即根据方法的返回值取得视图对象(View),然后由视图对象决定如何渲染(转发,重定向)。
//WebMvcAutoConfiguration
@Bean //我们在这里确实看到已经给容器中注册了一个bean
        @ConditionalOnBean({ViewResolver.class})
        @ConditionalOnMissingBean(
            name = {"viewResolver"},
            value = {ContentNegotiatingViewResolver.class}
        )
        public ContentNegotiatingViewResolver viewResolver(BeanFactory beanFactory) {
            ContentNegotiatingViewResolver resolver = new ContentNegotiatingViewResolver();
            resolver.setContentNegotiationManager((ContentNegotiationManager)beanFactory.getBean(ContentNegotiationManager.class));
            resolver.setOrder(-2147483648);
            return resolver;
        }


//ContentNegotiatingViewResolver
@Nullable
    public View resolveViewName(String viewName, Locale locale) throws Exception {
        RequestAttributes attrs = RequestContextHolder.getRequestAttributes();
        Assert.state(attrs instanceof ServletRequestAttributes, "No current ServletRequestAttributes");
        List<MediaType> requestedMediaTypes = this.getMediaTypes(((ServletRequestAttributes)attrs).getRequest());
        if (requestedMediaTypes != null) {
            //获取候选的视图对象
            List<View> candidateViews = this.getCandidateViews(viewName, locale, requestedMediaTypes);
            //选择一个最适合的视图对象,然后把这个对象返回
            View bestView = this.getBestView(candidateViews, requestedMediaTypes, attrs);
            if (bestView != null) {
                return bestView;
            }
        }

        String mediaTypeInfo = this.logger.isDebugEnabled() && requestedMediaTypes != null ? " given " + requestedMediaTypes.toString() : "";
        if (this.useNotAcceptableStatusCode) {
            if (this.logger.isDebugEnabled()) {
                this.logger.debug("Using 406 NOT_ACCEPTABLE" + mediaTypeInfo);
            }

            return NOT_ACCEPTABLE_VIEW;
        } else {
            this.logger.debug("View remains unresolved" + mediaTypeInfo);
            return null;
        }
    }


//getCandidateViews
private List<View> getCandidateViews(String viewName, Locale locale, List<MediaType> requestedMediaTypes)
			throws Exception {

		List<View> candidateViews = new ArrayList<>();
		if (this.viewResolvers != null) {
			Assert.state(this.contentNegotiationManager != null, "No ContentNegotiationManager set");
			for (ViewResolver viewResolver : this.viewResolvers) {
				View view = viewResolver.resolveViewName(viewName, locale);
				if (view != null) {
					candidateViews.add(view);
				}
				for (MediaType requestedMediaType : requestedMediaTypes) {
					List<String> extensions = this.contentNegotiationManager.resolveFileExtensions(requestedMediaType);
					for (String extension : extensions) {
						String viewNameWithExtension = viewName + '.' + extension;
						view = viewResolver.resolveViewName(viewNameWithExtension, locale);
						if (view != null) {
							candidateViews.add(view);
						}
					}
				}
			}
		}
		if (!CollectionUtils.isEmpty(this.defaultViews)) {
			candidateViews.addAll(this.defaultViews);
		}
		return candidateViews;
	}


//initServletContext
@Override
	protected void initServletContext(ServletContext servletContext) {
		Collection<ViewResolver> matchingBeans =
				BeanFactoryUtils.beansOfTypeIncludingAncestors(obtainApplicationContext(), ViewResolver.class).values();
		if (this.viewResolvers == null) {
			this.viewResolvers = new ArrayList<>(matchingBeans.size());
			for (ViewResolver viewResolver : matchingBeans) {
				if (this != viewResolver) {
					this.viewResolvers.add(viewResolver);
				}
			}
		}
		else {
			for (int i = 0; i < this.viewResolvers.size(); i++) {
				ViewResolver vr = this.viewResolvers.get(i);
				if (matchingBeans.contains(vr)) {
					continue;
				}
				String name = vr.getClass().getName() + i;
				obtainApplicationContext().getAutowireCapableBeanFactory().initializeBean(vr, name);
			}

		}
		AnnotationAwareOrderComparator.sort(this.viewResolvers);
		this.cnmFactoryBean.setServletContext(servletContext);
	}
通过上面的代码分析,我们知道了springboot是在容器中去找视图解析器,因此,我们可以给容器自定义添加视图解析器,这个类会帮我们将他组合起来。
//自定义视图解析器
    @Bean //放到bean中
    public ViewResolver myViewResolver(){
        return new MyViewResolver();
    }

    //我们写一个静态内部类,视图解析器就需要实现ViewResolver接口
    private static class MyViewResolver implements ViewResolver{
        @Override
        public View resolveViewName(String s, Locale locale) throws Exception {
            return null;
        }
    }
扩展使用springmvc
/*如果您想保留 Spring Boot MVC 的功能,并且需要添加其他 MVC 配置(interceptor、formatter 和视图控制器等),可以添加自己的 WebMvcConfigurerAdapter 类型的 @Configuration 类,但不能带 @EnableWebMvc 注解。如果您想自定义 RequestMappingHandlerMapping、RequestMappingHandlerAdapter 或者 ExceptionHandlerExceptionResolver 实例,可以声明一个 WebMvcRegistrationsAdapter 实例来提供这些组件。
如果您想完全掌控 Spring MVC,可以添加自定义注解了 @EnableWebMvc 的 @Configuration 配置类
*/
package com.xujiakai.config;

import org.springframework.context.annotation.Configuration;
import org.springframework.web.servlet.config.annotation.ViewControllerRegistry;
import org.springframework.web.servlet.config.annotation.WebMvcConfigurer;

@Configuration
public class MyMvcConfig implements WebMvcConfigurer {
    @Override
    public void addViewControllers(ViewControllerRegistry registry) {
        registry.addViewController("/msb").setViewName("success");
    }
}
注意:需要添加模板引擎
<dependency>
    <groupId>org.thymeleaf</groupId>
    <artifactId>thymeleaf-spring5</artifactId>
</dependency>
<dependency>
    <groupId>org.thymeleaf.extras</groupId>
    <artifactId>thymeleaf-extras-java8time</artifactId>
</dependency>
springboot配置文件详解
在之前的项目开发中,我们可以使用xml,properties进行相关的配置,这种配置方式比较简单,但是在应对复杂的商业需求下,多环境和编程化的配置无法得到满足,因此springboot为我们提供了YAML的配置方式丰富功能和简化开发。
·1、Properties配置详解
通常情况下,我们可以使用properties文件进行相关的配置。
(1)在resources目录下创建application.properties
person.name=zhangsan
person.age=12
person.gender=男
person.desc=my name is ${person.name},my age is ${person.age}
(2)创建对应的实体类对象
@Component
public class Person {
    @Value("${person.name}")
    private String name;
    @Value("${person.age}")
    private int age;
    private String sex;
    @Value("${person.desc}")
    private String desc;

    public Person() {
    }

    public Person(String name, int age, String sex) {
        this.name = name;
        this.age = age;
        this.sex = sex;
    }

    @Override
    public String toString() {
        return "Person{" +
                "name='" + name + '\'' +
                ", age=" + age +
                ", sex='" + sex + '\'' +
                ", desc='" + desc + '\'' +
                '}';
    }
}
(3)创建对应的测试类
@SpringBootTest
class ConfigApplicationTests {

    @Autowired
    Person person;
    @Test
    void contextLoads() {
        System.out.println(person);
    }

}
可以在properties文件中使用随机数
(1)在application.properties文件中添加如下属性
my.secret=${random.value}
my.number=${random.int}
my.bignumber=${random.long}
my.uuid=${random.uuid}
my.number.less.than.ten=${random.int(10)}
my.number.in.range=${random.int[1024,65536]}
(2)创建对应的实体类
@Component
public class My {
    @Value("${my.secret}")
    private String screct;
    @Value("${my.number}")
    private int number;
    @Value("${my.bignumber}")
    private long bignumber;
    @Value("${my.uuid}")
    private UUID uuid;
    @Value("${my.number.less.than.ten}")
    private int lessThanTen;
    @Value("${my.number.in.range}")
    private int numberInRangel;

    @Override
    public String toString() {
        return "My{" +
                "screct=" + screct +
                ", number=" + number +
                ", bignumber=" + bignumber +
                ", uuid=" + uuid +
                ", lessThanTen=" + lessThanTen +
                ", numberInRangel=" + numberInRangel +
                '}';
    }
}
(3)创建对应的测试类
@SpringBootTest
class ConfigApplicationTests {

    @Autowired
    My my;
    @Test
    void contextLoads() {
        System.out.println(my);
    }
}
多环境配置
在实际开发中,我们的一套代码可能会被同时部署到开发、测试、生产等多个服务器中,每个环境中诸如数据库密码等这些个性化配置是避免不了的,虽然我们可以通过自动化运维部署的方式使用外部参数在服务启动时临时替换属性值,但这也意味着运维成本增高。
1、在resources目录下创建多个配置文件
- application-dev.properties
- application-test.properties
- application-prod.properties
- application.properties
spring.profiles.active=dev/test/prod
2、YAML
YAML是“YAML Ain’t Markup Language YAML不是一种标记语言”的外语缩写,但为了强调这种语言以数据做为中心,而不是以置标语言为重点,而用返璞词重新命名。它是一种直观的能够被电脑识别的数据序列化格式,是一个可读性高并且容易被人类阅读,容易和脚本语言交互,用来表达资料序列的编程语言。它是类似于标准通用标记语言的子集XML的数据描述语言,语法比XML简单很多。
基本原则:
1、大小写敏感
2、使用缩进表示层级关系
3、禁止使用tab缩进,只能使用空格键
4、缩进长度没有限制,只要元素对齐就表示这些元素属于一个层级。
5、使用#表示注释
6、字符串可以不用引号标注
(1)使用yaml完成多环境配置:application.yaml
spring:
  profiles:
    active: test
---
spring:
  profiles: dev
server:
  port: 8080
---
spring:
  profiles: test
server:
  port: 8081
(2)使用yaml进行相关参数的设置
person:
  name: zhangsan
  age: 12
  sex: 男
  desc: my name is ${person.name},my age is ${person.age}
对应的实体类对象
@Component
@ConfigurationProperties(prefix = "person")
public class Person {
//    @Value("${person.name}")
    private String name;
//    @Value("${person.age}")
    private int age;
    private String sex;
//    @Value("${person.desc}")
    private String desc;

    public Person() {
    }

    public Person(String name, int age, String sex) {
        this.name = name;
        this.age = age;
        this.sex = sex;
    }

    @Override
    public String toString() {
        return "Person{" +
                "name='" + name + '\'' +
                ", age=" + age +
                ", sex='" + sex + '\'' +
                ", desc='" + desc + '\'' +
                '}';
    }
}
3、@ConfigurationProperties 与 @Value 对比
| 功能 | @ConfigurationProperties | @Value |
|---|---|---|
| 松散绑定 | 是 | 否 |
| 元数据支持 | 是 | 否 |
| spEL表达式 | 否 | 是 |
thymeleaf模板引擎的使用
在早期开发的时候,我们完成的都是静态页面也就是html页面,随着时间轴的发展,慢慢的引入了jsp页面,当在后端服务查询到数据之后可以转发到jsp页面,可以轻松的使用jsp页面来实现数据的显示及交互,jsp有非常强大的功能,但是,在使用springboot的时候,整个项目是以jar包的方式运行而不是war包,而且还嵌入了tomcat容器,因此,在默认情况下是不支持jsp页面的。如果直接以纯静态页面的方式会给我们的开发带来很大的麻烦,springboot推荐使用模板引擎。
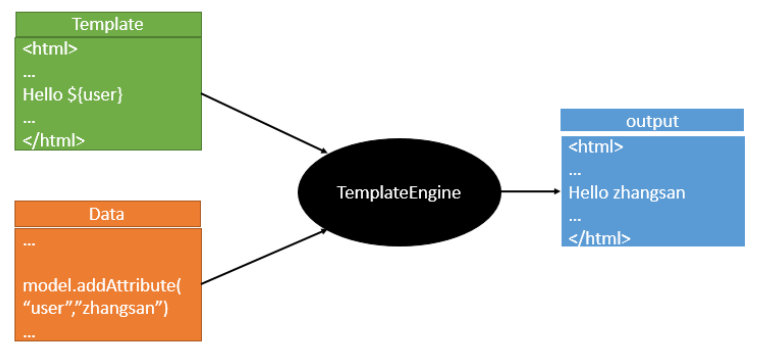
模板引擎有很多种,jsp,freemarker,thymeleaf,模板引擎的作用就是我们来写一个页面模板,比如有些值呢,是动态的,我们写一些表达式。而这些值,从哪来呢,我们来组装一些数据,我们把这些数据找到。然后把这个模板和这个数据交给我们模板引擎,模板引擎按照我们这个数据帮你把这表达式解析、填充到我们指定的位置,然后把这个数据最终生成一个我们想要的内容给我们写出去,这就是我们这个模板引擎,不管是jsp还是其他模板引擎,都是这个思想。只不过不同的模板引擎语法不同而已,下面重点学习下springboot推荐使用的thymeleaf模板引擎,语法简单且功能强大
1、thymeleaf的介绍
官网地址:https://www.thymeleaf.org/
thymeleaf在github的地址:https://github.com/thymeleaf/thymeleaf
中文网站:https://raledong.gitbooks.io/using-thymeleaf/content/
导入依赖:
        <!--thymeleaf模板-->
        <dependency>
            <groupId>org.thymeleaf</groupId>
            <artifactId>thymeleaf-spring5</artifactId>
        </dependency>
        <dependency>
            <groupId>org.thymeleaf.extras</groupId>
            <artifactId>thymeleaf-extras-java8time</artifactId>
        </dependency>
在springboot中有专门的thymeleaf配置类:ThymeleafProperties
@ConfigurationProperties(prefix = "spring.thymeleaf")
public class ThymeleafProperties {
	private static final Charset DEFAULT_ENCODING = StandardCharsets.UTF_8;
	public static final String DEFAULT_PREFIX = "classpath:/templates/";
	public static final String DEFAULT_SUFFIX = ".html";
	/**
	 * Whether to check that the template exists before rendering it.
	 */
	private boolean checkTemplate = true;
	/**
	 * Whether to check that the templates location exists.
	 */
	private boolean checkTemplateLocation = true;
	/**
	 * Prefix that gets prepended to view names when building a URL.
	 */
	private String prefix = DEFAULT_PREFIX;
	/**
	 * Suffix that gets appended to view names when building a URL.
	 */
	private String suffix = DEFAULT_SUFFIX;
	/**
	 * Template mode to be applied to templates. See also Thymeleaf's TemplateMode enum.
	 */
	private String mode = "HTML";
	/**
	 * Template files encoding.
	 */
	private Charset encoding = DEFAULT_ENCODING;
	/**
	 * Whether to enable template caching.
	 */
	private boolean cache = true;
2、thymeleaf使用模板
在java代码中写入如下代码:
    @RequestMapping("/hello")
    public String hello(Model model){
        model.addAttribute("msg","Hello");
        //classpath:/templates/hello.html
        return "hello";
    }
html页面中写入如下代码:
<!DOCTYPE html>
<html lang="en" xmlns:th="http://www.thymeleaf.org">
<body>
<h1>Hello</h1>
<div th:text="${msg}"></div>
</body>
</html>
3、thymeleaf的表达式语法
Simple expressions:
	Variable Expressions: ${...}
	Selection Variable Expressions: *{...}
	Message Expressions: #{...}
	Link URL Expressions: @{...}
	Fragment Expressions: ~{...}
Literals
	Text literals: 'one text', 'Another one!',…
	Number literals: 0, 34, 3.0, 12.3,…
	Boolean literals: true, false
	Null literal: null
	Literal tokens: one, sometext, main,…
Text operations:
	String concatenation: +
	Literal substitutions: |The name is ${name}|
Arithmetic operations:
	Binary operators: +, -, *, /, %
	Minus sign (unary operator): -
	Boolean operations:
	Binary operators: and, or
	Boolean negation (unary operator): !, not
Comparisons and equality:
	Comparators: >, <, >=, <= (gt, lt, ge, le)
	Equality operators: ==, != (eq, ne)
	Conditional operators:
	If-then: (if) ? (then)
	If-then-else: (if) ? (then) : (else)
	Default: (value) ?: (defaultvalue)
Special tokens:
	No-Operation: _

4、thymeleaf实例演示
1、th的常用属性值
一、th:text :设置当前元素的文本内容,相同功能的还有th:utext,两者的区别在于前者不会转义html标签,后者会。优先级不高:order=7
二、th:value:设置当前元素的value值,类似修改指定属性的还有th:src,th:href。优先级不高:order=6
三、th:each:遍历循环元素,和th:text或th:value一起使用。注意该属性修饰的标签位置,详细往后看。优先级很高:order=2
四、th:if:条件判断,类似的还有th:unless,th:switch,th:case。优先级较高:order=3
五、th:insert:代码块引入,类似的还有th:replace,th:include,三者的区别较大,若使用不恰当会破坏html结构,常用于公共代码块提取的场景。优先级最高:order=1
六、th:fragment:定义代码块,方便被th:insert引用。优先级最低:order=8
七、th:object:声明变量,一般和*{}一起配合使用,达到偷懒的效果。优先级一般:order=4
八、th:attr:修改任意属性,实际开发中用的较少,因为有丰富的其他th属性帮忙,类似的还有th:attrappend,th:attrprepend。优先级一般:order=5
thymeleaf.html
<!DOCTYPE html>
<html lang="en" xmlns:th="http://www.thymeleaf.org">
<head>
    <meta charset="UTF-8">
    <title>Title</title>
</head>
<body>
    <p th:text="${thText}"></p>
    <p th:utext="${thUText}"></p>
    <input type="text" th:value="${thValue}">
    <div th:each="message:${thEach}">
        <p th:text="${message}"></p>
    </div>
    <div>
        <p th:text="${message}" th:each="message:${thEach}"></p>
    </div>
    <p th:text="${thIf}" th:if="${not #strings.isEmpty(thIf)}"></p>
    <div th:object="${thObject}">
        <p>name:<span th:text="*{name}"/></p>
        <p>age:<span th:text="*{age}"/></p>
        <p>gender:<span th:text="*{gender}"/></p>
    </div>

</body>
</html>
ThymeleafController.java
package com.xujiakai.controller;

import com.xujiakai.entity.Person;
import org.springframework.stereotype.Controller;
import org.springframework.ui.ModelMap;
import org.springframework.web.bind.annotation.RequestMapping;

@Controller
public class ThymeleafController {

    @RequestMapping("thymeleaf")
    public String thymeleaf(ModelMap map){

        map.put("thText","th:text设置文本内容 <b>加粗</b>");
        map.put("thUText","th:utext 设置文本内容 <b>加粗</b>");
        map.put("thValue","thValue 设置当前元素的value值");
        map.put("thEach","Arrays.asList(\"th:each\", \"遍历列表\")");
        map.put("thIf","msg is not null");
        map.put("thObject",new Person("zhangsan",12,"男"));
        return "thymeleaf";
    }
}
2、标准表达式语法
${…} 变量表达式,Variable Expressions
*{…} 选择变量表达式,Selection Variable Expressions
一、可以获取对象的属性和方法
二、可以使用ctx,vars,locale,request,response,session,servletContext内置对象
session.setAttribute("user","zhangsan");
th:text="${session.user}"
三、可以使用dates,numbers,strings,objects,arrays,lists,sets,maps等内置方法
standardExpression.html
<!--
一、strings:字符串格式化方法,常用的Java方法它都有。比如:equals,equalsIgnoreCase,length,trim,toUpperCase,toLowerCase,indexOf,substring,replace,startsWith,endsWith,contains,containsIgnoreCase等

二、numbers:数值格式化方法,常用的方法有:formatDecimal等

三、bools:布尔方法,常用的方法有:isTrue,isFalse等

四、arrays:数组方法,常用的方法有:toArray,length,isEmpty,contains,containsAll等

五、lists,sets:集合方法,常用的方法有:toList,size,isEmpty,contains,containsAll,sort等

六、maps:对象方法,常用的方法有:size,isEmpty,containsKey,containsValue等

七、dates:日期方法,常用的方法有:format,year,month,hour,createNow等
-->
<!DOCTYPE html>
<html lang="en" xmlns:th="http://www.thymeleaf.org">
<head>
    <meta charset="UTF-8">
    <title>thymeleaf内置方法</title>
</head>
<body>
    <h3>#strings </h3>
    <div th:if="${not #strings.isEmpty(Str)}" >
        <p>Old Str : <span th:text="${Str}"/></p>
        <p>toUpperCase : <span th:text="${#strings.toUpperCase(Str)}"/></p>
        <p>toLowerCase : <span th:text="${#strings.toLowerCase(Str)}"/></p>
        <p>equals : <span th:text="${#strings.equals(Str, 'blog')}"/></p>
        <p>equalsIgnoreCase : <span th:text="${#strings.equalsIgnoreCase(Str, 'blog')}"/></p>
        <p>indexOf : <span th:text="${#strings.indexOf(Str, 'r')}"/></p>
        <p>substring : <span th:text="${#strings.substring(Str, 2, 4)}"/></p>
        <p>replace : <span th:text="${#strings.replace(Str, 'it', 'IT')}"/></p>
        <p>startsWith : <span th:text="${#strings.startsWith(Str, 'it')}"/></p>
        <p>contains : <span th:text="${#strings.contains(Str, 'IT')}"/></p>
    </div>
    <h3>#numbers </h3>
    <div>
        <p>formatDecimal 整数部分随意,小数点后保留两位,四舍五入: <span th:text="${#numbers.formatDecimal(Num, 0, 2)}"/></p>
        <p>formatDecimal 整数部分保留五位数,小数点后保留两位,四舍五入: <span th:text="${#numbers.formatDecimal(Num, 5, 2)}"/></p>
    </div>

    <h3>#bools </h3>
    <div th:if="${#bools.isTrue(Bool)}">
        <p th:text="${Bool}"></p>
    </div>

    <h3>#arrays </h3>
    <div th:if="${not #arrays.isEmpty(Array)}">
        <p>length : <span th:text="${#arrays.length(Array)}"/></p>
        <p>contains : <span th:text="${#arrays.contains(Array,2)}"/></p>
        <p>containsAll : <span th:text="${#arrays.containsAll(Array, Array)}"/></p>
    </div>
    <h3>#lists </h3>
    <div th:if="${not #lists.isEmpty(List)}">
        <p>size : <span th:text="${#lists.size(List)}"/></p>
        <p>contains : <span th:text="${#lists.contains(List, 0)}"/></p>
        <p>sort : <span th:text="${#lists.sort(List)}"/></p>
    </div>
    <h3>#maps </h3>
    <div th:if="${not #maps.isEmpty(hashMap)}">
        <p>size : <span th:text="${#maps.size(hashMap)}"/></p>
        <p>containsKey : <span th:text="${#maps.containsKey(hashMap, 'thName')}"/></p>
        <p>containsValue : <span th:text="${#maps.containsValue(hashMap, '#maps')}"/></p>
    </div>
    <h3>#dates </h3>
    <div>
        <p>format : <span th:text="${#dates.format(Date)}"/></p>
        <p>custom format : <span th:text="${#dates.format(Date, 'yyyy-MM-dd HH:mm:ss')}"/></p>
        <p>day : <span th:text="${#dates.day(Date)}"/></p>
        <p>month : <span th:text="${#dates.month(Date)}"/></p>
        <p>monthName : <span th:text="${#dates.monthName(Date)}"/></p>
        <p>year : <span th:text="${#dates.year(Date)}"/></p>
        <p>dayOfWeekName : <span th:text="${#dates.dayOfWeekName(Date)}"/></p>
        <p>hour : <span th:text="${#dates.hour(Date)}"/></p>
        <p>minute : <span th:text="${#dates.minute(Date)}"/></p>
        <p>second : <span th:text="${#dates.second(Date)}"/></p>
        <p>createNow : <span th:text="${#dates.createNow()}"/></p>
    </div>
</body>
</html>
ThymeleafController.java
 @RequestMapping("standardExpression")
    public String standardExpression(ModelMap map){
        map.put("Str", "Blog");
        map.put("Bool", true);
        map.put("Array", new Integer[]{1,2,3,4});
        map.put("List", Arrays.asList(1,3,2,4,0));
        Map hashMap = new HashMap();
        hashMap.put("thName", "${#...}");
        hashMap.put("desc", "变量表达式内置方法");
        map.put("Map", hashMap);
        map.put("Date", new Date());
        map.put("Num", 888.888D);
        return "standardExpression";
    }
@{…} 链接表达式,Link URL Expressions
<!--
不管是静态资源的引用,form表单的请求,凡是链接都可以用@{...} 。这样可以动态获取项目路径,即便项目名变了,依然可以正常访问
链接表达式结构
无参:@{/xxx}
有参:@{/xxx(k1=v1,k2=v2)} 对应url结构:xxx?k1=v1&k2=v2
引入本地资源:@{/项目本地的资源路径}
引入外部资源:@{/webjars/资源在jar包中的路径}
-->
<link th:href="@{/webjars/bootstrap/4.0.0/css/bootstrap.css}" rel="stylesheet">
<link th:href="@{/main/css/123.css}" rel="stylesheet">
<form class="form-login" th:action="@{/user/login}" th:method="post" >
<a class="btn btn-sm" th:href="@{/login.html(l='zh_CN')}">中文</a>
<a class="btn btn-sm" th:href="@{/login.html(l='en_US')}">English</a>
#{…} 消息表达式,Message Expressions
<!--
消息表达式一般用于国际化的场景。结构:th:text="#{msg}"
-->
~{…} 代码块表达式,Fragment Expressions
fragment.html
<!--
支持两种语法结构
推荐:~{templatename::fragmentname}
支持:~{templatename::#id}
templatename:模版名,Thymeleaf会根据模版名解析完整路:/resources/templates/templatename.html,要注意文件的路径。
fragmentname:片段名,Thymeleaf通过th:fragment声明定义代码块,即:th:fragment="fragmentname"
id:HTML的id选择器,使用时要在前面加上#号,不支持class选择器。
代码块表达式的使用
代码块表达式需要配合th属性(th:insert,th:replace,th:include)一起使用。
th:insert:将代码块片段整个插入到使用了th:insert的HTML标签中,
th:replace:将代码块片段整个替换使用了th:replace的HTML标签中,
th:include:将代码块片段包含的内容插入到使用了th:include的HTML标签中,
-->
<!DOCTYPE html>
<html lang="en" xmlns:th="http://www.thymeleaf.org">
<head>
<meta charset="UTF-8">
<title>Title</title>
</head>
<body>
<!--th:fragment定义代码块标识-->
<footer th:fragment="copy">
2019 The Good Thymes Virtual Grocery
</footer>
<!--三种不同的引入方式-->
<div th:insert="fragment::copy"></div>
<div th:replace="fragment::copy"></div>
<div th:include="fragment::copy"></div>
<!--th:insert是在div中插入代码块,即多了一层div-->
<div>
<footer>
© 2011 The Good Thymes Virtual Grocery
</footer>
</div>
<!--th:replace是将代码块代替当前div,其html结构和之前一致-->
<footer>
© 2011 The Good Thymes Virtual Grocery
</footer>
<!--th:include是将代码块footer的内容插入到div中,即少了一层footer-->
<div>
© 2011 The Good Thymes Virtual Grocery
</div>
</body>
</html>
5、国际化的配置
在很多应用场景下,我们需要实现页面的国际化,springboot对国际化有很好的支持, 下面来演示对应的效果。
1、在idea中设置统一的编码格式,file->settings->Editors->File Encoding,选择编码格式为utf-8
2、在resources资源文件下创建一个i8n的目录,创建一个login.properties的文件,还有login_zh_CN.properties,idea会自动识别国际化操作
3、创建三个不同的文件,名称分别是:login.properties,login_en_US.properties,login_zh_CN.properties
内容如下:
#login.properties
login.password=密码1
login.remmber=记住我1
login.sign=登录1
login.username=用户名1
#login_en_US.properties
login.password=Password
login.remmber=Remember Me
login.sign=Sign In
login.username=Username
#login_zh_CN.properties
login.password=密码~
login.remmber=记住我~
login.sign=登录~
login.username=用户名~
4、配置国际化的资源路径
spring:
  messages:
    basename: i18n/login
5、编写html页面
初始html页面
<!DOCTYPE html>
<html lang="en" xmlns:th="http://www.thymeleaf.org">
    <head>
        <meta charset="UTF-8"/>
        <title>Title</title>
    </head>
    <body>
        <form action="" method="post">

            <label >Username</label>
            <input type="text"  name="username"  placeholder="Username" >
            <label >Password</label>
            <input type="password" name="password" placeholder="Password" >
            <br> <br>
            <div>
                <label>
                    <input type="checkbox" value="remember-me"/> Remember Me
                </label>
            </div>
            <br>
            <button  type="submit">Sign in</button>
            <br> <br>
            <a>中文</a>
            <a>English</a>
        </form>
    </body>
</html>

修改后的页面
<!DOCTYPE html>
<html lang="en" xmlns:th="http://www.thymeleaf.org">
    <head>
        <meta charset="UTF-8"/>
        <title>Title</title>
    </head>
    <body>
        <form action="" method="post">
            <label th:text="#{login.username}">Username</label>
            <input type="text"  name="username"  placeholder="Username" th:placeholder="#{login.username}">
            <label th:text="#{login.password}">Password</label>
            <input type="password" name="password" placeholder="Password" th:placeholder="#{login.password}">
            <br> <br>
            <div>
                <label>
                    <input type="checkbox" value="remember-me"/> [[#{login.remmber}]]
                </label>
            </div>
            <br>
            <button  type="submit" th:text="#{login.sign}">Sign in</button>
            <br> <br>
            <a>中文</a>
            <a>English</a>
        </form>
    </body>
</html>
可以看到通过浏览器的切换语言已经能够实现,想要通过超链接实现的话,如下所示:
添加WebMVCConfig.java代码
package com.xujiakai.config;

import org.springframework.context.annotation.Bean;
import org.springframework.context.annotation.Configuration;
import org.springframework.util.StringUtils;
import org.springframework.web.servlet.LocaleResolver;
import org.springframework.web.servlet.config.annotation.ViewControllerRegistry;
import org.springframework.web.servlet.config.annotation.WebMvcConfigurer;

import javax.servlet.http.HttpServletRequest;
import javax.servlet.http.HttpServletResponse;
import java.util.Locale;

@Configuration
public class WebMVCConfig implements WebMvcConfigurer {

    @Override
    public void addViewControllers(ViewControllerRegistry registry) {
        registry.addViewController("/").setViewName("login");
        registry.addViewController("/login.html").setViewName("login");
    }

    @Bean
    public LocaleResolver localeResolver(){
        return new NativeLocaleResolver();
    }

    protected static class NativeLocaleResolver implements LocaleResolver{

        @Override
        public Locale resolveLocale(HttpServletRequest request) {
            String language = request.getParameter("language");
            Locale locale = Locale.getDefault();
            if(!StringUtils.isEmpty(language)){
                String[] split = language.split("_");
                locale = new Locale(split[0],split[1]);
            }
            return locale;
        }

        @Override
        public void setLocale(HttpServletRequest request, HttpServletResponse response, Locale locale) {

        }
    }
}
login.html页面修改为:
<!DOCTYPE html>
<html lang="en" xmlns:th="http://www.thymeleaf.org">
<head>
    <meta charset="UTF-8"/>
    <title>Title</title>
</head>
<body>
<form action="" method="post">
    <label th:text="#{login.username}">Username</label>
    <input type="text"  name="username"  placeholder="Username" th:placeholder="#{login.username}">
    <label th:text="#{login.password}">Password</label>
    <input type="password" name="password" placeholder="Password" th:placeholder="#{login.password}">
    <br> <br>
    <div>
        <label>
            <input type="checkbox" value="remember-me"/> [[#{login.remmber}]]
        </label>
    </div>
    <br>
    <button  type="submit" th:text="#{login.sign}">Sign in</button>
    <br> <br>
    <a th:href="@{/login.html(language='zh_CN')}">中文</a>
    <a th:href="@{/login.html(language='en_US')}">English</a>
</form>
</body>
</html>
国际化的源码解释:
//MessageSourceAutoConfiguration
public class MessageSourceAutoConfiguration {
    private static final Resource[] NO_RESOURCES = new Resource[0];

    public MessageSourceAutoConfiguration() {
    }

    @Bean
    @ConfigurationProperties(prefix = "spring.messages") //我们的配置文件可以直接放在类路径下叫: messages.properties, 就可以进行国际化操作了
    public MessageSourceProperties messageSourceProperties() {
        return new MessageSourceProperties();
    }

    @Bean
    public MessageSource messageSource(MessageSourceProperties properties) {
        ResourceBundleMessageSource messageSource = new ResourceBundleMessageSource();
        if (StringUtils.hasText(properties.getBasename())) {
        //设置国际化文件的基础名(去掉语言国家代码的)
            messageSource.setBasenames(StringUtils.commaDelimitedListToStringArray(StringUtils.trimAllWhitespace(properties.getBasename())));
        }

        if (properties.getEncoding() != null) {
            messageSource.setDefaultEncoding(properties.getEncoding().name());
        }

        messageSource.setFallbackToSystemLocale(properties.isFallbackToSystemLocale());
        Duration cacheDuration = properties.getCacheDuration();
        if (cacheDuration != null) {
            messageSource.setCacheMillis(cacheDuration.toMillis());
        }

        messageSource.setAlwaysUseMessageFormat(properties.isAlwaysUseMessageFormat());
        messageSource.setUseCodeAsDefaultMessage(properties.isUseCodeAsDefaultMessage());
        return messageSource;
    }
}


//WebMvcAutoConfiguration
		@Bean
		@ConditionalOnMissingBean
		@ConditionalOnProperty(prefix = "spring.mvc", name = "locale")
		public LocaleResolver localeResolver() {
			if (this.mvcProperties.getLocaleResolver() == WebMvcProperties.LocaleResolver.FIXED) {
				return new FixedLocaleResolver(this.mvcProperties.getLocale());
			}
			AcceptHeaderLocaleResolver localeResolver = new AcceptHeaderLocaleResolver();
			localeResolver.setDefaultLocale(this.mvcProperties.getLocale());
			return localeResolver;
		}

//AcceptHeaderLocaleResolver
	@Override
	public Locale resolveLocale(HttpServletRequest request) {
		Locale defaultLocale = getDefaultLocale();
		if (defaultLocale != null && request.getHeader("Accept-Language") == null) {
			return defaultLocale;
		}
		Locale requestLocale = request.getLocale();
		List<Locale> supportedLocales = getSupportedLocales();
		if (supportedLocales.isEmpty() || supportedLocales.contains(requestLocale)) {
			return requestLocale;
		}
		Locale supportedLocale = findSupportedLocale(request, supportedLocales);
		if (supportedLocale != null) {
			return supportedLocale;
		}
		return (defaultLocale != null ? defaultLocale : requestLocale);
	}
springboot配置数据源
Spring Framework 为 SQL 数据库提供了广泛的支持。从直接使用 JdbcTemplate 进行 JDBC 访问到完全的对象关系映射(object relational mapping)技术,比如 Hibernate。Spring Data 提供了更多级别的功能,直接从接口创建的 Repository 实现,并使用了约定从方法名生成查询。
1、JDBC
1、创建项目,导入需要的依赖
        <dependency>
            <groupId>org.springframework.boot</groupId>
            <artifactId>spring-boot-starter-jdbc</artifactId>
        </dependency>
 		<dependency>
            <groupId>mysql</groupId>
            <artifactId>mysql-connector-java</artifactId>
            <scope>runtime</scope>
        </dependency>
2、配置数据源
spring:
  datasource:
    username: root
    password: 123456
    url: jdbc:mysql://loclhost:3306/test?serverTimezone=UTC&useUnicode=true@characterEncoding=utf-8
    driver-class-name: com.mysql.jdbc.Driver
3、测试类代码
package com.xujiakai;

import org.junit.jupiter.api.Test;
import org.springframework.beans.factory.annotation.Autowired;
import org.springframework.boot.test.context.SpringBootTest;

import javax.sql.DataSource;
import java.sql.Connection;
import java.sql.SQLException;

@SpringBootTest
class DataApplicationTests {

    @Autowired
    DataSource dataSource;

    @Test
    void contextLoads() throws SQLException {
        System.out.println(dataSource.getClass());
        Connection connection = dataSource.getConnection();
        System.out.println(connection);
        connection.close();
    }

}
//可以看到默认配置的数据源为class com.zaxxer.hikari.HikariDataSource,我们没有经过任何配置,说明springboot默认情况下支持的就是这种数据源,可以在DataSourceProperties.java文件中查看具体的属性配置
4、crud操作
1、有了数据源(com.zaxxer.hikari.HikariDataSource),然后可以拿到数据库连接(java.sql.Connection),有了连接,就可以使用连接和原生的 JDBC 语句来操作数据库
2、即使不使用第三方第数据库操作框架,如 MyBatis等,Spring 本身也对原生的JDBC 做了轻量级的封装,即 org.springframework.jdbc.core.JdbcTemplate。
3、数据库操作的所有 CRUD 方法都在 JdbcTemplate 中。
4、Spring Boot 不仅提供了默认的数据源,同时默认已经配置好了 JdbcTemplate 放在了容器中,程序员只需自己注入即可使用
5、JdbcTemplate 的自动配置原理是依赖 org.springframework.boot.autoconfigure.jdbc 包下的 org.springframework.boot.autoconfigure.jdbc.JdbcTemplateAutoConfiguration 类
package com.xujiakai.contoller;

import org.springframework.beans.factory.annotation.Autowired;
import org.springframework.jdbc.core.JdbcTemplate;
import org.springframework.web.bind.annotation.GetMapping;
import org.springframework.web.bind.annotation.PathVariable;
import org.springframework.web.bind.annotation.RestController;

import java.util.List;
import java.util.Map;

@RestController
public class JDBCController {

    @Autowired
    JdbcTemplate jdbcTemplate;

    @GetMapping("/emplist")
    public List<Map<String,Object>> empList(){
        String sql = "select * from emp";
        List<Map<String, Object>> maps = jdbcTemplate.queryForList(sql);
        return maps;
    }

    @GetMapping("/addEmp")
    public String addUser(){
        String sql = "insert into emp(empno,ename) values(1111,'zhangsan')";
        jdbcTemplate.update(sql);
        return "success";
    }

    @GetMapping("/updateEmp/{id}")
    public String updateEmp(@PathVariable("id") Integer id){
        String sql = "update emp set ename=? where empno = "+id;
        String name = "list";
        jdbcTemplate.update(sql,name);
        return "update success";
    }

    @GetMapping("/deleteEmp/{id}")
    public String deleteEmp(@PathVariable("id")Integer id){
        String sql = "delete from emp where empno = "+id;
        jdbcTemplate.update(sql);
        return "delete success";
    }
}
2、自定义数据源DruidDataSource
通过源码查看DataSourceAutoConfiguration.java
@Configuration(proxyBeanMethods = false)
@ConditionalOnClass({ DataSource.class, EmbeddedDatabaseType.class })
@EnableConfigurationProperties(DataSourceProperties.class)
@Import({ DataSourcePoolMetadataProvidersConfiguration.class, DataSourceInitializationConfiguration.class })
public class DataSourceAutoConfiguration {

	@Configuration(proxyBeanMethods = false)
	@Conditional(EmbeddedDatabaseCondition.class)
	@ConditionalOnMissingBean({ DataSource.class, XADataSource.class })
	@Import(EmbeddedDataSourceConfiguration.class)
	protected static class EmbeddedDatabaseConfiguration {

	}

	@Configuration(proxyBeanMethods = false)
	@Conditional(PooledDataSourceCondition.class)
	@ConditionalOnMissingBean({ DataSource.class, XADataSource.class })
	@Import({ DataSourceConfiguration.Hikari.class, DataSourceConfiguration.Tomcat.class,
			DataSourceConfiguration.Dbcp2.class, DataSourceConfiguration.Generic.class,
			DataSourceJmxConfiguration.class })
	protected static class PooledDataSourceConfiguration {

	}

	/**
	 * {@link AnyNestedCondition} that checks that either {@code spring.datasource.type}
	 * is set or {@link PooledDataSourceAvailableCondition} applies.
	 */
	static class PooledDataSourceCondition extends AnyNestedCondition {

		PooledDataSourceCondition() {
			super(ConfigurationPhase.PARSE_CONFIGURATION);
		}

		@ConditionalOnProperty(prefix = "spring.datasource", name = "type")
		static class ExplicitType {

		}

		@Conditional(PooledDataSourceAvailableCondition.class)
		static class PooledDataSourceAvailable {

		}

	}
1、添加druid的maven配置
<dependency>
    <groupId>com.alibaba</groupId>
    <artifactId>druid</artifactId>
    <version>1.1.12</version>
</dependency>
2、添加数据源的配置
spring:
  datasource:
    username: root
    password: 123456
    url: jdbc:mysql://loclhost:3306/demo?serverTimezone=UTC&useUnicode=true@characterEncoding=utf-8
    driver-class-name: com.mysql.jdbc.Driver
    type: com.alibaba.druid.pool.DruidDataSource
3、测试发现数据源已经更改
4、druid是数据库连接池,可以添加druid的独有配置
spring:
  datasource:
    username: root
    password: 123456
    url: jdbc:mysql://loclhost:3306/demo?serverTimezone=UTC&useUnicode=true@characterEncoding=utf-8
    driver-class-name: com.mysql.jdbc.Driver
    type: com.alibaba.druid.pool.DruidDataSource
    #Spring Boot 默认是不注入这些属性值的,需要自己绑定
    #druid 数据源专有配置
    initialSize: 5
    minIdle: 5
    maxActive: 20
    maxWait: 60000
    timeBetweenEvictionRunsMillis: 60000
    minEvictableIdleTimeMillis: 300000
    validationQuery: SELECT 1 FROM DUAL
    testWhileIdle: true
    testOnBorrow: false
    testOnReturn: false
    poolPreparedStatements: true

    #配置监控统计拦截的filters,stat:监控统计、log4j:日志记录、wall:防御sql注入
    #如果允许时报错  java.lang.ClassNotFoundException: org.apache.log4j.Priority
    #则导入 log4j 依赖即可,Maven 地址: https://mvnrepository.com/artifact/log4j/log4j
    filters: stat,wall,log4j
    maxPoolPreparedStatementPerConnectionSize: 20
    useGlobalDataSourceStat: true
    connectionProperties: druid.stat.mergeSql=true;druid.stat.slowSqlMillis=500
测试类,发现配置的参数没有生效
package com.xujiakai;

import com.alibaba.druid.pool.DruidDataSource;
import org.junit.jupiter.api.Test;
import org.springframework.beans.factory.annotation.Autowired;
import org.springframework.boot.test.context.SpringBootTest;

import javax.sql.DataSource;
import java.sql.Connection;
import java.sql.SQLException;

@SpringBootTest
class DataApplicationTests {

    @Autowired
    DataSource dataSource;

    @Test
    void contextLoads() throws SQLException {
        System.out.println(dataSource.getClass());
        Connection connection = dataSource.getConnection();
        System.out.println(connection);

        DruidDataSource druidDataSource = (DruidDataSource)dataSource;
        System.out.println(druidDataSource.getMaxActive());
        System.out.println(druidDataSource.getInitialSize());
        connection.close();
    }

}
需要定义druidDatasource的配置类,绑定参数
package com.xujiakai.config;

import com.alibaba.druid.pool.DruidDataSource;
import org.springframework.boot.context.properties.ConfigurationProperties;
import org.springframework.context.annotation.Bean;
import org.springframework.context.annotation.Configuration;

import javax.sql.DataSource;

@Configuration
public class DruidConfig {
    @ConfigurationProperties(prefix = "spring.datasource")
    @Bean
    public DataSource druidDataSource(){
        return new DruidDataSource();
    }
}
Druid数据源还具有监控的功能,并提供了一个web界面方便用户进行查看。
加入log4j的日志依赖
        <!-- https://mvnrepository.com/artifact/log4j/log4j -->
        <dependency>
            <groupId>log4j</groupId>
            <artifactId>log4j</artifactId>
            <version>1.2.17</version>
        </dependency>
向DruidConfig中添加代码,配置druid监控管理台的servlet
package com.xujiakai.config;

import com.alibaba.druid.pool.DruidDataSource;
import com.alibaba.druid.support.http.StatViewServlet;
import com.alibaba.druid.support.http.WebStatFilter;
import org.springframework.boot.context.properties.ConfigurationProperties;
import org.springframework.boot.web.servlet.FilterRegistrationBean;
import org.springframework.boot.web.servlet.ServletRegistrationBean;
import org.springframework.context.annotation.Bean;
import org.springframework.context.annotation.Configuration;

import javax.servlet.Servlet;
import javax.sql.DataSource;
import java.util.Arrays;
import java.util.HashMap;
import java.util.Map;

@Configuration
public class DruidConfig {
    @ConfigurationProperties(prefix = "spring.datasource")
    @Bean
    public DataSource druidDataSource(){
        return new DruidDataSource();
    }

    @Bean
    public ServletRegistrationBean druidServletRegistrationBean(){
        ServletRegistrationBean<Servlet> servletRegistrationBean = new ServletRegistrationBean<>(new StatViewServlet(),"/druid/*");
        Map<String,String> initParams = new HashMap<>();
        initParams.put("loginUsername","admin");
        initParams.put("loginPassword","123456");
        //后台允许谁可以访问
        //initParams.put("allow", "localhost"):表示只有本机可以访问
        //initParams.put("allow", ""):为空或者为null时,表示允许所有访问
        initParams.put("allow","");
        //deny:Druid 后台拒绝谁访问
        //initParams.put("msb", "192.168.1.20");表示禁止此ip访问

        servletRegistrationBean.setInitParameters(initParams);
        return servletRegistrationBean;
    }

    //配置 Druid 监控 之  web 监控的 filter
    //WebStatFilter:用于配置Web和Druid数据源之间的管理关联监控统计
    @Bean
    public FilterRegistrationBean webStatFilter() {
        FilterRegistrationBean bean = new FilterRegistrationBean();
        bean.setFilter(new WebStatFilter());

        //exclusions:设置哪些请求进行过滤排除掉,从而不进行统计
        Map<String, String> initParams = new HashMap<>();
        initParams.put("exclusions", "*.js,*.css,/druid/*");
        bean.setInitParameters(initParams);

        //"/*" 表示过滤所有请求
        bean.setUrlPatterns(Arrays.asList("/*"));
        return bean;
    }
}
3、springboot配置多数据源并动态切换
DataSource是和线程绑定的,动态数据源的配置主要是通过继承AbstractRoutingDataSource类实现的,实现在AbstractRoutingDataSource类中的 protected Object determineCurrentLookupKey()方法来获取数据源,所以我们需要先创建一个多线程线程数据隔离的类来存放DataSource,然后在determineCurrentLookupKey()方法中通过这个类获取当前线程的DataSource,在AbstractRoutingDataSource类中,DataSource是通过Key-value的方式保存的,我们可以通过ThreadLocal来保存Key,从而实现数据源的动态切换。
1、修改配置文件类
spring:
  datasource:
    local:
      username: root
      password: 123456
      driver-class-name: com.mysql.jdbc.Driver
      jdbc-url: jdbc:mysql://localhost:3306/demo?serverTimezone=UTC&useUnicode=true@characterEncoding=utf-8
    remote:
      username: root
      password: 123456
      driver-class-name: com.mysql.jdbc.Driver
      jdbc-url: jdbc:mysql://loclhost:3306/demo?serverTimezone=UTC&useUnicode=true@characterEncoding=utf-8
2、创建数据源枚举类
package com.xujiakai.expansions;

public enum DataSourceType {
    REMOTE,
    LOCAL
}
3、数据源切换处理
创建一个数据源切换处理类,有对数据源变量的获取、设置和情况的方法,其中threadlocal用于保存某个线程共享变量。
package com.xujiakai.expansions;

public class DynamicDataSourceContextHolder {

    /**
     * 使用ThreadLocal维护变量,ThreadLocal为每个使用该变量的线程提供独立的变量副本,
     *  所以每一个线程都可以独立地改变自己的副本,而不会影响其它线程所对应的副本。
     */
    private static final ThreadLocal<String> CONTEXT_HOLDER = new ThreadLocal<>();

    /**
     * 设置数据源变量
     * @param dataSourceType
     */
    public static void setDataSourceType(String dataSourceType){
        System.out.printf("切换到{%s}数据源", dataSourceType);
        CONTEXT_HOLDER.set(dataSourceType);
    }

    /**
     * 获取数据源变量
     * @return
     */
    public static String getDataSourceType(){
        return CONTEXT_HOLDER.get();
    }

    /**
     * 清空数据源变量
     */
    public static void clearDataSourceType(){
        CONTEXT_HOLDER.remove();
    }
}
4、继承AbstractRoutingDataSource
动态切换数据源主要依靠AbstractRoutingDataSource。创建一个AbstractRoutingDataSource的子类,重写determineCurrentLookupKey方法,用于决定使用哪一个数据源。这里主要用到AbstractRoutingDataSource的两个属性defaultTargetDataSource和targetDataSources。defaultTargetDataSource默认目标数据源,targetDataSources(map类型)存放用来切换的数据源。
package com.xujiakai.expansions;

import org.springframework.jdbc.datasource.lookup.AbstractRoutingDataSource;

import javax.sql.DataSource;
import java.util.Map;

public class DynamicDataSource extends AbstractRoutingDataSource {

    public DynamicDataSource(DataSource defaultTargetDataSource, Map<Object, Object> targetDataSources) {
        super.setDefaultTargetDataSource(defaultTargetDataSource);
        super.setTargetDataSources(targetDataSources);
        // afterPropertiesSet()方法调用时用来将targetDataSources的属性写入resolvedDataSources中的
        super.afterPropertiesSet();
    }

    /**
     * 根据Key获取数据源的信息
     *
     * @return
     */
    @Override
    protected Object determineCurrentLookupKey() {
        return DynamicDataSourceContextHolder.getDataSourceType();
    }
}
5、注入数据源
package com.xujiakai.expansions;

import org.springframework.boot.autoconfigure.condition.ConditionalOnProperty;
import org.springframework.boot.context.properties.ConfigurationProperties;
import org.springframework.boot.jdbc.DataSourceBuilder;
import org.springframework.context.annotation.Bean;
import org.springframework.context.annotation.Configuration;
import org.springframework.context.annotation.Primary;

import javax.sql.DataSource;
import java.util.HashMap;
import java.util.Map;

@Configuration
public class DataSourceConfig {
    @Bean
    @ConfigurationProperties("spring.datasource.remote")
    public DataSource remoteDataSource() {
        return DataSourceBuilder.create().build();
    }

    @Bean
    @ConfigurationProperties("spring.datasource.local")
    public DataSource localDataSource() {
        return DataSourceBuilder.create().build();
    }

    @Bean(name = "dynamicDataSource")
    @Primary
    public DynamicDataSource dataSource(DataSource remoteDataSource, DataSource localDataSource) {
        Map<Object, Object> targetDataSources = new HashMap<>();
        targetDataSources.put(DataSourceType.REMOTE.name(), remoteDataSource);
        targetDataSources.put(DataSourceType.LOCAL.name(), localDataSource);
        return new DynamicDataSource(remoteDataSource, targetDataSources);
    }
}
6、自定义多数据源切换注解
设置拦截数据源的注解,可以设置在具体的类上,或者在具体的方法上
package com.xujiakai.expansions;

import java.lang.annotation.*;

@Target(ElementType.METHOD)
@Retention(RetentionPolicy.RUNTIME)
@Documented
public @interface DataSource {
    /**
     * 切换数据源名称
     */
    DataSourceType value() default DataSourceType.REMOTE;
}
7、AOP拦截类的实现
通过拦截上面的注解,在其执行之前处理设置当前执行SQL的数据源的信息,CONTEXT_HOLDER.set(dataSourceType)这里的数据源信息从我们设置的注解上面获取信息,如果没有设置就是用默认的数据源的信息。
package com.xujiakai.expansions;

import org.aspectj.lang.ProceedingJoinPoint;
import org.aspectj.lang.annotation.Around;
import org.aspectj.lang.annotation.Aspect;
import org.aspectj.lang.annotation.Pointcut;
import org.aspectj.lang.reflect.MethodSignature;
import org.springframework.core.annotation.Order;
import org.springframework.stereotype.Component;

import java.lang.reflect.Method;

@Aspect
@Order(1)
@Component
public class DataSourceAspect {

    @Pointcut("@annotation(com.xujiakai.expansions.DataSource)")
    public void dsPointCut() {

    }

    @Around("dsPointCut()")
    public Object around(ProceedingJoinPoint point) throws Throwable {
        MethodSignature signature = (MethodSignature) point.getSignature();
        Method method = signature.getMethod();
        DataSource dataSource = method.getAnnotation(DataSource.class);
        if (dataSource != null) {
            DynamicDataSourceContextHolder.setDataSourceType(dataSource.value().name());
        }
        try {
            return point.proceed();
        } finally {
            // 销毁数据源 在执行方法之后
            DynamicDataSourceContextHolder.clearDataSourceType();
        }
    }
}
8、使用切换数据源注解
package com.xujiakai.expansions;

import org.springframework.beans.factory.annotation.Autowired;
import org.springframework.jdbc.core.JdbcTemplate;
import org.springframework.web.bind.annotation.GetMapping;
import org.springframework.web.bind.annotation.RestController;

import java.util.List;
import java.util.Map;


@RestController
public class EmpController {

    @Autowired
    JdbcTemplate jdbcTemplate;

    @GetMapping("/local")
    @DataSource(value = DataSourceType.LOCAL)
    public List<Map<String, Object>> local(){
        List<Map<String, Object>> maps = jdbcTemplate.queryForList("select * from emp");
        return maps;
    }
    @GetMapping("/remote")
    @DataSource(value = DataSourceType.REMOTE)
    public List<Map<String, Object>> remote(){
        List<Map<String, Object>> maps = jdbcTemplate.queryForList("select * from emp");
        return maps;
    }

}
9、在启动项目的过程中会发生循环依赖的问题,直接修改启动类即可
package com.xujiakai;

import org.springframework.boot.SpringApplication;
import org.springframework.boot.autoconfigure.SpringBootApplication;
import org.springframework.boot.autoconfigure.jdbc.DataSourceAutoConfiguration;

@SpringBootApplication(exclude = DataSourceAutoConfiguration.class)
public class SpringbootDataApplication {

    public static void main(String[] args) {
        SpringApplication.run(SpringbootDataApplication.class, args);
    }
}
4、springboot整合mybatis
1、导入mybatis的依赖
<!-- https://mvnrepository.com/artifact/org.mybatis.spring.boot/mybatis-spring-boot-starter -->
<dependency>
    <groupId>org.mybatis.spring.boot</groupId>
    <artifactId>mybatis-spring-boot-starter</artifactId>
    <version>2.1.1</version>
</dependency>
2、配置数据源
spring:
  datasource:
    username: root
    password: 123456
    url: jdbc:mysql://loclhost:3306/demo?serverTimezone=UTC&useUnicode=true@characterEncoding=utf-8
    driver-class-name: com.mysql.jdbc.Driver
3、测试类
package com.xujiakai;

import com.alibaba.druid.pool.DruidDataSource;
import org.junit.jupiter.api.Test;
import org.springframework.beans.factory.annotation.Autowired;
import org.springframework.boot.test.context.SpringBootTest;

import javax.sql.DataSource;
import java.sql.Connection;
import java.sql.SQLException;

@SpringBootTest
class DataApplicationTests {

    @Autowired
    DataSource dataSource;

    @Test
    void contextLoads() throws SQLException {
        System.out.println(dataSource.getClass());
        Connection connection = dataSource.getConnection();
        System.out.println(connection);
        System.out.println(connection.getMetaData().getURL());

        connection.close();
    }
}
4、创建实体类
package com.xujiakai.entity;

import java.sql.Date;
import java.util.Objects;

public class Emp {
    private Integer empno;
    private String ename;
    private String job;
    private Integer mgr;
    private Date hiredate;
    private Double sal;
    private Double comm;
    private Integer deptno;

    public Emp() {
    }

    public Emp(Integer empno, String ename) {
        this.empno = empno;
        this.ename = ename;
    }

    public Emp(Integer empno, String ename, String job, Integer mgr, Date hiredate, Double sal, Double comm, Integer deptno) {
        this.empno = empno;
        this.ename = ename;
        this.job = job;
        this.mgr = mgr;
        this.hiredate = hiredate;
        this.sal = sal;
        this.comm = comm;
        this.deptno = deptno;
    }

    public Integer getEmpno() {
        return empno;
    }

    public void setEmpno(Integer empno) {
        this.empno = empno;
    }

    public String getEname() {
        return ename;
    }

    public void setEname(String ename) {
        this.ename = ename;
    }

    public String getJob() {
        return job;
    }

    public void setJob(String job) {
        this.job = job;
    }

    public Integer getMgr() {
        return mgr;
    }

    public void setMgr(Integer mgr) {
        this.mgr = mgr;
    }

    public Date getHiredate() {
        return hiredate;
    }

    public void setHiredate(Date hiredate) {
        this.hiredate = hiredate;
    }

    public Double getSal() {
        return sal;
    }

    public void setSal(Double sal) {
        this.sal = sal;
    }

    public Double getComm() {
        return comm;
    }

    public void setComm(Double comm) {
        this.comm = comm;
    }

    public Integer getDeptno() {
        return deptno;
    }

    public void setDeptno(Integer deptno) {
        this.deptno = deptno;
    }

    @Override
    public boolean equals(Object o) {
        if (this == o) return true;
        if (!(o instanceof Emp)) return false;
        Emp emp = (Emp) o;
        return Objects.equals(empno, emp.empno) &&
                Objects.equals(ename, emp.ename) &&
                Objects.equals(job, emp.job) &&
                Objects.equals(mgr, emp.mgr) &&
                Objects.equals(hiredate, emp.hiredate) &&
                Objects.equals(sal, emp.sal) &&
                Objects.equals(comm, emp.comm) &&
                Objects.equals(deptno, emp.deptno);
    }

    @Override
    public int hashCode() {

        return Objects.hash(empno, ename, job, mgr, hiredate, sal, comm, deptno);
    }

    @Override
    public String toString() {
        return "Emp{" +
                "empno=" + empno +
                ", ename='" + ename + '\'' +
                ", job='" + job + '\'' +
                ", mgr=" + mgr +
                ", hiredate=" + hiredate +
                ", sal=" + sal +
                ", comm=" + comm +
                ", deptno=" + deptno +
                '}';
    }
}
5、配置Mapper接口类
package com.xujiakai.mapper;

import com.xujiakai.entity.Emp;
import org.apache.ibatis.annotations.Mapper;
import org.springframework.stereotype.Repository;

import java.util.List;

@Mapper
@Repository
public interface EmpMapper {

    List<Emp> selectEmp();

    Emp selectEmpById(Integer empno);

    Integer addEmp(Emp emp);

    Integer updateEmp(Emp emp);

    Integer deleteEmp(Integer empno);
}
6、在resources下创建Emp.xml文件
<?xml version="1.0" encoding="UTF-8" ?>
<!DOCTYPE mapper
        PUBLIC "-//mybatis.org//DTD Mapper 3.0//EN"
        "http://mybatis.org/dtd/mybatis-3-mapper.dtd">
<mapper namespace="com.xujiakai.mapper.EmpMapper">

    <select id="selectEmp" resultType="Emp">
    	select * from emp
  	</select>

    <select id="selectEmpById" resultType="Emp">
    	select * from emp where empno = #{empno}
    </select>

    <insert id="addEmp" parameterType="Emp">
    	insert into emp (empno,ename) values (#{empno},#{ename})
    </insert>

    <update id="updateEmp" parameterType="Emp">
    	update emp set ename=#{ename} where empno = #{empno}
    </update>

    <delete id="deleteEmp" parameterType="int">
    	delete from emp where empno = #{empno}
	</delete>
</mapper>
7、添加配置文件
spring:
  datasource:
    username: root
    password: 123456
    url: jdbc:mysql://loclhost:3306/demo?serverTimezone=UTC&useUnicode=true@characterEncoding=utf-8
    driver-class-name: com.mysql.jdbc.Driver
mybatis:
  mapper-locations: classpath:mybatis/mapper/*.xml
  type-aliases-package: com.xujiakai.entity
8、编写controller
package com.xujiakai.contoller;

import com.xujiakai.entity.Emp;
import com.xujiakai.mapper.EmpMapper;
import org.springframework.beans.factory.annotation.Autowired;
import org.springframework.web.bind.annotation.GetMapping;
import org.springframework.web.bind.annotation.RestController;

import java.util.List;

@RestController
public class EmpController {
    @Autowired
    private EmpMapper empMapper;

    //选择全部用户
    @GetMapping("/selectEmp")
    public String selectEmp(){
        List<Emp> emps = empMapper.selectEmp();
        for (Emp Emp : emps) {
            System.out.println(Emp);
        }
        return "ok";
    }
    //根据id选择用户
    @GetMapping("/selectEmpById")
    public String selectEmpById(){
        Emp emp = empMapper.selectEmpById(1234);
        System.out.println(emp);
        return "ok";
    }
    //添加一个用户
    @GetMapping("/addEmp")
    public String addEmp(){
        empMapper.addEmp(new Emp(1234,"heheda"));
        return "ok";
    }
    //修改一个用户
    @GetMapping("/updateEmp")
    public String updateEmp(){
        empMapper.updateEmp(new Emp(1234,"heihei"));
        return "ok";
    }
    //根据id删除用户
    @GetMapping("/deleteEmp")
    public String deleteEmp(){
        empMapper.deleteEmp(1234);
        return "ok";
    }
}
9、测试即可
springboot源码解析(一):启动过程
springboot的入口程序
@SpringBootApplication
public class StartupApplication {

    public static void main(String[] args) {
        SpringApplication.run(StartupApplication.class, args);
    }
}
当程序开始执行之后,会调用SpringApplication的构造方法,进行某些初始参数的设置
//创建一个新的实例,这个应用程序的上下文将要从指定的来源加载Bean
public SpringApplication(ResourceLoader resourceLoader, Class<?>... primarySources) {
    //资源初始化资源加载器,默认为null
	this.resourceLoader = resourceLoader;
    //断言主要加载资源类不能为 null,否则报错
	Assert.notNull(primarySources, "PrimarySources must not be null");
    //初始化主要加载资源类集合并去重
	this.primarySources = new LinkedHashSet<>(Arrays.asList(primarySources));
    //推断当前 WEB 应用类型,一共有三种:NONE,SERVLET,REACTIVE
	this.webApplicationType = WebApplicationType.deduceFromClasspath();
    //设置应用上线文初始化器,从"META-INF/spring.factories"读取ApplicationContextInitializer类的实例名称集合并去重,并进行set去重。(一共7个)
	setInitializers((Collection) getSpringFactoriesInstances(ApplicationContextInitializer.class));
    //设置监听器,从"META-INF/spring.factories"读取ApplicationListener类的实例名称集合并去重,并进行set去重。(一共11个)
	setListeners((Collection) getSpringFactoriesInstances(ApplicationListener.class));
    //推断主入口应用类,通过当前调用栈,获取Main方法所在类,并赋值给mainApplicationClass
	this.mainApplicationClass = deduceMainApplicationClass();
}
在上述构造方法中,有一个判断应用类型的方法,用来判断当前应用程序的类型:
static WebApplicationType deduceFromClasspath() {
    if (ClassUtils.isPresent(WEBFLUX_INDICATOR_CLASS, null) && !ClassUtils.isPresent(WEBMVC_INDICATOR_CLASS, null)
        && !ClassUtils.isPresent(JERSEY_INDICATOR_CLASS, null)) {
        return WebApplicationType.REACTIVE;
    }
    for (String className : SERVLET_INDICATOR_CLASSES) {
        if (!ClassUtils.isPresent(className, null)) {
            return WebApplicationType.NONE;
        }
    }
    return WebApplicationType.SERVLET;
}
//WebApplicationType的类型
public enum WebApplicationType {

	/**
	 * The application should not run as a web application and should not start an
	 * embedded web server.
	 * 非web项目
	 */
	NONE,

	/**
	 * The application should run as a servlet-based web application and should start an
	 * embedded servlet web server.
	 * servlet web 项目
	 */
	SERVLET,

	/**
	 * The application should run as a reactive web application and should start an
	 * embedded reactive web server.
	 * 响应式 web 项目
	 */
	REACTIVE;
springboot启动的运行方法,可以看到主要是各种运行环境的准备工作
public ConfigurableApplicationContext run(String... args) {
    //1、创建并启动计时监控类
	StopWatch stopWatch = new StopWatch();
	stopWatch.start();
    //2、初始化应用上下文和异常报告集合
	ConfigurableApplicationContext context = null;
	Collection<SpringBootExceptionReporter> exceptionReporters = new ArrayList<>();
    //3、设置系统属性“java.awt.headless”的值,默认为true,用于运行headless服务器,进行简单的图像处理,多用于在缺少显示屏、键盘或者鼠标时的系统配置,很多监控工具如jconsole 需要将该值设置为true
	configureHeadlessProperty();
    //4、创建所有spring运行监听器并发布应用启动事件,简单说的话就是获取SpringApplicationRunListener类型的实例(EventPublishingRunListener对象),并封装进SpringApplicationRunListeners对象,然后返回这个SpringApplicationRunListeners对象。说的再简单点,getRunListeners就是准备好了运行时监听器EventPublishingRunListener。
	SpringApplicationRunListeners listeners = getRunListeners(args);
	listeners.starting();
	try {
        //5、初始化默认应用参数类
		ApplicationArguments applicationArguments = new DefaultApplicationArguments(args);
        //6、根据运行监听器和应用参数来准备spring环境
		ConfigurableEnvironment environment = prepareEnvironment(listeners, applicationArguments);
        //将要忽略的bean的参数打开
		configureIgnoreBeanInfo(environment);
        //7、创建banner打印类
		Banner printedBanner = printBanner(environment);
        //8、创建应用上下文,可以理解为创建一个容器
		context = createApplicationContext();
        //9、准备异常报告器,用来支持报告关于启动的错误
		exceptionReporters = getSpringFactoriesInstances(SpringBootExceptionReporter.class,
					new Class[] { ConfigurableApplicationContext.class }, context);
        //10、准备应用上下文,该步骤包含一个非常关键的操作,将启动类注入容器,为后续开启自动化提供基础
		prepareContext(context, environment, listeners, applicationArguments, printedBanner);
        //11、刷新应用上下文
		refreshContext(context);
        //12、应用上下文刷新后置处理,做一些扩展功能
		afterRefresh(context, applicationArguments);
        //13、停止计时监控类
		stopWatch.stop();
        //14、输出日志记录执行主类名、时间信息
		if (this.logStartupInfo) {
				new StartupInfoLogger(this.mainApplicationClass).logStarted(getApplicationLog(), stopWatch);
		}
        //15、发布应用上下文启动监听事件
		listeners.started(context);
        //16、执行所有的Runner运行器
		callRunners(context, applicationArguments);
	}catch (Throwable ex) {
		handleRunFailure(context, ex, exceptionReporters, listeners);
		throw new IllegalStateException(ex);
	}
	try {
        //17、发布应用上下文就绪事件
		listeners.running(context);
	}catch (Throwable ex) {
		handleRunFailure(context, ex, exceptionReporters, null);
		throw new IllegalStateException(ex);
	}
    //18、返回应用上下文
	return context;
}
下面详细介绍各个启动的环节:
1、创建并启动计时监控类,可以看到记录当前任务的名称,默认是空字符串,然后记录当前springboot应用启动的开始时间。
StopWatch stopWatch = new StopWatch();
stopWatch.start();
//详细源代码
public void start() throws IllegalStateException {
	start("");
}
public void start(String taskName) throws IllegalStateException {
	if (this.currentTaskName != null) {
		throw new IllegalStateException("Can't start StopWatch: it's already running");
	}
	this.currentTaskName = taskName;
	this.startTimeNanos = System.nanoTime();
}
2、初始化应用上下文和异常报告集合
ConfigurableApplicationContext context = null;
Collection<SpringBootExceptionReporter> exceptionReporters = new ArrayList<>();
3、设置系统属性java.awt.headless的值:
/*
java.awt.headless模式是在缺少显示屏、键盘或者鼠标的系统配置
当配置了如下属性之后,应用程序可以执行如下操作:
	1、创建轻量级组件
	2、收集关于可用的字体、字体指标和字体设置的信息
	3、设置颜色来渲染准备图片
	4、创造和获取图像,为渲染准备图片
	5、使用java.awt.PrintJob,java.awt.print.*和javax.print.*类里的方法进行打印
*/
private void configureHeadlessProperty() {
		System.setProperty(SYSTEM_PROPERTY_JAVA_AWT_HEADLESS,
				System.getProperty(SYSTEM_PROPERTY_JAVA_AWT_HEADLESS, Boolean.toString(this.headless)));
}
4、创建所有spring运行监听器并发布应用启动事件
SpringApplicationRunListeners listeners = getRunListeners(args);
listeners.starting();

//创建spring监听器
private SpringApplicationRunListeners getRunListeners(String[] args) {
	Class<?>[] types = new Class<?>[] { SpringApplication.class, String[].class };
	return new SpringApplicationRunListeners(logger,
				getSpringFactoriesInstances(SpringApplicationRunListener.class, types, this, args));
}
SpringApplicationRunListeners(Log log, Collection<? extends SpringApplicationRunListener> listeners) {
	this.log = log;
	this.listeners = new ArrayList<>(listeners);
}
//循环遍历获取监听器
void starting() {
	for (SpringApplicationRunListener listener : this.listeners) {
		listener.starting();
	}
}
//此处的监听器可以看出是事件发布监听器,主要用来发布启动事件
@Override
public void starting() {
    //这里是创建application事件‘applicationStartingEvent’
	this.initialMulticaster.multicastEvent(new ApplicationStartingEvent(this.application, this.args));
}
//applicationStartingEvent是springboot框架最早执行的监听器,在该监听器执行started方法时,会继续发布事件,主要是基于spring的事件机制
	@Override
	public void multicastEvent(final ApplicationEvent event, @Nullable ResolvableType eventType) {
		ResolvableType type = (eventType != null ? eventType : resolveDefaultEventType(event));
        //获取线程池,如果为空则同步处理。这里线程池为空,还未初始化
		Executor executor = getTaskExecutor();
		for (ApplicationListener<?> listener : getApplicationListeners(event, type)) {
			if (executor != null) {
                //异步发送事件
				executor.execute(() -> invokeListener(listener, event));
			}
			else {
                //同步发送事件
				invokeListener(listener, event);
			}
		}
	}
5、初始化默认应用参数类
ApplicationArguments applicationArguments = new DefaultApplicationArguments(args);
public DefaultApplicationArguments(String... args) {
	Assert.notNull(args, "Args must not be null");
	this.source = new Source(args);
	this.args = args;
}
6、根据运行监听器和应用参数来准备spring环境
ConfigurableEnvironment environment = prepareEnvironment(listeners, applicationArguments);
//详细环境的准备
private ConfigurableEnvironment prepareEnvironment(SpringApplicationRunListeners listeners,
	ApplicationArguments applicationArguments) {
	// 获取或者创建应用环境
	ConfigurableEnvironment environment = getOrCreateEnvironment();
    // 配置应用环境,配置propertySource和activeProfiles
	configureEnvironment(environment, applicationArguments.getSourceArgs());
    //listeners环境准备,广播ApplicationEnvironmentPreparedEvent
	ConfigurationPropertySources.attach(environment);
	listeners.environmentPrepared(environment);
    //将环境绑定给当前应用程序
	bindToSpringApplication(environment);
    //对当前的环境类型进行判断,如果不一致进行转换
	if (!this.isCustomEnvironment) {
		environment = new EnvironmentConverter(getClassLoader()).convertEnvironmentIfNecessary(environment,
					deduceEnvironmentClass());
	}
    //配置propertySource对它自己的递归依赖
	ConfigurationPropertySources.attach(environment);
	return environment;
}
// 获取或者创建应用环境,根据应用程序的类型可以分为servlet环境、标准环境(特殊的非web环境)和响应式环境
private ConfigurableEnvironment getOrCreateEnvironment() {
    //存在则直接返回
		if (this.environment != null) {
			return this.environment;
		}
    //根据webApplicationType创建对应的Environment
		switch (this.webApplicationType) {
		case SERVLET:
			return new StandardServletEnvironment();
		case REACTIVE:
			return new StandardReactiveWebEnvironment();
		default:
			return new StandardEnvironment();
		}
	}
//配置应用环境
protected void configureEnvironment(ConfigurableEnvironment environment, String[] args) {
	if (this.addConversionService) {
		ConversionService conversionService = ApplicationConversionService.getSharedInstance();
		environment.setConversionService((ConfigurableConversionService) conversionService);
	}
    //配置property sources
	configurePropertySources(environment, args);
    //配置profiles
	configureProfiles(environment, args);
}
7、创建banner的打印类
Banner printedBanner = printBanner(environment);
//打印类的详细操作过程
private Banner printBanner(ConfigurableEnvironment environment) {
		if (this.bannerMode == Banner.Mode.OFF) {
			return null;
		}
		ResourceLoader resourceLoader = (this.resourceLoader != null) ? this.resourceLoader
				: new DefaultResourceLoader(getClassLoader());
		SpringApplicationBannerPrinter bannerPrinter = new SpringApplicationBannerPrinter(resourceLoader, this.banner);
		if (this.bannerMode == Mode.LOG) {
			return bannerPrinter.print(environment, this.mainApplicationClass, logger);
		}
		return bannerPrinter.print(environment, this.mainApplicationClass, System.out);
	}
8、创建应用的上下文:根据不同哦那个的应用类型初始化不同的上下文应用类
context = createApplicationContext();
protected ConfigurableApplicationContext createApplicationContext() {
		Class<?> contextClass = this.applicationContextClass;
		if (contextClass == null) {
			try {
				switch (this.webApplicationType) {
				case SERVLET:
					contextClass = Class.forName(DEFAULT_SERVLET_WEB_CONTEXT_CLASS);
					break;
				case REACTIVE:
					contextClass = Class.forName(DEFAULT_REACTIVE_WEB_CONTEXT_CLASS);
					break;
				default:
					contextClass = Class.forName(DEFAULT_CONTEXT_CLASS);
				}
			}
			catch (ClassNotFoundException ex) {
				throw new IllegalStateException(
						"Unable create a default ApplicationContext, please specify an ApplicationContextClass", ex);
			}
		}
		return (ConfigurableApplicationContext) BeanUtils.instantiateClass(contextClass);
	}
9、准备异常报告器
exceptionReporters = getSpringFactoriesInstances(SpringBootExceptionReporter.class,
					new Class[] { ConfigurableApplicationContext.class }, context);
private <T> Collection<T> getSpringFactoriesInstances(Class<T> type, Class<?>[] parameterTypes, Object... args) {
		ClassLoader classLoader = getClassLoader();
		// Use names and ensure unique to protect against duplicates
		Set<String> names = new LinkedHashSet<>(SpringFactoriesLoader.loadFactoryNames(type, classLoader));
		List<T> instances = createSpringFactoriesInstances(type, parameterTypes, classLoader, args, names);
		AnnotationAwareOrderComparator.sort(instances);
		return instances;
	}
10、准备应用上下文
prepareContext(context, environment, listeners, applicationArguments, printedBanner);

private void prepareContext(ConfigurableApplicationContext context, ConfigurableEnvironment environment,
			SpringApplicationRunListeners listeners, ApplicationArguments applicationArguments, Banner printedBanner) {
    	//应用上下文的environment
		context.setEnvironment(environment);
    	//应用上下文后处理
		postProcessApplicationContext(context);
    	//为上下文应用所有初始化器,执行容器中的applicationContextInitializer(spring.factories的实例),将所有的初始化对象放置到context对象中
		applyInitializers(context);
    	//触发所有SpringApplicationRunListener监听器的ContextPrepared事件方法。添加所有的事件监听器
		listeners.contextPrepared(context);
   	 	//记录启动日志
		if (this.logStartupInfo) {
			logStartupInfo(context.getParent() == null);
			logStartupProfileInfo(context);
		}
		// 注册启动参数bean,将容器指定的参数封装成bean,注入容器
		ConfigurableListableBeanFactory beanFactory = context.getBeanFactory();
		beanFactory.registerSingleton("springApplicationArguments", applicationArguments);
    	//设置banner
		if (printedBanner != null) {
			beanFactory.registerSingleton("springBootBanner", printedBanner);
		}
		if (beanFactory instanceof DefaultListableBeanFactory) {
			((DefaultListableBeanFactory) beanFactory)
					.setAllowBeanDefinitionOverriding(this.allowBeanDefinitionOverriding);
		}
		if (this.lazyInitialization) {
			context.addBeanFactoryPostProcessor(new LazyInitializationBeanFactoryPostProcessor());
		}
		// 加载所有资源,指的是启动器指定的参数
		Set<Object> sources = getAllSources();
		Assert.notEmpty(sources, "Sources must not be empty");
    	//将bean加载到上下文中
		load(context, sources.toArray(new Object[0]));
    	//触发所有springapplicationRunListener监听器的contextLoaded事件方法,
		listeners.contextLoaded(context);
	}
-------------------
    //这里没有做任何的处理过程,因为beanNameGenerator和resourceLoader默认为空,可以方便后续做扩展处理
    protected void postProcessApplicationContext(ConfigurableApplicationContext context) {
		if (this.beanNameGenerator != null) {
			context.getBeanFactory().registerSingleton(AnnotationConfigUtils.CONFIGURATION_BEAN_NAME_GENERATOR,
					this.beanNameGenerator);
		}
		if (this.resourceLoader != null) {
			if (context instanceof GenericApplicationContext) {
				((GenericApplicationContext) context).setResourceLoader(this.resourceLoader);
			}
			if (context instanceof DefaultResourceLoader) {
				((DefaultResourceLoader) context).setClassLoader(this.resourceLoader.getClassLoader());
			}
		}
		if (this.addConversionService) {
			context.getBeanFactory().setConversionService(ApplicationConversionService.getSharedInstance());
		}
	}
---------------------
    //将启动器类加载到spring容器中,为后续的自动化配置奠定基础,之前看到的很多注解也与此相关
    protected void load(ApplicationContext context, Object[] sources) {
		if (logger.isDebugEnabled()) {
			logger.debug("Loading source " + StringUtils.arrayToCommaDelimitedString(sources));
		}
		BeanDefinitionLoader loader = createBeanDefinitionLoader(getBeanDefinitionRegistry(context), sources);
		if (this.beanNameGenerator != null) {
			loader.setBeanNameGenerator(this.beanNameGenerator);
		}
		if (this.resourceLoader != null) {
			loader.setResourceLoader(this.resourceLoader);
		}
		if (this.environment != null) {
			loader.setEnvironment(this.environment);
		}
		loader.load();
	}
---------------------
    //springboot会优先选择groovy加载方式,找不到在选择java方式
    private int load(Class<?> source) {
		if (isGroovyPresent() && GroovyBeanDefinitionSource.class.isAssignableFrom(source)) {
			// Any GroovyLoaders added in beans{} DSL can contribute beans here
			GroovyBeanDefinitionSource loader = BeanUtils.instantiateClass(source, GroovyBeanDefinitionSource.class);
			load(loader);
		}
		if (isComponent(source)) {
			this.annotatedReader.register(source);
			return 1;
		}
		return 0;
	}
11、刷新应用上下文 refreshContext(context);
private void refreshContext(ConfigurableApplicationContext context) {
    refresh(context);
    if (this.registerShutdownHook) {
        try {
            context.registerShutdownHook();
        }
        catch (AccessControlException ex) {
            // Not allowed in some environments.
        }
    }
}

------------
public void refresh() throws BeansException, IllegalStateException {
    synchronized (this.startupShutdownMonitor) {
        // Prepare this context for refreshing.
        //刷新上下文环境,初始化上下文环境,对系统的环境变量或者系统属性进行准备和校验
        prepareRefresh();

        // Tell the subclass to refresh the internal bean factory.
        //初始化beanfactory,解析xml,相当于之前的xmlBeanfactory操作
        ConfigurableListableBeanFactory beanFactory = obtainFreshBeanFactory();

        // Prepare the bean factory for use in this context.
        //为上下文准备beanfactory,对beanFactory的各种功能进行填充,如@autowired,设置spel表达式解析器,设置编辑注册器,添加applicationContextAwareprocessor处理器等等
        prepareBeanFactory(beanFactory);

        try {
            // Allows post-processing of the bean factory in context subclasses.
            //提供子类覆盖的额外处理,即子类处理自定义的beanfactorypostProcess
            postProcessBeanFactory(beanFactory);

            // Invoke factory processors registered as beans in the context.
            //激活各种beanfactory处理器
            invokeBeanFactoryPostProcessors(beanFactory);

            // Register bean processors that intercept bean creation.
            //注册拦截bean创建的bean处理器,即注册beanPostProcessor
            registerBeanPostProcessors(beanFactory);

            // Initialize message source for this context.
            //初始化上下文中的资源文件如国际化文件的处理
            initMessageSource();

            // Initialize event multicaster for this context.
            //初始化上下文事件广播器
            initApplicationEventMulticaster();

            // Initialize other special beans in specific context subclasses.
            //给子类扩展初始化其他bean
            onRefresh();

            // Check for listener beans and register them.
            //在所有的bean中查找listener bean,然后 注册到广播器中
            registerListeners();

            // Instantiate all remaining (non-lazy-init) singletons.
            //初始化剩余的非懒惰的bean,即初始化非延迟加载的bean
            finishBeanFactoryInitialization(beanFactory);

            // Last step: publish corresponding event.
            //发完成刷新过程,通知声明周期处理器刷新过程,同时发出ContextRefreshEvent通知别人
            finishRefresh();
        }

        catch (BeansException ex) {
            if (logger.isWarnEnabled()) {
                logger.warn("Exception encountered during context initialization - " +
                            "cancelling refresh attempt: " + ex);
            }

            // Destroy already created singletons to avoid dangling resources.
            destroyBeans();

            // Reset 'active' flag.
            cancelRefresh(ex);

            // Propagate exception to caller.
            throw ex;
        }

        finally {
            // Reset common introspection caches in Spring's core, since we
            // might not ever need metadata for singleton beans anymore...
            resetCommonCaches();
        }
    }
}
12、应用上下文刷新后置处理 afterRefresh(context, applicationArguments);
//当前方法的代码是空的,可以做一些自定义的后置处理操作
protected void afterRefresh(ConfigurableApplicationContext context, ApplicationArguments args) {}
13、停止计时监控类:计时监听器停止,并统计一些任务执行信息
stopWatch.stop();
public void stop() throws IllegalStateException {
		if (this.currentTaskName == null) {
			throw new IllegalStateException("Can't stop StopWatch: it's not running");
		}
		long lastTime = System.nanoTime() - this.startTimeNanos;
		this.totalTimeNanos += lastTime;
		this.lastTaskInfo = new TaskInfo(this.currentTaskName, lastTime);
		if (this.keepTaskList) {
			this.taskList.add(this.lastTaskInfo);
		}
		++this.taskCount;
		this.currentTaskName = null;
	}
14、输出日志记录执行主类名、时间信息
if (this.logStartupInfo) {
	new StartupInfoLogger(this.mainApplicationClass).logStarted(getApplicationLog(), stopWatch);
}
15、发布应用上下文启动完成事件:触发所有SpringapplicationRunListener监听器的started事件方法
listeners.started(context);
	void started(ConfigurableApplicationContext context) {
		for (SpringApplicationRunListener listener : this.listeners) {
			listener.started(context);
		}
	}
16、执行所有Runner执行器:执行所有applicationRunner和CommandLineRunner两种运行器
callRunners(context, applicationArguments);
private void callRunners(ApplicationContext context, ApplicationArguments args) {
		List<Object> runners = new ArrayList<>();
		runners.addAll(context.getBeansOfType(ApplicationRunner.class).values());
		runners.addAll(context.getBeansOfType(CommandLineRunner.class).values());
		AnnotationAwareOrderComparator.sort(runners);
		for (Object runner : new LinkedHashSet<>(runners)) {
			if (runner instanceof ApplicationRunner) {
				callRunner((ApplicationRunner) runner, args);
			}
			if (runner instanceof CommandLineRunner) {
				callRunner((CommandLineRunner) runner, args);
			}
		}
	}
17、发布应用上下文就绪事件:触发所有springapplicationRunnListener将挺起的running事件方法
listeners.running(context);
void running(ConfigurableApplicationContext context) {
		for (SpringApplicationRunListener listener : this.listeners) {
			listener.running(context);
		}
	}
18、返回应用上下文
return context;
注意:
整个springboot框架中获取factorys文件的方式统一如下:
private <T> Collection<T> getSpringFactoriesInstances(Class<T> type) {
	return getSpringFactoriesInstances(type, new Class<?>[] {});
}
-------------------------------------
private <T> Collection<T> getSpringFactoriesInstances(Class<T> type, Class<?>[] parameterTypes, Object... args) {
		ClassLoader classLoader = getClassLoader();
		// Use names and ensure unique to protect against duplicates
		Set<String> names = new LinkedHashSet<>(SpringFactoriesLoader.loadFactoryNames(type, classLoader));
		List<T> instances = createSpringFactoriesInstances(type, parameterTypes, classLoader, args, names);
		AnnotationAwareOrderComparator.sort(instances);
		return instances;
}
-----------------------------
    public static List<String> loadFactoryNames(Class<?> factoryType, @Nullable ClassLoader classLoader) {
		String factoryTypeName = factoryType.getName();
		return loadSpringFactories(classLoader).getOrDefault(factoryTypeName, Collections.emptyList());
	}

	private static Map<String, List<String>> loadSpringFactories(@Nullable ClassLoader classLoader) {
		MultiValueMap<String, String> result = cache.get(classLoader);
		if (result != null) {
			return result;
		}

		try {
			Enumeration<URL> urls = (classLoader != null ?
					classLoader.getResources(FACTORIES_RESOURCE_LOCATION) :
					ClassLoader.getSystemResources(FACTORIES_RESOURCE_LOCATION));
			result = new LinkedMultiValueMap<>();
			while (urls.hasMoreElements()) {
				URL url = urls.nextElement();
				UrlResource resource = new UrlResource(url);
				Properties properties = PropertiesLoaderUtils.loadProperties(resource);
				for (Map.Entry<?, ?> entry : properties.entrySet()) {
					String factoryTypeName = ((String) entry.getKey()).trim();
					for (String factoryImplementationName : StringUtils.commaDelimitedListToStringArray((String) entry.getValue())) {
						result.add(factoryTypeName, factoryImplementationName.trim());
					}
				}
			}
			cache.put(classLoader, result);
			return result;
		}
		catch (IOException ex) {
			throw new IllegalArgumentException("Unable to load factories from location [" +
					FACTORIES_RESOURCE_LOCATION + "]", ex);
		}
	}
-------------------------
    private <T> List<T> createSpringFactoriesInstances(Class<T> type, Class<?>[] parameterTypes,
			ClassLoader classLoader, Object[] args, Set<String> names) {
		List<T> instances = new ArrayList<>(names.size());
		for (String name : names) {
			try {
                //装载class文件到内存
				Class<?> instanceClass = ClassUtils.forName(name, classLoader);
				Assert.isAssignable(type, instanceClass);
				Constructor<?> constructor = instanceClass.getDeclaredConstructor(parameterTypes);
                //通过反射创建实例
				T instance = (T) BeanUtils.instantiateClass(constructor, args);
				instances.add(instance);
			}
			catch (Throwable ex) {
				throw new IllegalArgumentException("Cannot instantiate " + type + " : " + name, ex);
			}
		}
		return instances;
	}
spring.factory文件中的类的作用:
# PropertySource Loaders 属性文件加载器
org.springframework.boot.env.PropertySourceLoader=\
# properties文件加载器
org.springframework.boot.env.PropertiesPropertySourceLoader,\
# yaml文件加载器
org.springframework.boot.env.YamlPropertySourceLoader

# Run Listeners 运行时的监听器
org.springframework.boot.SpringApplicationRunListener=\
# 程序运行过程中所有监听通知都是通过此类来进行回调
org.springframework.boot.context.event.EventPublishingRunListener

# Error Reporters	错误报告器
org.springframework.boot.SpringBootExceptionReporter=\
org.springframework.boot.diagnostics.FailureAnalyzers

# Application Context Initializers
org.springframework.context.ApplicationContextInitializer=\
# 报告spring容器的一些常见的错误配置
org.springframework.boot.context.ConfigurationWarningsApplicationContextInitializer,\
# 设置spring应用上下文的ID
org.springframework.boot.context.ContextIdApplicationContextInitializer,\
# 使用环境属性context.initializer.classes指定初始化器进行初始化规则
org.springframework.boot.context.config.DelegatingApplicationContextInitializer,\
org.springframework.boot.rsocket.context.RSocketPortInfoApplicationContextInitializer,\
# 将内置servlet容器实际使用的监听端口写入到environment环境属性中
org.springframework.boot.web.context.ServerPortInfoApplicationContextInitializer

# Application Listeners
org.springframework.context.ApplicationListener=\
# 应用上下文加载完成后对缓存做清除工作,响应事件ContextRefreshEvent
org.springframework.boot.ClearCachesApplicationListener,\
# 监听双亲应用上下文的关闭事件并往自己的孩子应用上下文中传播,相关事件ParentContextAvailableEvent/ContextClosedEvent
org.springframework.boot.builder.ParentContextCloserApplicationListener,\
org.springframework.boot.cloud.CloudFoundryVcapEnvironmentPostProcessor,\
# 如果系统文件编码和环境变量中指定的不同则终止应用启动。具体的方法是比较系统属性file.encoding和环境变量spring.mandatory-file-encoding是否相等(大小写不敏感)。
org.springframework.boot.context.FileEncodingApplicationListener,\
# 根据spring.output.ansi.enabled参数配置AnsiOutput
org.springframework.boot.context.config.AnsiOutputApplicationListener,\
# EnvironmentPostProcessor,从常见的那些约定的位置读取配置文件,比如从以下目录读取#application.properties,application.yml等配置文件:
# classpath:
# file:.
# classpath:config
# file:./config/:
# 也可以配置成从其他指定的位置读取配置文件
org.springframework.boot.context.config.ConfigFileApplicationListener,\
# 监听到事件后转发给环境变量context.listener.classes指定的那些事件监听器
org.springframework.boot.context.config.DelegatingApplicationListener,\
# 一个SmartApplicationListener,对环境就绪事件ApplicationEnvironmentPreparedEvent/应用失败事件ApplicationFailedEvent做出响应,往日志DEBUG级别输出TCCL(thread context class loader)的classpath。
org.springframework.boot.context.logging.ClasspathLoggingApplicationListener,\
# 检测正在使用的日志系统,默认时logback,,此时日志系统还没有初始化
org.springframework.boot.context.logging.LoggingApplicationListener,\
# 使用一个可以和Spring Boot可执行jar包配合工作的版本替换liquibase ServiceLocator
org.springframework.boot.liquibase.LiquibaseServiceLocatorApplicationListener

# Environment Post Processors
org.springframework.boot.env.EnvironmentPostProcessor=\
org.springframework.boot.cloud.CloudFoundryVcapEnvironmentPostProcessor,\
org.springframework.boot.env.SpringApplicationJsonEnvironmentPostProcessor,\
org.springframework.boot.env.SystemEnvironmentPropertySourceEnvironmentPostProcessor,\
org.springframework.boot.reactor.DebugAgentEnvironmentPostProcessor

# Failure Analyzers
org.springframework.boot.diagnostics.FailureAnalyzer=\
org.springframework.boot.diagnostics.analyzer.BeanCurrentlyInCreationFailureAnalyzer,\
org.springframework.boot.diagnostics.analyzer.BeanDefinitionOverrideFailureAnalyzer,\
org.springframework.boot.diagnostics.analyzer.BeanNotOfRequiredTypeFailureAnalyzer,\
org.springframework.boot.diagnostics.analyzer.BindFailureAnalyzer,\
org.springframework.boot.diagnostics.analyzer.BindValidationFailureAnalyzer,\
org.springframework.boot.diagnostics.analyzer.UnboundConfigurationPropertyFailureAnalyzer,\
org.springframework.boot.diagnostics.analyzer.ConnectorStartFailureAnalyzer,\
org.springframework.boot.diagnostics.analyzer.NoSuchMethodFailureAnalyzer,\
org.springframework.boot.diagnostics.analyzer.NoUniqueBeanDefinitionFailureAnalyzer,\
org.springframework.boot.diagnostics.analyzer.PortInUseFailureAnalyzer,\
org.springframework.boot.diagnostics.analyzer.ValidationExceptionFailureAnalyzer,\
org.springframework.boot.diagnostics.analyzer.InvalidConfigurationPropertyNameFailureAnalyzer,\
org.springframework.boot.diagnostics.analyzer.InvalidConfigurationPropertyValueFailureAnalyzer

# FailureAnalysisReporters
org.springframework.boot.diagnostics.FailureAnalysisReporter=\
org.springframework.boot.diagnostics.LoggingFailureAnalysisReporter

# Initializers
org.springframework.context.ApplicationContextInitializer=\
org.springframework.boot.autoconfigure.SharedMetadataReaderFactoryContextInitializer,\
org.springframework.boot.autoconfigure.logging.ConditionEvaluationReportLoggingListener

# Application Listeners
org.springframework.context.ApplicationListener=\
# 另外单独启动一个线程实例化并调用run方法,包括验证器、消息转换器等
org.springframework.boot.autoconfigure.BackgroundPreinitializer

# Auto Configuration Import Listeners
org.springframework.boot.autoconfigure.AutoConfigurationImportListener=\
org.springframework.boot.autoconfigure.condition.ConditionEvaluationReportAutoConfigurationImportListener

# Auto Configuration Import Filters
org.springframework.boot.autoconfigure.AutoConfigurationImportFilter=\
org.springframework.boot.autoconfigure.condition.OnBeanCondition,\
org.springframework.boot.autoconfigure.condition.OnClassCondition,\
org.springframework.boot.autoconfigure.condition.OnWebApplicationCondition

# Auto Configure
org.springframework.boot.autoconfigure.EnableAutoConfiguration=\
org.springframework.boot.autoconfigure.admin.SpringApplicationAdminJmxAutoConfiguration,\
org.springframework.boot.autoconfigure.aop.AopAutoConfiguration,\
org.springframework.boot.autoconfigure.amqp.RabbitAutoConfiguration,\
org.springframework.boot.autoconfigure.batch.BatchAutoConfiguration,\
org.springframework.boot.autoconfigure.cache.CacheAutoConfiguration,\
org.springframework.boot.autoconfigure.cassandra.CassandraAutoConfiguration,\
org.springframework.boot.autoconfigure.cloud.CloudServiceConnectorsAutoConfiguration,\
org.springframework.boot.autoconfigure.context.ConfigurationPropertiesAutoConfiguration,\
org.springframework.boot.autoconfigure.context.MessageSourceAutoConfiguration,\
org.springframework.boot.autoconfigure.context.PropertyPlaceholderAutoConfiguration,\
org.springframework.boot.autoconfigure.couchbase.CouchbaseAutoConfiguration,\
org.springframework.boot.autoconfigure.dao.PersistenceExceptionTranslationAutoConfiguration,\
org.springframework.boot.autoconfigure.data.cassandra.CassandraDataAutoConfiguration,\
org.springframework.boot.autoconfigure.data.cassandra.CassandraReactiveDataAutoConfiguration,\
org.springframework.boot.autoconfigure.data.cassandra.CassandraReactiveRepositoriesAutoConfiguration,\
org.springframework.boot.autoconfigure.data.cassandra.CassandraRepositoriesAutoConfiguration,\
org.springframework.boot.autoconfigure.data.couchbase.CouchbaseDataAutoConfiguration,\
org.springframework.boot.autoconfigure.data.couchbase.CouchbaseReactiveDataAutoConfiguration,\
org.springframework.boot.autoconfigure.data.couchbase.CouchbaseReactiveRepositoriesAutoConfiguration,\
org.springframework.boot.autoconfigure.data.couchbase.CouchbaseRepositoriesAutoConfiguration,\
org.springframework.boot.autoconfigure.data.elasticsearch.ElasticsearchAutoConfiguration,\
org.springframework.boot.autoconfigure.data.elasticsearch.ElasticsearchDataAutoConfiguration,\
org.springframework.boot.autoconfigure.data.elasticsearch.ElasticsearchRepositoriesAutoConfiguration,\
org.springframework.boot.autoconfigure.data.elasticsearch.ReactiveElasticsearchRepositoriesAutoConfiguration,\
org.springframework.boot.autoconfigure.data.elasticsearch.ReactiveRestClientAutoConfiguration,\
org.springframework.boot.autoconfigure.data.jdbc.JdbcRepositoriesAutoConfiguration,\
org.springframework.boot.autoconfigure.data.jpa.JpaRepositoriesAutoConfiguration,\
org.springframework.boot.autoconfigure.data.ldap.LdapRepositoriesAutoConfiguration,\
org.springframework.boot.autoconfigure.data.mongo.MongoDataAutoConfiguration,\
org.springframework.boot.autoconfigure.data.mongo.MongoReactiveDataAutoConfiguration,\
org.springframework.boot.autoconfigure.data.mongo.MongoReactiveRepositoriesAutoConfiguration,\
org.springframework.boot.autoconfigure.data.mongo.MongoRepositoriesAutoConfiguration,\
org.springframework.boot.autoconfigure.data.neo4j.Neo4jDataAutoConfiguration,\
org.springframework.boot.autoconfigure.data.neo4j.Neo4jRepositoriesAutoConfiguration,\
org.springframework.boot.autoconfigure.data.solr.SolrRepositoriesAutoConfiguration,\
org.springframework.boot.autoconfigure.data.redis.RedisAutoConfiguration,\
org.springframework.boot.autoconfigure.data.redis.RedisReactiveAutoConfiguration,\
org.springframework.boot.autoconfigure.data.redis.RedisRepositoriesAutoConfiguration,\
org.springframework.boot.autoconfigure.data.rest.RepositoryRestMvcAutoConfiguration,\
org.springframework.boot.autoconfigure.data.web.SpringDataWebAutoConfiguration,\
org.springframework.boot.autoconfigure.elasticsearch.jest.JestAutoConfiguration,\
org.springframework.boot.autoconfigure.elasticsearch.rest.RestClientAutoConfiguration,\
org.springframework.boot.autoconfigure.flyway.FlywayAutoConfiguration,\
org.springframework.boot.autoconfigure.freemarker.FreeMarkerAutoConfiguration,\
org.springframework.boot.autoconfigure.gson.GsonAutoConfiguration,\
org.springframework.boot.autoconfigure.h2.H2ConsoleAutoConfiguration,\
org.springframework.boot.autoconfigure.hateoas.HypermediaAutoConfiguration,\
org.springframework.boot.autoconfigure.hazelcast.HazelcastAutoConfiguration,\
org.springframework.boot.autoconfigure.hazelcast.HazelcastJpaDependencyAutoConfiguration,\
org.springframework.boot.autoconfigure.http.HttpMessageConvertersAutoConfiguration,\
org.springframework.boot.autoconfigure.http.codec.CodecsAutoConfiguration,\
org.springframework.boot.autoconfigure.influx.InfluxDbAutoConfiguration,\
org.springframework.boot.autoconfigure.info.ProjectInfoAutoConfiguration,\
org.springframework.boot.autoconfigure.integration.IntegrationAutoConfiguration,\
org.springframework.boot.autoconfigure.jackson.JacksonAutoConfiguration,\
org.springframework.boot.autoconfigure.jdbc.DataSourceAutoConfiguration,\
org.springframework.boot.autoconfigure.jdbc.JdbcTemplateAutoConfiguration,\
org.springframework.boot.autoconfigure.jdbc.JndiDataSourceAutoConfiguration,\
org.springframework.boot.autoconfigure.jdbc.XADataSourceAutoConfiguration,\
org.springframework.boot.autoconfigure.jdbc.DataSourceTransactionManagerAutoConfiguration,\
org.springframework.boot.autoconfigure.jms.JmsAutoConfiguration,\
org.springframework.boot.autoconfigure.jmx.JmxAutoConfiguration,\
org.springframework.boot.autoconfigure.jms.JndiConnectionFactoryAutoConfiguration,\
org.springframework.boot.autoconfigure.jms.activemq.ActiveMQAutoConfiguration,\
org.springframework.boot.autoconfigure.jms.artemis.ArtemisAutoConfiguration,\
org.springframework.boot.autoconfigure.groovy.template.GroovyTemplateAutoConfiguration,\
org.springframework.boot.autoconfigure.jersey.JerseyAutoConfiguration,\
org.springframework.boot.autoconfigure.jooq.JooqAutoConfiguration,\
org.springframework.boot.autoconfigure.jsonb.JsonbAutoConfiguration,\
org.springframework.boot.autoconfigure.kafka.KafkaAutoConfiguration,\
org.springframework.boot.autoconfigure.ldap.embedded.EmbeddedLdapAutoConfiguration,\
org.springframework.boot.autoconfigure.ldap.LdapAutoConfiguration,\
org.springframework.boot.autoconfigure.liquibase.LiquibaseAutoConfiguration,\
org.springframework.boot.autoconfigure.mail.MailSenderAutoConfiguration,\
org.springframework.boot.autoconfigure.mail.MailSenderValidatorAutoConfiguration,\
org.springframework.boot.autoconfigure.mongo.embedded.EmbeddedMongoAutoConfiguration,\
org.springframework.boot.autoconfigure.mongo.MongoAutoConfiguration,\
org.springframework.boot.autoconfigure.mongo.MongoReactiveAutoConfiguration,\
org.springframework.boot.autoconfigure.mustache.MustacheAutoConfiguration,\
org.springframework.boot.autoconfigure.orm.jpa.HibernateJpaAutoConfiguration,\
org.springframework.boot.autoconfigure.quartz.QuartzAutoConfiguration,\
org.springframework.boot.autoconfigure.rsocket.RSocketMessagingAutoConfiguration,\
org.springframework.boot.autoconfigure.rsocket.RSocketRequesterAutoConfiguration,\
org.springframework.boot.autoconfigure.rsocket.RSocketServerAutoConfiguration,\
org.springframework.boot.autoconfigure.rsocket.RSocketStrategiesAutoConfiguration,\
org.springframework.boot.autoconfigure.security.servlet.SecurityAutoConfiguration,\
org.springframework.boot.autoconfigure.security.servlet.UserDetailsServiceAutoConfiguration,\
org.springframework.boot.autoconfigure.security.servlet.SecurityFilterAutoConfiguration,\
org.springframework.boot.autoconfigure.security.reactive.ReactiveSecurityAutoConfiguration,\
org.springframework.boot.autoconfigure.security.reactive.ReactiveUserDetailsServiceAutoConfiguration,\
org.springframework.boot.autoconfigure.security.rsocket.RSocketSecurityAutoConfiguration,\
org.springframework.boot.autoconfigure.security.saml2.Saml2RelyingPartyAutoConfiguration,\
org.springframework.boot.autoconfigure.sendgrid.SendGridAutoConfiguration,\
org.springframework.boot.autoconfigure.session.SessionAutoConfiguration,\
org.springframework.boot.autoconfigure.security.oauth2.client.servlet.OAuth2ClientAutoConfiguration,\
org.springframework.boot.autoconfigure.security.oauth2.client.reactive.ReactiveOAuth2ClientAutoConfiguration,\
org.springframework.boot.autoconfigure.security.oauth2.resource.servlet.OAuth2ResourceServerAutoConfiguration,\
org.springframework.boot.autoconfigure.security.oauth2.resource.reactive.ReactiveOAuth2ResourceServerAutoConfiguration,\
org.springframework.boot.autoconfigure.solr.SolrAutoConfiguration,\
org.springframework.boot.autoconfigure.task.TaskExecutionAutoConfiguration,\
org.springframework.boot.autoconfigure.task.TaskSchedulingAutoConfiguration,\
org.springframework.boot.autoconfigure.thymeleaf.ThymeleafAutoConfiguration,\
org.springframework.boot.autoconfigure.transaction.TransactionAutoConfiguration,\
org.springframework.boot.autoconfigure.transaction.jta.JtaAutoConfiguration,\
org.springframework.boot.autoconfigure.validation.ValidationAutoConfiguration,\
org.springframework.boot.autoconfigure.web.client.RestTemplateAutoConfiguration,\
org.springframework.boot.autoconfigure.web.embedded.EmbeddedWebServerFactoryCustomizerAutoConfiguration,\
org.springframework.boot.autoconfigure.web.reactive.HttpHandlerAutoConfiguration,\
org.springframework.boot.autoconfigure.web.reactive.ReactiveWebServerFactoryAutoConfiguration,\
org.springframework.boot.autoconfigure.web.reactive.WebFluxAutoConfiguration,\
org.springframework.boot.autoconfigure.web.reactive.error.ErrorWebFluxAutoConfiguration,\
org.springframework.boot.autoconfigure.web.reactive.function.client.ClientHttpConnectorAutoConfiguration,\
org.springframework.boot.autoconfigure.web.reactive.function.client.WebClientAutoConfiguration,\
org.springframework.boot.autoconfigure.web.servlet.DispatcherServletAutoConfiguration,\
org.springframework.boot.autoconfigure.web.servlet.ServletWebServerFactoryAutoConfiguration,\
org.springframework.boot.autoconfigure.web.servlet.error.ErrorMvcAutoConfiguration,\
org.springframework.boot.autoconfigure.web.servlet.HttpEncodingAutoConfiguration,\
org.springframework.boot.autoconfigure.web.servlet.MultipartAutoConfiguration,\
org.springframework.boot.autoconfigure.web.servlet.WebMvcAutoConfiguration,\
org.springframework.boot.autoconfigure.websocket.reactive.WebSocketReactiveAutoConfiguration,\
org.springframework.boot.autoconfigure.websocket.servlet.WebSocketServletAutoConfiguration,\
org.springframework.boot.autoconfigure.websocket.servlet.WebSocketMessagingAutoConfiguration,\
org.springframework.boot.autoconfigure.webservices.WebServicesAutoConfiguration,\
org.springframework.boot.autoconfigure.webservices.client.WebServiceTemplateAutoConfiguration

# Failure analyzers
org.springframework.boot.diagnostics.FailureAnalyzer=\
org.springframework.boot.autoconfigure.diagnostics.analyzer.NoSuchBeanDefinitionFailureAnalyzer,\
org.springframework.boot.autoconfigure.flyway.FlywayMigrationScriptMissingFailureAnalyzer,\
org.springframework.boot.autoconfigure.jdbc.DataSourceBeanCreationFailureAnalyzer,\
org.springframework.boot.autoconfigure.jdbc.HikariDriverConfigurationFailureAnalyzer,\
org.springframework.boot.autoconfigure.session.NonUniqueSessionRepositoryFailureAnalyzer

# Template availability providers
org.springframework.boot.autoconfigure.template.TemplateAvailabilityProvider=\
org.springframework.boot.autoconfigure.freemarker.FreeMarkerTemplateAvailabilityProvider,\
org.springframework.boot.autoconfigure.mustache.MustacheTemplateAvailabilityProvider,\
org.springframework.boot.autoconfigure.groovy.template.GroovyTemplateAvailabilityProvider,\
org.springframework.boot.autoconfigure.thymeleaf.ThymeleafTemplateAvailabilityProvider,\
org.springframework.boot.autoconfigure.web.servlet.JspTemplateAvailabilityProvider
springboot源码(二):自动装配原理
在之前的课程中我们讲解了springboot的启动过程,其实在面试过程中问的最多的可能是自动装配的原理,而自动装配是在启动过程中完成,只不过在刚开始的时候我们选择性的跳过了,下面详细讲解自动装配的过程。
1、在springboot的启动过程中,有一个步骤是创建上下文,如果不记得可以看下面的代码:
public ConfigurableApplicationContext run(String... args) {
		StopWatch stopWatch = new StopWatch();
		stopWatch.start();
		ConfigurableApplicationContext context = null;
		Collection<SpringBootExceptionReporter> exceptionReporters = new ArrayList<>();
		configureHeadlessProperty();
		SpringApplicationRunListeners listeners = getRunListeners(args);
		listeners.starting();
		try {
			ApplicationArguments applicationArguments = new DefaultApplicationArguments(args);
			ConfigurableEnvironment environment = prepareEnvironment(listeners, applicationArguments);
			configureIgnoreBeanInfo(environment);
			Banner printedBanner = printBanner(environment);
			context = createApplicationContext();
			exceptionReporters = getSpringFactoriesInstances(SpringBootExceptionReporter.class,
					new Class[] { ConfigurableApplicationContext.class }, context);
            //此处完成自动装配的过程
			prepareContext(context, environment, listeners, applicationArguments, printedBanner);
			refreshContext(context);
			afterRefresh(context, applicationArguments);
			stopWatch.stop();
			if (this.logStartupInfo) {
				new StartupInfoLogger(this.mainApplicationClass).logStarted(getApplicationLog(), stopWatch);
			}
			listeners.started(context);
			callRunners(context, applicationArguments);
		}
		catch (Throwable ex) {
			handleRunFailure(context, ex, exceptionReporters, listeners);
			throw new IllegalStateException(ex);
		}

		try {
			listeners.running(context);
		}
		catch (Throwable ex) {
			handleRunFailure(context, ex, exceptionReporters, null);
			throw new IllegalStateException(ex);
		}
		return context;
	}
2、在prepareContext方法中查找load方法,一层一层向内点击,找到最终的load方法
//prepareContext方法
	private void prepareContext(ConfigurableApplicationContext context, ConfigurableEnvironment environment,
			SpringApplicationRunListeners listeners, ApplicationArguments applicationArguments, Banner printedBanner) {
		context.setEnvironment(environment);
		postProcessApplicationContext(context);
		applyInitializers(context);
		listeners.contextPrepared(context);
		if (this.logStartupInfo) {
			logStartupInfo(context.getParent() == null);
			logStartupProfileInfo(context);
		}
		// Add boot specific singleton beans
		ConfigurableListableBeanFactory beanFactory = context.getBeanFactory();
		beanFactory.registerSingleton("springApplicationArguments", applicationArguments);
		if (printedBanner != null) {
			beanFactory.registerSingleton("springBootBanner", printedBanner);
		}
		if (beanFactory instanceof DefaultListableBeanFactory) {
			((DefaultListableBeanFactory) beanFactory)
					.setAllowBeanDefinitionOverriding(this.allowBeanDefinitionOverriding);
		}
		if (this.lazyInitialization) {
			context.addBeanFactoryPostProcessor(new LazyInitializationBeanFactoryPostProcessor());
		}
		// Load the sources
		Set<Object> sources = getAllSources();
		Assert.notEmpty(sources, "Sources must not be empty");
        //load方法完成该功能
		load(context, sources.toArray(new Object[0]));
		listeners.contextLoaded(context);
	}


	/**
	 * Load beans into the application context.
	 * @param context the context to load beans into
	 * @param sources the sources to load
	 * 加载bean对象到context中
	 */
	protected void load(ApplicationContext context, Object[] sources) {
		if (logger.isDebugEnabled()) {
			logger.debug("Loading source " + StringUtils.arrayToCommaDelimitedString(sources));
		}
        //获取bean对象定义的加载器
		BeanDefinitionLoader loader = createBeanDefinitionLoader(getBeanDefinitionRegistry(context), sources);
		if (this.beanNameGenerator != null) {
			loader.setBeanNameGenerator(this.beanNameGenerator);
		}
		if (this.resourceLoader != null) {
			loader.setResourceLoader(this.resourceLoader);
		}
		if (this.environment != null) {
			loader.setEnvironment(this.environment);
		}
		loader.load();
	}

	/**
	 * Load the sources into the reader.
	 * @return the number of loaded beans
	 */
	int load() {
		int count = 0;
		for (Object source : this.sources) {
			count += load(source);
		}
		return count;
	}
3、实际执行load的是BeanDefinitionLoader中的load方法,如下:
	//实际记载bean的方法
	private int load(Object source) {
		Assert.notNull(source, "Source must not be null");
        //如果是class类型,启用注解类型
		if (source instanceof Class<?>) {
			return load((Class<?>) source);
		}
        //如果是resource类型,启动xml解析
		if (source instanceof Resource) {
			return load((Resource) source);
		}
        //如果是package类型,启用扫描包,例如@ComponentScan
		if (source instanceof Package) {
			return load((Package) source);
		}
        //如果是字符串类型,直接加载
		if (source instanceof CharSequence) {
			return load((CharSequence) source);
		}
		throw new IllegalArgumentException("Invalid source type " + source.getClass());
	}
4、下面方法将用来判断是否资源的类型,是使用groovy加载还是使用注解的方式
	private int load(Class<?> source) {
        //判断使用groovy脚本
		if (isGroovyPresent() && GroovyBeanDefinitionSource.class.isAssignableFrom(source)) {
			// Any GroovyLoaders added in beans{} DSL can contribute beans here
			GroovyBeanDefinitionSource loader = BeanUtils.instantiateClass(source, GroovyBeanDefinitionSource.class);
			load(loader);
		}
        //使用注解加载
		if (isComponent(source)) {
			this.annotatedReader.register(source);
			return 1;
		}
		return 0;
	}
5、下面方法判断启动类中是否包含@Component注解,但是会神奇的发现我们的启动类中并没有该注解,继续更进发现MergedAnnotations类传入了一个参数SearchStrategy.TYPE_HIERARCHY,会查找继承关系中是否包含这个注解,@SpringBootApplication–>@SpringBootConfiguration–>@Configuration–>@Component,当找到@Component注解之后,会把该对象注册到AnnotatedBeanDefinitionReader对象中
private boolean isComponent(Class<?> type) {
   // This has to be a bit of a guess. The only way to be sure that this type is
   // eligible is to make a bean definition out of it and try to instantiate it.
   if (MergedAnnotations.from(type, SearchStrategy.TYPE_HIERARCHY).isPresent(Component.class)) {
      return true;
   }
   // Nested anonymous classes are not eligible for registration, nor are groovy
   // closures
   return !type.getName().matches(".*\\$_.*closure.*") && !type.isAnonymousClass()
         && type.getConstructors() != null && type.getConstructors().length != 0;
}

	/**
	 * Register a bean from the given bean class, deriving its metadata from
	 * class-declared annotations.
	 * 从给定的bean class中注册一个bean对象,从注解中找到相关的元数据
	 */
	private <T> void doRegisterBean(Class<T> beanClass, @Nullable String name,
			@Nullable Class<? extends Annotation>[] qualifiers, @Nullable Supplier<T> supplier,
			@Nullable BeanDefinitionCustomizer[] customizers) {

		AnnotatedGenericBeanDefinition abd = new AnnotatedGenericBeanDefinition(beanClass);
		if (this.conditionEvaluator.shouldSkip(abd.getMetadata())) {
			return;
		}

		abd.setInstanceSupplier(supplier);
		ScopeMetadata scopeMetadata = this.scopeMetadataResolver.resolveScopeMetadata(abd);
		abd.setScope(scopeMetadata.getScopeName());
		String beanName = (name != null ? name : this.beanNameGenerator.generateBeanName(abd, this.registry));

		AnnotationConfigUtils.processCommonDefinitionAnnotations(abd);
		if (qualifiers != null) {
			for (Class<? extends Annotation> qualifier : qualifiers) {
				if (Primary.class == qualifier) {
					abd.setPrimary(true);
				}
				else if (Lazy.class == qualifier) {
					abd.setLazyInit(true);
				}
				else {
					abd.addQualifier(new AutowireCandidateQualifier(qualifier));
				}
			}
		}
		if (customizers != null) {
			for (BeanDefinitionCustomizer customizer : customizers) {
				customizer.customize(abd);
			}
		}

		BeanDefinitionHolder definitionHolder = new BeanDefinitionHolder(abd, beanName);
		definitionHolder = AnnotationConfigUtils.applyScopedProxyMode(scopeMetadata, definitionHolder, this.registry);
		BeanDefinitionReaderUtils.registerBeanDefinition(definitionHolder, this.registry);
	}

	/**
	 * Register the given bean definition with the given bean factory.
	 * 注册主类,如果有别名可以设置别名
	 */
	public static void registerBeanDefinition(
			BeanDefinitionHolder definitionHolder, BeanDefinitionRegistry registry)
			throws BeanDefinitionStoreException {

		// Register bean definition under primary name.
		String beanName = definitionHolder.getBeanName();
		registry.registerBeanDefinition(beanName, definitionHolder.getBeanDefinition());

		// Register aliases for bean name, if any.
		String[] aliases = definitionHolder.getAliases();
		if (aliases != null) {
			for (String alias : aliases) {
				registry.registerAlias(beanName, alias);
			}
		}
	}

//@SpringBootApplication
@Target(ElementType.TYPE)
@Retention(RetentionPolicy.RUNTIME)
@Documented
@Inherited
@SpringBootConfiguration
@EnableAutoConfiguration
@ComponentScan(excludeFilters = { @Filter(type = FilterType.CUSTOM, classes = TypeExcludeFilter.class),
		@Filter(type = FilterType.CUSTOM, classes = AutoConfigurationExcludeFilter.class) })
public @interface SpringBootApplication {}

//@SpringBootConfiguration
@Target(ElementType.TYPE)
@Retention(RetentionPolicy.RUNTIME)
@Documented
@Configuration
public @interface SpringBootConfiguration {}

//@Configuration
@Target(ElementType.TYPE)
@Retention(RetentionPolicy.RUNTIME)
@Documented
@Component
public @interface Configuration {}
当看完上述代码之后,只是完成了启动对象的注入,自动装配还没有开始,下面开始进入到自动装配。
6、自动装配入口,从刷新容器开始
@Override
	public void refresh() throws BeansException, IllegalStateException {
		synchronized (this.startupShutdownMonitor) {
			// Prepare this context for refreshing.
			prepareRefresh();

			// Tell the subclass to refresh the internal bean factory.
			ConfigurableListableBeanFactory beanFactory = obtainFreshBeanFactory();

			// Prepare the bean factory for use in this context.
			prepareBeanFactory(beanFactory);

			try {
				// Allows post-processing of the bean factory in context subclasses.
				postProcessBeanFactory(beanFactory);

				// Invoke factory processors registered as beans in the context.
                // 此处是自动装配的入口
				invokeBeanFactoryPostProcessors(beanFactory);
            }
7、在invokeBeanFactoryPostProcessors方法中完成bean的实例化和执行
/**
	 * Instantiate and invoke all registered BeanFactoryPostProcessor beans,
	 * respecting explicit order if given.
	 * <p>Must be called before singleton instantiation.
	 */
	protected void invokeBeanFactoryPostProcessors(ConfigurableListableBeanFactory beanFactory) {
        //开始执行beanFactoryPostProcessor对应实现类,需要知道的是beanFactoryPostProcessor是spring的扩展接口,在刷新容器之前,该接口可以用来修改bean元数据信息
		PostProcessorRegistrationDelegate.invokeBeanFactoryPostProcessors(beanFactory, getBeanFactoryPostProcessors());

		// Detect a LoadTimeWeaver and prepare for weaving, if found in the meantime
		// (e.g. through an @Bean method registered by ConfigurationClassPostProcessor)
		if (beanFactory.getTempClassLoader() == null && beanFactory.containsBean(LOAD_TIME_WEAVER_BEAN_NAME)) {
			beanFactory.addBeanPostProcessor(new LoadTimeWeaverAwareProcessor(beanFactory));
			beanFactory.setTempClassLoader(new ContextTypeMatchClassLoader(beanFactory.getBeanClassLoader()));
		}
	}
8、查看invokeBeanFactoryPostProcessors的具体执行方法
	public static void invokeBeanFactoryPostProcessors(
			ConfigurableListableBeanFactory beanFactory, List<BeanFactoryPostProcessor> beanFactoryPostProcessors) {

		// Invoke BeanDefinitionRegistryPostProcessors first, if any.
		Set<String> processedBeans = new HashSet<>();

		if (beanFactory instanceof BeanDefinitionRegistry) {
			BeanDefinitionRegistry registry = (BeanDefinitionRegistry) beanFactory;
			List<BeanFactoryPostProcessor> regularPostProcessors = new ArrayList<>();
			List<BeanDefinitionRegistryPostProcessor> registryProcessors = new ArrayList<>();
			//开始遍历三个内部类,如果属于BeanDefinitionRegistryPostProcessor子类,加入到bean注册的集合,否则加入到regularPostProcessors
			for (BeanFactoryPostProcessor postProcessor : beanFactoryPostProcessors) {
				if (postProcessor instanceof BeanDefinitionRegistryPostProcessor) {
					BeanDefinitionRegistryPostProcessor registryProcessor =
							(BeanDefinitionRegistryPostProcessor) postProcessor;
					registryProcessor.postProcessBeanDefinitionRegistry(registry);
					registryProcessors.add(registryProcessor);
				}
				else {
					regularPostProcessors.add(postProcessor);
				}
			}

			// Do not initialize FactoryBeans here: We need to leave all regular beans
			// uninitialized to let the bean factory post-processors apply to them!
			// Separate between BeanDefinitionRegistryPostProcessors that implement
			// PriorityOrdered, Ordered, and the rest.
			List<BeanDefinitionRegistryPostProcessor> currentRegistryProcessors = new ArrayList<>();

			// First, invoke the BeanDefinitionRegistryPostProcessors that implement PriorityOrdered.
            //通过BeanDefinitionRegistryPostProcessor获取到对应的处理类“org.springframework.context.annotation.internalConfigurationAnnotationProcessor”,但是需要注意的是这个类在springboot中搜索不到,这个类的完全限定名在AnnotationConfigEmbeddedWebApplicationContext中,在进行初始化的时候会装配几个类,在创建AnnotatedBeanDefinitionReader对象的时候会将该类注册到bean对象中,此处可以看到internalConfigurationAnnotationProcessor为bean名称,容器中真正的类是ConfigurationClassPostProcessor
			String[] postProcessorNames =
					beanFactory.getBeanNamesForType(BeanDefinitionRegistryPostProcessor.class, true, false);
            //首先执行类型为PriorityOrdered的BeanDefinitionRegistryPostProcessor
            //PriorityOrdered类型表明为优先执行
			for (String ppName : postProcessorNames) {
				if (beanFactory.isTypeMatch(ppName, PriorityOrdered.class)) {
                    //获取对应的bean
					currentRegistryProcessors.add(beanFactory.getBean(ppName, BeanDefinitionRegistryPostProcessor.class));
                    //用来存储已经执行过的BeanDefinitionRegistryPostProcessor
					processedBeans.add(ppName);
				}
			}
			sortPostProcessors(currentRegistryProcessors, beanFactory);
			registryProcessors.addAll(currentRegistryProcessors);
            //开始执行装配逻辑
			invokeBeanDefinitionRegistryPostProcessors(currentRegistryProcessors, registry);
			currentRegistryProcessors.clear();

			// Next, invoke the BeanDefinitionRegistryPostProcessors that implement Ordered.
            //其次执行类型为Ordered的BeanDefinitionRegistryPostProcessor
            //Ordered表明按顺序执行
			postProcessorNames = beanFactory.getBeanNamesForType(BeanDefinitionRegistryPostProcessor.class, true, false);
			for (String ppName : postProcessorNames) {
				if (!processedBeans.contains(ppName) && beanFactory.isTypeMatch(ppName, Ordered.class)) {
					currentRegistryProcessors.add(beanFactory.getBean(ppName, BeanDefinitionRegistryPostProcessor.class));
					processedBeans.add(ppName);
				}
			}
			sortPostProcessors(currentRegistryProcessors, beanFactory);
			registryProcessors.addAll(currentRegistryProcessors);
			invokeBeanDefinitionRegistryPostProcessors(currentRegistryProcessors, registry);
			currentRegistryProcessors.clear();

			// Finally, invoke all other BeanDefinitionRegistryPostProcessors until no further ones appear.
            //循环中执行类型不为PriorityOrdered,Ordered类型的BeanDefinitionRegistryPostProcessor
			boolean reiterate = true;
			while (reiterate) {
				reiterate = false;
				postProcessorNames = beanFactory.getBeanNamesForType(BeanDefinitionRegistryPostProcessor.class, true, false);
				for (String ppName : postProcessorNames) {
					if (!processedBeans.contains(ppName)) {
						currentRegistryProcessors.add(beanFactory.getBean(ppName, BeanDefinitionRegistryPostProcessor.class));
						processedBeans.add(ppName);
						reiterate = true;
					}
				}
				sortPostProcessors(currentRegistryProcessors, beanFactory);
				registryProcessors.addAll(currentRegistryProcessors);
				invokeBeanDefinitionRegistryPostProcessors(currentRegistryProcessors, registry);
				currentRegistryProcessors.clear();
			}

			// Now, invoke the postProcessBeanFactory callback of all processors handled so far.
            //执行父类方法,优先执行注册处理类
			invokeBeanFactoryPostProcessors(registryProcessors, beanFactory);
            //执行有规则处理类
			invokeBeanFactoryPostProcessors(regularPostProcessors, beanFactory);
		}

		else {
			// Invoke factory processors registered with the context instance.
			invokeBeanFactoryPostProcessors(beanFactoryPostProcessors, beanFactory);
		}

		// Do not initialize FactoryBeans here: We need to leave all regular beans
		// uninitialized to let the bean factory post-processors apply to them!
		String[] postProcessorNames =
				beanFactory.getBeanNamesForType(BeanFactoryPostProcessor.class, true, false);

		// Separate between BeanFactoryPostProcessors that implement PriorityOrdered,
		// Ordered, and the rest.
		List<BeanFactoryPostProcessor> priorityOrderedPostProcessors = new ArrayList<>();
		List<String> orderedPostProcessorNames = new ArrayList<>();
		List<String> nonOrderedPostProcessorNames = new ArrayList<>();
		for (String ppName : postProcessorNames) {
			if (processedBeans.contains(ppName)) {
				// skip - already processed in first phase above
			}
			else if (beanFactory.isTypeMatch(ppName, PriorityOrdered.class)) {
				priorityOrderedPostProcessors.add(beanFactory.getBean(ppName, BeanFactoryPostProcessor.class));
			}
			else if (beanFactory.isTypeMatch(ppName, Ordered.class)) {
				orderedPostProcessorNames.add(ppName);
			}
			else {
				nonOrderedPostProcessorNames.add(ppName);
			}
		}

		// First, invoke the BeanFactoryPostProcessors that implement PriorityOrdered.
		sortPostProcessors(priorityOrderedPostProcessors, beanFactory);
		invokeBeanFactoryPostProcessors(priorityOrderedPostProcessors, beanFactory);

		// Next, invoke the BeanFactoryPostProcessors that implement Ordered.
		List<BeanFactoryPostProcessor> orderedPostProcessors = new ArrayList<>(orderedPostProcessorNames.size());
		for (String postProcessorName : orderedPostProcessorNames) {
			orderedPostProcessors.add(beanFactory.getBean(postProcessorName, BeanFactoryPostProcessor.class));
		}
		sortPostProcessors(orderedPostProcessors, beanFactory);
		invokeBeanFactoryPostProcessors(orderedPostProcessors, beanFactory);

		// Finally, invoke all other BeanFactoryPostProcessors.
		List<BeanFactoryPostProcessor> nonOrderedPostProcessors = new ArrayList<>(nonOrderedPostProcessorNames.size());
		for (String postProcessorName : nonOrderedPostProcessorNames) {
			nonOrderedPostProcessors.add(beanFactory.getBean(postProcessorName, BeanFactoryPostProcessor.class));
		}
		invokeBeanFactoryPostProcessors(nonOrderedPostProcessors, beanFactory);

		// Clear cached merged bean definitions since the post-processors might have
		// modified the original metadata, e.g. replacing placeholders in values...
		beanFactory.clearMetadataCache();
	}
9、开始执行自动配置逻辑(启动类指定的配置,非默认配置),可以通过debug的方式一层层向里进行查找,会发现最终会在ConfigurationClassParser类中,此类是所有配置类的解析类,所有的解析逻辑在parser.parse(candidates)中
public void parse(Set<BeanDefinitionHolder> configCandidates) {
		for (BeanDefinitionHolder holder : configCandidates) {
			BeanDefinition bd = holder.getBeanDefinition();
			try {
                //是否是注解类
				if (bd instanceof AnnotatedBeanDefinition) {
					parse(((AnnotatedBeanDefinition) bd).getMetadata(), holder.getBeanName());
				}
				else if (bd instanceof AbstractBeanDefinition && ((AbstractBeanDefinition) bd).hasBeanClass()) {
					parse(((AbstractBeanDefinition) bd).getBeanClass(), holder.getBeanName());
				}
				else {
					parse(bd.getBeanClassName(), holder.getBeanName());
				}
			}
			catch (BeanDefinitionStoreException ex) {
				throw ex;
			}
			catch (Throwable ex) {
				throw new BeanDefinitionStoreException(
						"Failed to parse configuration class [" + bd.getBeanClassName() + "]", ex);
			}
		}
    	//执行配置类
		this.deferredImportSelectorHandler.process();
	}
-------------------
    	protected final void parse(AnnotationMetadata metadata, String beanName) throws IOException {
		processConfigurationClass(new ConfigurationClass(metadata, beanName));
	}
-------------------
    protected void processConfigurationClass(ConfigurationClass configClass) throws IOException {
		if (this.conditionEvaluator.shouldSkip(configClass.getMetadata(), ConfigurationPhase.PARSE_CONFIGURATION)) {
			return;
		}

		ConfigurationClass existingClass = this.configurationClasses.get(configClass);
		if (existingClass != null) {
			if (configClass.isImported()) {
				if (existingClass.isImported()) {
					existingClass.mergeImportedBy(configClass);
				}
				// Otherwise ignore new imported config class; existing non-imported class overrides it.
				return;
			}
			else {
				// Explicit bean definition found, probably replacing an import.
				// Let's remove the old one and go with the new one.
				this.configurationClasses.remove(configClass);
				this.knownSuperclasses.values().removeIf(configClass::equals);
			}
		}

		// Recursively process the configuration class and its superclass hierarchy.
		SourceClass sourceClass = asSourceClass(configClass);
		do {
            //循环处理bean,如果有父类,则处理父类,直至结束
			sourceClass = doProcessConfigurationClass(configClass, sourceClass);
		}
		while (sourceClass != null);

		this.configurationClasses.put(configClass, configClass);
	}
10、继续跟进doProcessConfigurationClass方法,此方式是支持注解配置的核心逻辑
/**
	 * Apply processing and build a complete {@link ConfigurationClass} by reading the
	 * annotations, members and methods from the source class. This method can be called
	 * multiple times as relevant sources are discovered.
	 * @param configClass the configuration class being build
	 * @param sourceClass a source class
	 * @return the superclass, or {@code null} if none found or previously processed
	 */
	@Nullable
	protected final SourceClass doProcessConfigurationClass(ConfigurationClass configClass, SourceClass sourceClass)
			throws IOException {

        //处理内部类逻辑,由于传来的参数是启动类,并不包含内部类,所以跳过
		if (configClass.getMetadata().isAnnotated(Component.class.getName())) {
			// Recursively process any member (nested) classes first
			processMemberClasses(configClass, sourceClass);
		}

		// Process any @PropertySource annotations
        //针对属性配置的解析
		for (AnnotationAttributes propertySource : AnnotationConfigUtils.attributesForRepeatable(
				sourceClass.getMetadata(), PropertySources.class,
				org.springframework.context.annotation.PropertySource.class)) {
			if (this.environment instanceof ConfigurableEnvironment) {
				processPropertySource(propertySource);
			}
			else {
				logger.info("Ignoring @PropertySource annotation on [" + sourceClass.getMetadata().getClassName() +
						"]. Reason: Environment must implement ConfigurableEnvironment");
			}
		}

		// Process any @ComponentScan annotations
        // 这里是根据启动类@ComponentScan注解来扫描项目中的bean
		Set<AnnotationAttributes> componentScans = AnnotationConfigUtils.attributesForRepeatable(
				sourceClass.getMetadata(), ComponentScans.class, ComponentScan.class);
		if (!componentScans.isEmpty() &&
				!this.conditionEvaluator.shouldSkip(sourceClass.getMetadata(), ConfigurationPhase.REGISTER_BEAN)) {

			for (AnnotationAttributes componentScan : componentScans) {
				// The config class is annotated with @ComponentScan -> perform the scan immediately
                //遍历项目中的bean,如果是注解定义的bean,则进一步解析
				Set<BeanDefinitionHolder> scannedBeanDefinitions =
						this.componentScanParser.parse(componentScan, sourceClass.getMetadata().getClassName());
				// Check the set of scanned definitions for any further config classes and parse recursively if needed
				for (BeanDefinitionHolder holder : scannedBeanDefinitions) {
					BeanDefinition bdCand = holder.getBeanDefinition().getOriginatingBeanDefinition();
					if (bdCand == null) {
						bdCand = holder.getBeanDefinition();
					}
					if (ConfigurationClassUtils.checkConfigurationClassCandidate(bdCand, this.metadataReaderFactory)) {
                        //递归解析,所有的bean,如果有注解,会进一步解析注解中包含的bean
						parse(bdCand.getBeanClassName(), holder.getBeanName());
					}
				}
			}
		}

		// Process any @Import annotations
        //递归解析,获取导入的配置类,很多情况下,导入的配置类中会同样包含导入类注解
		processImports(configClass, sourceClass, getImports(sourceClass), true);

		// Process any @ImportResource annotations
        //解析@ImportResource配置类
		AnnotationAttributes importResource =
				AnnotationConfigUtils.attributesFor(sourceClass.getMetadata(), ImportResource.class);
		if (importResource != null) {
			String[] resources = importResource.getStringArray("locations");
			Class<? extends BeanDefinitionReader> readerClass = importResource.getClass("reader");
			for (String resource : resources) {
				String resolvedResource = this.environment.resolveRequiredPlaceholders(resource);
				configClass.addImportedResource(resolvedResource, readerClass);
			}
		}

		// Process individual @Bean methods
        //处理@Bean注解修饰的类
		Set<MethodMetadata> beanMethods = retrieveBeanMethodMetadata(sourceClass);
		for (MethodMetadata methodMetadata : beanMethods) {
			configClass.addBeanMethod(new BeanMethod(methodMetadata, configClass));
		}

		// Process default methods on interfaces
        // 处理接口中的默认方法
		processInterfaces(configClass, sourceClass);

		// Process superclass, if any
        //如果该类有父类,则继续返回,上层方法判断不为空,则继续递归执行
		if (sourceClass.getMetadata().hasSuperClass()) {
			String superclass = sourceClass.getMetadata().getSuperClassName();
			if (superclass != null && !superclass.startsWith("java") &&
					!this.knownSuperclasses.containsKey(superclass)) {
				this.knownSuperclasses.put(superclass, configClass);
				// Superclass found, return its annotation metadata and recurse
				return sourceClass.getSuperClass();
			}
		}

		// No superclass -> processing is complete
		return null;
	}
11、查看获取配置类的逻辑
processImports(configClass, sourceClass, getImports(sourceClass), true);

	/**
	 * Returns {@code @Import} class, considering all meta-annotations.
	 */
	private Set<SourceClass> getImports(SourceClass sourceClass) throws IOException {
		Set<SourceClass> imports = new LinkedHashSet<>();
		Set<SourceClass> visited = new LinkedHashSet<>();
		collectImports(sourceClass, imports, visited);
		return imports;
	}
------------------
    	/**
	 * Recursively collect all declared {@code @Import} values. Unlike most
	 * meta-annotations it is valid to have several {@code @Import}s declared with
	 * different values; the usual process of returning values from the first
	 * meta-annotation on a class is not sufficient.
	 * <p>For example, it is common for a {@code @Configuration} class to declare direct
	 * {@code @Import}s in addition to meta-imports originating from an {@code @Enable}
	 * annotation.
	 * 看到所有的bean都以导入的方式被加载进去
	 */
	private void collectImports(SourceClass sourceClass, Set<SourceClass> imports, Set<SourceClass> visited)
			throws IOException {

		if (visited.add(sourceClass)) {
			for (SourceClass annotation : sourceClass.getAnnotations()) {
				String annName = annotation.getMetadata().getClassName();
				if (!annName.equals(Import.class.getName())) {
					collectImports(annotation, imports, visited);
				}
			}
			imports.addAll(sourceClass.getAnnotationAttributes(Import.class.getName(), "value"));
		}
	}
12、继续回到ConfigurationClassParser中的parse方法中的最后一行,继续跟进该方法:
this.deferredImportSelectorHandler.process()
-------------
public void process() {
			List<DeferredImportSelectorHolder> deferredImports = this.deferredImportSelectors;
			this.deferredImportSelectors = null;
			try {
				if (deferredImports != null) {
					DeferredImportSelectorGroupingHandler handler = new DeferredImportSelectorGroupingHandler();
					deferredImports.sort(DEFERRED_IMPORT_COMPARATOR);
					deferredImports.forEach(handler::register);
					handler.processGroupImports();
				}
			}
			finally {
				this.deferredImportSelectors = new ArrayList<>();
			}
		}
---------------
  public void processGroupImports() {
			for (DeferredImportSelectorGrouping grouping : this.groupings.values()) {
				grouping.getImports().forEach(entry -> {
					ConfigurationClass configurationClass = this.configurationClasses.get(
							entry.getMetadata());
					try {
						processImports(configurationClass, asSourceClass(configurationClass),
								asSourceClasses(entry.getImportClassName()), false);
					}
					catch (BeanDefinitionStoreException ex) {
						throw ex;
					}
					catch (Throwable ex) {
						throw new BeanDefinitionStoreException(
								"Failed to process import candidates for configuration class [" +
										configurationClass.getMetadata().getClassName() + "]", ex);
					}
				});
			}
		}
------------
    /**
		 * Return the imports defined by the group.
		 * @return each import with its associated configuration class
		 */
		public Iterable<Group.Entry> getImports() {
			for (DeferredImportSelectorHolder deferredImport : this.deferredImports) {
				this.group.process(deferredImport.getConfigurationClass().getMetadata(),
						deferredImport.getImportSelector());
			}
			return this.group.selectImports();
		}
	}
------------
    public DeferredImportSelector getImportSelector() {
			return this.importSelector;
		}
------------
    @Override
		public void process(AnnotationMetadata annotationMetadata, DeferredImportSelector deferredImportSelector) {
			Assert.state(deferredImportSelector instanceof AutoConfigurationImportSelector,
					() -> String.format("Only %s implementations are supported, got %s",
							AutoConfigurationImportSelector.class.getSimpleName(),
							deferredImportSelector.getClass().getName()));
			AutoConfigurationEntry autoConfigurationEntry = ((AutoConfigurationImportSelector) deferredImportSelector)
					.getAutoConfigurationEntry(getAutoConfigurationMetadata(), annotationMetadata);
			this.autoConfigurationEntries.add(autoConfigurationEntry);
			for (String importClassName : autoConfigurationEntry.getConfigurations()) {
				this.entries.putIfAbsent(importClassName, annotationMetadata);
			}
		}
springboot源码解析(三):springboot内嵌tomcat
在使用springboot搭建一个web应用程序的时候,我们发现不需要自己搭建一个tomcat服务器,只需要引入spring-boot-starter-web,在应用启动时会自动启动嵌入式的tomcat作为服务器,下面来分析下源码的分析流程:
之前我们已经讲过了自动装配的原理,其实tomcat的实现机制也是从自动装配开始的。
1、ServletWebServerFactoryAutoConfiguration类
@Configuration(proxyBeanMethods = false)
@AutoConfigureOrder(Ordered.HIGHEST_PRECEDENCE)
@ConditionalOnClass(ServletRequest.class)
@ConditionalOnWebApplication(type = Type.SERVLET)
@EnableConfigurationProperties(ServerProperties.class)
@Import({ ServletWebServerFactoryAutoConfiguration.BeanPostProcessorsRegistrar.class,
		ServletWebServerFactoryConfiguration.EmbeddedTomcat.class,
		ServletWebServerFactoryConfiguration.EmbeddedJetty.class,
		ServletWebServerFactoryConfiguration.EmbeddedUndertow.class })
public class ServletWebServerFactoryAutoConfiguration {

	@Bean
	public ServletWebServerFactoryCustomizer servletWebServerFactoryCustomizer(ServerProperties serverProperties) {
		return new ServletWebServerFactoryCustomizer(serverProperties);
	}

	@Bean
	@ConditionalOnClass(name = "org.apache.catalina.startup.Tomcat")
	public TomcatServletWebServerFactoryCustomizer tomcatServletWebServerFactoryCustomizer(
			ServerProperties serverProperties) {
		return new TomcatServletWebServerFactoryCustomizer(serverProperties);
	}

	@Bean
	@ConditionalOnMissingFilterBean(ForwardedHeaderFilter.class)
	@ConditionalOnProperty(value = "server.forward-headers-strategy", havingValue = "framework")
	public FilterRegistrationBean<ForwardedHeaderFilter> forwardedHeaderFilter() {
		ForwardedHeaderFilter filter = new ForwardedHeaderFilter();
		FilterRegistrationBean<ForwardedHeaderFilter> registration = new FilterRegistrationBean<>(filter);
		registration.setDispatcherTypes(DispatcherType.REQUEST, DispatcherType.ASYNC, DispatcherType.ERROR);
		registration.setOrder(Ordered.HIGHEST_PRECEDENCE);
		return registration;
	}

	/**
	 * Registers a {@link WebServerFactoryCustomizerBeanPostProcessor}. Registered via
	 * {@link ImportBeanDefinitionRegistrar} for early registration.
	 */
	public static class BeanPostProcessorsRegistrar implements ImportBeanDefinitionRegistrar, BeanFactoryAware {

		private ConfigurableListableBeanFactory beanFactory;

		@Override
		public void setBeanFactory(BeanFactory beanFactory) throws BeansException {
			if (beanFactory instanceof ConfigurableListableBeanFactory) {
				this.beanFactory = (ConfigurableListableBeanFactory) beanFactory;
			}
		}

		@Override
		public void registerBeanDefinitions(AnnotationMetadata importingClassMetadata,
				BeanDefinitionRegistry registry) {
			if (this.beanFactory == null) {
				return;
			}
			registerSyntheticBeanIfMissing(registry, "webServerFactoryCustomizerBeanPostProcessor",
					WebServerFactoryCustomizerBeanPostProcessor.class);
			registerSyntheticBeanIfMissing(registry, "errorPageRegistrarBeanPostProcessor",
					ErrorPageRegistrarBeanPostProcessor.class);
		}

		private void registerSyntheticBeanIfMissing(BeanDefinitionRegistry registry, String name, Class<?> beanClass) {
			if (ObjectUtils.isEmpty(this.beanFactory.getBeanNamesForType(beanClass, true, false))) {
				RootBeanDefinition beanDefinition = new RootBeanDefinition(beanClass);
				beanDefinition.setSynthetic(true);
				registry.registerBeanDefinition(name, beanDefinition);
			}
		}

	}

}
从这个类上可以看到,当前配置类主要导入了BeanPostProcessorRegister,该类实现了ImportBeanDefinitionRegister接口,可以用来注册额外的BeanDefinition,同时,该类还导入了EmbeddedTomcat,EmbeddedJetty,EmbeddedUndertow三个类,可以根据用户的需求去选择使用哪一个web服务器,默认情况下使用的是tomcat
2、当自动装配功能完成之后会接着执行onRefresh的方法(ServletWebServerApplicationContext)
@Override
protected void onRefresh() {
    //创建主题对象,不用在意
	super.onRefresh();
	try {
        //开始创建web服务
		createWebServer();
	}
	catch (Throwable ex) {
		throw new ApplicationContextException("Unable to start web server", ex);
	}
}
3、创建web服务,默认获取的是tomcat的web容器(ServletWebServerApplicationContext)
private void createWebServer() {
	WebServer webServer = this.webServer;
	ServletContext servletContext = getServletContext();
	if (webServer == null && servletContext == null) {
        //获取servletWebServerFactory,从上下文注册bean中可以找到
		ServletWebServerFactory factory = getWebServerFactory();
        //获取servletContextInitializer,获取webServer
		this.webServer = factory.getWebServer(getSelfInitializer());
	}
	else if (servletContext != null) {
		try {
			getSelfInitializer().onStartup(servletContext);
		}
		catch (ServletException ex) {
			throw new ApplicationContextException("Cannot initialize servlet context", ex);
		}
	}
    //替换servlet相关的属性资源
	initPropertySources();
}
如何获取tomcat的bean的实例对象呢?从如下代码中可以看出
ServletWebServerApplicationContext
protected ServletWebServerFactory getWebServerFactory() {
		// Use bean names so that we don't consider the hierarchy
		String[] beanNames = getBeanFactory().getBeanNamesForType(ServletWebServerFactory.class);
		if (beanNames.length == 0) {
			throw new ApplicationContextException("Unable to start ServletWebServerApplicationContext due to missing "
					+ "ServletWebServerFactory bean.");
		}
		if (beanNames.length > 1) {
			throw new ApplicationContextException("Unable to start ServletWebServerApplicationContext due to multiple "
					+ "ServletWebServerFactory beans : " + StringUtils.arrayToCommaDelimitedString(beanNames));
		}
		return getBeanFactory().getBean(beanNames[0], ServletWebServerFactory.class);
	}
DefaultListableBeanFactoryf
    /*
    第一个参数type表示要查找的类型
    第二个参数表示是否考虑非单例bean
    第三个参数表示是否允许提早初始化
    */
	@Override
	public String[] getBeanNamesForType(@Nullable Class<?> type, boolean includeNonSingletons, boolean allowEagerInit) {
        //配置还未被冻结或者类型为null或者不允许早期初始化
		if (!isConfigurationFrozen() || type == null || !allowEagerInit) {
			return doGetBeanNamesForType(ResolvableType.forRawClass(type), includeNonSingletons, allowEagerInit);
		}
        //此处注意isConfigurationFrozen为false的时候表示beanDefinition可能还会发生更改和添加,所以不能进行缓存,如果允许非单例bean,那么从保存所有bean的集合中获取,否则从单例bean中获取
		Map<Class<?>, String[]> cache =
				(includeNonSingletons ? this.allBeanNamesByType : this.singletonBeanNamesByType);
		String[] resolvedBeanNames = cache.get(type);
		if (resolvedBeanNames != null) {
			return resolvedBeanNames;
		}
        //如果缓存中没有获取到,那么只能重新获取,获取到之后就存入缓存
		resolvedBeanNames = doGetBeanNamesForType(ResolvableType.forRawClass(type), includeNonSingletons, true);
		if (ClassUtils.isCacheSafe(type, getBeanClassLoader())) {
			cache.put(type, resolvedBeanNames);
		}
		return resolvedBeanNames;
	}
private String[] doGetBeanNamesForType(ResolvableType type, boolean includeNonSingletons, boolean allowEagerInit) {
    List<String> result = new ArrayList<>();

    // Check all bean definitions.
    for (String beanName : this.beanDefinitionNames) {
        // Only consider bean as eligible if the bean name
        // is not defined as alias for some other bean.
        //如果时别名则跳过(当前集合会保存所有的主beanname,并且不会保存别名,别名由beanfactory中别名map维护)
        if (!isAlias(beanName)) {
            try {
                //获取合并的beandefinition,合并的beandefinition是指spring整合了父beandefinition的属性,将其beandefinition编程了rootBeanDefinition
                RootBeanDefinition mbd = getMergedLocalBeanDefinition(beanName);
                // Only check bean definition if it is complete.
                //抽象的beandefinition是不做考虑,抽象的就是拿来继承的,如果允许早期初始化,那么直接短路,进入方法体,如果不允许早期初始化,那么需要进一步判断,如果是不允许早期初始化的,并且beanClass已经被加载或者它是可以早期初始化的,那么如果当前bean是工厂bean,并且指定的bean又是工厂那么这个bean就必须被早期初始化,也就是说就不符合我们制定的allowEagerInit为false的情况,直接跳过

                if (!mbd.isAbstract() && (allowEagerInit ||
                                          (mbd.hasBeanClass() || !mbd.isLazyInit() || isAllowEagerClassLoading()) &&
                                          !requiresEagerInitForType(mbd.getFactoryBeanName()))) {
                    //如果当前bean是工厂bean
                    boolean isFactoryBean = isFactoryBean(beanName, mbd);
                    //如果允许早期初始化,那么基本上会调用最后的isTypeMatch方法,这个方法会导致工厂的实例化,但是当前不允许进行早期实例化在不允许早期实例化的情况下,如果当前bean是工厂bean,那么它只能在已经被创建的情况下调用isTypeMatch进行匹配判断否则只能宣告匹配失败,返回false
                    BeanDefinitionHolder dbd = mbd.getDecoratedDefinition();
                    boolean matchFound = false;
                    boolean allowFactoryBeanInit = allowEagerInit || containsSingleton(beanName);
                    boolean isNonLazyDecorated = dbd != null && !mbd.isLazyInit();
                    if (!isFactoryBean) {
                        if (includeNonSingletons || isSingleton(beanName, mbd, dbd)) {
                            matchFound = isTypeMatch(beanName, type, allowFactoryBeanInit);
                        }
                    }
                    else  {
                        //如果没有匹配到并且他是个工厂bean,那么加上&前缀,表示要获取factorybean类型的bean
                        if (includeNonSingletons || isNonLazyDecorated ||
                            (allowFactoryBeanInit && isSingleton(beanName, mbd, dbd))) {
                            matchFound = isTypeMatch(beanName, type, allowFactoryBeanInit);
                        }
                        if (!matchFound) {
                            // In case of FactoryBean, try to match FactoryBean instance itself next.
                            beanName = FACTORY_BEAN_PREFIX + beanName;
                            matchFound = isTypeMatch(beanName, type, allowFactoryBeanInit);
                        }
                    }
                    //找到便记录到result集合中,等待返回
                    if (matchFound) {
                        result.add(beanName);
                    }
                }
            }
            catch (CannotLoadBeanClassException | BeanDefinitionStoreException ex) {
                if (allowEagerInit) {
                    throw ex;
                }
                // Probably a placeholder: let's ignore it for type matching purposes.
                LogMessage message = (ex instanceof CannotLoadBeanClassException) ?
                    LogMessage.format("Ignoring bean class loading failure for bean '%s'", beanName) :
                LogMessage.format("Ignoring unresolvable metadata in bean definition '%s'", beanName);
                logger.trace(message, ex);
                onSuppressedException(ex);
            }
        }
    }
    // Check manually registered singletons too.
    //从单例注册集合中获取,这个单例集合石保存spring内部注入的单例对象,他们的特点就是没有beanDefinition
    for (String beanName : this.manualSingletonNames) {
        try {
            // In case of FactoryBean, match object created by FactoryBean.
            //如果是工厂bean,那么调用其getObjectType去匹配是否符合指定类型
            if (isFactoryBean(beanName)) {
                if ((includeNonSingletons || isSingleton(beanName)) && isTypeMatch(beanName, type)) {
                    result.add(beanName);
                    // Match found for this bean: do not match FactoryBean itself anymore.
                    continue;
                }
                // In case of FactoryBean, try to match FactoryBean itself next.
                beanName = FACTORY_BEAN_PREFIX + beanName;
            }
            // Match raw bean instance (might be raw FactoryBean).
            //如果没有匹配成功,那么匹配工厂类
            if (isTypeMatch(beanName, type)) {
                result.add(beanName);
            }
        }
        catch (NoSuchBeanDefinitionException ex) {
            // Shouldn't happen - probably a result of circular reference resolution...
            logger.trace(LogMessage.format("Failed to check manually registered singleton with name '%s'", beanName), ex);
        }
    }

    return StringUtils.toStringArray(result);
}
4、tomcat对象的初始化(ServletWebServerApplicationContext)
private org.springframework.boot.web.servlet.ServletContextInitializer getSelfInitializer() {
    return this::selfInitialize;
}

private void selfInitialize(ServletContext servletContext) throws ServletException {
    //使用给定的完全加载的servletContext准备WebApplicationContext
	prepareWebApplicationContext(servletContext);
	registerApplicationScope(servletContext);
    //使用给定的BeanFactory注册特定于web的作用域bean(contextParameters,contextAttributes)
	WebApplicationContextUtils.registerEnvironmentBeans(getBeanFactory(), servletContext);
	for (ServletContextInitializer beans : getServletContextInitializerBeans()) {
		beans.onStartup(servletContext);
	}
}
5、完成内嵌tomcat的api调用(TomcatServletWebServerFactory)
@Override
public WebServer getWebServer(ServletContextInitializer... initializers) {
	if (this.disableMBeanRegistry) {
		Registry.disableRegistry();
	}
    //完成tomcat的api调用
	Tomcat tomcat = new Tomcat();
	File baseDir = (this.baseDirectory != null) ? this.baseDirectory : createTempDir("tomcat");
	tomcat.setBaseDir(baseDir.getAbsolutePath());
	Connector connector = new Connector(this.protocol);
	connector.setThrowOnFailure(true);
	tomcat.getService().addConnector(connector);
	customizeConnector(connector);
	tomcat.setConnector(connector);
	tomcat.getHost().setAutoDeploy(false);
	configureEngine(tomcat.getEngine());
	for (Connector additionalConnector : this.additionalTomcatConnectors) {
		tomcat.getService().addConnector(additionalConnector);
	}
    //准备tomcatEmbeddedContext并设置到tomcat中
	prepareContext(tomcat.getHost(), initializers);
    //构建tomcatWebServer
	return getTomcatWebServer(tomcat);
}
6、获取tomcat服务(TomcatServletWebServerFactory)
protected TomcatWebServer getTomcatWebServer(Tomcat tomcat) {
	return new TomcatWebServer(tomcat, getPort() >= 0);
}
public TomcatWebServer(Tomcat tomcat, boolean autoStart) {
	Assert.notNull(tomcat, "Tomcat Server must not be null");
	this.tomcat = tomcat;
	this.autoStart = autoStart;
    //初始化
	initialize();
}
7、完成tomcat的初始化
private void initialize() throws WebServerException {
		logger.info("Tomcat initialized with port(s): " + getPortsDescription(false));
		synchronized (this.monitor) {
			try {
                //engineName拼接instanceId
				addInstanceIdToEngineName();

				Context context = findContext();
				context.addLifecycleListener((event) -> {
					if (context.equals(event.getSource()) && Lifecycle.START_EVENT.equals(event.getType())) {
						// Remove service connectors so that protocol binding doesn't
						// happen when the service is started.
                        //删除Connectors,以便再启动服务时不发生协议绑定
						removeServiceConnectors();
					}
				});

				// Start the server to trigger initialization listeners
                //启动服务触发初始化监听器
				this.tomcat.start();

				// We can re-throw failure exception directly in the main thread
                //在主线程中重新抛出失败异常
				rethrowDeferredStartupExceptions();

				try {
					ContextBindings.bindClassLoader(context, context.getNamingToken(), getClass().getClassLoader());
				}
				catch (NamingException ex) {
					// Naming is not enabled. Continue
				}

				// Unlike Jetty, all Tomcat threads are daemon threads. We create a
				// blocking non-daemon to stop immediate shutdown
                //所有的tomcat线程都是守护线程,我们创建一个阻塞非守护线程来避免立即关闭
				startDaemonAwaitThread();
			}
			catch (Exception ex) {
                //异常停止tomcat
				stopSilently();
				destroySilently();
				throw new WebServerException("Unable to start embedded Tomcat", ex);
			}
		}
	}
-----------------------
    	private void removeServiceConnectors() {
		for (Service service : this.tomcat.getServer().findServices()) {
			Connector[] connectors = service.findConnectors().clone();
            //将将要移除的conntector放到缓存中暂存
			this.serviceConnectors.put(service, connectors);
			for (Connector connector : connectors) {
                //移除connector
				service.removeConnector(connector);
			}
		}
	}
8、除了refresh方法之外,在finishRefresh()方法中也对tomcat做了相关的处理(ServletWebServerApplicationContext)
	protected void finishRefresh() {
        //调用父类的finishRefresh方法
		super.finishRefresh();
        //启动webServer
		WebServer webServer = startWebServer();
		if (webServer != null) {
            //发布webServer初始化完成事件
			publishEvent(new ServletWebServerInitializedEvent(webServer, this));
		}
	}
ServletWebServerApplicationContext
	private WebServer startWebServer() {
		WebServer webServer = this.webServer;
		if (webServer != null) {
            //启动webserver
			webServer.start();
		}
		return webServer;
	}
TomcatWebServer
	public void start() throws WebServerException {
		synchronized (this.monitor) {
			if (this.started) {
				return;
			}
			try {
                //添加之前移除的connector
				addPreviouslyRemovedConnectors();
				Connector connector = this.tomcat.getConnector();
				if (connector != null && this.autoStart) {
                    //延迟加载启动
					performDeferredLoadOnStartup();
				}
                //检查connector启动状态是否为失败,失败抛出异常
				checkThatConnectorsHaveStarted();
				this.started = true;
				logger.info("Tomcat started on port(s): " + getPortsDescription(true) + " with context path '"
						+ getContextPath() + "'");
			}
			catch (ConnectorStartFailedException ex) {
                //异常停止tomcat
				stopSilently();
				throw ex;
			}
			catch (Exception ex) {
				if (findBindException(ex) != null) {
					throw new PortInUseException(this.tomcat.getConnector().getPort());
				}
				throw new WebServerException("Unable to start embedded Tomcat server", ex);
			}
			finally {
				Context context = findContext();
                //context解绑classload
				ContextBindings.unbindClassLoader(context, context.getNamingToken(), getClass().getClassLoader());
			}
		}
	}
private void addPreviouslyRemovedConnectors() {
		Service[] services = this.tomcat.getServer().findServices();
		for (Service service : services) {
            //从上面移除connector添加的缓存中取出connector
			Connector[] connectors = this.serviceConnectors.get(service);
			if (connectors != null) {
				for (Connector connector : connectors) {
                    //添加到tomcat service中
					service.addConnector(connector);
					if (!this.autoStart) {
                        //如果不是自动启动,则暂停connector
						stopProtocolHandler(connector);
					}
				}
                //添加完成后移除
				this.serviceConnectors.remove(service);
			}
		}
	}
private void performDeferredLoadOnStartup() {
		try {
			for (Container child : this.tomcat.getHost().findChildren()) {
				if (child instanceof TomcatEmbeddedContext) {
                    //延迟加载启动
					((TomcatEmbeddedContext) child).deferredLoadOnStartup();
				}
			}
		}
		catch (Exception ex) {
			if (ex instanceof WebServerException) {
				throw (WebServerException) ex;
			}
			throw new WebServerException("Unable to start embedded Tomcat connectors", ex);
		}
	}
	void deferredLoadOnStartup() throws LifecycleException {
		doWithThreadContextClassLoader(getLoader().getClassLoader(),
				() -> getLoadOnStartupWrappers(findChildren()).forEach(this::load));
	}
9、应用上下文关闭时会调用tomcat的关闭
在refreshContext中注册一个关闭的钩子函数,而钩子函数可以完成关闭的功能
ServletWebServerApplicationContext
	@Override
	protected void onClose() {
		super.onClose();
		stopAndReleaseWebServer();
	}
	private void stopAndReleaseWebServer() {
		WebServer webServer = this.webServer;
		if (webServer != null) {
			try {
				webServer.stop();
				this.webServer = null;
			}
			catch (Exception ex) {
				throw new IllegalStateException(ex);
			}
		}
	}
TomcatWebServer
@Override
	public void stop() throws WebServerException {
		synchronized (this.monitor) {
			boolean wasStarted = this.started;
			try {
				this.started = false;
				try {
					stopTomcat();
					this.tomcat.destroy();
				}
				catch (LifecycleException ex) {
					// swallow and continue
				}
			}
			catch (Exception ex) {
				throw new WebServerException("Unable to stop embedded Tomcat", ex);
			}
			finally {
				if (wasStarted) {
					containerCounter.decrementAndGet();
				}
			}
		}
	}
springboot源码解析(四):监听器
在看springboot的源码过程中,发现内部使用了大量的监听器,下面来看下监听器的作用。
在springboot的监听器有如下两类:
# Run Listeners
#事件发布运行监听器,是springboot中配置的唯一一个应用运行监听器,作用是通过一个多路广播器,将springboot运行状态的变化,构建成事件,并广播给各个监听器
org.springframework.boot.SpringApplicationRunListener=\
org.springframework.boot.context.event.EventPublishingRunListener

# Application Listeners
org.springframework.context.ApplicationListener=\
org.springframework.boot.ClearCachesApplicationListener(),\
org.springframework.boot.builder.ParentContextCloserApplicationListener,\
org.springframework.boot.cloud.CloudFoundryVcapEnvironmentPostProcessor,\
org.springframework.boot.context.FileEncodingApplicationListener,\
org.springframework.boot.context.config.AnsiOutputApplicationListener,\
org.springframework.boot.context.config.ConfigFileApplicationListener,\
org.springframework.boot.context.config.DelegatingApplicationListener,\
org.springframework.boot.context.logging.ClasspathLoggingApplicationListener,\
org.springframework.boot.context.logging.LoggingApplicationListener,\
org.springframework.boot.liquibase.LiquibaseServiceLocatorApplicationListener

# Application Listeners
org.springframework.context.ApplicationListener=\
org.springframework.boot.autoconfigure.BackgroundPreinitializer
当程序开始运行的时候,可以看到启动了一个运行时监听器,并且创建了一个SpringApplicationRunListeners对象,该对象是一个封装工具类,封装了所有的启动监听器:代码如下
class SpringApplicationRunListeners {

	private final Log log;

    //启动类监听器
	private final List<SpringApplicationRunListener> listeners;

	SpringApplicationRunListeners(Log log, Collection<? extends SpringApplicationRunListener> listeners) {
		this.log = log;
		this.listeners = new ArrayList<>(listeners);
	}
	//启动上下文事件监听
	void starting() {
		for (SpringApplicationRunListener listener : this.listeners) {
			listener.starting();
		}
	}
	//environment准备完毕事件监听
	void environmentPrepared(ConfigurableEnvironment environment) {
		for (SpringApplicationRunListener listener : this.listeners) {
			listener.environmentPrepared(environment);
		}
	}
	//spring上下文准备完毕事件监听
	void contextPrepared(ConfigurableApplicationContext context) {
		for (SpringApplicationRunListener listener : this.listeners) {
			listener.contextPrepared(context);
		}
	}
	//上下文配置类加载事件监听
	void contextLoaded(ConfigurableApplicationContext context) {
		for (SpringApplicationRunListener listener : this.listeners) {
			listener.contextLoaded(context);
		}
	}
	//上下文刷新调用事件
	void started(ConfigurableApplicationContext context) {
		for (SpringApplicationRunListener listener : this.listeners) {
			listener.started(context);
		}
	}
	//上下文刷新完成,在run方法执行完之前调用该事件
	void running(ConfigurableApplicationContext context) {
		for (SpringApplicationRunListener listener : this.listeners) {
			listener.running(context);
		}
	}
	//在运行过程中失败调起的事件
	void failed(ConfigurableApplicationContext context, Throwable exception) {
		for (SpringApplicationRunListener listener : this.listeners) {
			callFailedListener(listener, context, exception);
		}
	}

	private void callFailedListener(SpringApplicationRunListener listener, ConfigurableApplicationContext context,
			Throwable exception) {
		try {
			listener.failed(context, exception);
		}
		catch (Throwable ex) {
			if (exception == null) {
				ReflectionUtils.rethrowRuntimeException(ex);
			}
			if (this.log.isDebugEnabled()) {
				this.log.error("Error handling failed", ex);
			}
			else {
				String message = ex.getMessage();
				message = (message != null) ? message : "no error message";
				this.log.warn("Error handling failed (" + message + ")");
			}
		}
	}

}
在启动源码的流程中,我们知道不同的方法会在不同的时间点触发执行,然后广播出不同的事件,进入到EventPublishingRunListener类中
public EventPublishingRunListener(SpringApplication application, String[] args) {
    this.application = application;
    this.args = args;
    this.initialMulticaster = new SimpleApplicationEventMulticaster();
    for (ApplicationListener<?> listener : application.getListeners()) {
        this.initialMulticaster.addApplicationListener(listener);
    }
}
在当前类的构造方法中默认创建了SimpleApplicationEventMulticaster类,用来完成创建全局的事件发布功能
	@Override
	public void starting() {
		this.initialMulticaster.multicastEvent(new ApplicationStartingEvent(this.application, this.args));
	}

	@Override
	public void environmentPrepared(ConfigurableEnvironment environment) {
		this.initialMulticaster
				.multicastEvent(new ApplicationEnvironmentPreparedEvent(this.application, this.args, environment));
	}

	@Override
	public void contextPrepared(ConfigurableApplicationContext context) {
		this.initialMulticaster
				.multicastEvent(new ApplicationContextInitializedEvent(this.application, this.args, context));
	}

	@Override
	public void contextLoaded(ConfigurableApplicationContext context) {
		for (ApplicationListener<?> listener : this.application.getListeners()) {
			if (listener instanceof ApplicationContextAware) {
				((ApplicationContextAware) listener).setApplicationContext(context);
			}
			context.addApplicationListener(listener);
		}
		this.initialMulticaster.multicastEvent(new ApplicationPreparedEvent(this.application, this.args, context));
	}

	@Override
	public void started(ConfigurableApplicationContext context) {
		context.publishEvent(new ApplicationStartedEvent(this.application, this.args, context));
	}

	@Override
	public void running(ConfigurableApplicationContext context) {
		context.publishEvent(new ApplicationReadyEvent(this.application, this.args, context));
	}

	@Override
	public void failed(ConfigurableApplicationContext context, Throwable exception) {
		ApplicationFailedEvent event = new ApplicationFailedEvent(this.application, this.args, context, exception);
		if (context != null && context.isActive()) {
			// Listeners have been registered to the application context so we should
			// use it at this point if we can
			context.publishEvent(event);
		}
		else {
			// An inactive context may not have a multicaster so we use our multicaster to
			// call all of the context's listeners instead
			if (context instanceof AbstractApplicationContext) {
				for (ApplicationListener<?> listener : ((AbstractApplicationContext) context)
						.getApplicationListeners()) {
					this.initialMulticaster.addApplicationListener(listener);
				}
			}
			this.initialMulticaster.setErrorHandler(new LoggingErrorHandler());
			this.initialMulticaster.multicastEvent(event);
		}
	}
在进行事件广播的时候,会进入如下方法:
	@Override
	public void multicastEvent(final ApplicationEvent event, @Nullable ResolvableType eventType) {
		ResolvableType type = (eventType != null ? eventType : resolveDefaultEventType(event));
        //获取线程池
		Executor executor = getTaskExecutor();
        //根据事件类型选取需要通知的监听器
		for (ApplicationListener<?> listener : getApplicationListeners(event, type)) {
			//如果不为空,则异步执行
            if (executor != null) {
				executor.execute(() -> invokeListener(listener, event));
			}
			else {
                //如果为空,则同步执行
				invokeListener(listener, event);
			}
		}
	}
在进行事件广播之前,需要将监听器进行过滤,符合类型的留下,不符合类型的过滤掉
	protected Collection<ApplicationListener<?>> getApplicationListeners(
			ApplicationEvent event, ResolvableType eventType) {

		Object source = event.getSource();
		Class<?> sourceType = (source != null ? source.getClass() : null);
		ListenerCacheKey cacheKey = new ListenerCacheKey(eventType, sourceType);

		// Quick check for existing entry on ConcurrentHashMap...
		ListenerRetriever retriever = this.retrieverCache.get(cacheKey);
		if (retriever != null) {
			return retriever.getApplicationListeners();
		}

		if (this.beanClassLoader == null ||
				(ClassUtils.isCacheSafe(event.getClass(), this.beanClassLoader) &&
						(sourceType == null || ClassUtils.isCacheSafe(sourceType, this.beanClassLoader)))) {
			// Fully synchronized building and caching of a ListenerRetriever
			synchronized (this.retrievalMutex) {
				retriever = this.retrieverCache.get(cacheKey);
				if (retriever != null) {
					return retriever.getApplicationListeners();
				}
				retriever = new ListenerRetriever(true);
				Collection<ApplicationListener<?>> listeners =
						retrieveApplicationListeners(eventType, sourceType, retriever);
				this.retrieverCache.put(cacheKey, retriever);
				return listeners;
			}
		}
		else {
			// No ListenerRetriever caching -> no synchronization necessary
			return retrieveApplicationListeners(eventType, sourceType, null);
		}
	}
实际处理判断逻辑的类:
	private Collection<ApplicationListener<?>> retrieveApplicationListeners(
			ResolvableType eventType, @Nullable Class<?> sourceType, @Nullable ListenerRetriever retriever) {

		List<ApplicationListener<?>> allListeners = new ArrayList<>();
		Set<ApplicationListener<?>> listeners;
		Set<String> listenerBeans;
		synchronized (this.retrievalMutex) {
			listeners = new LinkedHashSet<>(this.defaultRetriever.applicationListeners);
			listenerBeans = new LinkedHashSet<>(this.defaultRetriever.applicationListenerBeans);
		}

		// Add programmatically registered listeners, including ones coming
		// from ApplicationListenerDetector (singleton beans and inner beans).
		for (ApplicationListener<?> listener : listeners) {
			if (supportsEvent(listener, eventType, sourceType)) {
				if (retriever != null) {
					retriever.applicationListeners.add(listener);
				}
				allListeners.add(listener);
			}
		}

		// Add listeners by bean name, potentially overlapping with programmatically
		// registered listeners above - but here potentially with additional metadata.
		if (!listenerBeans.isEmpty()) {
			ConfigurableBeanFactory beanFactory = getBeanFactory();
			for (String listenerBeanName : listenerBeans) {
				try {
					if (supportsEvent(beanFactory, listenerBeanName, eventType)) {
						ApplicationListener<?> listener =
								beanFactory.getBean(listenerBeanName, ApplicationListener.class);
						if (!allListeners.contains(listener) && supportsEvent(listener, eventType, sourceType)) {
							if (retriever != null) {
								if (beanFactory.isSingleton(listenerBeanName)) {
									retriever.applicationListeners.add(listener);
								}
								else {
									retriever.applicationListenerBeans.add(listenerBeanName);
								}
							}
							allListeners.add(listener);
						}
					}
					else {
						// Remove non-matching listeners that originally came from
						// ApplicationListenerDetector, possibly ruled out by additional
						// BeanDefinition metadata (e.g. factory method generics) above.
						Object listener = beanFactory.getSingleton(listenerBeanName);
						if (retriever != null) {
							retriever.applicationListeners.remove(listener);
						}
						allListeners.remove(listener);
					}
				}
				catch (NoSuchBeanDefinitionException ex) {
					// Singleton listener instance (without backing bean definition) disappeared -
					// probably in the middle of the destruction phase
				}
			}
		}

		AnnotationAwareOrderComparator.sort(allListeners);
		if (retriever != null && retriever.applicationListenerBeans.isEmpty()) {
			retriever.applicationListeners.clear();
			retriever.applicationListeners.addAll(allListeners);
		}
		return allListeners;
	}
在监听器实例化之前,检查是否符合固定的类型
	protected boolean supportsEvent(
        ApplicationListener<?> listener, ResolvableType eventType, @Nullable Class<?> sourceType) {
		//判断监听器是否是GenericApplicationListener子类,如不是返回一个GenericApplicationListenerAdapter
		GenericApplicationListener smartListener = (listener instanceof GenericApplicationListener ?
				(GenericApplicationListener) listener : new GenericApplicationListenerAdapter(listener));
		return (smartListener.supportsEventType(eventType) && smartListener.supportsSourceType(sourceType));
    }
public interface GenericApplicationListener extends ApplicationListener<ApplicationEvent>, Ordered {
	boolean supportsEventType(ResolvableType eventType);
	default boolean supportsSourceType(@Nullable Class<?> sourceType) {
		return true;
	}
	@Override
	default int getOrder() {
		return LOWEST_PRECEDENCE;
	}

}
此时可以看到GenericApplicationListener类,该类是spring提供的用于重写匹配监听器事件的接口,如果需要判断的监听器是GenericApplicationListener的子类,说明类型匹配方法已被重现,就调用子类的匹配方法,如果不是,提供一个默认的适配器来匹配GenericApplicationListenerAdapter
	public boolean supportsEventType(ResolvableType eventType) {
		if (this.delegate instanceof SmartApplicationListener) {
			Class<? extends ApplicationEvent> eventClass = (Class<? extends ApplicationEvent>) eventType.resolve();
			return (eventClass != null && ((SmartApplicationListener) this.delegate).supportsEventType(eventClass));
		}
		else {
			return (this.declaredEventType == null || this.declaredEventType.isAssignableFrom(eventType));
		}
	}
可以看到该类最终调用的是declaredEventType.isAssignableFrom(eventType)方法,也就是说,如果我们没有重写监听器匹配方法,那么发布的事件 event 会被监听 event以及监听event的父类的监听器监听到。
java学习不易,点个赞再走呗~😜
这是我自己在学习时的笔记,如有雷同或侵权,请联系我~


 1753
1753


 被折叠的 条评论
为什么被折叠?
被折叠的 条评论
为什么被折叠?
 到【灌水乐园】发言


