


一,数据绑定基本定义:
引用百度的数据绑定定义:
简单绑定是将一个用户界面元素(控件)的属性绑定到一个类型(对象)实例上的某个属性的方法。例如,如果一个开发者有一个Customer类型的实例,那么他就可以把Customer的“Name”属性绑定到一个TextBox的“Text”属性上。“绑定”了这2个属性之后,对TextBox的Text属性的更改将“传播”到Customer的Name属性,而对Customer的Name属性的更改同样会“传播”到TextBox的Text属性。
二,springMVC支持的数据绑定方式
SpringMVC的各种参数包括对象java对象,集合,Map以及基本数据类型的绑定方式
1.基本类型,包装类型的绑定
1.1基本数据类型的绑定
基本类型的数据绑定需要注意的是:后台请求方法中声明的参数前台是必需传的,其次是类型必须相同
controller类:
@Controller
public class DataBind {
//    http://localhost:8080/dataBind/test.do?age=11
      @RequestMapping("/test")
    public String  test(int age){

        System.out.println(age);

    return "success";
        }
}
form表单
<form action="test.do" method="post">
   <input name="age" value="11" type="text"/>
   ......
</form>
注意:
1.参数名一致:表单中input的name值和Controller的参数变量名保持一致 ,就能完成基本数据类型的数据绑定.
2.参数类型一致:如果在后台参数定义的是int类型,那么前台传的值也只能是int类型否则springMVC会进行拦截报一个400参数错误(数据转换的异常)
3.参数不能为空:从jsp提交过来的数据为null或者""的话,会出现500异常。也就是说,必须保证表单传递过来的数据不能为null或"".
对于以上问题可以采用@RequestParam注解来解决
@Controller
public class DataBind {
    //
    @RequestMapping("/test")
    public String  test(@RequestParam(value ="age" ,required = false) int userAge){

        System.out.println(userAge);

    return "success";
        }
}
@RequestParam(value ="name" ,required = false) value值是参数别名与表单一致,required 默认值true为必传.
1.2包装类型的绑定
controller类:
 @RequestMapping("/test3")
    public  String test3(Integer age){

        System.out.println(age);

    }
form表单:
<form action="test.do" method="post">
   <input name="age" value="10" type="text"/>
   ......
</form>
和基本数据类型基本一样,不同之处在于,JSP表单传递过来的数据可以为null或"",以上面代码为例,如果jsp中num为""或者表单中无age这个input,那么,Controller方法参数中的num值则为null。
2.简单对象,复杂对象的绑定
2.1简单对象&多层对象
1. 简单POJO类对象:
public class User {

    private String firstName;

    private String lastName;

   //省略get&set ...

}
controller类
  @RequestMapping("/test4")
    public  String test4(User user){

        System.out.println(user);
        return "success";
    }
form表单
<form action="test.do" method="post">
   <input name="firstName" value="张" type="text"/>
   <input name="lastName" value="三" type="text"/>
   ......
</form>
简单对象:请求方式的参数Key即为对象属性名,不用加“对象名.”的前缀
2.多层对象
POJO对象
public class ContactInfo {

    private String tel;

    private String address;

    //。。。省略get&set

}

public class User {

    private String firstName;

    private String lastName;

    private ContactInfo contactInfo;

   // 。。。 省略get&set
controller类和简单对象没有什么区别,参数类型都是User(pojo类型对象)
form表单
<form action="<%=basePath%>test5.do" method="get">
    姓:<input name="firstName"/>
    名:<input name="lastName"/>
    地址:<input name="contactInfo.address"/>
...
</form>
多层级对象:第二级以上对象必须加“对象名.”的前缀。
2.2.同属性的多对象
同属性的多对象 在control中声明@initBinder的WebDataBinder的前缀
当两个对象含有相同属性时,为了精确的匹配绑定一种方法是通过命名的规范去规避,另一中解决办法使用@InitBinder对请求参数加前缀
java代码
@Controller
public class dataBind{
    @InitBinder("teacher")
    public void initBinder1(WebDataBinder binder){
        binder.setFieldDefaultPrefix("teacher.");
    }
    @InitBinder("student")
    public void initBinder2(WebDataBinder binder){
        binder.setFieldDefaultPrefix("student.");
    }

    //URL映射
    @RequestMapping(value="/save", method = RequestMethod.GET)
    public ModelAndView save(Teacher teacher,Student student) {
        System.out.println(teacher.getName()+" "+student.getName());
        return null;
} 注意:当save的参数名与对象名不一致(即参数名不为类名的小写)时,需要在参数前加@ModelAttribute()注解,同时保证@InitBinder的value值与@ModelAttribute的value值一致,如果不指定value值,那么所有的都将使用。
这种方式的缺点:
1、不支持Path variable的绑定,如/test1/{user1.id}这种情况的绑定;
2、不支持如集合/数组的绑定;
 @InitBinder("user1")
    public  void initUser(WebDataBinder binder){
        binder.setFieldDefaultPrefix("user.");
    }
    @InitBinder("student1")
    public  void initStudent(WebDataBinder binder){
        binder.setFieldDefaultPrefix("student.");
    }
  @RequestMapping("/test6")
    public  String test6(@ModelAttribute("student1")Student a,@ModelAttribute("user1")User b){
        System.out.println(a);
        System.out.println(b);

    return "success";
    }
3.List,Set,Map类型的数据绑定
3.1 List类型的数据绑定
springMVC 不支持list类型的直接转换,需包装成object。
public class User {

    private String firstName;

    private String lastName;

    // 。。。 省略get&set

}

       public class UserListForm {

    private List<User> users;

    // 。。。 省略get&set

}
@RequestMapping("test")
public void test(UserListForm userForm) {
    for (User user : userForm.getUsers()) {
        System.out.println(user.getFirstName() + " - " + user.getLastName());
    }
}
form表单
<form action="test.do" method="post">
   <table>
      <thead>
         <tr>
            <th>First Name</th>
            <th>Last Name</th>
         </tr>
      </thead>
      <tfoot>
         <tr>
            <td colspan="2"><input type="submit" value="Save" /></td>
         </tr>
      </tfoot>
      <tbody>
         <tr>
            <td><input name="users[0].firstName" value="aaa" /></td>
            <td><input name="users[0].lastName" value="bbb" /></td>
         </tr>
         <tr>
            <td><input name="users[1].firstName" value="ccc" /></td>
            <td><input name="users[1].lastName" value="ddd" /></td>
         </tr>
         <tr>
            <td><input name="users[2].firstName" value="eee" /></td>
            <td><input name="users[2].lastName" value="fff" /></td>
         </tr>
      </tbody>
   </table>
</form>
这里的UserListForm对象里面的属性被定义成List,而不是普通自定义对象。所以,在JSP中需要指定List的下标。值得一提的是,Spring会创建一个以最大下标值为size的List对象,所以,如果JSP表单中有动态添加行、删除行的情况,就需要特别注意,譬如一个表格,用户在使用过程中经过多次删除行、增加行的操作之后,下标值就会与实际大小不一致,这时候,List中的对象,只有在jsp表单中对应有下标的那些才会有值,否则会为null.
list集合绑定的时候 下标最好是连续的 否则可能造成后台资源浪费
3.2 Set类型的数据绑定
Set和List类似,也需要绑定在对象上,而不能直接写在Controller方法的参数中。但是,绑定Set数据时,必须先在Set对象中add相应的数量的,即Set绑定时需初始化
public class User {

    private String firstName;

    private String lastName;
//...省略set&get

}

public class UserSetForm {

    private Set<User> users = new HashSet<User>();

    public UserSetForm(){
        users.add(new User());
        users.add(new User());
        users.add(new User());
    }

   //...省略set&get

} 要使用Set的排重功能必须在对象中覆写hashcode和equals方法,至于为什么要重写hashcode和equals方法可参见:https://my.oschina.net/u/3406827/blog/897561
<form action="test.do" method="post">
   <table>
      <thead>
         <tr>
            <th>First Name</th>
            <th>Last Name</th>
         </tr>
      </thead>
      <tfoot>
         <tr>
            <td colspan="2"><input type="submit" value="Save" /></td>
         </tr>
      </tfoot>
      <tbody>
         <tr>
            <td><input name="users[0].firstName" value="aaa" /></td>
            <td><input name="users[0].lastName" value="bbb" /></td>
         </tr>
         <tr>
            <td><input name="users[1].firstName" value="ccc" /></td>
            <td><input name="users[1].lastName" value="ddd" /></td>
         </tr>
         <tr>
            <td><input name="users[2].firstName" value="eee" /></td>
            <td><input name="users[2].lastName" value="fff" /></td>
         </tr>
      </tbody>
   </table>
</form>
基本和List绑定类似。
要特别提醒的是,如果最大下标值大于Set的size,则会抛出org.springframework.beans.InvalidPropertyException异常
spingMVC在对集合进行绑定时,优先选择List
3.3 Map类型的数据绑定
Map类型的数据绑定也能用在对象的去重,因为Map的key值是唯一的.
public class User {

    private String firstName;

    private String lastName;

    。。。

}

public class UserMapForm {

    private Map<String, User> users;

    。。。

}

@RequestMapping("test")
public void test(UserMapForm userForm) {
    for (Map.Entry<String, User> entry : userForm.getUsers().entrySet()) {
        System.out.println(entry.getKey() + ": " + entry.getValue().getFirstName() + " - " +
                                 entry.getValue().getLastName());
    }
}
<form action="test.do" method="post">
   <table>
      <thead>
         <tr>
            <th>First Name</th>
            <th>Last Name</th>
         </tr>
      </thead>
      <tfoot>
         <tr>
            <td colspan="2"><input type="submit" value="Save" /></td>
         </tr>
      </tfoot>
      <tbody>
         <tr>
            <td><input name="users['x'].firstName" value="aaa" /></td>
            <td><input name="users['x'].lastName" value="bbb" /></td>
         </tr>
         <tr>
            <td><input name="users['y'].firstName" value="ccc" /></td>
            <td><input name="users['y'].lastName" value="ddd" /></td>
         </tr>
         <tr>
            <td><input name="users['z'].firstName" value="eee" /></td>
            <td><input name="users['z'].lastName" value="fff" /></td>
         </tr>
      </tbody>
   </table>
</form>
x即为Map的key,firstName即为User对象的属相
4.Json,Xml类型的数据绑定
4.1Json类型的数据绑定
@RequestBody把传过来的Json数据反序列化绑定到控制器参数上
对于JOSN类型的参数绑定一般应用的场景是在使用AJax请求.而在SpringMVC环境中,@RequestBody接收的是一个Json对象的字符串,而不是一个Json对象.可以用 JSON.stringify(data)的方式就能将对象变成字符串。同时ajax请求的时候也要指定dataType: "json",contentType:"application/json" 这样就可以轻易的将一个对象或者List传到Java端,使用@RequestBody即可绑定对象或者List.
JavaScript 代码:
<script type="text/javascript">
    $(document).ready(function(){
        var saveDataAry=[];
        var data1={"userName":"test","address":"gz"};
        var data2={"userName":"ququ","address":"gr"};
        saveDataAry.push(data1);
        saveDataAry.push(data2);
        $.ajax({
            type:"POST",
            url:"user/saveUser",
            dataType:"json",
            contentType:"application/json",
            data:JSON.stringify(saveData),
            success:function(data){
               //...tosomething
            }
         });
    });
</script>
controller方法:
 @RequestMapping(value = "test", method = {RequestMethod.POST }})
    @ResponseBody
    public void saveUser(@RequestBody List<User> users) {
         userService.batchSave(users);
    }
4.2Xml类型的数据绑定
1.SpingMVC对象Xml类型的数据绑定需要spring-oxm jar包支持.同样也是@RequestBody把传过来的Xml数据反序列化绑定到控制器参数上
2.xml 数据绑定:必须在实体类里面加注解@XmlRootElement(根节点),在属性上添加XmlElement (子节点)ex:@XmlElement(name="age"):此时就会将xml 里面对应的age数据添加到实体类中的age属性中去。
model对象的处理:
@XmlRootElement(name="admin")//根节点别名
public class Admin {
    private  String name;
    private  String age;
    @XmlElement(name="name")//在get方法在夹@XmlElement 子节点别名
    public String getName() {
        return name;
    }

    public void setName(String name) {
        this.name = name;
    }
    @XmlElement(name ="age")
    public String getAge() {

        return age;
    }

    public void setAge(String age) {
        this.age = age;
    }
}
xml数据
<? version="1.0" encoding="utf-8" ?>
<admin>
 <name>张三</name>
 <age>22</age>
</admin>
5.自定义类型转化器(PropertyEditor Formatter Converter)
5.1PropertyEditor的应用
先来看Sun提供的PropertyEditor属性编辑器
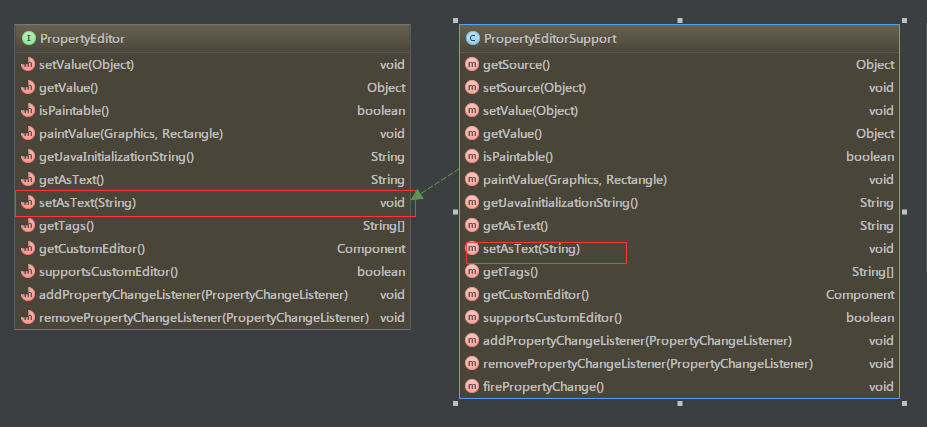
PropertyEditor是java提供的属性编辑器接口,PropertyEditorSupport是直接实现类,通常都是继承该实现类并重写setAsText(String) 方法,实现从String类型到自定类型的装换.
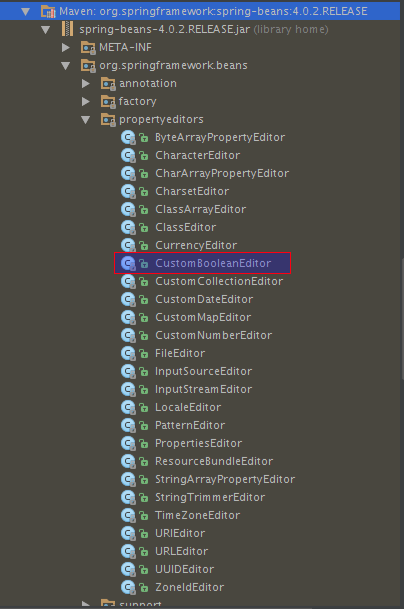
spring中也有继承了PropertyEditorSupport并重写了setAsText的自定义的属相编辑器,都在spring-beans包下的org.springframework.beans.propertyeditors包里:
在SpringMVC中主要是WebDataBinder实现对数据的转换
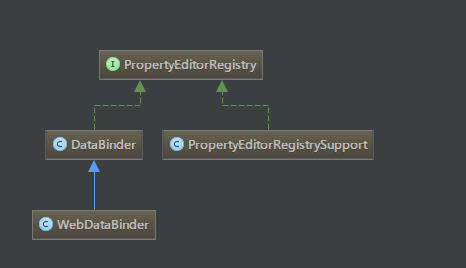
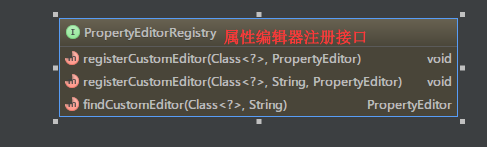
PropertyEditorRegistyr封装方法来给JavaBean注册对应的属性编辑器。
实现方式代码;
    /**
     * 在controller层中加入一段数据绑定代码
     * @param webDataBinder
     */
    @InitBinder
    public void initBinder(WebDataBinder webDataBinder) throws Exception{
        SimpleDateFormat simpleDateFormat = new SimpleDateFormat("yyyy-MM-dd hh:mm");
        simpleDateFormat.setLenient(false);
        webDataBinder.registerCustomEditor(Date.class , new CustomDateEditor(simpleDateFormat , true));
//CustomDateEditor是spring提供的继承PropertyEditorSupport的类,也可以换成自定义的MyCustomPropertyEditor类
    }
   //备注:自定义类型转换器必须实现PropertyEditor接口或者继承PropertyEditorSupport类
MyCustomPropertyEditor extends propertyEditorSupport{
     public void setAsText(String text){
         SimpleDateFormat simpleDateFormat = new SimpleDateFormat("yyyy -MM-dd hh:mm");
        Date date = simpleDateFormat.parse(text);
        this.setValue(date);
     }
     public String getAsTest(){
      Date date = (Date)this.getValue();
      return this.dateFormat.format(date);
     }
}
这种使用Property属性编辑器的方法需要在controller层加一段数据绑定的代码,不够灵活,不具有全局性
5.2Formatter的应用
要使用全局的数据转换器,在Spring 3.0后可以使用Converter和Formatter,都是用来做数据转换的
Formatter继承了Printer和Parser接口
public interface Formatter<T> extends Printer<T>, Parser<T> {

}
Printer用来打印转换后的对象
public interface Printer<T> {

    /**
     * Print the object of type T for display.
     * @param object the instance to print
     * @param locale the current user locale
     * @return the printed text string
     */
    String print(T object, Locale locale);

}
,Parser用来从String类型转换为指定类型值
public interface Parser<T> {

    /**
     * Parse a text String to produce a T.
     * @param text the text string
     * @param locale the current user locale
     * @return an instance of T
     * @throws ParseException when a parse exception occurs in a java.text parsing library
     * @throws IllegalArgumentException when a parse exception occurs
     */
    T parse(String text, Locale locale) throws ParseException;

}
从方法上,可以看分出Formatter是从String类型转换为任意目标类型<T>,有点类似PropertyEditor
代码实现:
public class MyDateFormatter implements Formatter<Date> {
    @Override
    public String print(Date object, Locale locale) {
        return null;
    }
    //只需重写parse方法 实现类型转换为目标类型<T>
    @Override
    public Date parse(String text, Locale locale) throws ParseException {

        return new SimpleDateFormat("yyyy-MM-dd").parse(text);
    }
}
在spring-mvc.xml的配置文件中需要注册自定义的转换器实现全局转换
 <mvc:annotation-driven conversion-service="MyDateFormatter"/>
    <bean id="MyDateFormatter"
class="org.springframework.format.support.FormattingConversionServiceFactoryBean">
    <property name="formatters">
        <set>
            <bean class="com.chuyu.ssm.controller.MyDateFormatter"/>
        </set>
    </property>
    </bean>
虽然这个方法可以实现全局的数据转换,但是支持的类型也只能是从String类型转换为任意目标类型<T>.
5.3Converter的应用
public interface Converter<S, T> {

    /**
     * Convert the source object of type {@code S} to target type {@code T}.
     * @param source the source object to convert, which must be an instance of {@code S} (never {@code null})
     * @return the converted object, which must be an instance of {@code T} (potentially {@code null})
     * @throws IllegalArgumentException if the source cannot be converted to the desired target type
     */
    T convert(S source);

}
从源码可以看出去,Converter接口可以从任意源类型,转换为任意目标类型
代码实现:
package com.chuyu.ssm.controller;

import java.text.ParseException;
import java.text.SimpleDateFormat;
import java.util.Date;

import org.springframework.core.convert.converter.Converter;
/**
 * 全局类型转换器
 * @author acer
 *
 */
public class DateConvert  implements Converter<String, Date>{
    @Override
    public Date convert(String text) {
        Date date = null;
        try {
            if(text.contains("-")){
                SimpleDateFormat sf = new SimpleDateFormat("yyyy-MM-dd");
                date = sf.parse(text);
            }else {
                SimpleDateFormat sf = new SimpleDateFormat("dd/MM/yyyy");
                date = sf.parse(text);
            }

        } catch (ParseException e) {
            e.printStackTrace();
        }
        return date;
    }

}
类型转换器需要在配置文件中配置:
<!--开启注解  -->
<mvc:annotation-driven conversion-service="MyDataConverterService" />

<!--类型转换器工厂  -->

<bean id="MyDataConverterService"
      class="org.springframework.context.support.FormattingConversionServiceFactoryBean">
    <property name="converters">
        <list>
            <bean class="com.cy.springannotation.controller.DateConvert" />
        </list>
    </property>
</bean>


 417
417

 被折叠的 条评论
为什么被折叠?
被折叠的 条评论
为什么被折叠?
 到【灌水乐园】发言


