


下面简述我在Cloud Foundry部署我的应用“咖啡厅”的坎坷历程,仅作为笔记使用。我想每个人遇到的问题都是不同的,布署不成功找原因最好、也是最有效的方法就是看Tomcat系统错误日志logs!
根据众多教程及方法,我们知道部署CF应用有多种方式,我所熟悉的是通过Ruby命令行和Eclipse插件,在此推荐Eclipse插件,因为这种方式更直观,而且可以很方便的查看系统日志,便于错误调试。
1.Eclipse插件的下载
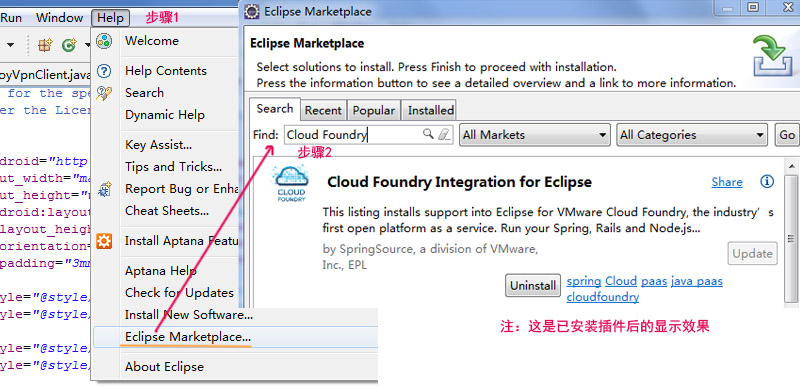
1)Help-- >Eclipse Marketplace,在弹出框里,输入Cloud Foundry,点击安装,安装后重启Eclipse,就代表安装完成了。
2)安装完成需要调出这个插件使用,方法是:Window --> Show View ,在弹出框里选择Server,点击确定,这是就会在平时我们常用的控制台栏(这个地方我不知道官方的说法是啥)出现了Server这个栏目。如果我们曾使用过Tomcat的话,会在这里看到Tomcat服务选项。
这里虽没有直接显示Cloud Foundry Server的影子,并不代表安装错误,而是我们没有新建!在Server选项框的“内容区”右键-->New -->Server,在弹出的对话框里下拉,回出现VMware,点进去就看到CloudFoundry了,选择它,确定。这样我们就建立了Cloud Foundry Server。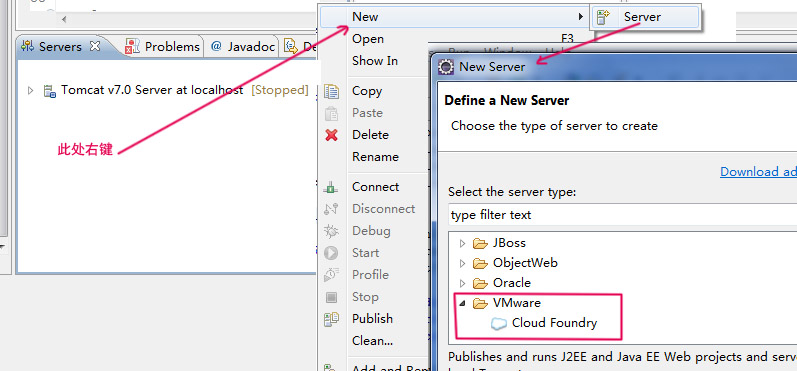
3)在上一步里调出的Cloud Foundry Server控制面板中,先验证账户(用户名是你申请时的邮箱,密码是注册时发给您的那几个随机字符---不知道如何修改密码)。验证完成后就可以进入Cloud Foundry Server控制面板了,左上角列出了部署的应用,如果没有,可以直接把应用从Project Explorer拖到这里,根据提示引导,就可以完成部署了。
4)数据库支持:在上面的应用列表框的下面就是DataBase Service,点击这个标题栏的带星的图标就可以建立自己的数据了。但我不知道如何建表,听说是不支持,这样我们就需要在程序里注册了。
5)部署应用:当我们搭建好服务器环境和数据库支持,就可以把我们的应用部署在CF上了。最简单的方式是把应用用鼠标拖动到CF管理窗体中的Applications窗口中

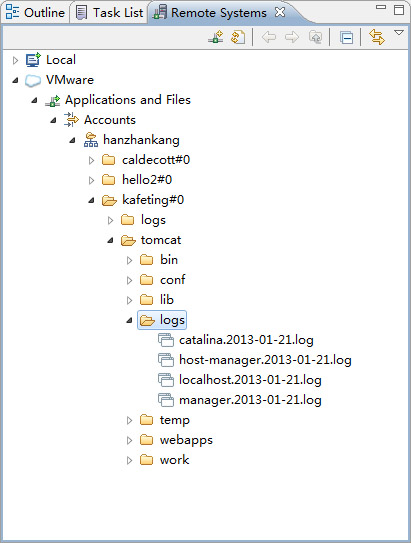
6)调试应用:以上只是对Eclipse插件的简单实用及部署,我们的应用在部署的时候很可能不成功,最好的解决方法应该是查看系统日志。查看部署应用文件列表的方法:Window-->Show View-->Remote Systems-->Remote Systems,这样我们就在Eclipse右侧会看到我们Remote Systems窗口,在这里我们就可以检查CF端部署的应用了。这个窗口是文件列表的形式,我们一步步双击,就能耐心点到我们的应用里,在应用名的目录里会有logs 和 tomcat 选项,logs里的内容不全面,建议看tomcat文件里的logs,那里会有更详细的日子记录,调试目标也应该注意针对这里面的。
以上就是关于Eclipse插件的使用介绍,也是推进使用的方式。如果你对这个不感兴趣的话,兴许命令行VMC的方式可以给你点参考,命令行相对于Eclipse插件来说,操作起来功能更多,但不是很方便,它能带给我们最大的好处就是可以直接使用命令提示行建立数据表,不需要程序去完成了。同样的步骤:下软件,安装,部署,调试……
1)搭建VMC命令环境
下软件:vmc需要Ruby支持,所以需要下载Ruby软件(相当于JDK)。我是Windows用户,所以需要下载安装Windows下面的Ruby安装包(http://www.rubyinstaller.org),下载后安装即可。可以通过Windows开始菜单来访问命令行工具 (All Programs > Ruby <version> > Start Command Prompt with Ruby)。最后,通过下面Ruby命令行更新RubyGems:
....> gem update --system
安装vmc
...> gem install vmc Windows平台
安装完成就可以与Cloud Foundry平台连接了,命令:
prompt$ vmc target api.cloudfoundry.com
登录平台的命令:
prompt$ vmc login
输入邮箱,根据提示正确输入密码就应该能够登录成功,如果命令可以,就可以着手部署我们的应用了。方法是先定位到我们的应用目录内(如kafeting这个应用,应先进入应用所在磁盘下,再使用cd命令,如:cd 应用目录路径,就进入应用中了【其实上传的应用是把文件push到服务器tomcat/webapps/ROOT目录里面了】),使用 vmc push 就可以布署我们的应用(在部署的时候会询问你是否create service...,其实是数据库服务,根据需要)。
注:第一次安装命令提示输入参数,部署完成后会在应用目录下生成一个manifest.yml文件,这是ruby文件,里面记录了我们应用的一些部署参数,是为了方便更新应用创建的。如果我们想重新部署,可以删除此文件。
2)建数据库:如果你的应用需要数据库服务,就需要先下载工具,更加帖子:Cloud Foundry mysql 数据导入里的介绍的方法安装命令步骤如下:
gem install rest-client
gem install eventmachine --pre
gem install caldecott
如果安装以上的提示能安装成功,并使用部署完成后系统会检查,如果检查失败,应用程序在本地是可以运行的:vmc tunnel命令,就说明安装成功,如果没有的话我就不知道了*{*.
使用vmc tunnel命令实现了直接操作数据库的功能,在mysql>命令里就可以创建数据表了。
3)其他vmc的常用命令
vmc可以使用的命令有:
Getting Started
target [url] Reports current target or sets a new target
login [email] [--email, --passwd Login
info System and account information
Applications
apps List deployed applications
Application Creation
push [appname] Create, push, map, and start a new application
push [appname] --path Push application from specified path
push [appname] --url Set the url for the application
push [appname] --instances <N> Set the expected number <N> of instances
push [appname] --mem M Set the memory reservation for the application
push [appname] --runtime RUNTIME Set the runtime to use for the application
push [appname] --no-start Do not auto-start the application
Application Operations
start <appname> Start the application
stop <appname> Stop the application
restart <appname> Restart the application
delete <appname> Delete the application
rename <appname> <newname> Rename the application
Application Updates
update <appname> [--path] Update the application bits
mem <appname> [memsize] Update the memory reservation for an application
map <appname> <url> Register the application to the url
unmap <appname> <url> Unregister the application from the url
instances <appname> <num|delta> Scale the application instances up or down
Application Information
crashes <appname> List recent application crashes
crashlogs <appname> Display log information for crashed applications
logs <appname> [--all] Display log information for the application
files <appname> [path] [--all] Display directory listing or file download for [path]
stats <appname> Display resource usage for the application
instances <appname> List application instances
Application Environment
env <appname> List application environment variables
env-add <appname> <variable[=]value> Add an environment variable to an application
env-del <appname> <variable> Delete an environment variable to an application
Services
services Lists of services available and provisioned
create-service <service> [--name,--bind] Create a provisioned service
create-service <service> <name> Create a provisioned service and assign it <name>
create-service <service> <name> <app> Create a provisioned service and assign it <name>, and bind to <app>
delete-service [servicename] Delete a provisioned service
bind-service <servicename> <appname> Bind a service to an application
unbind-service <servicename> <appname> Unbind service from the application
clone-services <src-app> <dest-app> Clone service bindings from <src-app> application to <dest-app>
Administration
user Display user account information
passwd Change the password for the current user
logout Logs current user out of the target system
add-user [--email, --passwd] Register a new user (requires admin privileges)
delete-user <user> Delete a user and all apps and services (requires admin privileges)
System
runtimes Display the supported runtimes of the target system
frameworks Display the recognized frameworks of the target system
Misc
aliases List aliases
alias <alias[=]command> reate an alias for a command
unalias <alias> Remove an alias
targets List known targets and associated authorization tokens
Help
help [command] Get general help or help on a specific command
help options Get help on available options
最后特别提醒的是Cloud Foundry提供的数据库用户名和密码的问题。先说说我遇到的情况吧:
我之前部署了2个应用,创建了1个数据库服务,2个应用都绑定在这个数据库服务上。通过jsp页面输出系统环境变量的值(VCAP_SERVICES),比较得到的2个JSON结果,发现结果并不相同。所以我们在布署时不能拿第一个应用得到的值来设置第二个应用的用户名和密码,这算是我的发现吧。最好的办法是使用自适应方式,JFinal自适应实现方式,可以参考开源系统ChunMengLu / jnode,但要注意使用的JSON包,是普通的还是FastJSON,2者是有区别的, 我就在这上面耗了好久才明白过来。
自适应的原理就是输出环境安装环境的环境变量信息,如果想知道系统所有的环境变量Key,可以通过方法:
Map<String,String> m = System.getenv();
获取,但对我们来说,最有用的还是VCAP_SERVICES对应的值。
PS:我也曾不止一次尝试使用本地安装的SQLyog去远程访问布署应用的数据库,但没有成功,不知道是我连接参数设置有问题还是CF本身就不支持,如果支持的话,各有利弊吧~~其他方式如:使用Navicate连接数据库我并没有尝试过,如果你感兴趣,可以去尝试一下。
附:社区里一篇提问:Cloud Foundry 怎么连接MYSQL数据库,然后创建数据库和表 里面会有些有用的链接。
最后,预祝您的Cloud Foundry布署之旅愉快~!


 835
835

 被折叠的 条评论
为什么被折叠?
被折叠的 条评论
为什么被折叠?
 到【灌水乐园】发言


