


花了一天半的时间研究了一下Elasticsearch:
- 完成了Elasticsearch,Kibana,Elasticsearch Head在Windows上的安装和使用。
- 在Spring Boot中使用Elasticsearch完成实体的增加和查询。
- 使用Logstash将mysql数据库中的数据导入到Elasticsearch中。
- 复用JPA的entity,实现Elasticsearch对该entity的查询。
1)安装Elasticsearch:下载zip包,解压之后,可将整个文件夹拷到C盘根目录,在C:\elasticsearch-6.6.2\bin目录下执行elasticsearch.bat, 即可启动,访问 http://localhost:9200/ 验证是否安装成功。
2)安装Elasticsearch Head:预先安装node.js, 拉取源代码, 根据github上的安装提示进行启动,访问 http://localhost:9100/ 验证是否安装成功。
3)用Elasticsearch Head 访问 Elasticsearch, 根据
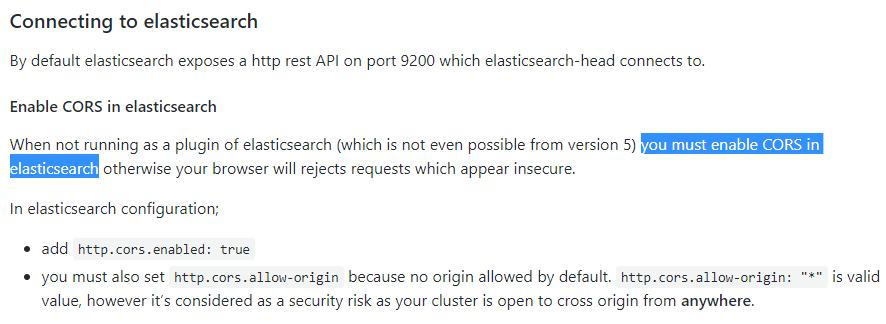
需要在Elasticsearch配置跨源访问,在C:\elasticsearch-6.6.2\config\elasticsearch.yml添加
http.cors.enabled: true
http.cors.allow-origin: "*"
访问 http://localhost:9100/ 连接elasticsearch, 可通过head对数据进行查询。
4)安装Kibana,下载zip包,解压之后通过bin\kibana.bat启动,通过 http://localhost:5601 可访问。
5)在Spring Boot项目中使用Elasticsearch,参考
6) Logstash的安装和使用,下载zip包,解压并进入bin目录,通过一下指令可验证Logstash是否工作(注意,要用双引号,而非单引号,否则会出错)
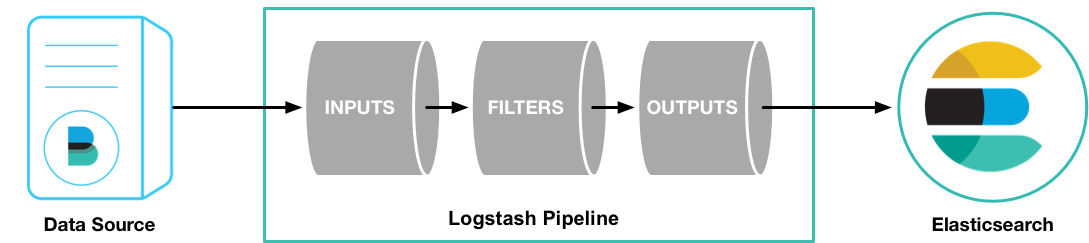
logstash -e "input { stdin { } } output { stdout {codec=>rubydebug} }"7)使用Logstash将mysql数据库中的数据导入到Elasticsearch,写好配置文件,对象为本地数据库xiasha中atom表,内容如下:
input {
   jdbc {
       jdbc_connection_string => "jdbc:mysql://127.0.0.1:3306/xiasha?serverTimezone=Asia/Shanghai&characterEncoding=UTF8"
       jdbc_user => "root"
       jdbc_password => "root"
       jdbc_driver_library => "C:\Users\zhusi\.m2\repository\mysql\mysql-connector-java\8.0.13\mysql-connector-java-8.0.13.jar"
       jdbc_driver_class => "com.mysql.jdbc.Driver"
       jdbc_paging_enabled => "true"
       jdbc_page_size => "20"
       statement => "SELECT id, name FROM atom"
       schedule => "* * * * *"
   }
}

output {
    elasticsearch {
         hosts => "127.0.0.1:9200"
         index => "atom"
         document_id => "%{id}"
    }
    stdout {
         codec=>json_lines
    }
}
Logstash的基本流程,也是配置文件的主要内容:
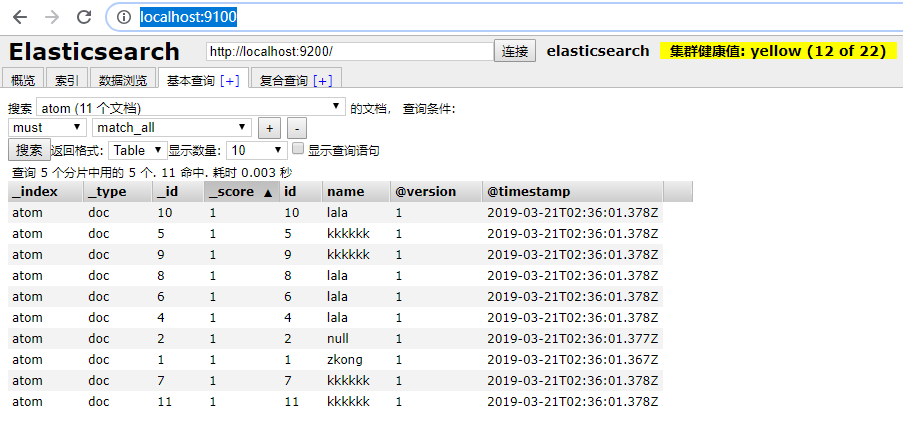
注意创建conf文件时将编码格式改为UTF-8,内容不要有中文。导入成功后,可通过Head来查询导入的数据,注意_index和_type的值!如:
8)通过写一个Controller访问Atom。
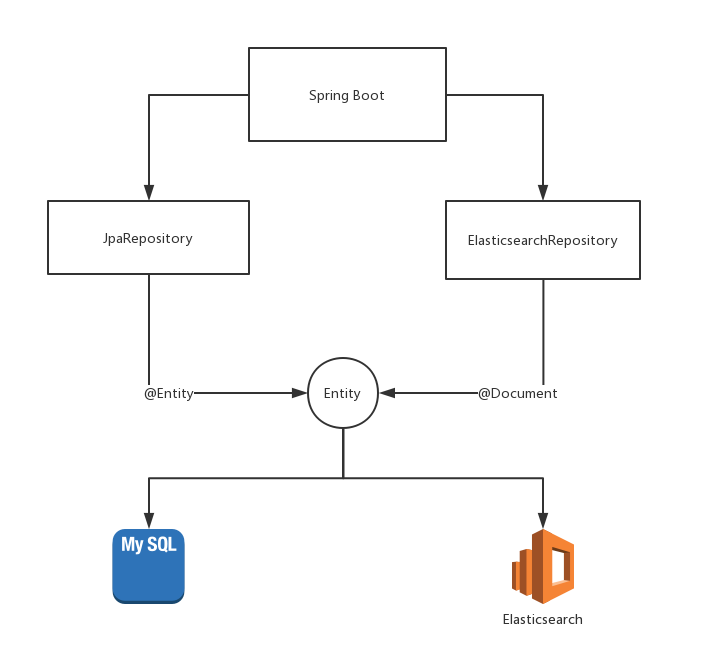
Atom在Spring Boot中已经存在,且被JPA @Entity标注。通过第5)步的流程增加对Elasticsearch中Atom的访问。(注意indexName和type的值与Head中查询到的_index和_type相对应)
package hello.model;
import org.springframework.data.elasticsearch.annotations.Document;

import javax.persistence.*;

@Entity
@Document(indexName="atom",type="doc",refreshInterval="-1")
public class Atom {
    @org.springframework.data.annotation.Id
    private Long id;
    private String name;

    @Id
    @GeneratedValue(strategy=GenerationType.IDENTITY)
    public Long getId() {
        return id;
    }

    public void setId(Long id) {
        this.id = id;
    }

    @Column(length = 5)
    public String getName() {
        return name;
    }

    public void setName(String name) {
        this.name = name;
    }
}
这样直接启动Spring Boot的话,会有失败,有‘No property index found for type ’ 异常, 可参考
需要将JPA和Elasticsearch的repository文件放在两个不同包里,并在启动类添加相应的配置指定basePackages。
package hello;

import org.springframework.boot.SpringApplication;
import org.springframework.boot.autoconfigure.SpringBootApplication;
import org.springframework.data.elasticsearch.repository.config.EnableElasticsearchRepositories;
import org.springframework.data.jpa.repository.config.EnableJpaRepositories;
import org.springframework.scheduling.annotation.EnableScheduling;

@SpringBootApplication
@EnableScheduling
@EnableJpaRepositories(basePackages = {"hello.dao"})
@EnableElasticsearchRepositories(basePackages = "hello.es")
public class Application {

    public static void main(String[] args) {
//        The SpringApplication class, providing static convenience methods that make it easy to write a stand-alone Spring Application.
//        Its sole job is to create and refresh an appropriate Spring ApplicationContext
        SpringApplication.run(Application.class, args);
    }
}
在Spring Boot中同时使用JPA和Elasticsearch的关系:


 153
153

 被折叠的 条评论
为什么被折叠?
被折叠的 条评论
为什么被折叠?
 到【灌水乐园】发言


