


1.实现身份验证 实现linux之间域的加入
NIS 的Server配置
[root@localhost Server]# rpm -ivh ypserv-2.19-5.el5.i386.rpm
Cd /var/yp 把自己加入到域里面
[root@localhost yp]# vim /etc/sysconfig/network
NISDOMAIN=ZZDX
[root@localhost yp]# service ypserv start
设置 NIS 域名 ZZDX: [确定]
启动 YP 服务器的服务: [确定]
[root@localhost yp]# vim Makefile
2.导入用户到域里面
117 all: passwd group hosts \
3.开始产NIS 数据库
[root@localhost yp]# /usr/lib/yp/ypinit -m master 数据库
CTRL +d
Is this correct? [y/n: y] y
4.可以看到更新了文件
[root@localhost yp]# ll
drwxr-xr-x 2 root root 4096 12-24 02:22 ZZDX
[root@localhost yp]# cd ZZDX
[root@localhost ZZDX]# ll
总计 140
-rw------- 1 root root 12501 12-24 02:22 group.bygid
-rw------- 1 root root 12510 12-24 02:22 group.byname
-rw------- 1 root root 12504 12-24 02:22 hosts.byaddr 我们刚才选择要导入
-rw------- 1 root root 12525 12-24 02:22 hosts.byname
-rw------- 1 root root 12750 12-24 02:22 passwd.byname
-rw------- 1 root root 12742 12-24 02:22 passwd.byuid
-rw------- 1 root root 12391 12-24 02:22 ypservers
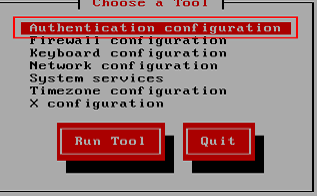
5.客户机测试 只能是linux才能加入linuxserver 的域中
添加到 ypbind
Setup
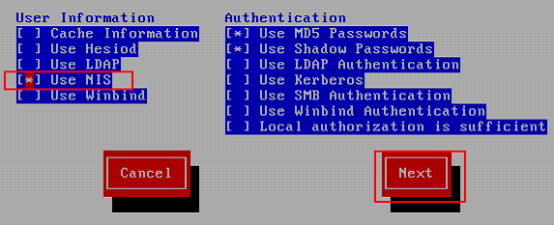
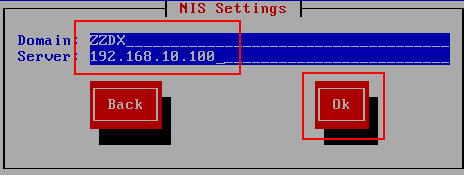
6.填写NIS server的ip地址
7.Server 新建一个用户并更新
[root@localhost ZZDX]# useradd test1
[root@localhost ZZDX]# passwd test1
[root@localhost yp]# make
8.客户机上就可以测试了
Could not chdir to home directory /home/test1: No such file or directory
/usr/bin/xauth: error in locking authority file /home/test1/.Xauthority
-bash-3.2$
提示有错误
9.server上test1没有家目录报错,在server上做如下设置。
在服务器端配置NFS服务器
[root@localhost yp]# vim /etc/exports
/home *(rw,sync)
[root@localhost yp]# service nfs start
[root@localhost ~]# chkconfig nfs on
[root@localhost yp]# exportfs -rv
exporting *:/home
10.客户机root登录上测试并挂载
[root@client2 ~]# showmount -e 192.168.10.100
Export list for 192.168.10.100:
/home *
[root@client2 ~]# mount 192.168.10.100:/home /home
[root@client2 ~]# mount
192.168.10.100:/home on /home type nfs (rw,addr=192.168.10.100)
11.下面 在客户端配置autofs自动挂载
[root@localhost ~]# umount /home #先卸掉挂载
[root@localhost ~]# service portmap start #开启portmap 服务
[root@localhost ~]# vim /etc/auto.master
/home /etc/auto.dd --timeout=30 #当NIS上的用户退出登录30秒后,自动卸载
[root@localhost ~]# cp /etc/auto.misc /etc/auto.dd
[root@localhost ~]# vim /etc/auto.dd
/* -rw,soft,intr 192.168.10.100:/home/&
12.重启autofs服务
[root@localhost ~]# service autofs restart
使用test1 登录正常
[root@localhost ~]# su - test1
[test2@localhost ~]$ ll
总计 4
drwxrwxr-x 2 test1 test1 4096 12-26 04:25 aa
[test2@localhost ~]$ pwd
/home/test1
[test1@localhost ~]$ mount
nfsd on /proc/fs/nfsd type nfsd (rw)
192.168.10.100:/home/test1 on /home/test1 type nfs (rw,soft,intr,addr=192.168.10.100)
在客户机上创建一个目录,在服务器上就可发现了。其实测试的用户所有的操作都只会保留NIS在服务器上。
13.在服务器上查看如下:
[root@localhost ~]# cd /home/test1
[root@localhost test2]# ll
总计 4
drwxrwxr-x 2 test1 test14096 12-26 09:25 aa
转载于:https://blog.51cto.com/dg123/1101833


 1018
1018


 被折叠的 条评论
为什么被折叠?
被折叠的 条评论
为什么被折叠?
 到【灌水乐园】发言


