


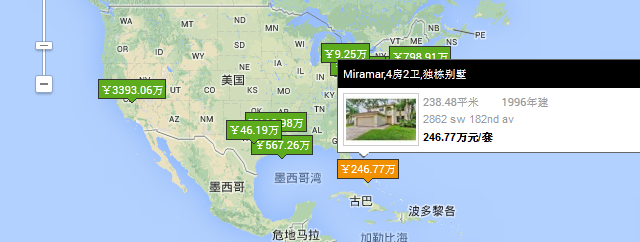
在做googlemap的时候,一般会要求有标记(maker),点击标记或者鼠标移上去会显示信息框(infowindow),但google自带的maker只能自己定义图片
不能改变图片里的内容,如下图,显示钱数,infowindow虽然能够自定义内部的html代码,但外部边框,还是不能改变,这样就不能达到自己想要的效果.
这样我们就要用到谷歌地图的自定义叠加层(OverlayView)
参考地址:https://developers.google.com/maps/documentation/javascript/overlays?hl=zh-cn#CustomOverlays
代码如下..
var map;
var lastpointer=""; //记录那个大的类似infowindow的div的id
var lastpointer1=""; //记录类似maker的div的id
var categoryid='<%=CategoryID %>';
jq(document).ready(function () {
initialize("<%=midx %>", "<%=midy %>");//<%=midx %>,<%=midy %>这两个是从后台取的值
});
function initialize(lat,lng) {
var latlng = new google.maps.LatLng(lat, lng);
var mapOptions = {
zoom: 3,
center: latlng,
mapTypeId: google.maps.MapTypeId.ROADMAP
};
map = new google.maps.Map(document.getElementById('map-canvas1'), mapOptions);
//添加监听,当中心坐标,缩放比例变化时,类似的infowindow隐藏
google.maps.event.addListener(map, 'zoom_changed', function() {
if(lastpointer!="")
{
jq(lastpointer).hide();
}
});
google.maps.event.addListener(map, 'center_changed', function() {
if(lastpointer!="")
{
jq(lastpointer).hide();
}
});
//下面是循环添加叠加层
<% for (int j = 0; j <_mapList.Count ; j++) { %>
if (<%=_mapList[j].xcoord%>!='null'&&<%=_mapList[j].xcoord%>!=''&&<%=_mapList[j].ycoord%>!='null'&&<%=_mapList[j].ycoord%>!=''&&<%=_mapList[j].ycoord%>!=null&&<%=_mapList[j].xcoord%>!=null){
addSite(map,<%=j %>,'<% =_mapList[j].simpleprice%>',<%=_mapList[j].xcoord %>,<%=_mapList[j].ycoord %>,"<%=_mapList[j].comerce %>","<%=_mapList[j].detailurl %>","<%=_mapList[j].projname %>","<%=_mapList[j].titleimg %>","<%=_mapList[j].livearea %>","<%=_mapList[j].cretetime %>","<%=_mapList[j].pricermb %>");
}
<% }%>
}
//添加叠加层的方法
function addSite(map, siteCode, siteDesc, lat, lng, address,url,projectname,picurl,livearea,createtime,price) {
var pt = new google.maps.LatLng(lat,lng);
//这实例化一个叠加层
var label = new ELabel(map,
pt,
'<div class="SearchMapCityIco" οnmοuseοut="showinfo2('+siteCode+',this)" id="m'+siteCode+'" οnmοuseοver="showinfo('+siteCode+',this)" ><a class="CityIco">'+siteDesc+'</a>'+
'<div id="houseinfo'+siteCode+'" style="position: absolute; display:none;" class="SearchMapBox">'+
'<div class="SearchMapBoxTit">'+
'<a href="'+url+'" target="_blank">'+projectname+'</a></div>'+
'<div class="SearchMapBoxTxt clearfix">'+
'<div class="SearchMapBoxTxtImg">'+
'<a href="'+url+'" target="_blank">'+
'<img width="70" height="47" alt="" src="'+picurl+'"></a></div>'+
'<div class="SearchMapBoxTxtImgR">'+
'<p class="Color999">'+
'<span>'+livearea+' </span><span class="PL20">'+createtime+'</span></p>'+
'<p class="Color999">'+address+
'</p>'+
'<p class="FwB ColorBlack">'+price+
'</p>'+
'</div>'+
'</div>'+
'<div class="SearchMapBoxJianTou">'+
'<span>◆</span> <b>◆</b>'+
'</div>'+
'</div>'
+'<\/div>',
'', // null
new google.maps.Size(-15,9)
);
label.setMap(map);//在地图上添加叠加层
}
//鼠标的mouseover方法,显示类似infowindow信息
function showinfo(code,obj)
{
if(lastpointer!="")
{
jq(lastpointer).hide();
jq(lastpointer1).removeClass("ColorYellowBg");
}
jq("#houseinfo"+code).show();
lastpointer="#houseinfo"+code;
lastpointer1="#m"+code;
jq("#m"+code).addClass("ColorYellowBg");
jq("#m"+code).parent().parent().addClass("ColorYellowBg1").siblings().removeClass("ColorYellowBg1");
}
//鼠标mouseout方法,隐藏
function showinfo2(code,obj)
{
if(lastpointer!="")
{
jq(lastpointer).hide();
jq("#m"+code).removeClass("ColorYellowBg");
}
jq("#m"+code).removeClass("ColorYellowBg");
}
下面是Elable的js内容,从网上找的,忘了下载地址了.coding by Mike Williams
function ELabel(map, point, html, classname, pixelOffset, percentOpacity, overlap) {
this.div_ = null;
this.map_ = map;
this.point = point;
this.html = html;
this.classname = classname || "";
this.pixelOffset = pixelOffset || new google.maps.Size(0, 0);
if (percentOpacity) {
if (percentOpacity < 0) percentOpacity = 0;
if (percentOpacity > 100) percentOpacity = 100;
}
this.percentOpacity = percentOpacity;
this.overlap = overlap || false;
this.hidden = false;
}
ELabel.prototype = new google.maps.OverlayView();
ELabel.prototype.onAdd = function () {
var div = document.createElement("div");
div.style.position = "absolute";
div.innerHTML = '<div class=" + this.classname + ">' + this.html + '</div>';
this.div_ = div;
if (this.percentOpacity) {
if (typeof (div.style.filter) == 'string') { div.style.filter = 'alpha(opacity:' + this.percentOpacity + ')'; }
if (typeof (div.style.KHTMLOpacity) == 'string') { div.style.KHTMLOpacity = this.percentOpacity / 100; }
if (typeof (div.style.MozOpacity) == 'string') { div.style.MozOpacity = this.percentOpacity / 100; }
if (typeof (div.style.opacity) == 'string') { div.style.opacity = this.percentOpacity / 100; }
}
if (this.overlap) {
// you may need to work on this "hack" to replace V2 getZindex
// GOverlay.getZIndex(this.point.lat());
var z = 1000 * (90 - this.point.lat());
this.div_.style.zIndex = parseInt(z);
}
if (this.hidden) {
this.hide();
}
// add ourselves to the shadow overlay layer
var panes = this.getPanes();
panes.floatShadow.appendChild(div);
}
ELabel.prototype.onRemove = function () {
this.div_.parentNode.removeChild(this.div_);
}
ELabel.prototype.draw = function (force) {
var proj = this.getProjection();
var p = proj.fromLatLngToDivPixel(this.point);
var h = parseInt(this.div_.clientHeight);
this.div_.style.left = (p.x + this.pixelOffset.width) + "px";
this.div_.style.top = (p.y + this.pixelOffset.height - h) + "px";
}
ELabel.prototype.show = function () {
if (this.div_) {
this.div_.style.display = "";
this.redraw();
}
this.hidden = false;
}
ELabel.prototype.hide = function () {
if (this.div_) {
this.div_.style.display = "none";
}
this.hidden = true;
}
ELabel.prototype.copy = function () {
return new ELabel(this.point, this.html, this.classname, this.pixelOffset, this.percentOpacity, this.overlap);
}
ELabel.prototype.isHidden = function () {
return this.hidden;
}
ELabel.prototype.supportsHide = function () {
return true;
}
ELabel.prototype.setContents = function (html) {
this.html = html;
this.div_.innerHTML = '<div class=" + this.classname + ">' + this.html + '</div>';
this.redraw(true);
}
ELabel.prototype.setPoint = function (point) {
this.point = point;
if (this.overlap) {
var z = GOverlay.getZIndex(this.point.lat());
this.div_.style.zIndex = z;
}
this.redraw(true);
}
ELabel.prototype.setOpacity = function (percentOpacity) {
if (percentOpacity) {
if (percentOpacity < 0) { percentOpacity = 0; }
if (percentOpacity > 100) { percentOpacity = 100; }
}
this.percentOpacity = percentOpacity;
if (this.percentOpacity) {
if (typeof (this.div_.style.filter) == 'string') { this.div_.style.filter = 'alpha(opacity:' + this.percentOpacity + ')'; }
if (typeof (this.div_.style.KHTMLOpacity) == 'string') { this.div_.style.KHTMLOpacity = this.percentOpacity / 100; }
if (typeof (this.div_.style.MozOpacity) == 'string') { this.div_.style.MozOpacity = this.percentOpacity / 100; }
if (typeof (this.div_.style.opacity) == 'string') { this.div_.style.opacity = this.percentOpacity / 100; }
}
}
ELabel.prototype.getPoint = function () {
return this.point;
}
ELabel.prototype.redraw = function (force) {
var proj = this.getProjection();
var p = proj.fromLatLngToDivPixel(this.point);
var h = parseInt(this.div_.clientHeight);
this.div_.style.left = (p.x + this.pixelOffset.width) + "px";
this.div_.style.top = (p.y + this.pixelOffset.height - h) + "px";
}


 3092
3092


 被折叠的 条评论
为什么被折叠?
被折叠的 条评论
为什么被折叠?
 到【灌水乐园】发言


