


我们已经有文章向你描述如何使用标签来重用和共享你的布局代码。这篇文章将向你阐述标签的使用以及如何与标签互补使用。
标签用于减少View树的层次来优化Android的布局。通过看一个例子,你就能很容易的理解这个标签能解决的问题。下面的XML布局显示一个图片,并且有一个标题位于其上方。这个结构相当的简单;FrameLayout里放置了一个ImageView,其上放置了一个TextView:
android:layout_width="fill_parent"
android:layout_height="fill_parent">
android:layout_width="fill_parent"
android:layout_height="fill_parent"
android:scaleType="center"
android:src="@drawable/golden_gate" />
android:layout_width="wrap_content"
android:layout_height="wrap_content"
android:layout_marginBottom="20dip"
android:layout_gravity="center_horizontal|bottom"
android:padding="12dip"
android:background="#AA000000"
android:textColor="#ffffffff"
android:text="Golden Gate" />
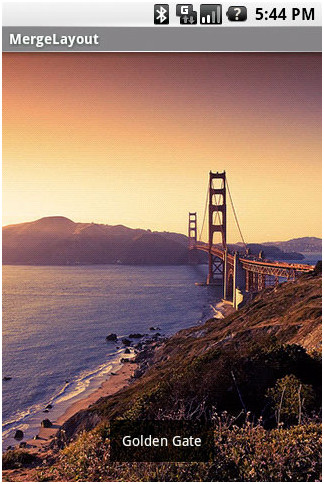
布局渲染起来很漂亮,而且看不出有什么问题:
当你使用HierarchyViewer工具来检查时,你会发现事情变得很有趣。如果你仔细查看View树,你将会注意到,我们在XML文件中定义的FrameLayout(蓝色高亮显示)是另一个FrameLayout唯一的子元素:
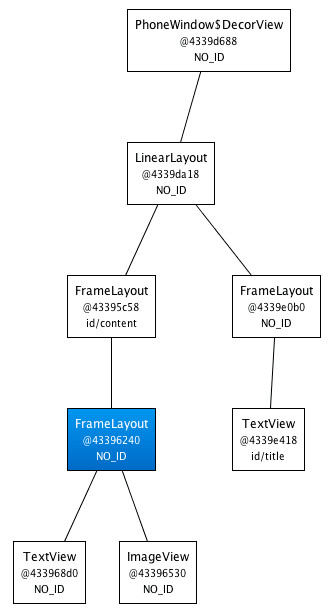
既然我们的FrameLayout和它的父元素有着相同的尺寸(归功于fill_parent常量),并且也没有定义任何的background,额外的padding或者gravity,所以它完全是无用的。我们所做的,只是让UI变得更为复杂。怎样我们才能摆脱这个FrameLayout呢?毕竟,XML文档需要一个根标签且XML布局总是与相应的View实例想对应。
这时候,标签闪亮登场了。当LayoutInflater遇到这个标签时,它会跳过它,并将内的元素添加到的父元素里。迷惑了吗?让我们用来替换FrameLayout,并重写之前的XML布局:
android:layout_width="fill_parent"
android:layout_height="fill_parent"
android:scaleType="center"
android:src="@drawable/golden_gate" />
android:layout_width="wrap_content"
android:layout_height="wrap_content"
android:layout_marginBottom="20dip"
android:layout_gravity="center_horizontal|bottom"
android:padding="12dip"
android:background="#AA000000"
android:textColor="#ffffffff"
android:text="Golden Gate" />
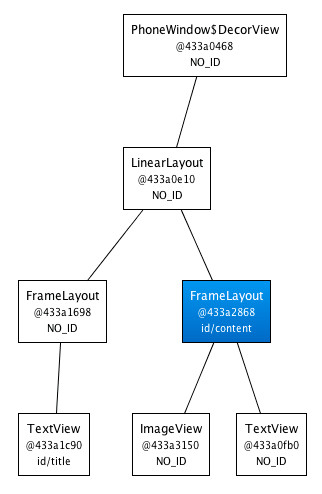
新的代码中,TextView和ImageView都直接添加到上一层的FrameLayout里。虽然视觉上看起来一样,但View的层次更加简单了:
很显然,在这个场合使用是因为Activity的ContentView的父元素始终是FrameLayout。如果你的布局使用LinearLayout作为它的根标签(举例),那么你就不能使用这个技巧。在其它的一些场合也很有用的。例如,它与标签结合起来就能表现得很完美。你还可以在创建一个自定义的组合View时使用。让我们看一个使用创建一个新View的例子——OkCancelBar,包含两个按钮,并可以设置按钮标签。下面的XML用于在一个图片上显示自定义的View:
xmlns:android="http://schemas.android.com/apk/res/android" xmlns:okCancelBar="http://schemas.android.com/apk/res/com.example.android.merge">
android:layout_width="fill_parent"
android:layout_height="fill_parent"
android:scaleType="center"
android:src="@drawable/golden_gate" />
android:layout_width="fill_parent"
android:layout_height="wrap_content"
android:layout_gravity="bottom"
android:paddingTop="8dip"
android:gravity="center_horizontal"
android:background="#AA000000"
okCancelBar:okLabel="Save"
okCancelBar:cancelLabel="Don't save" />
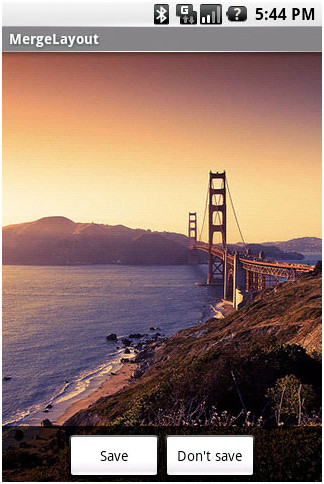
新的布局效果如下图所示:
OkCancelBar的代码很简单,因为这两个按钮在外部的XML文件中定义,通过LayoutInflate类导入。如下面的代码片段所示,R.layout.okcancelbar以OkCancelBar为父元素:
public class OkCancelBar extends LinearLayout {
public OkCancelBar(Context context, AttributeSet attrs) {
super(context, attrs);
setOrientation(HORIZONTAL);
setGravity(Gravity.CENTER);
setWeightSum(1.0f);
LayoutInflater.from(context).inflate(R.layout.okcancelbar, this, true);
TypedArray array = context.obtainStyledAttributes(attrs, R.styleable.OkCancelBar, 0, 0);
String text = array.getString(R.styleable.OkCancelBar_okLabel);
if (text == null) text = "Ok";
((Button) findViewById(R.id.okcancelbar_ok)).setText(text);
text = array.getString(R.styleable.OkCancelBar_cancelLabel);
if (text == null) text = "Cancel";
((Button) findViewById(R.id.okcancelbar_cancel)).setText(text);
array.recycle();
}
}
两个按钮的定义如下面的XML所示。正如你所看到的,我们使用标签直接添加两个按钮到OkCancelBar。每个按钮都是从外部相同的XML布局文件包含进来的,便于维护;我们只是简单地重写它们的id:
layout="@layout/okcancelbar_button"
android:id="@+id/okcancelbar_ok" />
layout="@layout/okcancelbar_button"
android:id="@+id/okcancelbar_cancel" />
我们创建了一个灵活且易于维护的自定义View,它有着高效的View层次:

标签极其有用。然而它也有以下两个限制:
· 只能作为XML布局的根标签使用
· 当Inflate以开头的布局文件时,必须指定一个父ViewGroup,并且必须设定attachToRoot为true(参看inflate(int, android.view.ViewGroup, Boolean)方法)。
效果图:

以上就是本文的全部内容,希望对大家的学习有所帮助,也希望大家多多支持脚本之家。


 903
903


 被折叠的 条评论
为什么被折叠?
被折叠的 条评论
为什么被折叠?
 到【灌水乐园】发言


