


1.概述
源码分析基于Android O 。
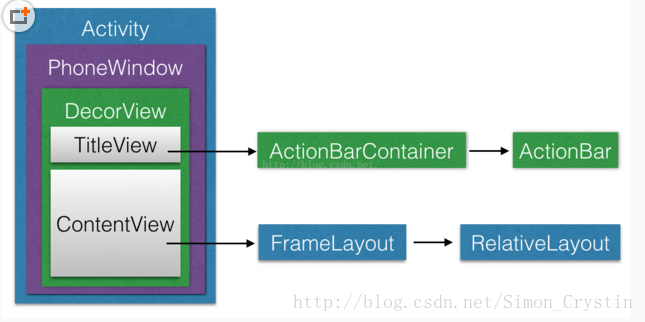
如上图,Activity由window组成,Activity内部有个Window成员,它的实例为PhoneWindow,PhoneWindow有个DecorView(这个也是最顶层的View),这个DecorView就是存放布局文件的,里面有TitleActionBar和ContentView(这个就是我们我们setContentView的布局)。
1.ViewRoot对应于ViewRootImpl类,是连接WindowManager和DecorView的纽带,View的三大流程均是通过ViewRoot来完成的。在ActivityThread中,当Activity对象被创建完毕后,会将DecorView添加到Window中,同时会创建ViewRootImpl对象,并将WindowManager对象和DecorView建立关联。
2.View的绘制流程从ViewRoot的performTraversals开始,经过measure、layout和draw三个过程才可以把一个View绘制出来,其中measure用来测量View的宽高,layout用来确定View在父容器中的放置位置,而draw则负责将View绘制到屏幕上。
3.performTraversals会依次调用performMeasure、performLayout和performDraw三个方法,这三个方法分别完成顶级View的measure、layout和draw这三大流程。其中performMeasure中会调用measure方法,在measure方法中又会调用onMeasure方法,在onMeasure方法中则会对所有子元素进行measure过程,这样就完成了一次measure过程;子元素会重复父容器的measure过程,如此反复完成了整个View数的遍历。
整个绘制流程是在ViewRoot中的performTraversals()方法展开的 我们先看看ViewRootImpl#performTraversals()
private void performTraversals() {
...
if (!mStopped) {
int childWidthMeasureSpec = getRootMeasureSpec(mWidth, lp.width); // 1
int childHeightMeasureSpec = getRootMeasureSpec(mHeight, lp.height);
performMeasure(childWidthMeasureSpec, childHeightMeasureSpec);
}
}
if (didLayout) {
performLayout(lp, desiredWindowWidth, desiredWindowHeight);
...
}
if (!cancelDraw && !newSurface) {
if (!skipDraw || mReportNextDraw) {
if (mPendingTransitions != null && mPendingTransitions.size() > 0) {
for (int i = 0; i < mPendingTransitions.size(); ++i) {
mPendingTransitions.get(i).startChangingAnimations();
}
mPendingTransitions.clear();
}
performDraw();
}
}
...
}
复制代码
performTraversals()方法非常的长,不过主要就是递归去测量,布局,和绘图。
2.View的测量流程
2.1 MeasureSpec
在介绍测量流程之前,我们先来介绍下MeasureSpec,它用来把测量要求从父View传递给子View。我们知道View的大小最终由子View的LayoutParams与父View的测量要求公共决定,测量要求指的 就是这个MeasureSpec,它是一个32位int值。
高2位:SpecMode,测量模式 低30位:SpecSize,在特定测量模式下的大小
我们可以去看看MeasureSpec的源码:
View#MeasureSpec
private static final int MODE_SHIFT = 30;
private static final int MODE_MASK = 0x3 << MODE_SHIFT;
/** @hide */
@IntDef({UNSPECIFIED, EXACTLY, AT_MOST})
@Retention(RetentionPolicy.SOURCE)
public @interface MeasureSpecMode {}
/**
* 父View不对子View做任何限制,需要多大给多大,这种情况一般用于系统内部,表示一种测量的状态
* Measure specification mode: The parent has not imposed any constraint
* on the child. It can be whatever size it wants.
*/
public static final int UNSPECIFIED = 0 << MODE_SHIFT;
/**
*父View已经检测出View所需要的精确大小,这个时候View的最终大小就是SpecSize所指定的值,它对应LayoutParams中的match_parent和具体数值这两种模式
* Measure specification mode: The parent has determined an exact size
* for the child. The child is going to be given those bounds regardless
* of how big it wants to be.
*/
public static final int EXACTLY = 1 << MODE_SHIFT;
/**
*父View给子VIew提供一个最大可用的大小,子View去自适应这个大小
* Measure specification mode: The child can be as large as it wants up
* to the specified size.
*/
public static final int AT_MOST = 2 << MODE_SHIFT;复制代码
日常开发中我们接触最多的不是MeasureSpec而是LayoutParams,在View测量的时候,LayoutParams会和父View的MeasureSpec相结合被换算成View的MeasureSpec,进而决定View的大小。
2.2 测量流程
测量流程简单来说就是调用View调用measure()方法,View的measure()方法是一个final修饰的,意味着我们不能够重写他,最终它会调用onMeasure()方法进行真正的测量,测量原则就是循环遍历子类,遍历每一个子节点对View进行测量,直到最后一个View为止。而这里ViewGroup和View的测量有点不同
View:View 在 onMeasure() 中会计算出自己的尺寸然后保存;
ViewGroup:ViewGroup在onMeasure()中会调用所有子View的measure()让它们进行自我测量,并根据子View计算出的期望尺寸来计算出它们的实际尺寸和位置然后保存。同时,它也会 根据子View的尺寸和位置来计算出自己的尺寸然后保存.
这里需要清楚的是ViewGroup 类并没有实现onMeasure,因为都是在它的子类实现了,不同的布局有不同的测量方法。我们知道测量过程其实都是在onMeasure方法里面做的,这里我们以FrameLayout为例,来看下FrameLayout 的onMeasure 方法,具体分析看注释。
//FrameLayout 的测量
protected void onMeasure(int widthMeasureSpec, int heightMeasureSpec) {
....
int maxHeight = 0;
int maxWidth = 0;
int childState = 0;
for (int i = 0; i < count; i++) {
final View child = getChildAt(i);
if (mMeasureAllChildren || child.getVisibility() != GONE) {
// 遍历自己的子View,只要不是GONE的都会参与测量,基本思想就是父View把自己的MeasureSpec
// 传给子View结合子View自己的LayoutParams 算出子View 的MeasureSpec,然后继续往下传,
// 传递叶子节点,叶子节点没有子View,根据传下来的这个MeasureSpec测量自己就好了。
measureChildWithMargins(child, widthMeasureSpec, 0, heightMeasureSpec, 0);
final LayoutParams lp = (LayoutParams) child.getLayoutParams();
maxWidth = Math.max(maxWidth, child.getMeasuredWidth() + lp.leftMargin + lp.rightMargin);
maxHeight = Math.max(maxHeight, child.getMeasuredHeight() + lp.topMargin + lp.bottomMargin);
....
....
}
}
.....
.....
//所有的孩子测量之后,经过一系类的计算之后通过setMeasuredDimension设置自己的宽高,
//对于FrameLayout 可能用最大的字View的大小,对于LinearLayout,可能是高度的累加,
//具体测量的原理去看看源码。总的来说,父View是等所有的子View测量结束之后,再来测量自己。
setMeasuredDimension(resolveSizeAndState(maxWidth, widthMeasureSpec, childState),
resolveSizeAndState(maxHeight, heightMeasureSpec, childState << MEASURED_HEIGHT_STATE_SHIFT));
....
}
复制代码
这里关键的方法是measureChildWithMargins()方法,我们再去看看measureChildWithMargins()的源码
ViewGroup#measureChildWithMargins():
/**
* Ask one of the children of this view to measure itself, taking into
* account both the MeasureSpec requirements for this view and its padding
* and margins. The child must have MarginLayoutParams The heavy lifting is
* done in getChildMeasureSpec.
* @param child The child to measure
* @param parentWidthMeasureSpec The width requirements for this view
* @param widthUsed Extra space that has been used up by the parent
* horizontally (possibly by other children of the parent)
* @param parentHeightMeasureSpec The height requirements for this view
* @param heightUsed Extra space that has been used up by the parent
* vertically (possibly by other children of the parent)
*/
protected void measureChildWithMargins(View child,
int parentWidthMeasureSpec, int widthUsed,
int parentHeightMeasureSpec, int heightUsed) {
final MarginLayoutParams lp = (MarginLayoutParams) child.getLayoutParams();
final int childWidthMeasureSpec = getChildMeasureSpec(parentWidthMeasureSpec,
mPaddingLeft + mPaddingRight + lp.leftMargin + lp.rightMargin
+ widthUsed, lp.width);
final int childHeightMeasureSpec = getChildMeasureSpec(parentHeightMeasureSpec,
mPaddingTop + mPaddingBottom + lp.topMargin + lp.bottomMargin
+ heightUsed, lp.height);
child.measure(childWidthMeasureSpec, childHeightMeasureSpec);
}复制代码
这个方法主要做了:
1. 调用getChildMeasureSpec()去获取子View的测量规格;
2. 调用 measure()方法进子View的测量。
这里的getChildMeasureSpec()非常重要,因为里面定义了子View的测量规格,也就是怎么通过父View的MeasureSpec和子类的LayoutParams来知道子View的大小。
我们去getChildMeasureSpec看看源码
/**
* Does the hard part of measureChildren: figuring out the MeasureSpec to
* pass to a particular child. This method figures out the right MeasureSpec
* for one dimension (height or width) of one child view.
*
* The goal is to combine information from our MeasureSpec with the
* LayoutParams of the child to get the best possible results. For example,
* if the this view knows its size (because its MeasureSpec has a mode of
* EXACTLY), and the child has indicated in its LayoutParams that it wants
* to be the same size as the parent, the parent should ask the child to
* layout given an exact size.
*
* @param spec The requirements for this view
* @param padding The padding of this view for the current dimension and
* margins, if applicable
* @param childDimension How big the child wants to be in the current
* dimension
* @return a MeasureSpec integer for the child
*/
public static int getChildMeasureSpec(int spec, int padding, int childDimension) {
int specMode = MeasureSpec.getMode(spec);//父View的测量模式
int specSize = MeasureSpec.getSize(spec);//父View的测量大小
int size = Math.max(0, specSize - padding);
int resultSize = 0;
int resultMode = 0;
switch (specMode) {
// Parent has imposed an exact size on us
case MeasureSpec.EXACTLY:
if (childDimension >= 0) {
resultSize = childDimension;
resultMode = MeasureSpec.EXACTLY;
} else if (childDimension == LayoutParams.MATCH_PARENT) {
// Child wants to be our size. So be it.
resultSize = size;
resultMode = MeasureSpec.EXACTLY;
} else if (childDimension == LayoutParams.WRAP_CONTENT) {
// Child wants to determine its own size. It can't be
// bigger than us.
resultSize = size;
resultMode = MeasureSpec.AT_MOST;
}
break;
// Parent has imposed a maximum size on us
case MeasureSpec.AT_MOST:
if (childDimension >= 0) {
// Child wants a specific size... so be it
resultSize = childDimension;
resultMode = MeasureSpec.EXACTLY;
} else if (childDimension == LayoutParams.MATCH_PARENT) {
// Child wants to be our size, but our size is not fixed.
// Constrain child to not be bigger than us.
resultSize = size;
resultMode = MeasureSpec.AT_MOST;
} else if (childDimension == LayoutParams.WRAP_CONTENT) {
// Child wants to determine its own size. It can't be
// bigger than us.
resultSize = size;
resultMode = MeasureSpec.AT_MOST;
}
break;
// Parent asked to see how big we want to be
case MeasureSpec.UNSPECIFIED:
if (childDimension >= 0) {
// Child wants a specific size... let him have it
resultSize = childDimension;
resultMode = MeasureSpec.EXACTLY;
} else if (childDimension == LayoutParams.MATCH_PARENT) {
// Child wants to be our size... find out how big it should
// be
resultSize = View.sUseZeroUnspecifiedMeasureSpec ? 0 : size;
resultMode = MeasureSpec.UNSPECIFIED;
} else if (childDimension == LayoutParams.WRAP_CONTENT) {
// Child wants to determine its own size.... find out how
// big it should be
resultSize = View.sUseZeroUnspecifiedMeasureSpec ? 0 : size;
resultMode = MeasureSpec.UNSPECIFIED;
}
break;
}
//noinspection ResourceType
return MeasureSpec.makeMeasureSpec(resultSize, resultMode);
}复制代码
该方法用来获取子View的MeasureSpec,由参数我们就可以知道子View的MeasureSpec由父容器的spec,父容器中已占用的的空间大小 padding,以及子View自身大小childDimension共同来决定的。
通过上述方法,我们可以总结出普通View的MeasureSpec的创建规则。
当View采用固定宽高的时候,不管父容器的MeasureSpec是什么,resultSize都是指定的宽高,resultMode都是MeasureSpec.EXACTLY。
当View的宽高是match_parent,当父容器是MeasureSpec.EXACTLY,则View也是MeasureSpec.EXACTLY,并且其大小就是父容器的剩余空间。当父容器是MeasureSpec.AT_MOST 则View也是MeasureSpec.AT_MOST,并且大小不会超过父容器的剩余空间。
当View的宽高是wrap_content时,不管父容器的模式是MeasureSpec.EXACTLY还是MeasureSpec.AT_MOST,View的模式总是MeasureSpec.AT_MOST,并且大小都不会超过父类的剩余空间。
通过getChildMeasureSpec()方法我们能够得到子View的测量规格,然后measureChildWithMargins ()会调用measure()方法进子View的测量(前面已经提到了)。前面我们已经说了,measure方法是一个final定义的方法,所以无法被重写,但是真正测量的是在onMeasure()方法中,在源码中也可以得到验证,这里我们直接来看onMeasure()方法
View#onMeasure():
protected void onMeasure(int widthMeasureSpec, int heightMeasureSpec) {
setMeasuredDimension(getDefaultSize(getSuggestedMinimumWidth(), widthMeasureSpec),
getDefaultSize(getSuggestedMinimumHeight(), heightMeasureSpec));
}复制代码
通过getDefaultSize()来获取直接测量的大小;
通过setMeasuredDimension()来对测量的结果进行设置。
我们来看 getDefaultSize()方法:
View#getDefaultSize()
/**
* Utility to return a default size. Uses the supplied size if the
* MeasureSpec imposed no constraints. Will get larger if allowed
* by the MeasureSpec.
*
* @param size Default size for this view
* @param measureSpec Constraints imposed by the parent
* @return The size this view should be.
*/
public static int getDefaultSize(int size, int measureSpec) {
int result = size;
int specMode = MeasureSpec.getMode(measureSpec);//前面测量后返回的测量模式
int specSize = MeasureSpec.getSize(measureSpec);//前面测量后返回的测量大小
switch (specMode) {
//MeasureSpec.UNSPECIFIED一般用来系统的内部测量流程
case MeasureSpec.UNSPECIFIED:
result = size;
break;
//我们主要关注着两种情况,它们返回的是View测量后的大小
case MeasureSpec.AT_MOST:
case MeasureSpec.EXACTLY:
result = specSize;
break;
}
return result;
}复制代码
通过MeasureSpec来获取最后的结果;
再看看 getDefaultSize的第一个参数getSuggestedMinimumWidth()方法:
View#getSuggestedMinimumWidth()
//如果View没有设置背景,那么返回android:minWidth这个属性的值,这个值可以为0
//如果View设置了背景,那么返回android:minWidth和背景最小宽度两者中的最大值。
protected int getSuggestedMinimumWidth() {
return (mBackground == null) ? mMinWidth : max(mMinWidth, mBackground.getMinimumWidth());
}复制代码
如果View没有设置背景,那么返回android:minWidth这个属性的值,这个值可以为0 如果View设置了背景,那么返回android:minWidth和背景最小宽度两者中的最大值。
关于getDefaultSize(int size, int measureSpec) 方法需要说明一下,通过上面的描述我们知道etDefaultSize()方法中AT_MOST与EXACTLY模式下,返回的 都是specSize,这个specSize是父View当前可以使用的大小,如果不处理,那wrap_content就相当于match_parent。
如何处理?
@Override
protected void onMeasure(int widthMeasureSpec, int heightMeasureSpec) {
super.onMeasure(widthMeasureSpec, heightMeasureSpec);
Log.d(TAG, "widthMeasureSpec = " + widthMeasureSpec + " heightMeasureSpec = " + heightMeasureSpec);
//指定一组默认宽高,至于具体的值是多少,这就要看你希望在wrap_cotent模式下
//控件的大小应该设置多大了
int mWidth = 200;
int mHeight = 200;
int widthSpecMode = MeasureSpec.getMode(widthMeasureSpec);
int widthSpecSize = MeasureSpec.getSize(widthMeasureSpec);
int heightSpecMode = MeasureSpec.getMode(heightMeasureSpec);
int heightSpecSize = MeasureSpec.getSize(heightMeasureSpec);
if (widthSpecMode == MeasureSpec.AT_MOST && heightMeasureSpec == MeasureSpec.AT_MOST) {
setMeasuredDimension(mWidth, mHeight);
} else if (widthSpecMode == MeasureSpec.AT_MOST) {
setMeasuredDimension(mWidth, heightSpecSize);
} else if (heightSpecMode == MeasureSpec.AT_MOST) {
setMeasuredDimension(widthSpecSize, mHeight);
}
}复制代码
注:你可以自己尝试一下自定义一个View,然后不重写onMeasure()方法,你会发现只有设置match_parent和wrap_content效果是一样的,事实上TextView、ImageView 等系统组件都在wrap_content上有自己的处理,可以去翻一翻源码。
这就是View的测量流程。
3.View的布局流程 Layout
performTraversals 方法执行完mView.measure 计算出mMeasuredXXX后就开始执行layout 函数来确定View具体放在哪个位置,我们计算出来的View目前只知道view矩阵的大小,具体这个矩阵放在哪里,这就是layout 的工作了。layout的主要作用 :根据子视图的大小以及布局参数将View树放到合适的位置上。
既然是通过mView.layout(0, 0, mView.getMeasuredWidth(), mView.getMeasuredHeight()); 那我们来看下layout 函数做了什么,mView肯定是个ViewGroup,不会是View,我们直接看下ViewGroup 的layout函数
@Override
public final void layout(int l, int t, int r, int b) {
if (!mSuppressLayout && (mTransition == null || !mTransition.isChangingLayout())) {
if (mTransition != null) {
mTransition.layoutChange(this);
}
super.layout(l, t, r, b);
} else {
// record the fact that we noop'd it; request layout when transition finishes
mLayoutCalledWhileSuppressed = true;
}
}复制代码
代码可以看个大概,LayoutTransition是用于处理ViewGroup增加和删除子视图的动画效果,也就是说如果当前ViewGroup未添加LayoutTransition动画,或者LayoutTransition动画此刻并未运行,那么调用super.layout(l, t, r, b),继而调用到ViewGroup中的onLayout。 我们在源码中可以看到ViewGroup中的onLayout()方法是一个抽象方法,我们仍然以FrameLayout为例子,去看看他的onLayout方法
FrameLayout#onLayout()
@Override
protected void onLayout(boolean changed, int left, int top, int right, int bottom) {
layoutChildren(left, top, right, bottom, false /* no force left gravity */);
}复制代码
调用layoutChildren()方法给子类布局
FrameLayout#layoutChildren
void layoutChildren(int left, int top, int right, int bottom, boolean forceLeftGravity) {
final int count = getChildCount();
final int parentLeft = getPaddingLeftWithForeground();
final int parentRight = right - left - getPaddingRightWithForeground();
final int parentTop = getPaddingTopWithForeground();
final int parentBottom = bottom - top - getPaddingBottomWithForeground();
//循环遍历子View进行布局
for (int i = 0; i < count; i++) {
final View child = getChildAt(i);
if (child.getVisibility() != GONE) {
final LayoutParams lp = (LayoutParams) child.getLayoutParams();
final int width = child.getMeasuredWidth();
final int height = child.getMeasuredHeight();
int childLeft;
int childTop;
int gravity = lp.gravity;
if (gravity == -1) {
gravity = DEFAULT_CHILD_GRAVITY;
}
final int layoutDirection = getLayoutDirection();
final int absoluteGravity = Gravity.getAbsoluteGravity(gravity, layoutDirection);
final int verticalGravity = gravity & Gravity.VERTICAL_GRAVITY_MASK;
switch (absoluteGravity & Gravity.HORIZONTAL_GRAVITY_MASK) {
case Gravity.CENTER_HORIZONTAL:
childLeft = parentLeft + (parentRight - parentLeft - width) / 2 +
lp.leftMargin - lp.rightMargin;
break;
case Gravity.RIGHT:
if (!forceLeftGravity) {
childLeft = parentRight - width - lp.rightMargin;
break;
}
case Gravity.LEFT:
default:
childLeft = parentLeft + lp.leftMargin;
}
switch (verticalGravity) {
case Gravity.TOP:
childTop = parentTop + lp.topMargin;
break;
case Gravity.CENTER_VERTICAL:
childTop = parentTop + (parentBottom - parentTop - height) / 2 +
lp.topMargin - lp.bottomMargin;
break;
case Gravity.BOTTOM:
childTop = parentBottom - height - lp.bottomMargin;
break;
default:
childTop = parentTop + lp.topMargin;
}
child.layout(childLeft, childTop, childLeft + width, childTop + height);
}
}
}复制代码
我们先来解释一下这个函数里的变量的含义。
int left, int top, int right, int bottom: 描述的是当前视图的外边距,即它与父窗口的边距。
mPaddingLeft,mPaddingTop,mPaddingRight,mPaddingBottom: 描述的当前视图的内边距。
通过这些参数,我们就可以得到当前视图的子视图所能布局在的区域。
接着,该方法就会遍历它的每一个子View,并获取它的左上角的坐标位置:childLeft,childTop。这两个位置信息会根据gravity来进行计算。 最后会调用子View的layout()方法循环布局操作,直到所有的布局都完成为止。
4.View的绘制流程 Draw
performTraversals 方法的下一步就是mView.draw(canvas); 因为View的draw 方法一般不去重写,官网文档也建议不要去重写draw 方法,所以下一步执行就是View.java的draw 方法,我们来看下源码:
public void draw(Canvas canvas) {
final int privateFlags = mPrivateFlags;
final boolean dirtyOpaque = (privateFlags & PFLAG_DIRTY_MASK) == PFLAG_DIRTY_OPAQUE &&
(mAttachInfo == null || !mAttachInfo.mIgnoreDirtyState);
mPrivateFlags = (privateFlags & ~PFLAG_DIRTY_MASK) | PFLAG_DRAWN;
/*
* Draw traversal performs several drawing steps which must be executed
* in the appropriate order:
*
* 1. Draw the background
* 2. If necessary, save the canvas' layers to prepare for fading
* 3. Draw view's content
* 4. Draw children
* 5. If necessary, draw the fading edges and restore layers
* 6. Draw decorations (scrollbars for instance)
*/
// Step 1, draw the background, if needed
int saveCount;
if (!dirtyOpaque) {
drawBackground(canvas);
}
//检查是否可以跳过第2步和第5步,也就是绘制变量,FADING_EDGE_HORIZONTAL == 1表示处于水平
//滑动状态,则需要绘制水平边框渐变效果,FADING_EDGE_VERTICAL == 1表示处于垂直滑动状态,则
//需要绘制垂直边框渐变效果。
// skip step 2 & 5 if possible (common case)
final int viewFlags = mViewFlags;
boolean horizontalEdges = (viewFlags & FADING_EDGE_HORIZONTAL) != 0;
boolean verticalEdges = (viewFlags & FADING_EDGE_VERTICAL) != 0;
if (!verticalEdges && !horizontalEdges) {
// Step 3, draw the content
if (!dirtyOpaque) onDraw(canvas);
// Step 4, draw the children
dispatchDraw(canvas);
drawAutofilledHighlight(canvas);
// Overlay is part of the content and draws beneath Foreground
if (mOverlay != null && !mOverlay.isEmpty()) {
mOverlay.getOverlayView().dispatchDraw(canvas);
}
// Step 6, draw decorations (foreground, scrollbars)
onDrawForeground(canvas);
// Step 7, draw the default focus highlight
drawDefaultFocusHighlight(canvas);
if (debugDraw()) {
debugDrawFocus(canvas);
}
// we're done...
return;
}
/*
* Here we do the full fledged routine...
* (this is an uncommon case where speed matters less,
* this is why we repeat some of the tests that have been
* done above)
*/
boolean drawTop = false;
boolean drawBottom = false;
boolean drawLeft = false;
boolean drawRight = false;
float topFadeStrength = 0.0f;
float bottomFadeStrength = 0.0f;
float leftFadeStrength = 0.0f;
float rightFadeStrength = 0.0f;
// Step 2, save the canvas' layers
int paddingLeft = mPaddingLeft;
final boolean offsetRequired = isPaddingOffsetRequired();
if (offsetRequired) {
paddingLeft += getLeftPaddingOffset();
}
int left = mScrollX + paddingLeft;
int right = left + mRight - mLeft - mPaddingRight - paddingLeft;
int top = mScrollY + getFadeTop(offsetRequired);
int bottom = top + getFadeHeight(offsetRequired);
if (offsetRequired) {
right += getRightPaddingOffset();
bottom += getBottomPaddingOffset();
}
final ScrollabilityCache scrollabilityCache = mScrollCache;
final float fadeHeight = scrollabilityCache.fadingEdgeLength;
int length = (int) fadeHeight;
// clip the fade length if top and bottom fades overlap
// overlapping fades produce odd-looking artifacts
if (verticalEdges && (top + length > bottom - length)) {
length = (bottom - top) / 2;
}
// also clip horizontal fades if necessary
if (horizontalEdges && (left + length > right - length)) {
length = (right - left) / 2;
}
if (verticalEdges) {
topFadeStrength = Math.max(0.0f, Math.min(1.0f, getTopFadingEdgeStrength()));
drawTop = topFadeStrength * fadeHeight > 1.0f;
bottomFadeStrength = Math.max(0.0f, Math.min(1.0f, getBottomFadingEdgeStrength()));
drawBottom = bottomFadeStrength * fadeHeight > 1.0f;
}
if (horizontalEdges) {
leftFadeStrength = Math.max(0.0f, Math.min(1.0f, getLeftFadingEdgeStrength()));
drawLeft = leftFadeStrength * fadeHeight > 1.0f;
rightFadeStrength = Math.max(0.0f, Math.min(1.0f, getRightFadingEdgeStrength()));
drawRight = rightFadeStrength * fadeHeight > 1.0f;
}
saveCount = canvas.getSaveCount();
int solidColor = getSolidColor();
if (solidColor == 0) {
final int flags = Canvas.HAS_ALPHA_LAYER_SAVE_FLAG;
if (drawTop) {
canvas.saveLayer(left, top, right, top + length, null, flags);
}
if (drawBottom) {
canvas.saveLayer(left, bottom - length, right, bottom, null, flags);
}
if (drawLeft) {
canvas.saveLayer(left, top, left + length, bottom, null, flags);
}
if (drawRight) {
canvas.saveLayer(right - length, top, right, bottom, null, flags);
}
} else {
scrollabilityCache.setFadeColor(solidColor);
}
// Step 3, draw the content
if (!dirtyOpaque) onDraw(canvas);
// Step 4, draw the children
dispatchDraw(canvas);
// Step 5, draw the fade effect and restore layers
final Paint p = scrollabilityCache.paint;
final Matrix matrix = scrollabilityCache.matrix;
final Shader fade = scrollabilityCache.shader;
if (drawTop) {
matrix.setScale(1, fadeHeight * topFadeStrength);
matrix.postTranslate(left, top);
fade.setLocalMatrix(matrix);
p.setShader(fade);
canvas.drawRect(left, top, right, top + length, p);
}
if (drawBottom) {
matrix.setScale(1, fadeHeight * bottomFadeStrength);
matrix.postRotate(180);
matrix.postTranslate(left, bottom);
fade.setLocalMatrix(matrix);
p.setShader(fade);
canvas.drawRect(left, bottom - length, right, bottom, p);
}
if (drawLeft) {
matrix.setScale(1, fadeHeight * leftFadeStrength);
matrix.postRotate(-90);
matrix.postTranslate(left, top);
fade.setLocalMatrix(matrix);
p.setShader(fade);
canvas.drawRect(left, top, left + length, bottom, p);
}
if (drawRight) {
matrix.setScale(1, fadeHeight * rightFadeStrength);
matrix.postRotate(90);
matrix.postTranslate(right, top);
fade.setLocalMatrix(matrix);
p.setShader(fade);
canvas.drawRect(right - length, top, right, bottom, p);
}
canvas.restoreToCount(saveCount);
drawAutofilledHighlight(canvas);
// Overlay is part of the content and draws beneath Foreground
if (mOverlay != null && !mOverlay.isEmpty()) {
mOverlay.getOverlayView().dispatchDraw(canvas);
}
// Step 6, draw decorations (foreground, scrollbars)
onDrawForeground(canvas);
if (debugDraw()) {
debugDrawFocus(canvas);
}
}复制代码
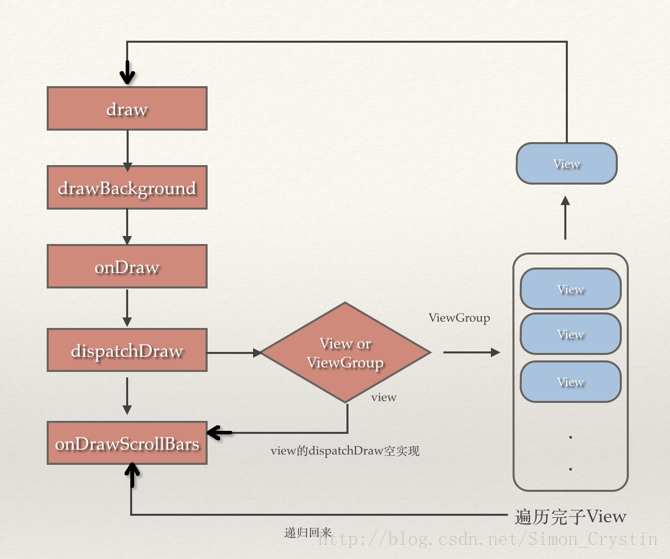
注释写得比较清楚,一共分成6步
1、第一步:背景绘制
将背景绘制到对应的画布中,这里就不贴代码了。
2、第二步:保存画布状态
保存当前画布的状态,并且在当前画布创建额外的突出,以便接下来可以绘制视图在滑动时的边框渐变效果。
3、第三步,对View的内容进行绘制。
onDraw(canvas) 方法是view用来draw 自己的,具体如何绘制,颜色线条什么样式就需要子View自己去实现,View.java 的onDraw(canvas) 是空实现,ViewGroup 也没有实现,每个View的内容是各不相同的,所以需要由子类去实现具体逻辑。(我们自定义View写的onDraw()方法就是在这里进行绘制,感兴趣的可以去看看源码)
4、第4步 对当前View的所有子View进行绘制
dispatchDraw(canvas) 方法是用来绘制子View的,View.java 的dispatchDraw()方法是一个空方法,因为View没有子View,不需要实现dispatchDraw ()方法,ViewGroup就不一样了,它实现了dispatchDraw ()方法。
5、第五步 绘制滑动效果
绘制当前视图在滑动时的边框渐变效果并且恢复画布状态
6、第6步 对View的滚动条进行绘制
绘制当前视图的滚动条
这里面会检查是否可以跳过第2步和第5步,也就是绘制变量,FADING_EDGE_HORIZONTAL == 1表示处于水平滑动状态,则需要绘制水平边框渐变效果,FADING_EDGE_VERTICAL == 1表示处于垂直滑动状态,则 需要绘制垂直边框渐变效果。
一张图看下整个draw的递归流程。
到这里Draw流程也就结束了。
总结:
1.绘制流程分为三步,Measure,Layout,Draw。
2.都是ViewGroup循环遍历子View进行操作,直到最后一个子节点的View。


 701
701


 被折叠的 条评论
为什么被折叠?
被折叠的 条评论
为什么被折叠?
 到【灌水乐园】发言


