


一、进程/线程:
1.进程:是一个正在执行的程序;进程是资源管理的最小单位;
//每一个进程执行都有一个执行顺序;该顺序是一个执行路径,或者叫一个执行单元;
2.线程:是进程中一个独立的控制单元;线程不能管理资源;
//线程在控制着进程的执行;
PS:一个进程中至少有一个线程;
二、创建线程的两种方式:
1、继承Thread类:
(1)定义类继承Thread;
(2)复写Thread中的run方法;
(3)创建类继承Thread的类对象;
(4)调用线程的start()方法:1)启动线程;2)调用run方法;
PS:1)如果不使用start(),而使用run(),则为正常调用函数,不开启线程;
2)start()仅仅是通知线程开始,只有争取到时间片后才开始运行;


public classThreadTest {public static voidmain(String args[]) {
MyThread mt1= newMyThread();
MyThread mt2= newMyThread();
mt1.start();
mt2.start();for (int i = 0; i < 100; i++) {
System.out.println("主线程:"+i);
}
System.out.println("执行完成");
}
}class MyThread extendsThread {
@Overridepublic voidrun() {for (int i = 0; i < 100; i++) {
System.out.println(this.getName() + ":" +i);
}
}
}
View Code
2、实现runnable接口:
(1)定义类实现(implements)Runnable接口;
(2)覆盖Runnable中的run方法;
(3)通过Thread类建立线程对象;
(4)将Runnable接口中的子类对象作为实际参数传递给Thread类的构造函数;
//传入对象是为了让Thread执行指定的run方法;
(5)调用Thread类的start方法开启线程并调用Runnable接口子类的run方法;
public classRunnableTest {public static voidmain(String args[]) {
Runnable myThread= newMyThread();
Thread thread1= newThread(myThread);
Thread thread2= newThread(myThread);
thread1.start();
thread2.start();
System.out.println("执行结束");
}
}class MyThread implementsRunnable {
@Overridepublic voidrun() {for (int i = 0; i < 100; i++) {
System.out.println(Thread.currentThread().getName()+ ":" +i);
}
}
}
View Code
3、实现和继承两种方式的区别:
(1)java为单继承,继承Thread后,则无法再继承其他类;
(2)继承的线程代码存放在Thread的子类中;实现的线程代码存放在接口的子类中;
4、两种方式的匿名实现:
public classTest {public static voidmain(String[] args) {//匿名继承Thread类
demo1();//匿名实现Runnable接口
demo2();
}private static voiddemo1() {//new一个类(){},继承Thread这个类
newThread() {
@Overridepublic voidrun() {for (int i = 0; i < 100; i++) {
System.out.println(this.getName() + ":" +i);
}
}
}.start();
}private static voiddemo2() {//将Runnable的子类对象当作参数传递给Thread的构造方法;new Runnable(){}:实现Runnable接口;
new Thread(newRunnable() {
@Overridepublic voidrun() {for (int i = 0; i < 100; i++) {
System.out.println(Thread.currentThread().getName()+ ":" +i);
}
}
}).start();
}
}
View Code
三、线程方法:
(1).getName();获得线程的名称;(用于继承时获取线程名)//this.getName()
(2)Thread.currentThread();获取创建当前线程的对象;==this;(用于实现时获取线程名)//Thread.currentThread().getName();
(3)设置线程的名称:1)构造函数传入name;2)setName;
(4)obj.join();让指定线程加入执行,当前线程进入就绪状态不再执行,但是其他进程还是会抢时间片;加入的指定线程执行完后,当前线程开始执行;
public classRunnableTest {public static void main(String args[]) throwsInterruptedException {
Runnable myThread= newMyThread();
Thread thread1= newThread(myThread);
Thread thread2= newThread(myThread);
thread1.start();
thread2.start();for (int i = 0; i < 100; i++) {
thread1.join();
System.out.println("主线程:"+i);
}
System.out.println("执行结束");
}
}class MyThread implementsRunnable {
@Overridepublic voidrun() {for (int i = 0; i < 100; i++) {
System.out.println(Thread.currentThread().getName()+ ":" +i);
}
}
}
View Code
(5)obj.sleep(毫秒[,纳秒]);休眠;休眠状态结束后进入就绪状态;
(6)obj.yield();让出时间片;线程进入到就绪状态;
//yield进入到就绪状态,还会争抢时间片,所有yield之后可能还是它第一个运行;
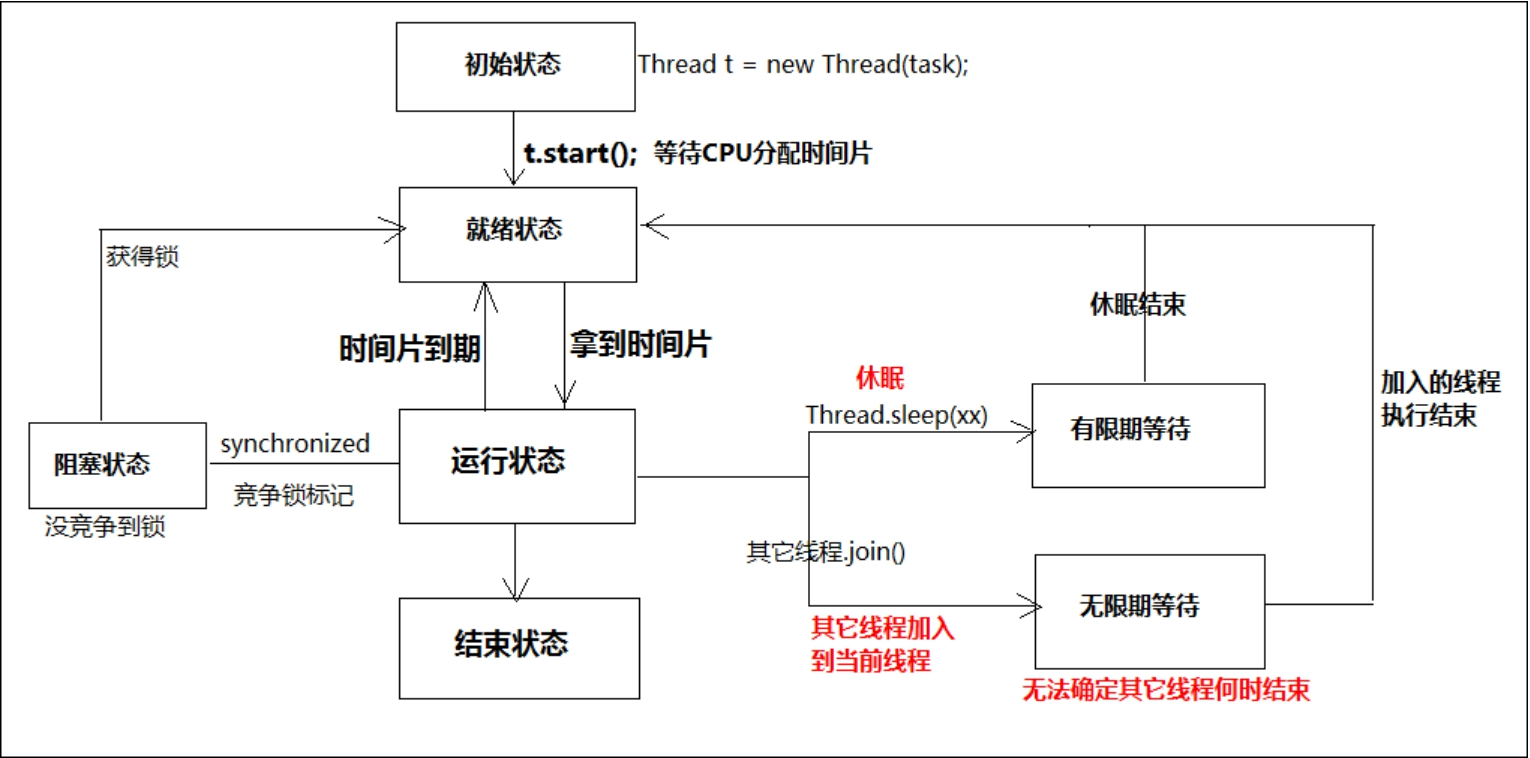
四、多线程状态:
五、多线程安全问题
(1)问题原因:多条语句在操作同一个线程共享数据时,一个线程对多条语句只执行了一部分,还没有执行完,另一个线程参与进来执行,导致共享数据错误;
(2)解决办法:对多条操作共享数据的语句,只能让一个线程都执行完。再让其它线程进入;
public classTest {public static voidmain(String args[]) {
Runnable myThread= newMyThread();
Thread thread1= newThread(myThread);
Thread thread2= newThread(myThread);
thread1.start();
thread2.start();
}
}class MyThread implementsRunnable {private int num = 100;
@Overridepublic voidrun() {while (true) {if (num > 0) {try{
Thread.sleep(10);
}catch(Exception e) {
}
num--;
System.out.println(Thread.currentThread().getName()+ ":" +num);
}
}
}
}
View Code
六、同步代码块synchronized;
(1)同步代码块:synchronized(对象){需要被同步的代码};
(2)同步方法:访问修饰符 synchronized 返回值类型 方法名(){};
//区别:同步代码块可以指定锁;同步方法的锁只能是this;
//同步前提:1)两个或以上多线程;2)同一个对象(锁);
(3)缺点:
1)死锁:请求互斥 请求保持 不可剥夺 形成环路;
2)性能低;
3)无法灵活的加锁,解锁;
1)同步方法:
public classTest {public static voidmain(String args[]) {
Runnable myThread= newMyThread();
Thread thread1= newThread(myThread);
Thread thread2= newThread(myThread);
thread1.start();
thread2.start();
}
}class MyThread implementsRunnable {private int num = 100;
@Overridepublic synchronized voidrun() {while (true) {if (num > 0) {try{
Thread.sleep(10);
}catch(Exception e) {
}
num--;
System.out.println(Thread.currentThread().getName()+ ":" +num);
}
}
}
}
View Code
2)同步代码块:
public classTest {public static voidmain(String args[]) {
Runnable myThread= newMyThread();
Thread thread1= newThread(myThread);
Thread thread2= newThread(myThread);
thread1.start();
thread2.start();
}
}class MyThread implementsRunnable {private int num = 100;
@Overridepublic voidrun() {while (true) {synchronized (MyThread.class) {if (num > 0) {try{
Thread.sleep(10);
}catch(Exception e) {
}
num--;
System.out.println(Thread.currentThread().getName()+ ":" +num);
}
}
}
}
}
View Code
3)死锁:简单的说就是两个线程拿了对方需要的锁且互不想让,导致两边都无法结束线程;
classMyLock {public static final Object locka = newObject();public static final Object lockb = newObject();
}class MyThread implementsRunnable {private booleanflag;
MyThread(booleanflag) {this.flag =flag;
}
@Overridepublic voidrun() {if(flag) {while (true) {synchronized(MyLock.locka) {
System.out.println(Thread.currentThread().getName()+ "locka....");synchronized(MyLock.lockb) {
System.out.println(Thread.currentThread().getName()+ "lockb....");
}
}
}
}else{while (true) {synchronized(MyLock.lockb) {
System.out.println(Thread.currentThread().getName()+ "lockb....");synchronized(MyLock.locka) {
System.out.println(Thread.currentThread().getName()+ "locka....");
}
}
}
}
}
}public classTest {public static voidmain(String[] args) {
MyThread myThread1= new MyThread(true);
MyThread myThread2= new MyThread(false);
Thread t1= newThread(myThread1);
Thread t2= newThread(myThread2);
t1.start();
t2.start();
}
}
死锁示例
(4)synchronized线程间通讯方法:
1.obj.wait();让当前线程处于等待状态;释放obj锁;
2.obj.notify();唤醒此锁等待线程中的一个;
3.obj.notifyAll();唤醒此锁所有等待线程;
public classTest {//1、承装元素的集合
private LinkedList list = new LinkedList<>();//2、计数器
private AtomicInteger count = newAtomicInteger();//3、指定上限和下限
private final int minSize = 0;private final intmaxSize;//4、构造方法,传入maxSize的最大值
public Test(intsize) {this.maxSize =size;
}//5、初始化一个对象,用于加锁
private final Object lock = newObject();//6、向容器增加元素,当到达最大值等待
public voidput(Object obj) {synchronized(lock) {while (count.get() == this.maxSize) {try{
lock.wait();
}catch(InterruptedException e) {
e.printStackTrace();
}
}//6.1、加入元素
list.add(obj);//6.2、计数器累加
count.incrementAndGet();
System.out.println("加入:" +obj);//6.3、唤醒另外一个线程
lock.notify();
}
}//7、从容器中取走元素,当到达0时等待
publicObject take() {
Object obj;synchronized(lock) {while (count.get() == this.minSize) {try{
lock.wait();
}catch(InterruptedException e) {
e.printStackTrace();
}
}//7.1、移除元素
obj =list.removeFirst();
System.out.println("移除:" +obj);//7.2、计数器递减
count.decrementAndGet();//7.3 唤醒另外一个线程
lock.notify();
}returnobj;
}public static voidmain(String[] args) {
Test t= new Test(5);new Thread("t1") {
@Overridepublic voidrun() {for (int i = 0; i < 50; i++) {
t.put(i);
Thread.yield();
}
}
}.start();new Thread("t2") {
@Overridepublic voidrun() {for (int i = 0; i < 50; i++) {
t.take();
}
}
}.start();
}
}
View Code
七、重入锁:
//重入锁是指,加锁的一段代码内的方法,其中的方法本身已经使用了锁;
voidmethodA(){
lock.lock();//获取锁
methodB();
lock.unlock()//释放锁
}voidmethodB(){
lock.lock();//获取锁//其他业务
lock.unlock();//释放锁
}
1、Lock接口:
//不可创建实例对象,需要用它的子类ReentrantLock创建对象来调用方法;
(1)void lock();获取锁;
(2)boolean TryLock();尝试获取锁,获取成功返回true,失败返回false;jdk1.8版本后被多次获取;
(3)void unlock();释放锁; //在finally代码块中释放锁,保证100%释放成功;
//java中只有unlock和substring不符合小驼峰命名规范;据说开发java的写错了!!
(4)Condition newCondition();获得Condition对象;
2、ReentrantLock:Lock实现类;
Lock reentrantLock = new ReentrantLock();
3、Condition类:
(1)void await();等待;
(2)void signal();唤醒;
(3)void signalAll();唤醒所有;
4、 lock()/unlock()代码示例:
public class Test implementsRunnable {private Lock lock = newReentrantLock();private int tickets = 100;
@Overridepublic voidrun() {while (true) {//获取锁
lock.lock();try{if (tickets > 0) {
Thread.sleep(100);
System.out.println(Thread.currentThread().getName()+ " " + tickets--);
}else{break;
}
}catch(InterruptedException e) {
e.printStackTrace();
}finally{//释放所
lock.unlock();
}
}
}public static voidmain(String[] args) {
Test test= newTest();for (int i = 0; i < 10; i++) {
Thread thread= new Thread(test, "thread" +i);
thread.start();
}
}
}
View Code
5、线程通讯方法示例:
public classTest {private Lock lock = newReentrantLock();private Condition addCondition =lock.newCondition();private Condition removeCondition =lock.newCondition();private LinkedList resources = new LinkedList<>();private intmaxSize;public Test(intmaxSize) {this.maxSize =maxSize;
}public class Producer implementsRunnable {private intproSize;private Producer(intproSize) {this.proSize =proSize;
}
@Overridepublic voidrun() {
lock.lock();try{for (int i = 1; i < proSize; i++) {while (resources.size() >=maxSize) {
System.out.println("当前仓库已满,等待消费...");try{
addCondition.await();
}catch(InterruptedException e) {
e.printStackTrace();
}
}
System.out.println("已经生产产品数: " + i + "\t现仓储量总量:" +resources.size());
resources.add(i);
removeCondition.signal();
}
}finally{
lock.unlock();
}
}
}public class Consumer implementsRunnable {
@Overridepublic voidrun() {
String threadName=Thread.currentThread().getName();while (true) {
lock.lock();try{while (resources.size() <= 0) {
System.out.println(threadName+ " 当前仓库没有产品,请稍等...");try{//进入阻塞状态
removeCondition.await();
}catch(InterruptedException e) {
e.printStackTrace();
}
}//消费数据
int size =resources.size();for (int i = 0; i < size; i++) {
Integer remove=resources.remove();
System.out.println(threadName+ " 当前消费产品编号为:" +remove);
}//唤醒生产者
addCondition.signal();
}finally{
lock.unlock();
}
}
}
}public static void main(String[] args) throwsInterruptedException {
Test Test= new Test(10);
Producer producer= Test.new Producer(100);
Consumer consumer= Test.newConsumer();final Thread producerThread = new Thread(producer, "producer");final Thread consumerThread = new Thread(consumer, "consumer");
producerThread.start();
TimeUnit.SECONDS.sleep(2);
consumerThread.start();
}
}
View Code
八、线程池:
1、Executor:线程池顶级接口;//java.util. concurrent;
2、ExecutorService:Executor子接口;
方法:Future>.submit(Runnable task);提交任务代码;//返回Future接口类型的值;
3、Executors工厂类:通过此类获得线程池;//四种方式都会造成内存溢出;
(1)Executors.newSingleThreadExecutor(); 单实例线程池,保证提交任务的执行顺序;
(2)Executors.newFixedThreadPool(int num);获得固定数量的线程池;
(3)Executors.newCachedThreadPool();获得动态数量的线程池,如果不够创建新的;
(4)Executors.newScheduledThreadPool(); 定时任务相关线程池;
4、Callable接口:具有泛型返回值,可以声明异常;与Runable接口类似;
//new Callable()
//public Longcall()throws Exception { return null; }
5、Future接口:是接口池调用submit后的返回值类型;
方法:.get();返回Future接口的值,值类型为Callable中泛型指定的值;
6、ThreadPoolExecutor类:Executor接口实现类;
Executors.newScheduledThreadPool();cpu核数
ExecutorService pool = new ThreadPoolExecutor(100, 200, 100, TimeUnit.MILLISECONDS, new LinkedBlockingDeque(100));
参数:100初始化线程数;200最大线程数;100呆滞时间;单位时间;队列;
呆滞时间:当线程池处于空闲状态时,进行多余线程的回收参照时间;
public classTest {public static void main(String[] args) throwsInterruptedException, ExecutionException {
ExecutorService pool= Executors.newFixedThreadPool(5);
Future future1 = pool.submit(new Callable() {
@Overridepublic Long call() throwsException {
Long res= 0L;for (int i = 0; i <= 50; i++) {
res+=i;
}returnres;
}
});
Future future2 = pool.submit(new Callable() {public Long call() throwsException {
Long res= 0L;for (int i = 51; i <= 100; i++) {
res+=i;
}returnres;
}
});
Long res1=future1.get();
Long res2=future2.get();
System.out.println(res1);
System.out.println(res2);
}
}
View Code
//创建100个线程
public classTest {public static void main(String[] args) throwsInterruptedException, ExecutionException {
ExecutorService pool= new ThreadPoolExecutor(100, 200, 100, TimeUnit.MILLISECONDS, new LinkedBlockingDeque<>(100));for (int i = 0; i < 100; i++) {
pool.submit(newRunnable() {
@Overridepublic voidrun() {
System.out.println(Thread.currentThread().getName()+ "...");
}
});
}
}
}


 2001
2001


 被折叠的 条评论
为什么被折叠?
被折叠的 条评论
为什么被折叠?
 到【灌水乐园】发言


