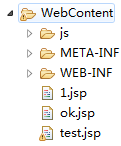
1:首先创建一个项目如:(说明:此项目是在eclipse创建的)

2.在创建相对应的包如:

3.创建写好相对应的配置文件如:

applicationContext.xml具体内容如下:
xmlns:context="http://www.springframework.org/schema/context"
xmlns:tx="http://www.springframework.org/schema/tx"
xmlns:xsi="http://www.w3.org/2001/XMLSchema-instance"
xsi:schemaLocation="
http://www.springframework.org/schema/beans
http://www.springframework.org/schema/beans/spring-beans.xsd
http://www.springframework.org/schema/context
http://www.springframework.org/schema/context/spring-context-4.0.xsd
http://www.springframework.org/schema/tx
http://www.springframework.org/schema/tx/spring-tx-4.0.xsd
">
org.hibernate.dialect.MySQL57InnoDBDialect
true
true
false
update
 具体内容如下:(这是与MySQL数据库连接的配置)
#database information
driverClass=com.mysql.cj.jdbc.Driver
jdbcUrl=jdbc:mysql://localhost:3306/lib?serverTimezone=UTC
user=root
password=
struts.xml配置文件如下:
/p>
"-//Apache Software Foundation//DTD Struts Configuration 2.5//EN"
"http://struts.apache.org/dtds/struts-2.5.dtd">
jsonMap
getAllBook
配置web.xml过滤文件

web.xml具体内容如下:
xmlns="http://xmlns.jcp.org/xml/ns/javaee"
xsi:schemaLocation="http://xmlns.jcp.org/xml/ns/javaee http://xmlns.jcp.org/xml/ns/javaee/web-app_3_1.xsd"
id="WebApp_ID" version="3.1">
Archetype Created Web Application
struts-prepare
org.apache.struts2.dispatcher.filter.StrutsPrepareFilter
struts-execute
org.apache.struts2.dispatcher.filter.StrutsExecuteFilter
struts-prepare
/*
struts-execute
/*
contextConfigLocation
classpath:applicationContext.xml
org.springframework.web.context.ContextLoaderListener
4.在web目录下创建个js文件夹来存放这俩个js文件(注:这俩个文件是第三方的js文件):


在webContext目录下建个jsp文件,如:test.jsp
(具体内容如下:)
pageEncoding="UTF-8"%>
Insert title here| ID | 书名 | 价格 |
|---|---|---|
| {{book.id}} | {{book.name}} | {{book.price}} |
var myModel = {bookList:[]};
var myViewModel = new Vue({
el:"#myView" ,
data:myModel
}) ;
/*
var myViewModel = new Vue({
el:'#myView',
data:myModel
});
*/
//写成函数的目的,为了【复用】
function getData(){
$.ajax({
url:"bookAction_getAllBook", //后端的API地址
type:'GET', //http:POST/GET
//data:postData, //指客户端提交给后台的参数
dataType:'json', //服务端返回类型text,json
timeout:3000,
success:function(result){
//alert(result);
//$.extend(true, result, myModel);
//失败
//myViewModel.data = result;
//失败
//myModel = result;
myModel.bookList = result.bookList ;
},
error:function(){
alert('服务器忙,请不要说脏话,理论上大家都是文明人');
}
});
}
getData();
6.开始在src目录下写后台代码了
先从
 开始:
开始:
创建Book.java文件
具体内容如下:
package com.nf.entity;
import javax.persistence.*;
@Entity
@Table(name = "book")
public class Book {
private Integer id;
private String name;
private Integer price;
@Id
@GeneratedValue(strategy= GenerationType.IDENTITY)
@Column(name="id")
public Integer getId() {
return id;
}
public void setId(Integer id) {
this.id = id;
}
@Column(name = "name",length = 50,nullable = false)
public String getName() {
return name;
}
public void setName(String name) {
this.name = name;
}
@Column(name = "price",nullable = false)
public Integer getPrice() {
return price;
}
public void setPrice(Integer price) {
this.price = price;
}
}
然后在创建
 dao模层,
先创建个BookDao接口,具体内容如下:
package com.nf.dao;
import com.nf.entity.Book;
import java.util.List;
public interface BookDao {
public List getAllBook();
}
在创建个BookDaoImpl类并实现BookDao接口,内容如下:
package com.nf.dao;
import com.nf.entity.Book;
import org.hibernate.Session;
import org.hibernate.SessionFactory;
import org.hibernate.query.Query;
import org.springframework.beans.factory.annotation.Autowired;
import org.springframework.context.annotation.Scope;
import org.springframework.stereotype.Repository;
import java.util.List;
@Repository
@Scope("prototype")
public class BookDaoImpl implements BookDao {
@Autowired
private SessionFactory sessionFactory;
public List getAllBook() {
Session session = sessionFactory.getCurrentSession();
Query query = session.createQuery("from Book", Book.class);
List bookList = query.getResultList();
return bookList;
}
}
最后写
 模块
模块
(具体内容如下:)
package com.nf.action;
import com.nf.entity.Book;
import com.nf.service.BookService;
import com.opensymphony.xwork2.ActionContext;
import com.opensymphony.xwork2.ActionSupport;
import org.springframework.beans.factory.annotation.Autowired;
import org.springframework.context.annotation.Scope;
import org.springframework.stereotype.Controller;
import java.util.HashMap;
import java.util.List;
import java.util.Map;
@Controller
@Scope("prototype")
public class BookAction extends ActionSupport {
//姝sonMap鐢ㄤ簬瀛樺偍JSON鏍煎紡鐨勬暟鎹�
private Map jsonMap = new HashMap();
public Map getJsonMap() {
return jsonMap;
}
public void setJsonMap(Map jsonMap) {
this.jsonMap = jsonMap;
}
@Autowired
private BookService bookService;
public String getAllBook(){
List bookList = bookService.getAllBook();
jsonMap.put("bookList", bookList);
return "jsonOK";
}
}
好了,到这里整个案例已经完成了,一来可以作为我以后复习的笔记,二来希望可以帮助到在这方面学习的朋友,做的不够精细,请多多包含,勿喷
!!


 2313
2313


 被折叠的 条评论
为什么被折叠?


