


1.安装apache和php
yum -y install http* http-* php* php-*
2.修改httpd.conf文件
添加以下内容:
#
# This next section will call PHP for .php, .phtml, and .phps files
#
AddType application/x-httpd-php .php
AddType application/x-httpd-php .phtml
AddType application/x-httpd-php-source .phps
#
# This is the directory containing php.ini
#
PHPIniDir "/usr/local/apache/conf"
LoadModule行如果未插入由PHP安装,添加:
LoadModule php5_module modules/libphp5.so
编辑php.ini文件进行以下更改:
vi /etc/php.ini
display_errors On
extension=oci8.so
oci8.privileged_connect = On
编写个phpinfo测试php是否成功
3.安装oci8支持
下载oracle-instantclient-basic,oracle-instantclient-devel包
安装:
rpm -ivh oracle-instantclient11.2-basic
安装oci8-1.4.9.tgz
tar xvzf oci8-1.4.9.tgz
cd oci8
ln -s /usr/include/oracle/11.2/client /usr/lib/oracle/11.2/client/lib/include
phpize
./configure --with-oci8=instantclient,/usr/lib/oracle/11.2/client/lib/
make && make install
---或 phpize CFLAGS="-l/usr/include/oracle/11.2/client" CXXFLAGS="-l/usr/lib/oracle/11.2/client64/lib/include"
./configure --with-oci8=instantclient,/usr/lib/oracle/11.2/client64/lib/
make install
然后在php.ini中加入
[Oci8]
extension = "oci8.so"
oci8.privileged_connect = On
创建个php页眉页脚文件
vi anyco_ui.inc
function ui_print_header($title)
{
$title = htmlentities($title);
echo <<
/p>
"http://www.w3.org/TR/html4/strict.dtd">
content="text/html; charset=ISO-8859-1">
Any Co.: $title$title
END;
}
function ui_print_footer($date)
{
$date = htmlentities($date);
echo <<
END;
}
使用层叠样式表(CSS)文件名为style.css文件指定在HTML浏览器中的表现风格
vi stylee.css
body
{ background: #CCCCFF;
color: #000000;
font-family: Arial, sans-serif; }
h1
{ border-bottom: solid #334B66 4px;
font-size: 160%; }
table
{ padding: 5px; }
td
{ border: solid #000000 1px;
text-align: left;
padding: 5px; }
th
{ text-align: left;
padding: 5px; }
.footer
{ border-top: solid #334B66 4px;
font-size: 90%; }
.company
{ padding-top: 5px;
float: right; }
.date
{ padding-top: 5px;
float: left; }
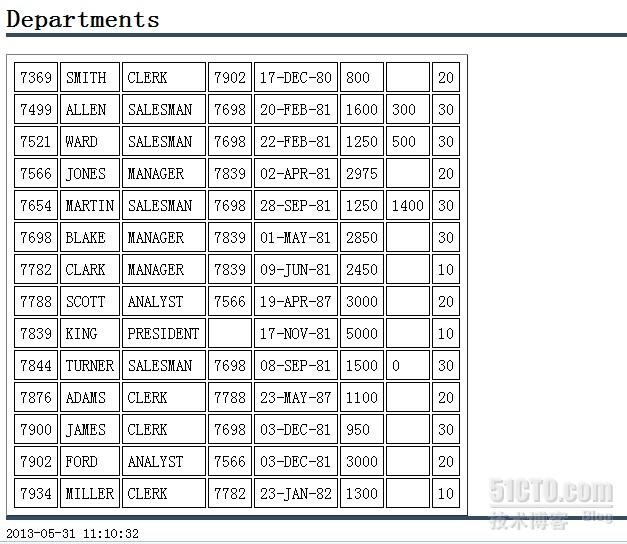
要调用用户界面功能,创建以下文本的anyco.php文件
require('anyco_ui.inc');
ui_print_header('Departments');
ui_print_footer(date('Y-m-d H:i:s'));
?>
连接到数据库
使用oci_connect()函数
$conn = oci_connect($username, $password, $db)
解锁oracle scott用户
alter user scott account unlock;
1. Edit the anyco.php file to add a database connection with the following
parameter values:
■ Username is scott.
■ Password for this example is hr. Remember to use the actual password of
your scott user.
■ Oracle connection identifier is //localhost/orcl.
2. Edit the anyco.php file to validate that the oci_connect() call returns a usable
database connection, write a do_query() function that accepts two parameters:
the database connection identifier, obtained from the call to oci_connect(), and
a query string to select all the rows from the DEPARTMENTS table.
3. Edit the anyco.php file to prepare the query for execution, add an oci_parse()
call. The oci_parse() function has two parameters, the connection identifier
and the query string. It returns a statement identifier needed to execute the query
and fetch the resulting data rows. It returns FALSE if an error occurs.
4. Edit the anyco.php file to execute the query, add a call to the oci_execute()
function. The oci_execute() function executes the statement associated with the
statement identifier provided in its first parameter. The second parameter specifies
the execution mode. OCI_DEFAULT is used to indicate that you do not want
statements to be committed automatically. The default execution mode is OCI_
COMMIT_ON_SUCCESS. The oci_execute() function returns TRUE on success;
otherwise it returns FALSE.
5. Edit the anyco.php file to fetch all the rows for the query executed, add a while
loop and a call to the oci_fetch_array() function. The oci_fetch_array()
function returns the next row from the result data; it returns FALSE if there are no
more rows. The second parameter of the oci_fetch_array() function, OCI_
RETURN_NULLS, indicates that NULL database fields will be returned as PHP
NULL values.
Each row of data is returned as a numeric array of column values. The code uses a
PHP foreach construct to loop through the array and print each column value in
an HTML table cell, inside a table row element. If the item value is NULL then a
nonbreaking space is printed; otherwise the item value is printed.
After the edits in Steps 1 to 5, the anyco.php file becomes:
重新编辑anyco.php
vi anyco.php
require('anyco_ui.inc');
// Create a database connection
$db = "localhost";
$conn = oci_connect('//localhost:1521/ORCLXDB.us.oracle.com/ORCL'); **oracle11G 没有加服务名没连接到数据库 - -#||| 参考文件地址:http://www.php.net/manual/zh/function.oci-connect.php
***************************************************************************************
要使用 Easy Connect 命名方法,PHP 必须与 Oracle 10g 或更高版本的客户端库进行链接。Oracle 10g 的 Easy Connect 串格式:[//]host_name[:port][/service_name]。
*****************************************************************************
Oracle 11g 则为:[//]host_name[:port][/service_name][:server_type][/instance_name]。服务名可在数据库服务器机器上运行 Oracle 实用程序 lsnrctl status 找到。
tnsnames.ora 文件可在 Oracle Net 查找路径中,此路径包括 $ORACLE_HOME/network/admin 和 /etc。 另一种方法是设置TNS_ADMIN 以便通过 $TNS_ADMIN/tnsnames.ora 来读取。表确认 web 守护进程可读取此文件。
*****************************************************************************************
ui_print_header('Departments');
do_query($conn, 'SELECT * FROM DEPARTMENTS');
ui_print_footer(date('Y-m-d H:i:s'));
// Execute query and display results
function do_query($conn, $query)
{
$stid = oci_parse($conn, $query);
$r = oci_execute($stid, OCI_DEFAULT);
print '
while ($row = oci_fetch_array($stid, OCI_ASSOC+OCI_RETURN_NULLS)) {
print '
';foreach ($row as $item) {
print '
'.($item!== null ? htmlentities($item) : ' ').'
';}
print '
';}
print '
';}
?>
输入地址测试 192.168.1.1/anyco.php


 2467
2467


 被折叠的 条评论
为什么被折叠?
被折叠的 条评论
为什么被折叠?
 到【灌水乐园】发言


