


好友QQ列表,可以展开,可以收起,在android中,以往用的比较多的是listview,虽然可以实现列表的展示,但在某些情况下,我们还是希望用到可以分组并实现收缩的列表,那就要用到android的ExpandableListView,今天研究了一下这个的用法,也参考了很多资料动手写了一个小demo,实现了基本的功能,下面直接上效果图以及源代码~!
ExpandableListView是一个垂直滚动显示两级列表项的视图,与ListView不同的是,它可以有两层:每一层都能够被独立的展开并显示其子项。
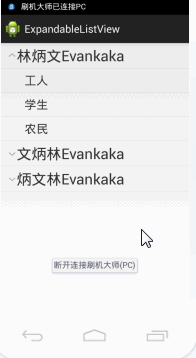
本文效果:

目录:
一、实现原理
二、布局与代码
三、自定义图标
四、图标放置右边
一、实现原理
1,首先必须在布局文件中定义一个ExpandableListView
2,其次创建一级条目对应的布局文件group
3,创建二级条目对应的布局文件child
4,加载ExpandableListView组件的Activity必须继承自ExpandableListActivity
二、布局与代码
1、首先在主布局中activity_main.xml
android:layout_width="fill_parent"
android:layout_height="fill_parent"
android:orientation="vertical" >
android:id="@id/android:list"
android:layout_width="fill_parent"
android:layout_height="fill_parent" />
2、其次在drawable文件夹定义布局一级列表groups.xml
xmlns:android="http://schemas.android.com/apk/res/android"
android:orientation="vertical"
android:layout_width="fill_parent"
android:layout_height="fill_parent"
>
android:id="@+id/textGroup"
android:layout_width="fill_parent"
android:layout_height="fill_parent"
android:paddingLeft="40px"
android:paddingTop="6px"
android:paddingBottom="6px"
android:textSize="25sp"
android:text="No data"
/>
3、接着在drawable文件夹定义布局二级列表childs.xml
xmlns:android="http://schemas.android.com/apk/res/android"
android:orientation="vertical"
android:layout_width="fill_parent"
android:layout_height="fill_parent"
>
android:id="@+id/textChild"
android:layout_width="fill_parent"
android:layout_height="fill_parent"
android:paddingLeft="60px"
android:paddingTop="10px"
android:paddingBottom="10px"
android:textSize="20sp"
android:text="No Data"
/>
4、然后就是初始化和使用了package com.example.expandablelistview;
import java.util.ArrayList;
import java.util.HashMap;
import java.util.List;
import java.util.Map;
import android.os.Bundle;
import android.app.ExpandableListActivity;
import android.util.DisplayMetrics;
import android.view.View;
import android.widget.ExpandableListView;
import android.widget.SimpleExpandableListAdapter;
import android.widget.Toast;
public class MainActivity extends ExpandableListActivity {
/**
* 创建一级条目容器
*/
List> gruops = new ArrayList>();
/**
* 存放内容, 以便显示在列表中
*/
List>> childs = new ArrayList>>();
@Override
public void onCreate(Bundle savedInstanceState) {
super.onCreate(savedInstanceState);
setContentView(R.layout.activity_main);
setListData();
}
/**
* 设置列表内容
*/
public void setListData() {
// 创建二个一级条目标题
Map title_1 = new HashMap();
Map title_2 = new HashMap();
Map title_3 = new HashMap();
title_1.put("group", "林炳文");
title_2.put("group", "文炳林");
gruops.add(title_1);
gruops.add(title_2);
// 创建二级条目内容
// 内容一
Map title_1_content_1 = new HashMap();
Map title_1_content_2 = new HashMap();
Map title_1_content_3 = new HashMap();
title_1_content_1.put("child", "工人");
title_1_content_2.put("child", "学生");
title_1_content_3.put("child", "农民");
List> childs_1 = new ArrayList>();
childs_1.add(title_1_content_1);
childs_1.add(title_1_content_2);
childs_1.add(title_1_content_3);
// 内容二
Map title_2_content_1 = new HashMap();
Map title_2_content_2 = new HashMap();
Map title_2_content_3 = new HashMap();
title_2_content_1.put("child", "猩猩");
title_2_content_2.put("child", "老虎");
title_2_content_3.put("child", "狮子");
List> childs_2 = new ArrayList>();
childs_2.add(title_2_content_1);
childs_2.add(title_2_content_2);
childs_2.add(title_2_content_3);
childs.add(childs_1);
childs.add(childs_2);
/**
* 创建ExpandableList的Adapter容器 参数: 1.上下文 2.一级集合 3.一级样式文件 4. 一级条目键值
* 5.一级显示控件名 6. 二级集合 7. 二级样式 8.二级条目键值 9.二级显示控件名
*
*/
SimpleExpandableListAdapter sela = new SimpleExpandableListAdapter(
this, gruops, R.drawable.groups, new String[] { "group" },
new int[] { R.id.textGroup }, childs, R.drawable.childs,
new String[] { "child" }, new int[] { R.id.textChild });
// 加入列表
setListAdapter(sela);
}
/**
* 列表内容按下
*/
@Override
public boolean onChildClick(ExpandableListView parent, View v,
int groupPosition, int childPosition, long id) {
Toast.makeText(
MainActivity.this,
"您选择了"
+ gruops.get(groupPosition).toString()
+ "子编号"
+ childs.get(groupPosition).get(childPosition)
.toString(), Toast.LENGTH_SHORT).show();
return super.onChildClick(parent, v, groupPosition, childPosition, id);
}
/**
* 二级标题按下
*/
@Override
public boolean setSelectedChild(int groupPosition, int childPosition,
boolean shouldExpandGroup) {
return super.setSelectedChild(groupPosition, childPosition,
shouldExpandGroup);
}
/**
* 一级标题按下
*/
@Override
public void setSelectedGroup(int groupPosition) {
super.setSelectedGroup(groupPosition);
}
}
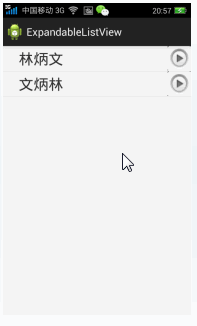
5、效果
三、自定义列表图标
上面的图标是系统自己生成的,下面我们要改成自己的
1、更改自定义图标
在drawable文件夹下新建expandablelistview_change.xml<?xml version = "1.0" encoding = "utf-8"?>
2、修改上面布局Activity.main.xml
android:layout_width="fill_parent"
android:layout_height="fill_parent"
android:orientation="vertical" >
android:id="@id/android:list"
android:layout_width="fill_parent"
android:layout_height="fill_parent"
android:background="#f5f5f5"
android:cacheColorHint="#f5f5f5"
android:groupIndicator="@drawable/expandablelistview_change" />
其实就是加了一句android:groupIndicator="@drawable/expandablelistview_change"
下面我们再来看看效果:
四、图标放置右边
在上面MainActivity.java的函数setListData()加中:// 得到屏幕的大小
DisplayMetrics dm = new DisplayMetrics();
getWindowManager().getDefaultDisplay().getMetrics(dm);
//图标设置在右边
getExpandableListView().setIndicatorBounds(dm.widthPixels-60, dm.widthPixels); // 设置指示图标的位置
效果:


 1705
1705


 被折叠的 条评论
为什么被折叠?
被折叠的 条评论
为什么被折叠?
 到【灌水乐园】发言


