


有关排队系统的应用是很多的,本文是针对医院的排队挂号流程进行的简易设计。要设计排队系统,首先要分别设计出病人和专家的类,然后编写服务器类模拟出若干等侯的病人。最后分别编写出专家与病人的客户端。具体步骤及代码如下:
1.病人类。
package com.TinySK;
public class Pro {
private int proId;
private String proName;
private Patient patienter;
public Pro(Patient patienter){
this.patienter=patienter;
}
public int getProId() {
return proId;
}
public void setProId(int proId) {
this.proId = proId;
}
public String getProName() {
return proName;
}
public void setProName(String proName) {
this.proName = proName;
}
public Patient getPatienter() {
return patienter;
}
public void setPatienter(Patient patienter) {
this.patienter = patienter;
}
}
2.专家类。
package com.TinySK;
public class Pro {
private int proId;
private String proName;
private Patient patienter;
public Pro(Patient patienter){
this.patienter=patienter;
}
public int getProId() {
return proId;
}
public void setProId(int proId) {
this.proId = proId;
}
public String getProName() {
return proName;
}
public void setProName(String proName) {
this.proName = proName;
}
public Patient getPatienter() {
return patienter;
}
public void setPatienter(Patient patienter) {
this.patienter = patienter;
}
}
3.服务器端。
package com.TinySK;
import java.util.HashMap;
import java.util.LinkedList;
import java.util.Map;
import java.util.Queue;
public class PatientServer {
private static int num=1;
public static int getNum() {
return num;
}
public static void setNum(int num) {
PatientServer.num = num;
}
Map> per=new HashMap>();
LinkedList waiterList1 = new LinkedList();
LinkedList waiterList2 = new LinkedList();
LinkedList waiterList3 = new LinkedList();
public Map> init(){
for(int i=1;i<=30;i++,num++){
Patient w1 = new Patient();
w1.setId(num);
w1.setFormer(i-1);
waiterList1.offer(w1);
}
per.put("冯医生",waiterList1);
for(int i=1;i<=20;i++,num++){
Patient w2 = new Patient();
w2.setId(num);
w2.setFormer(i-1);
waiterList2.offer(w2);
}
per.put("王医生",waiterList2);
for(int i=1;i<=10;i++,num++){
Patient w3 = new Patient();
w3.setId(num);
w3.setFormer(i-1);
waiterList3.offer(w3);
}
per.put("闫医生",waiterList3);
return per;
}
}
4.病人客户端。
package com.TinySK;
import java.util.Map;
import java.util.Queue;
import org.eclipse.swt.SWT;
import org.eclipse.swt.events.SelectionAdapter;
import org.eclipse.swt.events.SelectionEvent;
import org.eclipse.swt.graphics.Font;
import org.eclipse.swt.widgets.Button;
import org.eclipse.swt.widgets.Display;
import org.eclipse.swt.widgets.Shell;
import org.eclipse.swt.widgets.Text;
public class PatientUI {
public static void main(String[] args) {
final Display display = Display.getDefault();
final Shell shell = new Shell();
shell.setMaximized(true);
shell.setText("医院排队客户端");
// ------------------新插入的界面核心代码------------------------
PatientServer ps = new PatientServer();//实例化类
final Map> waiterList = ps.init();
//初始化队列服务器
final Text txt1 = new Text(shell,SWT.MULTI);
txt1.setBounds(150, 50, 200, 400);
// 事件代码里要访问button,所以加final
final Button button1 = new Button(shell, SWT.Activate);
button1.addSelectionListener(new SelectionAdapter() { // 加一个择监听器
public void widgetSelected(SelectionEvent e) {
Queue patient1List=waiterList.get("冯医生");
Patient patient1 = new Patient();
patient1.setId(patient1List.size()+1);
patient1.setFormer(patient1List.size());
patient1List.offer(patient1);
if(patient1List.size() <= 50){
txt1.setText( "您现在排在"+patient1.getId()+"位置上,\n您前面有"+patient1.getFormer()+"个人\n请您耐心等候吧!哈哈");
}else{
txt1.setText("您前面已经排50个人,请考虑!\n"+"您现在排在"+patient1.getId()+"位置上,\n您前面有"+patient1.getFormer()+"个人\n请您耐心等候吧!哈哈");
}
}
});
button1.setBounds(200, 530, 100, 40); // 设置按钮位置
button1.setFont(new Font(display,"宋体",12,SWT.BOLD));
button1.setText("冯医生");// 设置按钮上的文字
// ---------------------------------------------------------------
final Text txt2 = new Text(shell,SWT.MULTI);
txt2.setBounds(550, 50, 200, 400);
// 事件代码里要访问button,所以加final
final Button button2 = new Button(shell, SWT.Activate);
button2.addSelectionListener(new SelectionAdapter() { // 加一个择监听器
public void widgetSelected(SelectionEvent e) {
Queue patient2List=waiterList.get("王医生");
Patient patient2 = new Patient();
patient2.setId(patient2List.size()+1);
patient2.setFormer(patient2List.size());
patient2List.offer(patient2);
if(patient2List.size() <= 50){
txt2.setText( "您现在排在"+patient2.getId()+"位置上,\n您前面有"+patient2.getFormer()+"个人\n请您耐心等候吧!哈哈");
}else{
txt2.setText("您前面已经排50个人,请考虑!\n"+"您现在排在"+patient2.getId()+"位置上,\n您前面有"+patient2.getFormer()+"个人\n请您耐心等候吧!哈哈");
}
}
});
button2.setBounds(600, 530, 100, 40); // 设置按钮位置
button2.setFont(new Font(display,"宋体",12,SWT.BOLD));
button2.setText("王医生");// 设置按钮上的文字
//-----------------------------------------------------------------------------
final Text txt3 = new Text(shell,SWT.MULTI);
txt3.setBounds(950, 50, 200, 400);
// 事件代码里要访问button,所以加final
final Button button3 = new Button(shell, SWT.Activate);
button3.addSelectionListener(new SelectionAdapter() { // 加一个择监听器
public void widgetSelected(SelectionEvent e) {
Queue patient3List=waiterList.get("闫医生");
Patient patient3 = new Patient();
patient3.setId(patient3List.size()+1);
patient3.setFormer(patient3List.size());
patient3List.offer(patient3);
if(patient3List.size() <= 50){
txt3.setText( "您现在排在"+patient3.getId()+"位置上,\n您前面有"+patient3.getFormer()+"个人\n请您耐心等候吧!哈哈");
}else{
txt3.setText("您前面已经排50个人,请考虑!\n"+"您现在排在"+patient3.getId()+"位置上,\n您前面有"+patient3.getFormer()+"个人\n请您耐心等候吧!哈哈");
}
}
});
button3.setBounds(1000, 530, 100, 40); // 设置按钮位置
button3.setFont(new Font(display,"宋体",12,SWT.BOLD));
button3.setText("闫医生");// 设置按钮上的文字
shell.layout();
shell.open();
while (!shell.isDisposed()) {
if (!display.readAndDispatch())
display.sleep();
}
}
}
病人客户端运行界面如图:
5.医生客户端。
package com.TinySK;
import java.util.Map;
import java.util.Queue;
import org.eclipse.swt.SWT;
import org.eclipse.swt.events.SelectionAdapter;
import org.eclipse.swt.events.SelectionEvent;
import org.eclipse.swt.graphics.Font;
import org.eclipse.swt.widgets.Button;
import org.eclipse.swt.widgets.Display;
import org.eclipse.swt.widgets.Shell;
import org.eclipse.swt.widgets.Text;
public class ProUI {public static void main(String[] args) {
final Display display = Display.getDefault();
final Shell shell = new Shell();
shell.setMaximized(true);
shell.setText("医院排队专家端");
// ------------------新插入的界面核心代码------------------------
PatientServer ps = new PatientServer();//实例化类
final Map> waiterList = ps.init();
//初始化队列服务器
final Text txt1 = new Text(shell,SWT.MULTI);
txt1.setBounds(150, 50, 200, 400);
// 事件代码里要访问button,所以加final
final Button button1 = new Button(shell, SWT.Activate);
button1.addSelectionListener(new SelectionAdapter() { // 加一个择监听器
public void widgetSelected(SelectionEvent e) {
Queue patient1List=waiterList.get("冯医生");
Patient patient1 = patient1List.poll();
txt1.setText("请 " + patient1.getId()+"号到冯医生那里就诊");
}
});
button1.setBounds(200, 530, 100, 40); // 设置按钮位置
button1.setFont(new Font(display,"宋体",12,SWT.BOLD));
button1.setText("冯医生");// 设置按钮上的文字
// ------------------Second--------------------------------------------
final Text txt2 = new Text(shell,SWT.MULTI);
txt2.setBounds(550, 50, 200, 400);
// 事件代码里要访问button,所以加final
final Button button2 = new Button(shell, SWT.Activate);
button2.addSelectionListener(new SelectionAdapter() { // 加一个择监听器
public void widgetSelected(SelectionEvent e) {
Queue patient2List=waiterList.get("王医生");
Patient patient2 = patient2List.poll();
txt2.setText("请 " + patient2.getId()+"号到冯医生那里就诊");
}
});
button2.setBounds(600, 530, 100, 40); // 设置按钮位置
button2.setFont(new Font(display,"宋体",12,SWT.BOLD));
button2.setText("王医生");// 设置按钮上的文字
//---------------------Third--------------------------------------------------------
final Text txt3 = new Text(shell,SWT.MULTI);
txt3.setBounds(950, 50, 200, 400);
// 事件代码里要访问button,所以加final
final Button button3 = new Button(shell, SWT.Activate);
button3.addSelectionListener(new SelectionAdapter() { // 加一个择监听器
public void widgetSelected(SelectionEvent e) {
Queue patient3List=waiterList.get("闫医生");
Patient patient3 = patient3List.poll();
txt3.setText("请 " + patient3.getId()+"号到冯医生那里就诊");
}
});
button3.setBounds(1000, 530, 100, 40); // 设置按钮位置
button3.setFont(new Font(display,"宋体",12,SWT.BOLD));
button3.setText("闫医生");// 设置按钮上的文字
shell.layout();
shell.open();
while (!shell.isDisposed()) {
if (!display.readAndDispatch())
display.sleep();
}
}
}
医生客户端运行界面如图: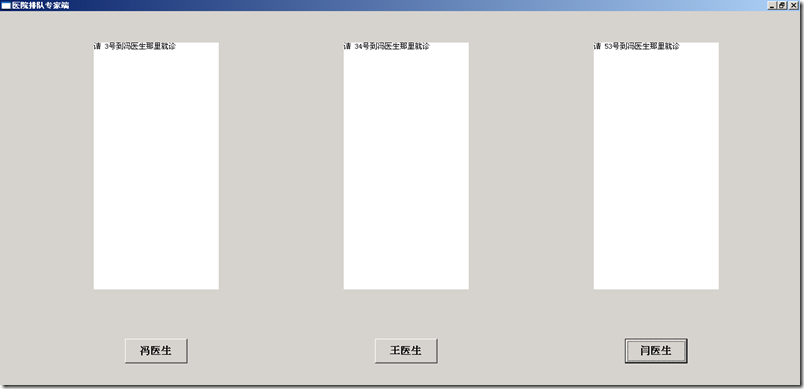
有关医院排队系统的简易模型就此完成,对于界面的美化,不再过多介绍。还有对于服务器端的模拟不太真实,这部分在实际应用中会很重要,而且要占一大部分内容,本文只是简单的模拟了一下服务器端。有关服务器端与用户端的结合使用,将在以后分析。本文写的不是很完善,若有问题请批评指正。


 被折叠的 条评论
为什么被折叠?
被折叠的 条评论
为什么被折叠?
 到【灌水乐园】发言


