


原理
众所周知,主从同步有两种数据库类型:master、slave。
master会将自己所经历的一切动作都记录在binlog(二进制文件中),而slave拿到这个文件就会产生自己的relay log(中继日志),slave再根据中继日志进行执行。
话说完成一次同步将会用到三个线程:binlog dump线程、i/o线程、sql线程;其中binlog dump线程为master所有,i/o线程、sql线程则为slave所有。
首先主库创建binlog dump线程,目的是观察并记录master的动作,接着master将信息异步传达给i/o线程;之后slave则需要产生i/o线程来与主库进行连接,目的是获取binlog信息;最后i/o线程将根据binlog文件创造出中继日志,slave的sql线程根据中继日志执行更新产生与主库相同的数据。而relay log在用过一次后就被会被清除,这样可以减少对磁盘的占有。
master与slave之间对应关系
它们之间有几种对应关系呢?
单master——单slave
单master——单master
单master——多并slave
多串master——多并slave
这些对应关系会应用到具体的工作环境中。
mysql数据库版本
这里准备在Windows和Linux虚拟机各自的mysql数据库之间建立主从同步关系。Windows上mysql为主库,Linux上mysql为从库,使其之间能异步的传递数据。
需要的两个mysql数据库准备好了,版本信息如下:
windows:mysql-5.5.48-winx64.zip
Linux:MySQL-server-5.5.48-1.linux2.6.x86_64.rpm、MySQL-client-5.5.48-1.linux2.6.x86_64.rpm
二者之间版本需要尽量接近,最好一致。
确保主从彼此连接
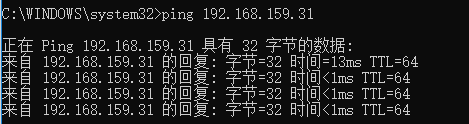
windows与linux的数据库需要建立连接所以需要彼此ping通,首先关闭各自的防火墙
linux关闭防火墙命令:
service iptabes stop
接着查看各自的ip地址
windows——ipconfig

linux——ifconfig
linux ping ipv4地址:
ping 192.168.43.61

windows ping inet地址:
ping 192.168.159.31
各自的配置文件信息
windows——my.ini
[mysql]
# 设置mysql客户端默认字符集
default-character-set=utf8
[mysqld]
#设置3306端口
port = 3306
# 设置mysql的安装目录
basedir=C:\Program Files (x86)\mysql-5.5.48-winx64
# 设置mysql数据库的数据的存放目录
datadir=C:\Program Files (x86)\mysql-5.5.48-winx64\data
#======================主从同步需要的属性配置=====================
#主数据库的唯一id
server-id=1
#行为日志,自命名,可辨即可。当你配置好这个属性的时候,就会触发binlog功能
log-bin=C:\Program Files (x86)\mysql-5.5.48-winx64\data\mysql_log_bin
#错误日志,自命名,可辨即可
log-err=C:\Program Files (x86)\mysql-5.5.48-winx64\data\mysql_log_err
#允许被记录binlog的数据库列表
#binlog-do-db=
#不允许被记录binlog的数据库列表
#binlog-ignore-db=
#读写控制:0代表可读可写,1代表只读。
read-only=0
#========================================================
# 允许最大连接数
max_connections=200
# 服务端使用的字符集默认为8比特编码的latin1字符集
character-set-server=utf8
# 创建新表时将使用的默认存储引擎
default-storage-engine=INNODB
注:蓝色为开启主从同步的必要条件,其它有关主从配置的属性不配也可以。
server-id,无论master还是slave,server-id只能有一个,且不能相同。
log-bin,会保存binlog二进制文件,只要它被配置进去就会开始记录。
需要注意的是mysql_log_bin和log-err这两个文件夹的位置必须直接在data文件夹下,否则mysql服务无法启动。
如果写成这样:log-err=C:\Program Files (x86)\mysql-5.5.48-winx64\data\log\mysql_log_err 服务器就无发正常启动。

binlog-do-db、binlog-ignore-db两个属性不进行设置的话,master默认会对未来所有的数据库进行记录binlog。不过在主从同步机制开启之前的旧数据并不会被slave同步,因为binlog没有其对应记录。所以说,如果之前master里已经有数据,而又想被slave同步可以有几种解决方法。其中一个方法比较繁琐:是先屏蔽写锁,然后对旧数据进行备份>>再删除旧数据>>最后打开被屏蔽的写锁、恢复旧数据,恢复旧数据的动作就会被记录,并同步到slave中;另一个方法比较简单:是通过mysqldump导出master数据,然后复制全部的备份的文件到从数据库即可。
read-only有两种状态:0代表可读可写,1代表只读。
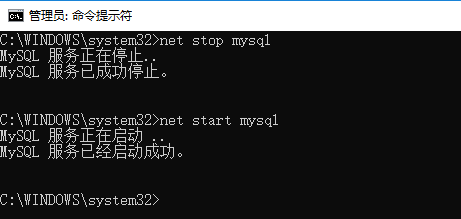
配置并保存,接着cmd以管理员身份重启windows上mysql服务(或者直接在计算机管理>服务——找到mysq服务启动就可以了)。
下面用命令控制mysql服务重启:
net stop mysql
net start mysql
linux——my.cnf
由于我的/etc下没有my.cnf文件所以需要去/usr/share/mysql/my-medium.cnf复制一份到/etc,取名为my.cnf即可,二者不会冲突。
# Example MySQL config file for medium systems.
#
# This is for a system with little memory (32M - 64M) where MySQL plays
# an important part, or systems up to 128M where MySQL is used together with
# other programs (such as a web server)
#
# MySQL programs look for option files in a set of
# locations which depend on the deployment platform.
# You can copy this option file to one of those
# locations. For information about these locations, see:
# http://dev.mysql.com/doc/mysql/en/option-files.html
#
# In this file, you can use all long options that a program supports.
# If you want to know which options a program supports, run the program
# with the "--help" option.
# The following options will be passed to all MySQL clients
[client]
#password = your_password
port = 3306
socket = /var/lib/mysql/mysql.sock
# Here follows entries for some specific programs
# The MySQL server
[mysqld]
port = 3306
socket = /var/lib/mysql/mysql.sock
skip-external-locking
key_buffer_size = 16M
max_allowed_packet = 1M
table_open_cache = 64
sort_buffer_size = 512K
net_buffer_length = 8K
read_buffer_size = 256K
read_rnd_buffer_size = 512K
myisam_sort_buffer_size = 8M
# Don't listen on a TCP/IP port at all. This can be a security enhancement,
# if all processes that need to connect to mysqld run on the same host.
# All interaction with mysqld must be made via Unix sockets or named pipes.
# Note that using this option without enabling named pipes on Windows
# (via the "enable-named-pipe" option) will render mysqld useless!
#
#skip-networking
# Replication Master Server (default)
# binary logging is required for replication
log-bin=mysql-bin
# binary logging format - mixed recommended
binlog_format=mixed
# required unique id between 1 and 2^32 - 1
# defaults to 1 if master-host is not set
# but will not function as a master if omitted
#server-id = 1
# Replication Slave (comment out master section to use this)
#
# To configure this host as a replication slave, you can choose between
# two methods :
#
# 1) Use the CHANGE MASTER TO command (fully described in our manual) -
# the syntax is:
#
# CHANGE MASTER TO MASTER_HOST=, MASTER_PORT=,
# MASTER_USER=, MASTER_PASSWORD= ;
#
# where you replace , , by quoted strings and
# by the master's port number (3306 by default).
#
# Example:
#
# CHANGE MASTER TO MASTER_HOST='125.564.12.1', MASTER_PORT=3306,
# MASTER_USER='joe', MASTER_PASSWORD='secret';
#
# OR
#
# 2) Set the variables below. However, in case you choose this method, then
# start replication for the first time (even unsuccessfully, for example
# if you mistyped the password in master-password and the slave fails to
# connect), the slave will create a master.info file, and any later
# change in this file to the variables' values below will be ignored and
# overridden by the content of the master.info file, unless you shutdown
# the slave server, delete master.info and restart the slaver server.
# For that reason, you may want to leave the lines below untouched
# (commented) and instead use CHANGE MASTER TO (see above)
#
# required unique id between 2 and 2^32 - 1
# (and different from the master)
# defaults to 2 if master-host is set
# but will not function as a slave if omitted
server-id = 2
#
# The replication master for this slave - required
#master-host =
#
# The username the slave will use for authentication when connecting
# to the master - required
#master-user =
#
# The password the slave will authenticate with when connecting to
# the master - required
#master-password =
#
# The port the master is listening on.
# optional - defaults to 3306
#master-port =
#
# binary logging - not required for slaves, but recommended
#log-bin=mysql-bin
# Uncomment the following if you are using InnoDB tables
#innodb_data_home_dir = /var/lib/mysql
#innodb_data_file_path = ibdata1:10M:autoextend
#innodb_log_group_home_dir = /var/lib/mysql
# You can set .._buffer_pool_size up to 50 - 80 %
# of RAM but beware of setting memory usage too high
#innodb_buffer_pool_size = 16M
#innodb_additional_mem_pool_size = 2M
# Set .._log_file_size to 25 % of buffer pool size
#innodb_log_file_size = 5M
#innodb_log_buffer_size = 8M
#innodb_flush_log_at_trx_commit = 1
#innodb_lock_wait_timeout = 50
[mysqldump]
quick
max_allowed_packet = 16M
[mysql]
no-auto-rehash
# Remove the next comment character if you are not familiar with SQL
#safe-updates
[myisamchk]
key_buffer_size = 20M
sort_buffer_size = 20M
read_buffer = 2M
write_buffer = 2M
[mysqlhotcopy]
interactive-timeout
注:蓝色为需要改动部分,该文件默认开启了binlog功能。其它属性就无需改动了。
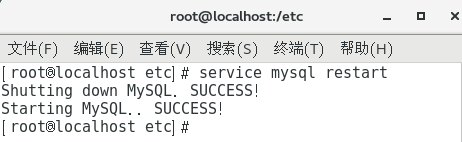
保存更改,接着需要重启linux上mysql服务:
service mysql restart
windows上master授权给slave
首先windows上cmd登陆mysql:
mysql -hlocalhost -uroot -p

接着键入授权命令:
用户授权(给自身授权,必须执行,否则slave的io线程可能连接不上,并处于"Connecting"状态)
grant all privileges on *.* to 'root'@'%' identified by '' with grant option;

给slave用户授权,使它拥有权力复制
grant replication slave on *.* to 'root'@'192.168.159.31' identified by ' ' ;

'root'是数据库用户名。
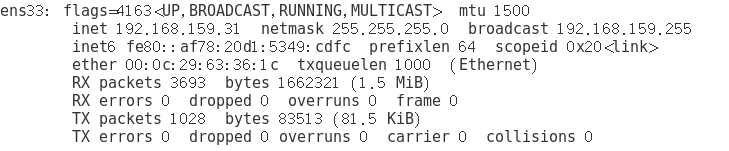
‘192.168.159.31’是ens33里的inet。
‘ ’是数据库密码(我没有设置数据库密码);
之后命令刷新一下:
flush privileges;

查看当前master的状态
show master status

可以看到4个字段
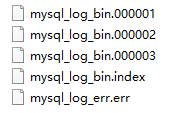
File就是已经生成的binlog,在my.ini配置文件中可以自定义binlog文件名,所以我的文件名是mysql_log_bin.000003,因此说我们有对这个binlog文件的命名权力。
可以看到data文件夹中生成的文件:
position是slave当前读取文件的位置,称为”偏移量“会一直发生变动,即slave会从这个点进行数据同步。
binlog_do_db、binlog_ignore_db由于没有进行配置所以里面不会有数据库名称列表。
如果你没有在my.ini中配置主从同步信息的话,在你键入“show master status“后会显示:“Empty set”。
在linux的mysql中指定master信息
首先在控制台登陆到linux上的mysql
mysql -uroot -p
[root@localhost etc]# mysql -uroot -p
Enter password:
Welcome to the MySQL monitor. Commands end with ; or \g.
Your MySQL connection id is 14
Server version: 5.5.48-log MySQL Community Server (GPL)
Copyright (c) 2000, 2016, Oracle and/or its affiliates. All rights reserved.
Oracle is a registered trademark of Oracle Corporation and/or its
affiliates. Other names may be trademarks of their respective
owners.
Type 'help;' or '\h' for help. Type '\c' to clear the current input statement.
mysql>
接着为slave指定master信息
change master to master_host='192.168.43.61',
master_user='root',
master_password='',
master_log_file='mysql_log_bin.000003' ,
master_log_pos=331;
mysql> change master to master_host='192.168.43.61',master_user='root',master_password='',
-> master_log_file='mysql_log_bin.000003',master_log_pos=331;
同时给mysql的root用户授权(一定要授权,否则,io线程可能连接不上)
grant all privileges on *.* to 'root'@'%' identified by '' with grant option;
mysql> grant all privileges on *.* to 'root'@'%' identified by '' with grant option;
Query OK, 0 rows affected (0.05 sec)
我的mysql数据库也是没有设置密码,请针对自身密码进行设置。
启动slave
start slave;
mysql> start slave;
Query OK, 0 rows affected (0.11 sec)
显示slave的状态
show slave status;(稍有点乱)
mysql> show slave status;
+----------------------+---------------+-------------+-------------+---------------+----------------------+---------------------+----------------------------+---------------+-----------------------+------------------+-------------------+-----------------+---------------------+--------------------+------------------------+-------------------------+-----------------------------+------------+------------+--------------+---------------------+-----------------+-----------------+----------------+---------------+--------------------+--------------------+--------------------+-----------------+-------------------+----------------+-----------------------+-------------------------------+---------------+---------------------------------------------------------------------------------------+----------------+----------------+-----------------------------+------------------+
| Slave_IO_State | Master_Host | Master_User | Master_Port | Connect_Retry | Master_Log_File | Read_Master_Log_Pos | Relay_Log_File | Relay_Log_Pos | Relay_Master_Log_File |Slave_IO_Running | Slave_SQL_Running | Replicate_Do_DB | Replicate_Ignore_DB | Replicate_Do_Table | Replicate_Ignore_Table | Replicate_Wild_Do_Table | Replicate_Wild_Ignore_Table | Last_Errno | Last_Error | Skip_Counter | Exec_Master_Log_Pos | Relay_Log_Space | Until_Condition | Until_Log_File | Until_Log_Pos | Master_SSL_Allowed | Master_SSL_CA_File | Master_SSL_CA_Path | Master_SSL_Cert | Master_SSL_Cipher | Master_SSL_Key | Seconds_Behind_Master | Master_SSL_Verify_Server_Cert | Last_IO_Errno | Last_IO_Error | Last_SQL_Errno | Last_SQL_Error | Replicate_Ignore_Server_Ids | Master_Server_Id |
+----------------------+---------------+-------------+-------------+---------------+----------------------+---------------------+----------------------------+---------------+-----------------------+------------------+-------------------+-----------------+---------------------+--------------------+------------------------+-------------------------+-----------------------------+------------+------------+--------------+---------------------+-----------------+-----------------+----------------+---------------+--------------------+--------------------+--------------------+-----------------+-------------------+----------------+-----------------------+-------------------------------+---------------+---------------------------------------------------------------------------------------+----------------+----------------+-----------------------------+------------------+
| Connecting to master | 192.168.43.61 | root | 3306 | 60 | mysql_log_bin.000003 | 331 | localhost-relay-bin.000001 | 4 | mysql_log_bin.000003 | Connecting | Yes | | | | | | | 0 | | 0 | 331 | 107 | None | | 0 | No | | | | | | NULL | No | 1130 | error connecting to master 'root@192.168.43.61:3306' - retry-time: 60 retries: 86400 | 0 | | | 0 |
+----------------------+---------------+-------------+-------------+---------------+----------------------+---------------------+----------------------------+---------------+-----------------------+------------------+-------------------+-----------------+---------------------+--------------------+------------------------+-------------------------+-----------------------------+------------+------------+--------------+---------------------+-----------------+-----------------+----------------+---------------+--------------------+--------------------+--------------------+-----------------+-------------------+----------------+-----------------------+-------------------------------+---------------+---------------------------------------------------------------------------------------+----------------+----------------+-----------------------------+------------------+
1 row in set (0.06 sec)
mysql>
或者
show slave status\G;
mysql> show slave status\G;
*************************** 1. row ***************************
Slave_IO_State: Connecting to master
Master_Host: 192.168.43.61
Master_User: root
Master_Port: 3306
Connect_Retry: 60
Master_Log_File: mysql_log_bin.000003
Read_Master_Log_Pos: 331
Relay_Log_File: localhost-relay-bin.000001
Relay_Log_Pos: 4
Relay_Master_Log_File: mysql_log_bin.000003
Slave_IO_Running: Connecting
Slave_SQL_Running: Yes
Replicate_Do_DB:
Replicate_Ignore_DB:
Replicate_Do_Table:
Replicate_Ignore_Table:
Replicate_Wild_Do_Table:
Replicate_Wild_Ignore_Table:
Last_Errno: 0
Last_Error:
Skip_Counter: 0
Exec_Master_Log_Pos: 331
Relay_Log_Space: 107
Until_Condition: None
Until_Log_File:
Until_Log_Pos: 0
Master_SSL_Allowed: No
Master_SSL_CA_File:
Master_SSL_CA_Path:
Master_SSL_Cert:
Master_SSL_Cipher:
Master_SSL_Key:
Seconds_Behind_Master: NULL
Master_SSL_Verify_Server_Cert: No
Last_IO_Errno: 1130
Last_IO_Error: error connecting to master 'root@192.168.43.61:3306' - retry-time: 60 retries: 86400
Last_SQL_Errno:0
Last_SQL_Error:
Replicate_Ignore_Server_Ids:
Master_Server_Id: 0
1 row in set (0.00 sec)
ERROR:
No query specified
mysql>
可以看到橙色部分的io线程状态不为Yes,而是connecting,并且有错误的日志生成,所以处于异常状态。因为master的Exec_Master_Log_Pos已经不再是331了(中途我操作了master数据库),导致pos改变。
这是其中一点原因,还有一点是我之前没有对各自的数据库用户赋予所有权限:grant all privileges on *.* to 'root'@'%' identified by '' with grant option;
所以说:Slave_IO_Running 和 Slave_SQL_Running都必须为Yes才是正确的状态,否则就是有问题。
引起不为Yes的原因主要有:
1 两个数据库的权限不足
2 指定的master或slave的个别参数错误,如:用户名或密码不正确、master_log_pos参数不匹配
3 网络有问题
所以在排除以上因素后我按照原有顺序重新执行了一遍:
windows中:

可以看到position已经变化为1756,因此需要重新在slave中对master进行指定参数。
linux中:
mysql> change master to master_host='192.168.43.61',master_user='root',master_password='', master_log_file='mysql_log_bin.000003',master_log_pos=1756;
ERROR 1198 (HY000): This operation cannot be performed with a running slave; run STOP SLAVE first
mysql> stop slave;
Query OK, 0 rows affected (0.01 sec)
mysql> change master to master_host='192.168.43.61',master_user='root',master_password='', master_log_file='mysql_log_bin.000003',master_log_pos=1756;
Query OK, 0 rows affected (0.03 sec)
mysql> start slave;
Query OK, 0 rows affected (0.00 sec)
接着
show slave status\G;
mysql> show slave status\G;
*************************** 1. row ***************************
Slave_IO_State: Waiting for master to send event
Master_Host: 192.168.43.61
Master_User: root
Master_Port: 3306
Connect_Retry: 60
Master_Log_File: mysql_log_bin.000003
Read_Master_Log_Pos: 1756
Relay_Log_File: localhost-relay-bin.000002
Relay_Log_Pos: 257
Relay_Master_Log_File: mysql_log_bin.000003
Slave_IO_Running: Yes
Slave_SQL_Running: Yes
Replicate_Do_DB:
Replicate_Ignore_DB:
Replicate_Do_Table:
Replicate_Ignore_Table:
Replicate_Wild_Do_Table:
Replicate_Wild_Ignore_Table:
Last_Errno: 0
Last_Error:
Skip_Counter: 0
Exec_Master_Log_Pos: 1756
Relay_Log_Space: 417
Until_Condition: None
Until_Log_File:
Until_Log_Pos: 0
Master_SSL_Allowed: No
Master_SSL_CA_File:
Master_SSL_CA_Path:
Master_SSL_Cert:
Master_SSL_Cipher:
Master_SSL_Key:
Seconds_Behind_Master: 0
Master_SSL_Verify_Server_Cert: No
Last_IO_Errno: 0
Last_IO_Error:
Last_SQL_Errno: 0
Last_SQL_Error:
Replicate_Ignore_Server_Ids:
Master_Server_Id: 1
1 row in set (0.00 sec)
ERROR:
No query specified
mysql>
这就是正确的方式,至此主从同步就实现了。
测试
可以用navacat来测试一下,这里是windows上navicat,现在在master上新建立一个数据库”db0325“,使用该数据库,并在db0325中新建一个表”test“,之后向test表插入信息并查询。
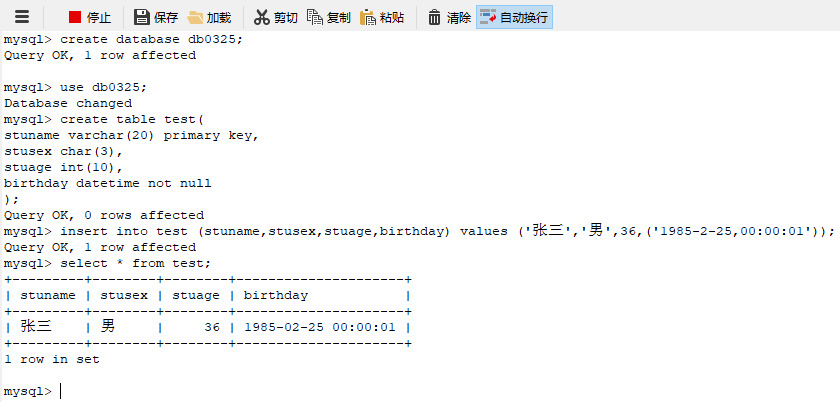
注:以下数据同上图
mysql>create database db0325;(数据库命名不能有下划线_) --新建数据库
Query OK,1row affected
mysql> use db0325; --使用当前数据库
Database changed
mysql>create table test( --新建表
stuname varchar(20) primary key,
stusexchar(3),
stuageint(10),
birthday datetime notnull);
Query OK,0rows affected
mysql> insert into test (stuname,stusex,stuage,birthday) values ('张三','男',36,('1985-2-25,00:00:01')); --插入语句
Query OK,1row affected
mysql> select * fromtest; --查询+---------+--------+--------+---------------------+
| stuname | stusex | stuage | birthday |
+---------+--------+--------+---------------------+
| 张三 | 男 | 36 | 1985-02-25 00:00:01 |
+---------+--------+--------+---------------------+
1 row in set
mysql>
来到linux
看slave是否和刚才的信息同步。
mysql -uroot -p
show databases;

可以看到除了自带的数据库以外,多了一个db0325。
use db0325;
select * from test;

测试没有出现问题,主从同步成功。
从结果可以验证;slave的确只能从得到binlog的时候同步数据,而之前的数据就要通过mysqldump备份的方式导入到slave中。
好啦,看到这里如果你也想配置MySQL数据库间的主从同步,就赶快动手配置一下吧,如果您有更加新奇的知识点,欢迎补充,如有不足之处还请赐教>>>


 187
187


 被折叠的 条评论
为什么被折叠?
被折叠的 条评论
为什么被折叠?
 到【灌水乐园】发言


