


一, 前言
1,研究coreseek的动机
我有一个自己的笔记博客,经常在上面做一些技术文章分析。在查询一些文章的时候,以前只能将要查询的内容去mysql中用like模糊匹配。在文章多了的情况下,这样做法效率肯定不行。于是我把目标投向了中文搜索插件coreseek,并成功的把它使用到了我的项目当中。
效果图:

希望通过这篇分析,让有兴趣的同学少走些弯路。
2,概念介绍
sphinx是开源的搜索引擎,它支持英文的全文检索。但英文的天然分词符是空格,而中文则有比较复杂的分词要求。中国人提供了一个可供企业使用的,基于Sphinx的中文全文检索引擎。也就是说Coreseek实际上的内核还是Sphinx。但其最大的不同是coreseek有一个中文分词利器mmseg。
3,环境介绍
系统:Ubuntu
http服务:Apache/2.2.22
Mysql: Ver 14.14 Distrib 5.5.41
PHP: PHP 5.3.10
二, 下载并安装Coreseek
安装步骤
下载coreseek-3.2.14.tar.gz,并放置在/usr/local/src
首先,为了避免安装中出现依赖包缺失,你需要补一下血
apt-get install make gcc g++ automake libtool mysql-client libmysqlclient15-dev libxml2-dev libexpat1-dev
上面那个命令你执行就行,不然可能会因为软件包不够新出现各种奇葩问题。比如我就更新了159M的软件包。(我在遇到各种坑后才回头补的血)
1,安装mmseg分词模块
cd /usr/local/srctar zxvf coreseek-3.2.14.tar.gz #解压
cd coreseek-3.2.14cd mmseg-3.2.14./bootstrap #输出的warning信息可以忽略,如果出现error则需要解决
./configure --prefix=/usr/local/mmseg3 #配置make#编译make install #安装
1.1)可能遇到的问题和解决办法:
在执行./bootstrap时出现./bootstrap: 27: ./bootstrap: autoconf: not found 的错误,
原因:因为没有安装automake 工具, (ubuntu 10.04)用下面的命令安装好就可以了。
sudo apt-get install autoconf automake libtool
1.2)可能遇到的问题:在安装分词模块 mmseg ,编译安装到最后,出现annot find input file: src/Makefile.in 的错误
然后查了一下,只找到解决办法,如下:
aclocal //是一个perl 脚本程序,它的定义是:“aclocal - create aclocal.m4 by scanning configure.ac”
libtoolize --force //运行后有一个错误,不用管它。
automake --add-missing
autoconf
autoheadermake clean
然后在重新编译
./configure --prefix=/usr/local/mmseg3
make && make install
编译安装成功
总结:其实这个报错原因我也没查出来。反正按照解决办法就成功了,谁若知道拜托请留言,谢谢。
2、安装CoreSeek
cd /usr/local/src
cd coreseek-3.2.14cd csft-3.2.14
sh buildconf.sh#输出的warning信息可以忽略,如果出现error则需要解决
./configure --prefix=/usr/local/coreseek --without-unixodbc --with-mmseg --with-mmseg-includes=/usr/local/mmseg3/include/mmseg/ --with-mmseg-libs=/usr/local/mmseg3/lib/ --with-mysql #配置make#编译make install #安装
3,测试mmseg分词、coreseek搜索、MySQL数据源
cd /usr/local/src
cd coreseek-3.2.14
cd testpack
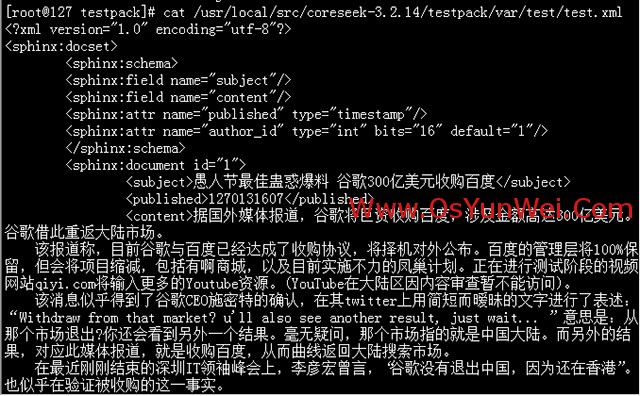
cat /usr/local/src/coreseek-3.2.14/testpack/var/test/test.xml #此时应该正确显示中文,如下图所示
/usr/local/mmseg3/bin/mmseg -d /usr/local/mmseg3/etc /usr/local/src/coreseek-3.2.14/testpack/var/test/test.xml
/usr/local/coreseek/bin/indexer -c /usr/local/src/coreseek-3.2.14/testpack/etc/csft.conf --all
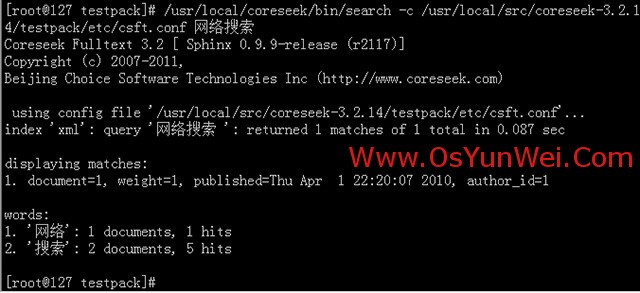
/usr/local/coreseek/bin/search -c /usr/local/src/coreseek-3.2.14/testpack/etc/csft.conf 网络搜索
/usr/local/coreseek/bin/indexer -c /usr/local/coreseek/etc/sphinx-min.conf.dist
/usr/local/coreseek/bin/indexer -c /usr/local/src/coreseek-3.2.14/testpack/etc/csft.conf --all --rotate #启动服务,更新索引
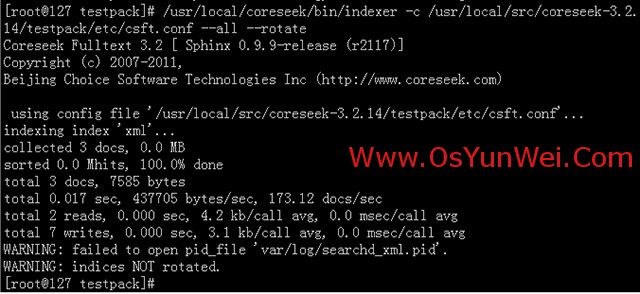
如图,且无报错。则说明你的coreseek已经能够正常运行了。
3.1)可能遇到的问题与解决办法:
在输入/usr/local/coreseek/bin/indexer -c etc/csft.conf --all,报xmlpipe2 support NOT compiled in. To use xmlpipe2, install missing错误
原因:
缺少xmlpipe2库,解决:
apt-get install expat-*
然后重新编译coreseek,记得make clean
4,coreseek配置和使用
cp /usr/local/src/coreseek-3.2.14/testpack/etc/csft_mysql.conf /usr/local/coreseek/etc/csft_mysql.conf #拷贝MySQL数据源配置文件ln -s /usr/local/coreseek/etc/csft_mysql.conf /etc/csft_mysql.conf #添加软连接
vim/etc/csft_mysql.conf #编辑,修改
三, 修改Coreseek配置文件
以我自己的配置文件为例:
/usr/local/coreseek/etc/csft_mysql.conf
#索引源定义
source mysql
{
type=mysql
sql_host=localhost
sql_user=xxxx
sql_pass=xxxx
sql_db=xxxx
sql_port= 3306sql_query_pre=SET NAMES utf8
sql_query= SELECT id,id,uid,title,data FROM notebook_notepad
#sql_query第一列id需为整数
#title、data作为字符串/文本字段,被全文索引
sql_attr_uint= id#从SQL读取到的值必须为整数
#sql_attr_timestamp= time#从SQL读取到的值必须为整数,作为时间属性
sql_attr_uint=uid
sql_query_info_pre=SET NAMES utf8 #命令行查询时,设置正确的字符集
sql_query_info= SELECT * FROM notebook_notepad WHERE id=$id#命令行查询时,从数据库读取原始数据信息
}
#index定义
index mysql
{
source=mysql #对应的source名称
path=/usr/local/coreseek/var/data/mysql #请修改为实际使用的绝对路径,例如:/usr/local/coreseek/var/...
docinfo=extern
mlock= 0morphology=none
min_word_len= 1html_strip= 0#中文分词配置,详情请查看:http://www.coreseek.cn/products-install/coreseek_mmseg/
charset_dictpath = /usr/local/mmseg3/etc/ #BSD、Linux环境下设置,/符号结尾
#charset_dictpath= etc/ #Windows环境下设置,/符号结尾,最好给出绝对路径,例如:C:/usr/local/coreseek/etc/...
charset_type= zh_cn.utf-8}
#全局index定义
indexer
{
mem_limit=128M
}
#searchd服务定义
searchd
{
listen= 9312read_timeout= 5max_children= 30max_matches= 1000seamless_rotate= 0preopen_indexes= 0unlink_old= 1pid_file=/usr/local/coreseek/var/log/searchd_mysql.pid #请修改为实际使用的绝对路径,例如:/usr/local/coreseek/var/...
log=/usr/local/coreseek/var/log/searchd_mysql.log #请修改为实际使用的绝对路径,例如:/usr/local/coreseek/var/...
query_log=/usr/local/coreseek/var/log/query_mysql.log #请修改为实际使用的绝对路径,例如:/usr/local/coreseek/var/...
}
这样搜索的话就会从索引文件中查出id,uid,title,data字段。
OK,配置完成以后,重启Coreseek 服务就能从生产你想要的查询索引,以后你就可以摆脱mysql的桎梏,什么中文,英文都可以,还自带分词。怎么样,是不是打开了新世界的大门。
下面讲一下重建索引可能出错的地方,以及解决办法。有兴趣的同学看一下,否则可以跳到下一节:PHP测试Coreseek 。
重建索引时报错误:WARNING: failed to open pid_file '/usr/local/coreseek/var/log/searchd_mysql.pid'.
解决方法:
试着停止一下coreseek服务
/usr/local/coreseek/bin/searchd -c /usr/local/coreseek/etc/csft_mysql.conf --stop 停止服务
然后重启
/usr/local/coreseek/bin/searchd -c /usr/local/coreseek/etc/csft_mysql.conf 启动服务
再次建立索引
/usr/local/coreseek/bin/indexer -c /usr/local/coreseek/etc/csft_mysql.conf --all 建立索引
如果提示:FATAL: failed to lock /usr/local/coreseek/var/data/xxxx.spl: Resource temporarily unavailable, will not index. Try --rotate option.
则尝试重建索引
/usr/local/coreseek/bin/indexer -c /usr/local/coreseek/etc/csft_mysql.conf --all --rotate 重建索引
四, PHP测试Coreseek
1,将sphinxapi.php放到测试目录下
cp /usr/local/src/coreseek-3.2.14/testpack/api/sphinxapi.php ./
vim test.php
header("Content-type: text/html; charset=utf-8");//require("./ ");
$s = newSphinxClient;$s->setServer("127.0.0.1", 9312);//SPH_MATCH_ALL, 匹配所有查询词(默认模式); SPH_MATCH_ANY, 匹配查询词中的任意一个; SPH_MATCH_EXTENDED2, 支持特殊运算符查询
$s->setMatchMode(SPH_MATCH_ALL);$s->setMaxQueryTime(30); //设置最大搜索时间
$s->SetArrayResult(false); //是否将Matches的key用ID代替
$s->SetSelect ( "*" ); //设置返回信息的内容,等同于SQL
$s->SetRankingMode(SPH_RANK_BM25);$s->SetLimits ( 0, 30, 1000, 0 ); //设置结果集偏移量 SetLimits
$res = $s->query('coreseek','mysql','--single-0-query--'); #[coreseek]关键字,[mysql]数据源source
$err = $s->GetLastError();echo '';var_dump($res);var_dump($res['matches']);var_export($err);echo '';
php5 test.php
运行结果:matches为匹配后的结果集

五, Coreseek在Thinkphp中的使用
1,Sphinx扩展安装安装
Coreseek官方教程中建议php使用直接include一个php文件进行操作,事实上php有独立的sphinx模块可以直接操作coreseek(coreseek就是sphinx!)已经进入了php的官方函数库,而且效率更高!但php模块依赖于libsphinxclient包。我是按照以下这篇文章的步骤安装了Sphinx扩展。
感谢:http://blog.csdn.net/e421083458/article/details/21529969
[第一步] 安装依赖libsphinxclient
# cd /var/install/coreseek-4.1-beta/csft-4.1/api/libsphinxclient/# ./configure --prefix=/usr/local/sphinxclient
configure: creating ./config.status
config.status: creating Makefile
config.status: error: cannotfind input file: Makefile.in#报错configure失败//处理configure报错
编译过程中报了一个config.status: error: cannot find input file: src/Makefile.in这个的错误,然后运行下列指令再次编译就能通过了:
# aclocal
# libtoolize--force
# automake--add-missing
# autoconf
# autoheader
#makeclean//从新configure编译
# ./configure
#make && make install
[第二步] 安装sphinx的PHP扩展
http://pecl.php.net/package/sphinx
# wget http://pecl.php.net/get/sphinx-1.3.0.tgz
# tar zxvf sphinx-1.3.0.tgz
# cd sphinx-1.3.0# phpize
# ./configure --with-php-config=/usr/bin/php-config --with-sphinx=/usr/local/sphinxclient
#make && make install# cd/etc/php.d/#cpgd.ini sphinx.ini
#visphinx.ini
extension=sphinx.so
# service php-fpm restart
安装完PHP的Sphinx扩展后,就可以直接使用$coreseek = new SphinxClient();而无需引入源文件了。
简单说一下我在TP里使用coreseek查询,并高亮关键词的思路:
1,通过sphinx查出id,uid的集合
2,然后$sql = "select * from post where id in($ids)";$res = mysql_query($sql);获取到数据库的真实数据
3,用BuildExcerpts将title和data的关键字高亮,然后分页展示
关键代码:
$where = array();$where['uid']=$uid;if(!empty($search)){ //有需要查找的内容,则去 coreseek 忠查出对应的id
$coreseek = new\SphinxClient();$coreseek->setServer("127.0.0.1", 9312);//SPH_MATCH_ALL, 匹配所有查询词(默认模式); SPH_MATCH_ANY, 匹配查询词中的任意一个; SPH_MATCH_EXTENDED2, 支持特殊运算符查询
$coreseek->setMatchMode(SPH_MATCH_ALL);$coreseek->setMaxQueryTime(30); //设置最大搜索时间
$coreseek->SetArrayResult(false); //是否将Matches的key用ID代替
$coreseek->SetSelect ( "*" ); //设置返回信息的内容,等同于SQL
$coreseek->SetLimits ( 0, 30, 1000, 0 ); //设置结果集偏移量 SetLimits
$res = $coreseek->query($search,'mysql','--single-0-query--');$key = array_keys($res['matches']);$where['id']=array('in',$key);$coreseek->close();
}else{
}//获取总数据条数
$total=$mod->where($where)->count();
高亮的关键代码:
if(!empty($search)){$page->parameter['search']=$search;//代码高亮
$opt = array("before_match"=>"","after_match"=>"");$coreseek1 = new\SphinxClient();$coreseek1->setServer("127.0.0.1", 9312);$coreseek1->SetMatchMode(SPH_MATCH_ALL);$i=0;$tags_title=array();foreach($info as $key=>$row){$tags_title[]=$row['title'];
}$replace_title=$coreseek1->BuildExcerpts($tags_title,'mysql',$search,$opt);foreach($info as $key=>&$row){$info[$key]['title']=$replace_title[$key];
}$coreseek1->close();
}
OK,至此,coreseek已经能够在TP里完美运行了。这篇分享的文章也可以画上句号了。以上是我一步步安装时的细节,记录下怕以后自己忘记,也希望能给感兴趣的同学一些帮助。文章信息量偏大,如果有哪些疏漏,万望指正!


 2712
2712


 被折叠的 条评论
为什么被折叠?
被折叠的 条评论
为什么被折叠?
 到【灌水乐园】发言


