


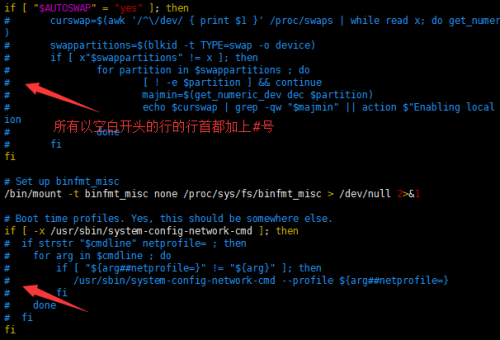
1、复制/etc/rc.d/rc.sysinit文件至/tmp目录,将/tmp/rc.sysinit文件中的以至少一个空白字符开头的行的行首加#;[root@localhost ~]# cp -a /etc/rc.d/rc.sysinit /tmp #复制文件到/tmp下[root@localhost ~]# vim /tmp/rc.sysinit #使用vim打开文件,提示vim命令找不到
-bash: vim: command not found
[root@localhost ~]# yum -y install vim #用yum安装vim程序,完成后,再次使用vim打开
[root@localhost ~]# vim /tmp/rc.sysinit
#打开vim编辑器后,使用:进入末行模式,输入以下命令进行查找替换
:%s/\(^[[:space:]]\+\)/#\1/g
另外,命令也可写成
:%s/^[[:space:]]\+/#&/g
拓展思路:
如何用查找替换命令恢复已经保存的加了#号的内容?原理相同,只是查找命令范围更换即可,如下::%s/^#\([[:space:]]\+\)/\1/g
#/etc/rc.d/rc.sysinit只能在CentOS6上找到,CentOS7上面是没有的,因为CentOS7采用systemd取代CentOS6是SysV init启动方式,原因在于SysV init服务启动慢。
先了解一下什么是rc.sysinit
rc.sysinit作用是执行一些重要的系统初始化任务。
在设定了运行等级后,Linux系统执行的第一个用户层文件就是/etc/rc.d/rc.sysinit脚本程序,它做的工作非常多,包括设定PATH、设定网络配置(/etc/sysconfig/network)、启动swap分区、设定/proc等等。
2、复制/boot/grub/grub.conf至/tmp目录中,删除/tmp/grub.conf文件中的行首的空白字符;[root@localhost ~]# cp -a /boot/grub/grub.conf /tmp #复制文件
[root@localhost ~]# vim /tmp/grub.conf #使用vim打开编辑文件
# 打开编辑器后按:进入末行模式,输入以下命令进行查找替换
:%s/^[[:space:]]\+//g
3、删除/tmp/rc.sysinit文件中的以#开头,且后面跟了至少一个空白字符的行行的#和空白字符[root@localhost ~]# vim /tmp/rc.sysinit #使用vim打开编辑文件
# 打开编辑器后按:进入末行模式,输入以下命令进行查找替换
:%s/^#[[:space:]]\+//g
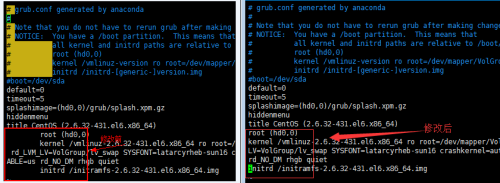
4、为/tmp/grub.conf文件中前三行的行首加#号;同上,打开vim编辑进入末行模式后输入以下命令:
:1,3s/*/#&/g
# vim编辑器末行模式,地址定界说明:
:start_pos,end_pos
# 具体第#行,例如2表示第2行
#,# 从左侧#表示行开始,到右侧#表示行结尾
#,+# 从左侧#表示的行起始,加上右侧#表示的行数
. 当前行
$ 最后一行
% 全文,相当于1,$
/pat1/,/pat2/ 从第一次被pat1模式匹配到的行开始,一直至第一次被pat2匹配到的行结尾
#,/pat/ 从第#行开始,到被pat模式匹配到的行
/pat/,$ 从被pat模式匹配到的行开始,到最后一行。
5、将/etc/yum.repos.d/CentOS-Media.repo文件中所有的enabled=0或gpgcheck=0的最后的0修改为1;进入vim末行编辑模式,分两次修改,先修改enabled=0,再修改gpgchechk=0的值
:%s@enabled=0@enable=1@g
:%s@gpgcheck=0@gpgcheck=1@g
6、每4小时执行一次对/etc目录的备份,备份至/backup目录中,保存的目录名为形如etc-201608300202[root@mylinux ~]# crontab -e
0 */4 * * * /usr/bin/cp -r /etc/ /backup/etc-`date +%Y%m%d%H%M`
时间表示法:
(1) 特定值;
给定时间点有效取值范围内的值;
(2) *
给定时间点上有效取值范围内的所有值;表示“每...”;
(3) 离散取值:,
#,#,#
(4) 连续取值:-
#-#
(5) 在指定时间范围上,定义步长:
/#: #即为步长
7、每周2,4,6备份/var/log/messages文件至/backup/messages_logs/目录中,保存的文件名形如messages-20160830# 创建文件夹:
[root@mylinux ~]# mkdir -pv /backup/messages_logs
mkdir: created directory ‘/backup’
mkdir: created directory ‘/backup/messages_logs’
# 使用crontab命令创建任务,cp命令进行备份
[root@mylinux ~]# crontab -e
0 0 * * 2,4,6 cp /var/log/messages /backup/messages_logs/messages-`date +%Y%m%d`
8、每天每两小时取当前系统/proc/meminfo文件中的所有以S开头的信息至/stats/memory.txt文件中# 创建所需的文件夹及文件
[root@mylinux ~]# mkdir /stats/
[root@mylinux ~]# touch /stats/memory.txt
[root@mylinux ~]# crontab -e
0 */2 * * * /usr/bin/egrep '^S' /proc/meminfo >> /stats/memory.txt
9、工作日的工作时间内,每两小时执行一次echo "howdy"[root@localhost ~]# crontab -e
0 */2 * * 1-5 /usr/bin/echo "howdy"
脚本编程练习
10、创建目录/tmp/testdir-当前日期时间;# 编辑脚本,并保存
[root@mylinux tmp]# vim datedir.sh
#!/bin/bash
mkdir -pv /tmp/testdir-$(date +%Y%m%d%H%M)# 修改脚本权限为可执行
[root@mylinux tmp]# chmod o+x datedir.sh# 执行脚本创建目录
[root@mylinux tmp]# ./datedir.sh
mkdir: created directory ‘/tmp/testdir-201609270041’验证脚本结果:
[root@mylinux tmp]# ls -l
drwxr-xr-x. 2 root root 6 Sep 27 00:41 testdir-201609270041
11、在此目录创建100个空文件:file1-file100# 编辑脚本保存
[root@mylinux tmp]# vim create_empty_file.sh
#!/bin/bash
#create_empty_file
for i in {1..100}; do
touch /tmp/testdir-201609270041/file$i
done
# 授予执行权限:
[root@mylinux tmp]# chmod o+x create_empty_file.sh# 运行脚本
[root@mylinux tmp]# ./create_empty_file.sh
# 查看脚本运行结果
[root@mylinux tmp]# ls ./testdir-201609270041/
file1 file18 file27 file36 file45 file54 file63 file72 file81 file90
file10 file19 file28 file37 file46 file55 file64 file73 file82 file91
file100 file2 file29 file38 file47 file56 file65 file74 file83 file92
file11 file20 file3 file39 file48 file57 file66 file75 file84 file93
file12 file21 file30 file4 file49 file58 file67 file76 file85 file94
file13 file22 file31 file40 file5 file59 file68 file77 file86 file95
file14 file23 file32 file41 file50 file6 file69 file78 file87 file96
file15 file24 file33 file42 file51 file60 file7 file79 file88 file97
file16 file25 file34 file43 file52 file61 file70 file8 file89 file98
file17 file26 file35 file44 file53 file62 file71 file80 file9 file99
12、显示/etc/passwd文件中位于第偶数行的用户的用户名;# 创建脚本并保存
[root@mylinux tmp]# vim display_username.sh
#!/bin/bash
# 显示/etc/passwd文件中位于偶数行的用户的用户名
sed -n 'n;p' /etc/passwd |cut -d: -f1# 对脚本授予执行权限x并运行
[root@mylinux tmp]# chmod o+x display_username.sh
[root@mylinux tmp]# ./display_username.sh
bin
adm
sync
halt
operator
ftp
avahi-autoipd
systemd-network
polkitd
tss
sshd
centos
acc
archlinux
13、创建10用户user10-user19;密码同用户名;# 创建脚本
[root@mylinux tmp]# vim adduser.sh
#!/bin/bash
# create user10-user19,these passwd the same as username
for i in {10..19};do
useradd user$i
echo "user$i" | passwd--stdin user$i
done# 授予脚本执行权限
[root@mylinux tmp]# chmod o+x adduser.sh
# 运行脚本
[root@mylinux tmp]# ./adduser.sh
Changing password for user user10.
passwd: all authentication tokens updated successfully.
Changing password for user user11.
passwd: all authentication tokens updated successfully.
Changing password for user user12.
passwd: all authentication tokens updated successfully.
Changing password for user user13.
passwd: all authentication tokens updated successfully.
Changing password for user user14.
passwd: all authentication tokens updated successfully.
Changing password for user user15.
passwd: all authentication tokens updated successfully.
Changing password for user user16.
passwd: all authentication tokens updated successfully.
Changing password for user user17.
passwd: all authentication tokens updated successfully.
Changing password for user user18.
passwd: all authentication tokens updated successfully.
Changing password for user user19.
passwd: all authentication tokens updated successfully.
# 验证结果方式,使用新创建的user10-19进行登录,测试密码是否与用户名一致
14、在/tmp/创建10个空文件file10-file19;# 创建脚本
[root@mylinux tmp]# vim createfile.sh
#!/bin/bash
#create empty file10-file19
for i in {10..19};do
touch /tmp/file$i
done
#对脚本授执行权限x
[root@mylinux tmp]# chmod o+x createfile.sh
#执行并显示结果
[root@mylinux tmp]# ./createfile.sh
[root@mylinux tmp]# ls
adduser.sh display_username.sh file13 file17 fstab.2
create_empty_file.sh file10 file14 file18 meminfo.txt
createfile.sh file11 file15 file19 profile
datedir.sh file12 file16 fstab testdir-201609270041
15、把file10的属主和属组改为user10,依次类推。# 创建脚本
[root@mylinux tmp]# vim chown.sh
#!/bin/bash
for i in {10..19};do
chown user$i:user$i /tmp/file$i
done
# 执行脚本命令
[root@mylinux tmp]# chmod o+x chown.sh
[root@mylinux tmp]# ./chown.sh
[root@mylinux tmp]# ll
...(中间省略)...
-rw-r--r--. 1 user10 user10 0 Sep 28 00:22 file10
-rw-r--r--. 1 user11 user11 0 Sep 28 00:22 file11
-rw-r--r--. 1 user12 user12 0 Sep 28 00:22 file12
-rw-r--r--. 1 user13 user13 0 Sep 28 00:22 file13
-rw-r--r--. 1 user14 user14 0 Sep 28 00:22 file14
-rw-r--r--. 1 user15 user15 0 Sep 28 00:22 file15
-rw-r--r--. 1 user16 user16 0 Sep 28 00:22 file16
-rw-r--r--. 1 user17 user17 0 Sep 28 00:22 file17
-rw-r--r--. 1 user18 user18 0 Sep 28 00:22 file18
-rw-r--r--. 1 user19 user19 0 Sep 28 00:22 file19
drwxr-xr-x. 2 root root 4096 Sep 27 23:35 testdir-201609270041


 172
172


 被折叠的 条评论
为什么被折叠?
被折叠的 条评论
为什么被折叠?
 到【灌水乐园】发言


