


一、任务要求
商家的后台管理系统实现新订单提醒推送功能,利用Spring Boot + WebSocket实时消息推送的方式进行实现。
二、实现代码
2.1 前端html代码
WebSocket打开WebSocket连接 关闭WebSocket连接 2.2 服务端代码
引入依赖,我使用的是SpringBoot版本2.2.6.RELEASE,自动管理依赖版本
org.springframework.boot spring-boot-starter-websocket配置类WebSocketConfig,扫描并注册带有@ServerEndpoint注解的所有websocket服务端
import org.springframework.context.annotation.Bean;import org.springframework.context.annotation.Configuration;import org.springframework.web.socket.server.standard.ServerEndpointExporter;/** * @author Alan Chen * @description 开启WebSocket支持 * @date 2020-04-08 */@Configurationpublic class WebSocketConfig { @Bean public ServerEndpointExporter serverEndpointExporter() { return new ServerEndpointExporter(); }}新建WebSocketServer类,WebSocket服务端是多例的,一次WebSocket连接对应一个实例
import org.springframework.stereotype.Component;import javax.websocket.*;import javax.websocket.server.PathParam;import javax.websocket.server.ServerEndpoint;import java.io.IOException;import java.util.ArrayList;import java.util.List;import java.util.concurrent.ConcurrentHashMap;/** * @author Alan Chen * @description 订单通知 * @date 2020-04-08 */@Component@ServerEndpoint("/web_socket/order_notification/{merchantId}")public class OrderNotificationWebSocket { static final ConcurrentHashMap> webSocketClientMap= new ConcurrentHashMap<>(); /** * 连接建立成功时触发,绑定参数 * @param session 与某个客户端的连接会话,需要通过它来给客户端发送数据 * @param merchantId 商户ID */ @OnOpen public void onOpen(Session session,@PathParam("merchantId") String merchantId){ WebSocketClient client = new WebSocketClient(); client.setSession(session); client.setUri(session.getRequestURI().toString()); List webSocketClientList = webSocketClientMap.get(merchantId); if(webSocketClientList == null){ webSocketClientList = new ArrayList<>(); } webSocketClientList.add(client); webSocketClientMap.put(merchantId, webSocketClientList); } /** * 连接关闭时触发,注意不能向客户端发送消息了 * @param merchantId */ @OnClose public void onClose(@PathParam("merchantId") String merchantId){ webSocketClientMap.remove(merchantId); } /** * 通信发生错误时触发 * @param session * @param error */ @OnError public void onError(Session session, Throwable error) { System.out.println("发生错误"); error.printStackTrace(); } /** * 向客户端发送消息 * @param merchantId * @param message */ public static void sendMessage(String merchantId,String message){ try { List webSocketClientList = webSocketClientMap.get(merchantId); if(webSocketClientList!=null){ for(WebSocketClient webSocketServer:webSocketClientList){ webSocketServer.getSession().getBasicRemote().sendText(message); } } } catch (IOException e) { e.printStackTrace(); throw new RuntimeException(e.getMessage()); } }}辅助类
import lombok.Data;import javax.websocket.Session;/** * @author Alan Chen * @description WebSocket客户端连接 * @date 2020-04-08 */@Datapublic class WebSocketClient { // 与某个客户端的连接会话,需要通过它来给客户端发送数据 private Session session; //连接的uri private String uri;}新建一个测试类,用于向客户端发送推送消息
import com.yh.supermarket.manage.websocket.OrderNotificationWebSocket;import io.swagger.annotations.Api;import io.swagger.annotations.ApiOperation;import org.springframework.web.bind.annotation.GetMapping;import org.springframework.web.bind.annotation.RequestParam;import org.springframework.web.bind.annotation.RestController;/** * @author Alan Chen * @description * @date 2020-04-08 */@Api(tags = "WebSocket-test")@RestController("notification")public class OrderNotificationWebSocketController { @ApiOperation("通知test") @GetMapping public void test(@RequestParam String merchantId){ OrderNotificationWebSocket.sendMessage(merchantId,"有新订单啦"); }}三、推送消息测试
1、 启动服务器程序,提供WebSocket服务。
2 、打开前端html客户端页面,连接WebSocket服务器。
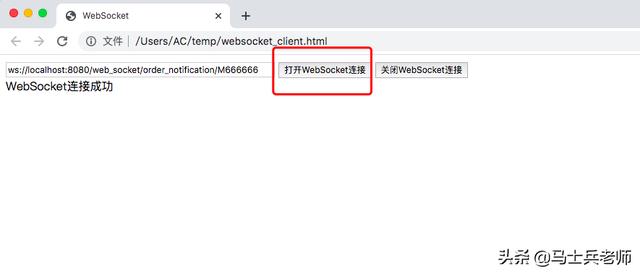
连接WebSocket服务器
3、向客户端发送推送消息
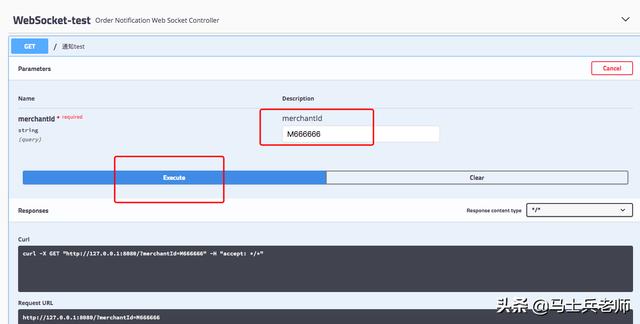
向客户端发送推送消息
4、客户端收到新订单推送消息
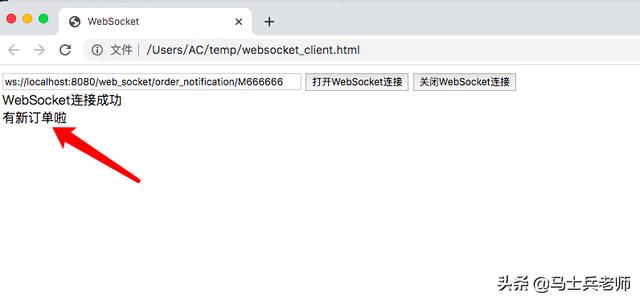
客户端收到新订单推送消息
四、Nginx部署支持WebSocket的配置
当我们在本地开采用WebSocket用IP连接时是OK的,例如
ws://39.108.*.186:8002/web_socket/order_notification/123当我们上线后,用Nginx部署,并用域名连接时就会失败。此时只需要在Nginx配置文件里加入一些配置即可。配置如下
server{ listen 80; server_name test.com www.test.com; # 访问WebSocket location /web_socket{ proxy_pass http://47.*.27.1:8002; proxy_set_header Host $host; #启用支持websocket连接 proxy_set_header Upgrade $http_upgrade; proxy_set_header Connection "upgrade"; }}.....
作者:陈琰AC
链接:https://www.jianshu.com/p/3a5c58e921b7


 841
841


 被折叠的 条评论
为什么被折叠?
被折叠的 条评论
为什么被折叠?
 到【灌水乐园】发言


