


基础环境搭建
创建maven工程
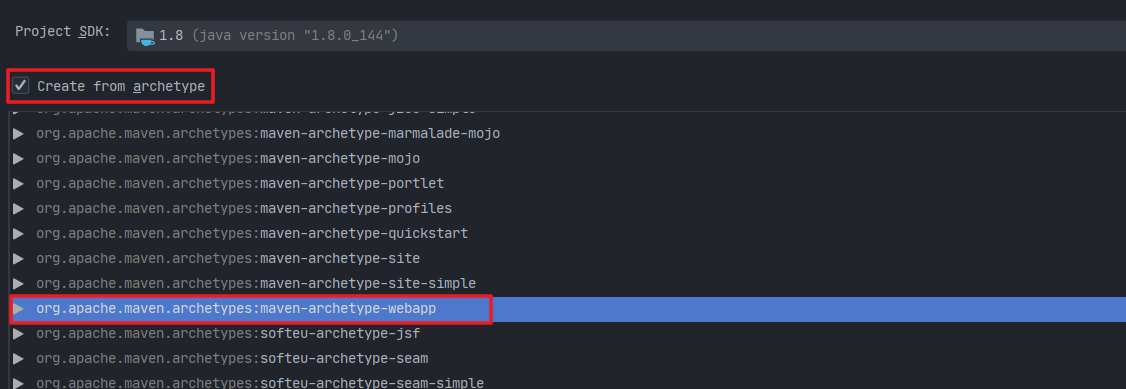

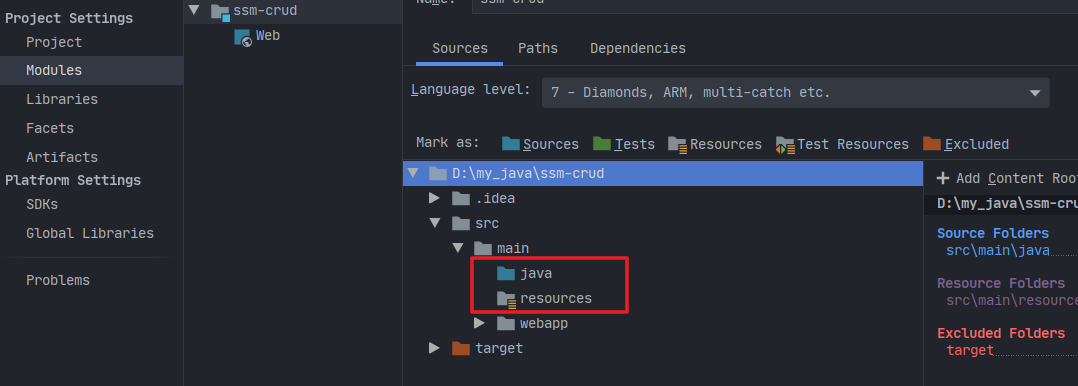
next,finish,等待创建完成,创建完成后,src/main下只有webapp文件夹,我们需要手动创建java和resources,鼠标右击main,new folder,将java改成Sources类型,resources变成Resources类型
引入项目依赖spring
springmvc
mybatis
数据库连接池,驱动
其它(jstl,servlet-api,junit)
编写ssm整合的配置文件
web.xml
添加约束
xmlns="http://java.sun.com/xml/ns/javaee"
xsi:schemaLocation="http://java.sun.com/xml/ns/javaee http://java.sun.com/xml/ns/javaee/web-app_2_5.xsd"
id="WebApp_ID" version="2.5">
配置spring,springmvc,字符过滤器,Restful URI
contextConfigLocation
classpath:applicationContext.xml
org.springframework.web.context.ContextLoaderListener
dispatcherServlet
org.springframework.web.servlet.DispatcherServlet
1
dispatcherServlet
/
CharacterEncodingFilter
org.springframework.web.filter.CharacterEncodingFilter
encoding
utf-8
forceRequestEncoding
true
forceResponseEncoding
true
CharacterEncodingFilter
/*
HiddenHttpMethodFilter
org.springframework.web.filter.HiddenHttpMethodFilter
HiddenHttpMethodFilter
/*
HttpPutFormContentFilter
org.springframework.web.filter.HttpPutFormContentFilter
HttpPutFormContentFilter
/*
springmvc配置文件<?xml version="1.0" encoding="UTF-8"?>
xmlns:xsi="http://www.w3.org/2001/XMLSchema-instance"
xmlns:context="http://www.springframework.org/schema/context"
xmlns:mvc="http://www.springframework.org/schema/mvc"
xsi:schemaLocation="http://www.springframework.org/schema/beans http://www.springframework.org/schema/beans/spring-beans.xsd http://www.springframework.org/schema/context http://www.springframework.org/schema/context/spring-context.xsd">
spring配置文件<?xml version="1.0" encoding="UTF-8"?>
xmlns:xsi="http://www.w3.org/2001/XMLSchema-instance"
xmlns:context="http://www.springframework.org/schema/context" xmlns:tx="http://www.springframework.org/schema/tx"
xmlns:aop="http://www.springframework.org/schema/aop"
xsi:schemaLocation="http://www.springframework.org/schema/beans http://www.springframework.org/schema/beans/spring-beans.xsd http://www.springframework.org/schema/context http://www.springframework.org/schema/context/spring-context.xsd http://www.springframework.org/schema/tx http://www.springframework.org/schema/tx/spring-tx.xsd http://www.springframework.org/schema/aop http://www.springframework.org/schema/aop/spring-aop.xsd">
数据源配置文件dbconfig.propertiesjdbc.jdbcUrl=jdbc:mysql://localhost:3306/ssm_crud
jdbc.driverClass=com.mysql.jdbc.Driver
jdbc.user=root
jdbc.password=123456
mybatis配置文件<?xml version="1.0" encoding="UTF-8"?>
/p>
PUBLIC "-//mybatis.org//DTD Config 3.0//EN"
"http://mybatis.org/dtd/mybatis-3-config.dtd">
使用mybatis的逆向工程生成对应的bean以及mapper
在当前项目下新建mbg.xml<?xml version="1.0" encoding="UTF-8"?>
/p>
PUBLIC "-//mybatis.org//DTD MyBatis Generator Configuration 1.0//EN"
"http://mybatis.org/dtd/mybatis-generator-config_1_0.dtd">
connectionURL="jdbc:mysql://localhost:3306/ssm_crud" userId="root"
password="******">
targetProject=".\src\main\java">
targetPackage="com.yu.crud.dao" targetProject=".\src\main\java">
在test包下新建MBGTest来逆向生成bean和mapperpublic class MBGTest {
public static void main(String[] args) throws Exception {
List warnings = new ArrayList();
boolean overwrite = true;
File configFile = new File("mbg.xml");
ConfigurationParser cp = new ConfigurationParser(warnings);
Configuration config = cp.parseConfiguration(configFile);
DefaultShellCallback callback = new DefaultShellCallback(overwrite);
MyBatisGenerator myBatisGenerator = new MyBatisGenerator(config,
callback, warnings);
myBatisGenerator.generate(null);
}
}
由于员工表存放的是部门id,所以要想以后查询员工列表的时候显示部门名称又不想执行两次sql,需要添加连表查询方法,在dao下的EmployeeMapper接口下添加两个方法,//查询员工同时带部门信息
List selectByExampleWithDept(EmployeeExample example);
Employee selectByPrimaryKeyWithDept(Integer empId);
在EmployeeMapper.xml里面也添加下面的代码
e.emp_id, e.emp_name, e.gender, e.email, e.d_id,d.dept_id,d.dept_name
select
distinct
FROM tbl_emp e
left join tbl_dept d on e.`d_id`=d.`dept_id`
order by ${orderByClause}
select
FROM tbl_emp e
left join tbl_dept d on e.`d_id`=d.`dept_id`
where emp_id = #{empId,jdbcType=INTEGER}
最后写一个测试方法,测试一下CRUD/**
* 测试dao层的工作
* @author yy
* 1、导入SpringTest模块
* 2、@ContextConfiguration指定Spring配置文件的位置
* 3、直接autowired要使用的组件即可
*/
@RunWith(SpringJUnit4ClassRunner.class)
@ContextConfiguration(locations={"classpath:applicationContext.xml"})
public class MapperTest {
@Autowired
DepartmentMapper departmentMapper;
@Autowired
EmployeeMapper employeeMapper;
@Autowired
SqlSession sqlSession;
/**
* 测试DepartmentMapper
*/
@Test
public void testCRUD(){
//1、插入几个部门
// departmentMapper.insertSelective(new Department(null, "开发部"));
// departmentMapper.insertSelective(new Department(null, "测试部"));
//2、生成员工数据,测试员工插入
//employeeMapper.insertSelective(new Employee(null, "Jerry", "M", "Jerry@atguigu.com", 2));
//3、批量插入多个员工;批量,使用可以执行批量操作的sqlSession。
EmployeeMapper mapper = sqlSession.getMapper(EmployeeMapper.class);
for(int i = 0;i<1000;i++){
String uid = UUID.randomUUID().toString().substring(0,5)+i;
mapper.insertSelective(new Employee(null,uid, "M", uid+"@163.com", 3));
}
System.out.println("批量完成");
}
}


 754
754


 被折叠的 条评论
为什么被折叠?
被折叠的 条评论
为什么被折叠?
 到【灌水乐园】发言


