


“Yeah It’s on. ”
前言
在Android系统中,Native层的代码基本都是C++写的,C++跟Java不一样,C++没有垃圾回收机制,C++代码中难于管理new出来对象的释放,稍有不慎就造成内存泄漏。针对此问题,Android中提出了一套类似Java垃圾回收机制的智能指针,采用强指针sp(Strong Pointer)和弱指针wp(Weak Pointer)对目标对象进行应用,实现对象的自动回收。下面我们将从C++的基础知识入手,对Android的智能指针展开逐步的分析。
Catagory
相关基础知识
Android的智能指针,巧妙的运用C++的基础特性,实现对象的自动释放,我们就先来看看都用了C++的什么特性。
作用域
标记变量的有效范围。从作用域上来看,可以将对象分为全局对象、局部对象、静态全局对象和静态局部对象。
一般来说,局部变量的有效作用域从它的定义点开始,到和定义变量之前最邻近的开括号配对的第一个闭括号,也就是说,作用域由变量所在的最近一对{}括号确定。
void testScope() {
Sheep bigSheep; //局部对象 {
Sheep smallSheep; // 局部对象 } // smallSheep的作用域结束} // bigSheep的作用域结束
对象内存空间的分配和释放
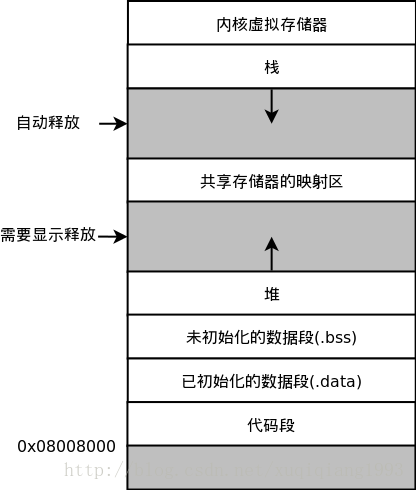
从内存分配空间来看,可将对象分为栈对象和堆对象。栈对象在作用域结束后会自动释放,而堆对象需要手动显示的释放。
void testMemoryMap() {
Sheep sheep; // 栈对象,testMemoryMap调用结束后自动释放 Sheep* pSheep; // 堆对象,需要手动释放 delete pSheep; // 释放pSheep指向的对象 pSheep = 0; //将pSheep指向NULL,防止造成野指针}
下图是内存空间的分配示意图。
原子操作函数
定义在system/core/libcutils/Atomic.c,依赖于具体的芯片平台。原子操作函数特点:线程安全,返回旧值。
int32_t android_atomic_add(int32_t increment, volatile int32_t *ptr) // 加函数,返回旧值,*ptr = *ptr + increment
int32_t android_atomic_inc(volatile int32_t *addr) // 自增操作,返回旧值,*ptr = *ptr + 1
int32_t android_atomic_dec(volatile int32_t *addr) // 自减操作, 返回旧值,*ptr = *ptr - 1
int32_t android_atomic_and(int32_t value, volatile int32_t *ptr) // 位与操作,返回旧值,*ptr = *ptr & value
int32_t android_atomic_or(int32_t value, volatile int32_t *ptr) // 位或操作,返回旧值,*ptr = *ptr | value
int android_atomic_cmpxchg(int32_t old_value, int32_t new_value, volatile int32_t *ptr) // 如果*addr == oldvalue,就会执行*addr = new_value的操作,然后返回0,否则返回1
引用计数的原理
栈对象在生命周期,即作用域结束后自动释放,所以我们这里讨论的是堆对象的引用,也就是指针对象。
下图是指针引用时,利用引用数管理实际对象释放的原理图。
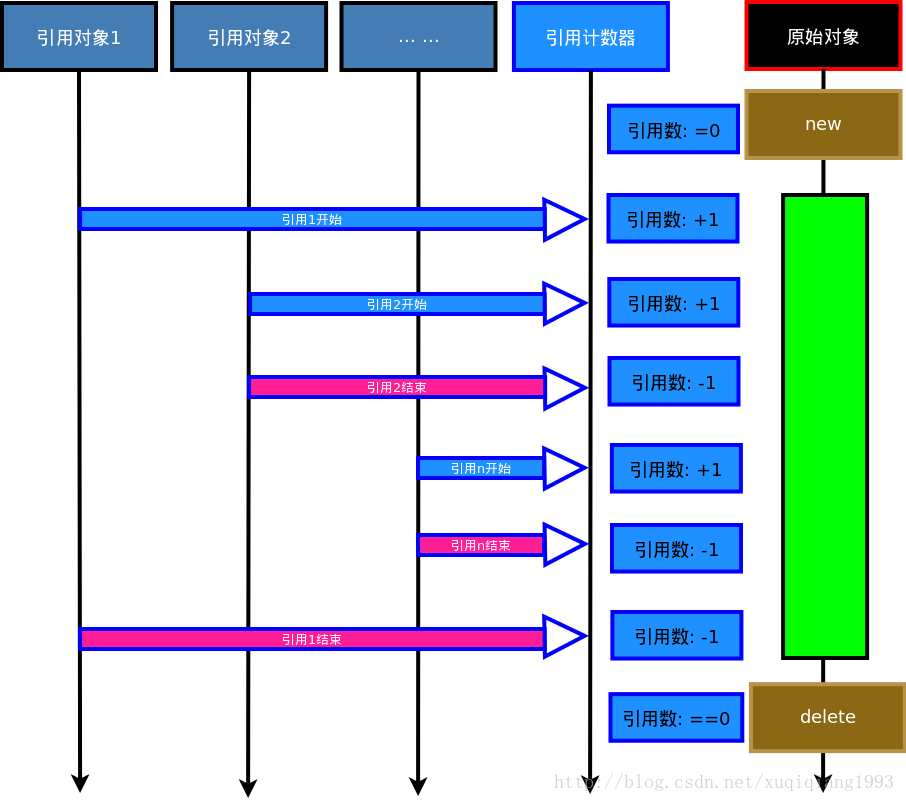
引用计数的原理很简单,当引用某个对象时,使其引用数+1;引用结束时,使其引用数-1;当引用数为0时,delete掉实际对象。
根据前面的原理,引出两个问题,带着这两个问题,我们来看看Android是怎么实现的。
怎么管理引用数?
怎么判断引用开始和结束,怎么增减引用数?
Android智能指针原理
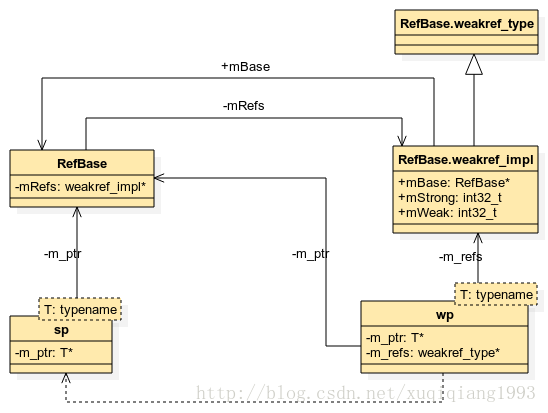
Android设计了基类RefBase,用以管理引用数,所有类必须从RefBase派生,RefBase是所有对象的始祖。
设计模板类sp、wp,用以引用实际对象,sp强引用和wp弱引用。sp、wp声明为栈对象,作用域结束时,自动释放,自动调用析构函数。因此,可以在sp、wp的构造函数中,增引用数;在析构函数中,减少引用计数。
专门设计weakref_impl类,该类是RefBase的内部类,用来做真正引用数管理,创建实际对象时,同时创建一个mRefs对象。不管是强引用和弱应用,都由mRefs来管理。
Android智能指针的关系图:
看了智能指针的实现原理,我们来看看具体的实现是什么样的。
智能指针的实现
根据前面的原理,Android设计了强引用sp和弱引用wp,故实际对象的释放,可分为强引用控制和弱引用控制。所谓强引用控制,指的是强引用数mStrong为0时,释放实际对象;弱引用控制,则指的是弱引用数mWeak为0时,才释放实际对象。
下面将结合一些实例,分析具体的实现。我们先来看一段代码实例。
class Sheep: public RefBase { // 羊年,定义Sheep从RefBase派生public:
Sheep() : RefBase() { }// 可显示调用RefBase的构造,也可以不用 virtual ~Sheep() { }// 最好声明为virtual,以便从Sheep派生};
void testSheep() {
Sheep* pSheep = new Sheep(); // new一个Sheep对象,这个是一个堆对象 { // 限定sp的作用域 sp spSheep(pSheep); // spSheep是一个栈对象 { // 限定wp的作用域 wp wpSheep(pSheep);
} // 调用wp的析构函数 } // 调用sp的析构函数,实际对象pSheep已释放,若再使用pSheep将会出错}
RefBase构造和mRefs
在上面实例代码中,我们先定义了一个类Sheep,从RefBase派生,创建了一个实际对象,pSheep 指向实际对象。
在构造Sheep的实际对象时,将调RefBase的构造函数。RefBase的构造函数如下,在构造函数中创建mRefs。
weakref_impl从weakref_type派生,mRefs才是真正的“管家”。
[system/core/libutils/RefBase.cpp]
RefBase::RefBase()
: mRefs(new weakref_impl(this)) // 真正管理引用计数{}
weakref_impl(RefBase* base)
: mStrong(INITIAL_STRONG_VALUE) // 1<<28(268435456),为什么不是0? , mWeak(0)
, mBase(base) // mBase指向实际对象 , mFlags(0) // 这个标识很重要,指定是强应用控制还是弱引用控制{}
请注意这里的mFlags,默认值为0,可通过修改这个标志来设置是强引用控制,还是弱引用控制,代码如下:
[system/core/include/utils/RefBase.h]
enum {
OBJECT_LIFETIME_STRONG = 0x0000,
OBJECT_LIFETIME_WEAK = 0x0001,
OBJECT_LIFETIME_MASK = 0x0001
};
mFlags默认为0,即OBJECT_LIFETIME_STRONG,强引用控制。设置为OBJECT_LIFETIME_WEAK时,为弱引用控制。可以通过extendObjectLifetime函数修改,代码如下:
[system/core/libutils/RefBase.cpp]
void RefBase::extendObjectLifetime(int32_t mode)
{
android_atomic_or(mode, &mRefs->mFlags);
}
sp构造
接下来,我们创建了一个sp对象spSheep,这是一个栈对象,在其作用域结束后将自动释放,调用sp的析构函数。
[system/core/include/utils/StrongPointer.h]
template
sp::sp(T* other)
: m_ptr(other) {
if (other)
other->incStrong(this);
}
other指向真正的Sheep对象,在sp的构造函数中,将other赋值给了sp的m_ptr,m-ptr就指向了真正的Sheep对象。
因而,other->incStrong(this),实际就是Sheep的父类RefBase的incStrong函数,代码如下:
[system/core/libutils/RefBase.cpp]
void RefBase::incStrong(const void* id) const
{
weakref_impl* const refs = mRefs;
refs->incWeak(id); // 调用incWeak函数
refs->addStrongRef(id); // 由DEBUG_REFS控制,release版本什么也不做 const int32_t c = android_atomic_inc(&refs->mStrong); // 强引用数+1,c为旧值 ALOG_ASSERT(c > 0, "incStrong() called on %p after last strong ref", refs);
if (c != INITIAL_STRONG_VALUE) { //判断是否是第一次引用 return;
} // 第一次引用,refs->mStrong为1<<28 +1 (268435457)
android_atomic_add(-INITIAL_STRONG_VALUE, &refs->mStrong);
// refs->mStrong为1 refs->mBase->onFirstRef(); //第一次引用时调用}
在incStrong函数中调用refs 的incWeak函数,incWeak的代码如下:
[system/core/libutils/RefBase.cpp]
void RefBase::weakref_type::incWeak(const void* id)
{
weakref_impl* const impl = static_cast(this);
impl->addWeakRef(id); // 由DEBUG_REFS控制,release版本什么也不做 const int32_t c __unused = android_atomic_inc(&impl->mWeak); //弱引用数+1 ALOG_ASSERT(c >= 0, "incWeak called on %p after last weak ref", this);
}
OK,sp构造完成,增加一次强引用。sp构造完成后,mRefs的强引用数变为1,弱引用数也变为1;第一次强引用时,回调onFirstRef()。
wp构造
接下来,我们创建了一个wp对象wpSheep,这是一个栈对象,在其作用域结束后将自动释放,调用wp的析构函数。
[system/core/include/utils/RefBase.h]
template
wp::wp(T* other)
: m_ptr(other)
{
if (other) m_refs = other->createWeak(this);
}
other指向真正的Sheep对象,在wp的构造函数中,将other赋值给了wp的m_ptr,m-ptr就指向了真正的Sheep对象。
因而,other-> createWeak (this),实际就是Sheep的父类RefBase的createWeak函数,代码如下:
[system/core/libutils/RefBase.cpp]
RefBase::weakref_type* RefBase::createWeak(const void* id) const
{
mRefs->incWeak(id); // incWeak函数前面分析过,最终的结果就是弱引用数+1 return mRefs;
}
createWeak时,调用incWeak,最终的影响是弱引用数+1。现在,我们的实例中,强引用数为1,弱引用数为2。
返回值为mRefs,也就是m_refs和mRefs指向同一个weakref_impl对象,而mRefs的mBase指向真正的对象Sheep。因此此处的spSheep和wpSheep都是管理同一个真正的对象。
wp析构
继续看我们的实例代码,现在wpSheep的作用域结束,将调wp的析构函数,wp析构函数的代码如下:
[system/core/include/utils/RefBase.h]
template
wp::~wp()
{
if (m_ptr) m_refs->decWeak(this); // 调用decWeak函数}
在wp的析构函数中调用m_refs的decWeak函数。m_refs和mRef指向同一个weakref_impl对象,decWeak代码如下:
[system/core/libutils/RefBase.cpp]
void RefBase::weakref_type::decWeak(const void* id)
{
weakref_impl* const impl = static_cast(this);
impl->removeWeakRef(id);
const int32_t c = android_atomic_dec(&impl->mWeak); // 弱引用数-1,c为旧值 ALOG_ASSERT(c >= 1, "decWeak called on %p too many times", this);
if (c != 1) return; //c为旧值,判断是否是最后一次弱引用 // 记得前面我们说的,mFlags为0,我们并没有改变它 if ((impl->mFlags&OBJECT_LIFETIME_WEAK) ==
OBJECT_LIFETIME_STRONG) {
// 强引用控制,是否释放实际对象是根据强引用数 if (impl->mStrong == INITIAL_STRONG_VALUE) {
delete impl->mBase; // 根本就没有强引用引用实际对象,释放实际对象 } else {
delete impl; // 释放mRefs }
} else {
impl->mBase->onLastWeakRef(id); //最后一次弱引用时调用 if ((impl->mFlags&OBJECT_LIFETIME_MASK) ==
OBJECT_LIFETIME_WEAK) {
delete impl->mBase; //弱引用控制,释放实际对象 }
}
}
wp析构,情况比较复杂,总的说来做了以下几件事:
弱引用数减1。
最后一次弱引用时,强引用控制,释放mRefs,若没有强引用,释放实际对象
最后一次弱引用时,弱引用控制,释放实际对象
就我们的实例来看,此时,强引用数为1,弱引用数为1,并没有任何释放。
sp析构
在我们的实例代码中,wp析构完后,sp的作用域也就结束了。此时,会调用sp的析构函数,代码如下:
[system/core/include/utils/StrongPointer.h]
template
sp::~sp() {
if (m_ptr)
m_ptr->decStrong(this);
}
在析构函数中调用m_ptr的decStrong函数,m_ptr指向实际对象。此处为Sheep的父类RefBase的decStrong函数,代码如下:
[system/core/libutils/RefBase.cpp]
void RefBase::decStrong(const void* id) const
{
weakref_impl* const refs = mRefs;
refs->removeStrongRef(id); // 由DEBUG_REFS控制,release版本什么也不做 const int32_t c = android_atomic_dec(&refs->mStrong); // 强引用数-1 ALOG_ASSERT(c >= 1, "decStrong() called on %p too many times", refs);
if (c == 1) { // c为旧值,c为1时,即强引用数为0 refs->mBase->onLastStrongRef(id); //最后一次强引用结束时调用 if ((refs->mFlags&OBJECT_LIFETIME_MASK) ==
OBJECT_LIFETIME_STRONG) {
delete this; // 若是强引用控制,释放实际对象,调实际对象的析构函数 }
}
refs->decWeak(id);
}
refs的decWeak函数,前面wp析构的时候分析过,这里不再重复。sp析构完成,主要完成以下工作:
强引用数减1,弱引用数据减1。
最后一次强引用时,若是强引用控制,释放实际对象,释放mRefs,调用onLastStrongRef函数。
在我们的代码中,此时强引用数为0,弱引用数为0,实际对象的析构函数将被调用,mRefs将被释放。下面我看看实际对象的析构函数。
RefBase析构
实际对象的析构,先析构RefBase,RefBase的析构函数如下:
[system/core/libutils/RefBase.cpp]
RefBase::~RefBase()
{
if (mRefs->mStrong == INITIAL_STRONG_VALUE) {
delete mRefs; // 没有强引用引用实际对象,释放mRefs } else {
if ((mRefs->mFlags & OBJECT_LIFETIME_MASK) !=
OBJECT_LIFETIME_STRONG) {
if (mRefs->mWeak == 0) {
delete mRefs; // 释放mRefs指向的对象 }
}
}
// for debugging purposes, clear this. const_cast(mRefs) = NULL; // mRefs指向0,避免野指针}
OK,RefBase析构分析完了,在RefBase的析构函数中主要的工作就是释放mRefs指向的weakref_impl的对象。
到此,我们的实例代码分析完成,我们首先构造一个Sheep对象,pSheep指向实际对象。再分别构造一个强引用sp和一个弱引用wp,用以引用实际对象,实际对象的释放就由sp和wp控制,我们并没有显示的释放构造的pSheep指向的实际对象。
我们来看看实例代码中,对象的构造和析构Log:
D/ (13624): Sheep::------------------testSheepstart--------------------------
D/ (13624): Sheep::Sheep constructor invoked this=0xb6301080
D/ (13624): Sheep:: No refs, strong count=268435456, weak count=0
D/ (13624): Sheep::in sp scope ------------
D/ (13624): Sheep::onFirstRef, object=0xb6301080
D/ (13624): Sheep:: After strong ref, strongcount=1, weak count=1
D/ (13624): Sheep::in wp scope ------------
D/ (13624): Sheep:: After weak ref, strong count=1, weak count=2
D/ (13624): Sheep::out wp scope ------------
D/ (13624):Sheep:: release weak ref, strong count=1, weak count=1
D/ (13624): Sheep::out sp scope ------------
D/ (13624): Sheep::onLastStrongRef, id=0xbec42884
D/ (13624): Sheep::Sheep destructor invoked this=0xb6301080
D/ (13624): Sheep::--------------------testSheepend--------------------------
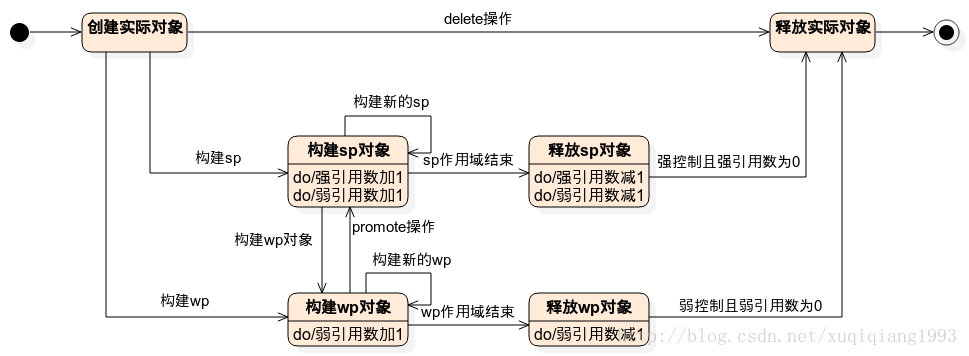
实际对象的状态
通过前面的分析,我们可以绘制出实际对象的状态图,如下图所示:
智能指针的使用
前面我们通过示例代码,知道了智能指针是怎么管理实际对象的,怎么控制实际对象的释放的。但是我们只是分析了其中的构造函数和析构函数,下面我们将对智能指针做全面的了解。
RefBase的特性
我们先看看RefBase的类图,如下图所示:
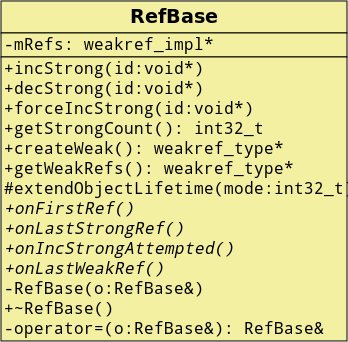
所有类须从RefBase派生,只有一个无参构造函数,RefBase析构函数需申明为virtual。
在构造函数中创建mRefs对象,为weakref_impl类型。
可以在派生类中通过函数extendObjectLifetime指定是强引用控制,还是弱引用控制,默认为强引用控制。
在析构函数中,判断是否释放mRefs。
私有的构造函数和赋值运算重载,不允许子类使用。
获取实际对象的强引用数getStrongCount
子类可派生virtual成员函数,获知自身的引用情况。
[system/core/include/utils/StrongPointer.h]
// 第一次强引用时回调virtual void onFirstRef();
// 最后一次强引用时调用virtual void onLastStrongRef(const void* id);
//由弱到强时调用,稍候介绍virtual bool onIncStrongAttempted(uint32_t flags, const void* id);
// 最后一次弱引用时调用virtual void onLastWeakRef(const void* id);
mRefs指向一个weakref_impl对象,是RefBase的应用计数管家,其类图如下图所示:
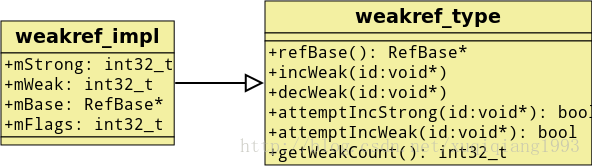
可以通过getWeakRefs()->getStrongCount()获取实际对象的弱引用数
sp模板类的特性
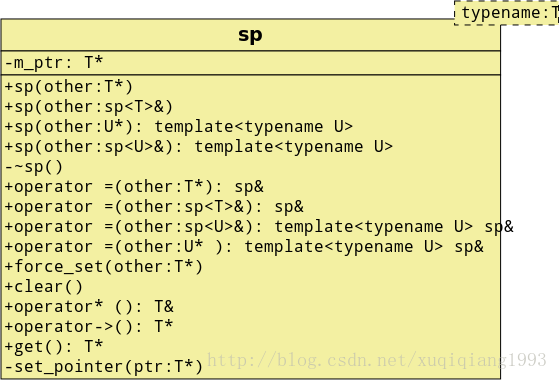
提供多种形式的构造方式
定义多种形式的赋值运算操作
重载操作运算符*,可以获取实际对象
重载操作运算符->,可以获取指向实际对象的指针
可通过get函数,获取实际对象的指针
force_set函数可以指定sp引用的实际对象,该函数设计有点缺点,若sp当前已经引用其他的对象,则可能造成其他对象无法释放。稍后我们单独介绍。
wp模板类特性
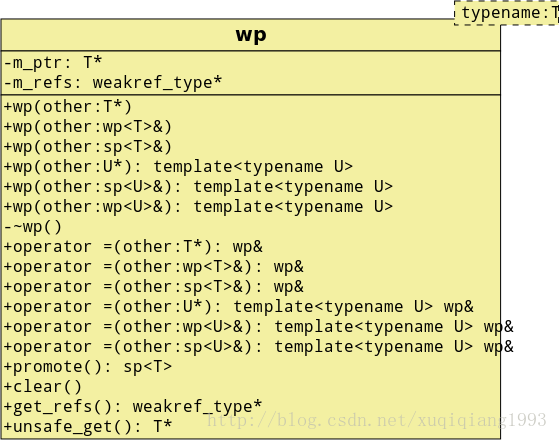
提供多种形式的构造方式
定义多种形式的赋值运算操作
可通过unsafe_get函数,获取实际对象的指针,但是可能获取到的是空的或是野指针
可以通过promote函数将弱引用变为强引用,这个是一个比较重要的函数,我们通过一个实例来看看是怎么由弱变强的。
void testPromote() {
{
Sheep* pSheep = new Sheep();
wp wpSheep(pSheep);
sp spSheep = wpSheep.promote();
}
}
Promote函数如下:
[system/core/include/utils/RefBase.h]
template
sp wp::promote() const
{
sp result;
if (m_ptr && m_refs->attemptIncStrong(&result)) {
result.set_pointer(m_ptr);
}
return result;
}
[system/core/libutils/RefBase.cpp]
bool RefBase::weakref_type::attemptIncStrong(const void* id)
{
incWeak(id); // 前面分析过,弱引用数+1;我们的实例中,此时弱引用数为2
weakref_impl* const impl = static_cast(this);
int32_t curCount = impl->mStrong;
while (curCount > 0 && curCount != INITIAL_STRONG_VALUE) {
if (android_atomic_cmpxchg(curCount, curCount+1, &impl->mStrong) == 0) {
break;
}
curCount = impl->mStrong;
}
if (curCount <= 0 || curCount == INITIAL_STRONG_VALUE) {
if ((impl->mFlags&OBJECT_LIFETIME_WEAK) ==
OBJECT_LIFETIME_STRONG) {
……
while (curCount > 0) {
if (android_atomic_cmpxchg(curCount, curCount + 1,
&impl->mStrong) == 0) { // 强引用控制,强引用数+1 break;
}
curCount = impl->mStrong;
}
……
} else {
…… // 弱引用控制,强引用数 +1 curCount = android_atomic_inc(&impl->mStrong);
}
}
……
return true; // 由弱变强成功}
promote函数成功后,强引用数+1,弱引用数+1。在我们的实例3中,此时弱引用数为2,强引用数为1。我们来看一下Log:
D/ (13742): Sheep:: -------------testPromote begin------------
D/ (13742): Sheep::Sheep constructor invoked this=0xb6301080
D/ (13742): Sheep:: No refs, strong count=268435456, weak count=0
D/ (13742): Sheep:: After weak ref, strong count=268435456, weak count=1
D/ (13742): Sheep:: After promote, strong count=1, weak count=2
D/ (13742): Sheep::onLastStrongRef, id=0xbed1c884
D/ (13742): Sheep::Sheep destructor invoked this=0xb6301080
D/ (13742): Sheep::-------------testPromote end------------
为什么要由弱生强?我们通过弱指针wp,不能获取实际的对象,wp并没有提供sp那个的存取操作*和->的重载,由弱生强后,可以sp获取实际的对象。
轻引用LightRefBase
前面介绍的RefBase和mRefs比较复杂,Android还提供了一个轻型的引用管理LightRefBase。LightRefBase的代码比较少,直接看代码:
[system/core/include/utils/RefBase.h]
template
class LightRefBase
{
public:
inline LightRefBase() : mCount(0) { }
inline void incStrong(__attribute__((unused)) const void* id) const {
android_atomic_inc(&mCount);
}
inline void decStrong(__attribute__((unused)) const void* id) const {
if (android_atomic_dec(&mCount) == 1) {
delete static_cast(this);
}
}
inline int32_t getStrongCount() const {
return mCount;
}
typedef LightRefBase basetype;
protected:
inline ~LightRefBase() { }
……
private:
mutable volatile int32_t mCount;
};
LightRefBase的类图如下:
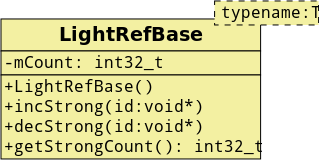
LightRefBase比较简单,直接用mCount控制引用数,从LightRefBase的特性看来,LightRefBase只支持sp控制,不支持wp。
下面通过一个实例代码,看看LightRefBase的使用,代码如下:
class Goat: public LightRefBase {
public:
Goat() {
ALOGD("Goat::Goat constructor invoked this=%p\n", this);
}
private:
friend class LightRefBase ;
~Goat() {
ALOGD("Goat::Goat destructor invoked this=%p\n", this);
}
};
void testGoat() {
Goat* pGoat = new Goat(); //初始时mCount为0 ALOGD("Goat:: before sp ref, mCount=%d", pGoat->getStrongCount());
{
sp spGoat(pGoat); // 调用pGoat的incStrong函数,mCount为1 }
// spGoat的作用域结束,调用pGoat的decStrong函数,mCount为0,delete掉pGoat}
实例代码也非常简单,只是和羊杆上了…今年羊年。下面是Goat的构造和析构情况,情况Log。
D/ (14539): Goat::--------------------testGoatend--------------------------
D/ (14539): Goat::Goat constructor invoked this=0xb6301080
D/ (14539): Goat:: before sp ref, mCount=0
D/ (14539): Sheep::in sp scope ------------
D/ (14539): Goat:: After sp ref, mCount=1
D/ (14539): Sheep::out sp scope ------------
D/ (14539): Goat::Goat destructor invoked this=0xb6301080
D/ (14539): Goat::--------------------testGoatend--------------------------
注意,LightRefBase的析构函数不是virtual的,对象释放时,可能会造成子类的析构函数调不到,因此,Android对LightRefBase做了一个简单的包裹,提供了VirtualLightRefBase类,VirtualLightRefBase的析构函数是virtual的,使用时,优先使用VirtualLightRefBase。
项目中遇到的实际问题
sp使用时,也要特别的小心,sp的作用域结束后,就会释放实际引用的对象。假如引用的是一个全局对象,那么全局对象就被释放掉了,所以全局对象需声明为sp对象,而不是 具体的对象。还有,sp析构释放实际对象的时间,可能比我们预期的早,很容易造成空指针和死锁,这类的问题比较多。下面我们来看一个典型的问题。
sp造成SurfaceFlinger死锁
这个是在Graphics中一个很经典的问题,死锁造成crash,Crash栈如下:
#4 android::Mutex::Autolock::Autolock (this=0x40483a94, mutex=...) atframeworks/native/include/utils/Mutex.h:65
#5 0x4011ca0a in android::SurfaceFlinger::removeLayer (this=0x4161f318,layer=...) at frameworks/native/services/surfaceflinger/SurfaceFlinger.cpp:1779
#6 0x4011420a in android::Client::~Client (this=0x42c331e0,__in_chrg=, __vtt_parm=) atframeworks/native/services/surfaceflinger/Client.cpp:48
#7 0x401142ac in android::Client::~Client (this=0x42c331e0,__in_chrg=, __vtt_parm=) atframeworks/native/services/surfaceflinger/Client.cpp:51
#8 0x4013efa2in android::RefBase::decStrong (this=0x42c33218, id=0x40483ae4) atframeworks/native/libs/utils/RefBase.cpp:359
#9 0x401177b8 in ~sp (this=0x40483ae4, __in_chrg=) atframeworks/native/include/utils/StrongPointer.h:149
#10 android::LayerBaseClient::~LayerBaseClient(this=0x43624728, __in_chrg=) atframeworks/native/services/surfaceflinger/LayerBase.cpp:512
#11 0x40116652 in android::Layer::~Layer(this=0x43624728, __in_chrg=) at frameworks/native/services/surfaceflinger/Layer.cpp:126
#12 0x40116664 in android::Layer::~Layer(this=0x43624728, __in_chrg=) atframeworks/native/services/surfaceflinger/Layer.cpp:126
#13 0x4013efa2 in android::RefBase::decStrong(this=0x43624728, id=0x42c0d4e8) atframeworks/native/libs/utils/RefBase.cpp:359
#14 0x4011ceae inandroid::sp<:layerbaseclient>::~sp (this=0x42c0d4e8,__in_chrg=) atframeworks/native/include/utils/StrongPointer.h:149
#15 0x40120e96 in destroy_type<:sp>> (n=, p=0x42c0d4e8) atframeworks/native/include/utils/TypeHelpers.h:144
#16android::SortedVector<:sp> >::do_destroy(this=, storage=, num=11) atframeworks/native/include/utils/SortedVector.h:253
#17 0x40141de8 in _do_destroy (num=, storage=, this=) atframeworks/native/libs/utils/VectorImpl.cpp:496
#18 android::VectorImpl::_do_destroy(this=, storage=, num=) at frameworks/native/libs/utils/VectorImpl.cpp:493
#19 0x40141e0a inandroid::VectorImpl::release_storage (this=0x4161f42c) atframeworks/native/libs/utils/VectorImpl.cpp:358
#20 0x40141e50 in android::VectorImpl::operator=(this=0x4161f42c, rhs=...) at frameworks/native/libs/utils/VectorImpl.cpp:76
#21 0x4011fcf4 in operator= (rhs=...,this=0x4161f42c) at frameworks/native/include/utils/SortedVector.h:170
#22 operator= (this=0x4161f42c) atframeworks/native/services/surfaceflinger/SurfaceFlinger.h:153
#23 android::SurfaceFlinger::State::operator=(this=) atframeworks/native/services/surfaceflinger/SurfaceFlinger.h:176
#24 0x4011fd8c inandroid::SurfaceFlinger::commitTransaction (this=0x4161f318) atframeworks/native/services/surfaceflinger/SurfaceFlinger.cpp:1384
#25 0x4012074e inandroid::SurfaceFlinger::handleTransactionLocked (this=0x4161f318,transactionFlags=3) atframeworks/native/services/surfaceflinger/SurfaceFlinger.cpp:1371
#26 0x401207c6 inandroid::SurfaceFlinger::handleTransaction (this=0x4161f318,transactionFlags=) atframeworks/native/services/surfaceflinger/SurfaceFlinger.cpp:1124
#27 0x40120844 inandroid::SurfaceFlinger::onMessageReceived (this=0x4161f318, what=0) atframeworks/native/services/surfaceflinger/SurfaceFlinger.cpp:770
Crash 分析
在SurfaceFlinger的handleTransaction函数执行时请求mStateLock,在该函数执行过程中有Layer释放
释放Layer时,会调用removeLayer函数, removeLayer函数中,请求mStateLock锁,该锁无法获取到
由于多线程的原因,handleTransaction执行过程中sp的作用域结束时,已经是最后一次引用实际对象Layer,因而释放Layer
SurfaceFlinger死锁问题的fix
该问题的修复方案和简单,增加一次强引用,在一次handleTransaction结束后才释放Layer,即是将真正Layer释放延迟了。下面的具体的code:
--- a/services/surfaceflinger/SurfaceFlinger.cpp
+++ b/services/surfaceflinger/SurfaceFlinger.cpp
@@ -1056,6 +1056,12 @@ void SurfaceFlinger::handleTransaction(uint32_t transactionFlags)
{
ATRACE_CALL();
+ // here we keep a copy of the drawing state (that is the state that's+ // going to be overwritten by handleTransactionLocked()) outside of+ // mStateLock so that the side-effects of the State assignment+ // don't happen with mStateLock held (which can cause deadlocks).+ State drawingState(mDrawingState);
+
Mutex::Autolock _l(mStateLock);
const nsecs_t now = systemTime();
mDebugInTransaction = now;
这个fix不难理解,State中的layersSortedByZ是Layer的强引用vector,我们的patch相当于增加一次强引用,因而在handleTransactionLocked的过程中可能会有Layer释放,就不会造成死锁问题。
[frameworks/native/services/surfaceflinger/SurfaceFlinger.h]
struct State {
LayerVector layersSortedByZ;
DefaultKeyedVector< wp, DisplayDeviceState> displays;
};
……
class LayerVector : public SortedVector< sp > {
public:
LayerVector();
LayerVector(const LayerVector& rhs);
virtual int do_compare(const void* lhs, const void* rhs) const;
};
Android原始设计缺陷
任何设计都不敢保证没有缺陷。前面说sp的时候我们说到sp的force_set函数,下面我将具体来分析。
force_set会破坏sp设计的初衷
force_set函数的原型:
[system/core/include/utils/StrongPointer.h]
template
void sp::force_set(T* other) {
other->forceIncStrong(this);
m_ptr = other; // 若m-ptr之前指向其他的对象,则其他对象的m-ptr不为0}
我们来举例说明一下,请看下面代码:
void testForceSet() {
{
sp spSheep(new Sheep());
spSheep.force_set(new Sheep());
}
}
我们看看Sheep的释放情况:
D/ (13385): Sheep:: -------------testForceSet begin------------
D/ (13385): Sheep::Sheep constructor invoked this=0xb6301080
D/ (13385): Sheep::onFirstRef, object=0xb6301080
D/ (13385): Sheep::Sheep constructor invoked this=0xb6301088
D/ (13385): Sheep::onFirstRef, object=0xb6301088
D/ (13385): Sheep::onLastStrongRef, id=0xbea5a894
D/ (13385): Sheep::Sheep destructor invoked this=0xb6301088
D/ (13385): Sheep:: -------------testForceSet begin------------
可见,我们构造了两个对象0xb6301080和0xb6301088,但是只有0xb6301088释放掉了,0xb6301080没有并释放。所以使用force_set函数时一定要注意,但是如下的代码是没有问题的。
void testForceSet() {
{
sp spSheep; // spSheep的m_ptr并没有指向实际的对象 spSheep.force_set(new Sheep());
}
}
force_set的改进方案
在force_set函数时,先将原引用的对象的引用数-1,sp再引用新对象,这这样可避免原实际对象不能释放的问题。
--- a/include/utils/StrongPointer.h
+++ b/include/utils/StrongPointer.h
@@ -187,7 +187,12 @@ sp& sp::operator =(U* other) {
template
void sp::force_set(T* other) {
- other->forceIncStrong(this);
+ if (m_ptr) {
+ m_ptr->decStrong(this);
+ }
+ if (other) {
+ other->forceIncStrong(this);
+ }
m_ptr = other;
}
智能指针小结
我们从C++的特性出发,逐步展开Android中智能指针的相关知识,从原理,到实现,再到具体的使用。
Android设计sp和wp对实际对象进行引用,而实际对象类需要从基类RefBase或LightRefBase派生。
—— SnailStudio 后记于 2017.5


 1727
1727


 被折叠的 条评论
为什么被折叠?
被折叠的 条评论
为什么被折叠?
 到【灌水乐园】发言


