


这是一个仿支付宝自定义软键盘的demo,分别为身份证号码、支付金额、支付密码输入定制的软键盘,以及EditText文本输入框与密码输入框的定制。
先上效果图:

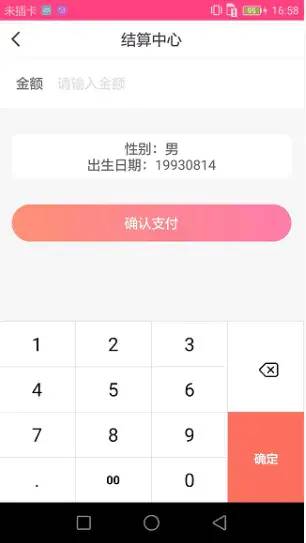
一 身份证键盘1 身份证键盘在MainActivity页面,使用时再布局中添加配置
android:id="@+id/indentity_card" android:layout_width="match_parent" android:layout_height="wrap_content" app:clear="true" app:hit="请输入身份证号" app:input_typed="email" app:left_text="身份证号" app:length="18" app:show_bottom_split="false" app:show_custom_keyboard="true" tools:layout_height="60dp" />要使用自定义的键盘记得配置:
app:show_custom_keyboard="true"
2 在Activity中创建 CumKeyboardContainer:
mCustomKeyboardView = new CumKeyboardContainer(this, getInputType());mCustomKeyboardView.attachKeyBoardView();3 并为输入框CEditText配置
mIndentityCard = findViewById(R.id.indentity_card);mIndentityCard.setCustomKeyboardView(mCustomKeyboardView);4 在onBackPressed中配置回退键盘,若键盘显示则先隐藏
if (mCustomKeyboardView != null && mCustomKeyboardView.getVisibility() == View.VISIBLE) { mCustomKeyboardView.setCmbVisibility(View.GONE); }二 数字键盘
数字键盘在SecondActivity页面,使用方法同上,只是在第二步中修改类型为金额输入:
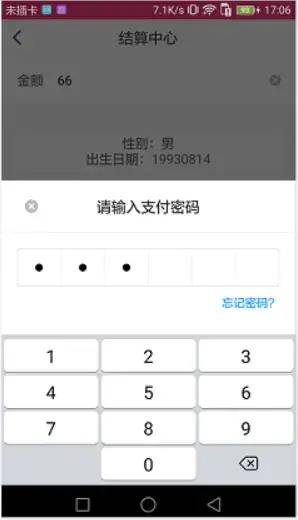
mCustomKeyboardView = new CumKeyboardContainer(this, CumKeyboardContainer.AMOUT_TYPE);三 支付密码对话框1 创建输入框和回调方法
inputPayPwdDialog = new InputPayPwdDialog(this); inputPayPwdDialog.setInputPasswordListener(new InputPayPwdDialog.PasswordListener() { @Override public void onSubmitPwd(String password) { Toast.makeText(SecondActivity.this, "成功支付" + mIndentityCard.getText() + "元", Toast.LENGTH_SHORT).show(); } });2 在显示的时候调用
inputPayPwdDialog.show();3 获取密码
inputPayPwdDialog.getPassword();源码地址:
https://github.com/weioule/KeyboardInputDemo
到这里就结束啦.


 944
944


 被折叠的 条评论
为什么被折叠?
被折叠的 条评论
为什么被折叠?
 到【灌水乐园】发言


