android编辑按钮图标,修改 Floating Action Button 图标

使用 Android Studio 新建的 basic 页面中的 floating action button (FAB) 是个邮件图标。而我想将图标修改成加号。

使用内置的图标

默认的图标为 ic_dialog_email。

app:srcCompat="@android:drawable/ic_dialog_email"

切换到 layout 代码的 design 界面,选中 FAB 控件,修改 srcCompat 的属性。

227a6bb32b4f83dbcaa73b7ff1f373e4.png

点击右侧选择按钮

246272c85b29c6052f88b9a09b6a661e.png

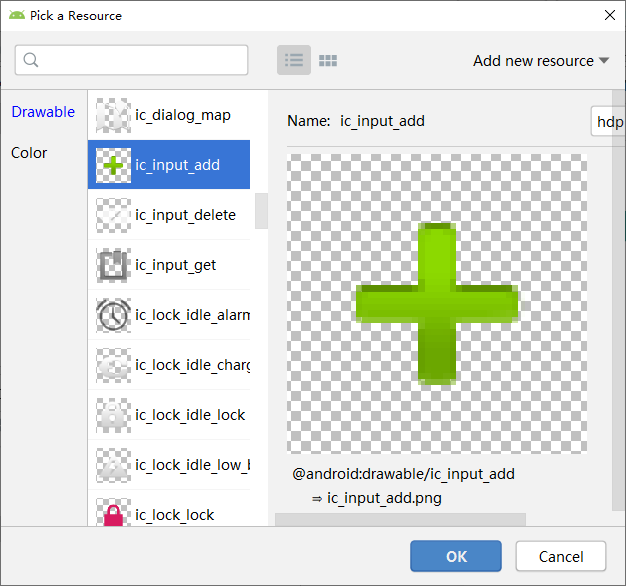
在弹出的 "Pick a Resource" 窗口中,选择 Drawable - android 中的图标。

调整 FAB 按钮背景色

由于选择的加号图标是 PNG 图片,所以无法通过代码修改图标颜色。所以,为了让图标突出显示,需要修改一下 FAB 按钮的背景色。

修改 backgroundTint 属性即可。

修改后的代码为:

android:id="@+id/fab"

android:layout_width="wrap_content"

android:layout_height="wrap_content"

android:layout_gravity="bottom|end"

android:layout_margin="@dimen/fab_margin"

android:backgroundTint="@color/colorPrimary"

app:srcCompat="@android:drawable/ic_input_add" />

  • 1
    点赞
  • 1
    收藏
    觉得还不错? 一键收藏
  • 0
    评论
您好!对于Android悬浮窗实现文本框和按钮可以修改文本框的需求,您可以按照以下步骤进行实现: 1. 首先,在AndroidManifest.xml文件中添加悬浮窗权限: ```xml <uses-permission android:name="android.permission.SYSTEM_ALERT_WINDOW" /> ``` 2. 创建一个Service类,用于显示悬浮窗。在该类中,您可以使用WindowManager类来添加悬浮窗,并设置悬浮窗的布局: ```java public class FloatingService extends Service { private WindowManager windowManager; private View floatView; @Override public void onCreate() { super.onCreate(); windowManager = (WindowManager) getSystemService(WINDOW_SERVICE); LayoutInflater inflater = LayoutInflater.from(this); floatView = inflater.inflate(R.layout.floating_layout, null); // 设置悬浮窗的位置等属性 WindowManager.LayoutParams params = new WindowManager.LayoutParams( WindowManager.LayoutParams.WRAP_CONTENT, WindowManager.LayoutParams.WRAP_CONTENT, WindowManager.LayoutParams.TYPE_APPLICATION_OVERLAY, WindowManager.LayoutParams.FLAG_NOT_FOCUSABLE, PixelFormat.TRANSLUCENT ); params.gravity = Gravity.TOP | Gravity.START; params.x = 0; params.y = 0; // 添加悬浮窗 windowManager.addView(floatView, params); } @Override public void onDestroy() { super.onDestroy(); if (floatView != null) { windowManager.removeView(floatView); } } @Nullable @Override public IBinder onBind(Intent intent) { return null; } } ``` 3. 在res目录下创建一个floating_layout.xml文件,用于定义悬浮窗的布局。您可以在该布局中添加一个EditText和一个Button,并设置相应的id和点击事件: ```xml <LinearLayout xmlns:android="http://schemas.android.com/apk/res/android" android:layout_width="wrap_content" android:layout_height="wrap_content" android:orientation="vertical"> <EditText android:id="@+id/edit_text" android:layout_width="match_parent" android:layout_height="wrap_content" android:hint="请输入文本" /> <Button android:id="@+id/button" android:layout_width="wrap_content" android:layout_height="wrap_content" android:text="修改文本" /> </LinearLayout> ``` 4. 在FloatingService类中,通过findViewById方法获取EditText和Button的实例,并设置Button的点击事件: ```java @Override public void onCreate() { super.onCreate(); // ... EditText editText = floatView.findViewById(R.id.edit_text); Button button = floatView.findViewById(R.id.button); button.setOnClickListener(new View.OnClickListener() { @Override public void onClick(View v) { String newText = editText.getText().toString(); // 在此处可以进行文本修改的操作 } }); // ... } ``` 这样,您就可以通过点击悬浮窗中的按钮来修改文本框的内容了。需要注意的是,由于悬浮窗需要使用SYSTEM_ALERT_WINDOW权限,因此在Android 6.0及以上版本需要动态申请该权限。 希望以上内容对您有所帮助!如果您有任何疑问,请随时提问。

“相关推荐”对你有帮助么?

  • 非常没帮助
  • 没帮助
  • 一般
  • 有帮助
  • 非常有帮助
提交
评论
添加红包

请填写红包祝福语或标题

红包个数最小为10个

红包金额最低5元

当前余额3.43前往充值 >
需支付:10.00
成就一亿技术人!
领取后你会自动成为博主和红包主的粉丝 规则
hope_wisdom
发出的红包
实付
使用余额支付
点击重新获取
扫码支付
钱包余额 0

抵扣说明:

1.余额是钱包充值的虚拟货币,按照1:1的比例进行支付金额的抵扣。
2.余额无法直接购买下载,可以购买VIP、付费专栏及课程。

余额充值