


 本文介绍了孪生风机项目中使用的前端技术,包括Canvas的平滑动画实现和Three.js在3D场景的应用。通过Canvas的动态重绘实现风向角平滑过渡效果,利用Three.js进行风机模型的加载与交互,如部件高亮和信息展示。
孪生风机
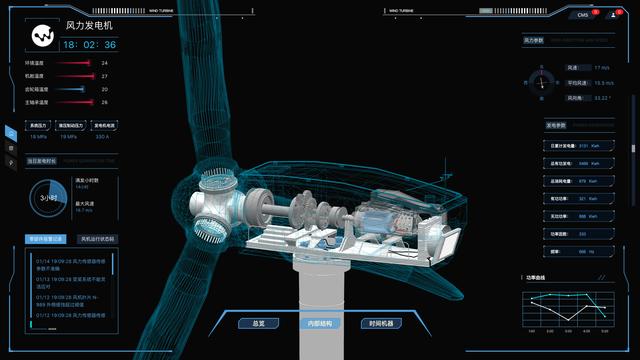
上一篇文章我们介绍了数字孪生,和该技术下孪生风机的诸多优点。本篇文章向大家介绍下孪生风机用了哪些前端技术?前端效果是如何实现的?
一、Canvas
简介
在web中,实现2D基本图形及动画效果,首先会想到使用canvas。例如上图,实现一个可以实时显示风向角变化的效果图。canvas非常灵活,能够很好地融合JavaScript代码并在浏览器内绘制华丽的图形,拥有多种绘制路径、形状、字符以及添加图像等方法。
面对各种复杂的图形及效果,我们可以采用canvas框架,例如Konva,它可以轻松的实现桌面应用和移动应用中的图形交互交互效果,可以高效的实现动画,变换, 节点嵌套, 局部操作,滤镜,缓存,事件等功能,不仅仅适用于桌面与移动开发, 还有更为广泛的应用。
实现
在实现动画实时变化效果时,如果每次风向发生改变,都需要重绘图形,效果显示难免有些单调。重新绘图的变化过程称为突变动画。
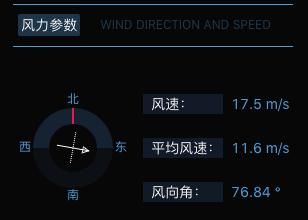
反面教材-突变动画
我们需要的是平滑的过渡效果,例如,风向角在上一时刻是36.89度,下一时刻是76.84度。动画效果由36.89度渐变到76.84度的平滑效果。
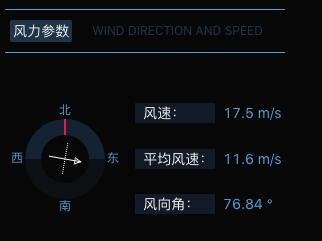
风向角动态变化
为避免上述情况,我们需要在componentWillUpdate中监听角度参数rotation的变化,当有新的角度参数传入的时候,我们需要重新绘制图形并将新的参数传入,代码如下:
componentWillUpdate(nextProps) { if (nextProps.rotation !== this.props.rotation) { this.layer.destroy() this.tween.destroy() this.drawWind(nextProps) } }//旋转部分初始角度赋值为当前rotation。let lineGroup = new Konva.Group({ x:radius, y:radius, rotation: this.props.rotation,//未变化时采用this.props值。动画处用nextProps })//动画部分旋转角度赋值为新的rotation。 this.tween = new Konva.Tween({ node: lineGroup, easing: Konva.Easings.Linear, duration: 0.5, rotation: nextProps.rotation ? nextProps.rotation : nextProps.rotation === 0 ? 0 : this.props.rotation, onFinish: () => { this.tween.destroy() } });二、Three.js
简介
Three.js是基于原生WebGL封装运行的三维引擎,在所有WebGL引擎中,Three.js是国内文档资料最多、使用最广泛的三维引擎;Three.js是纯渲染引擎,而且代码易读,适合作为学习WebGL、3D图形、3D数学应用的平台,也可以做中小型的重表现的Web项目。
实现
风机模型加载完毕后,当鼠标移动到风机各个零部件时,所选部件增加线框以表示为选中状态。如果在此之前有选中其它部件,需移除其它部件的选中状态。当鼠标移出该部件的时候,将其线框移除。
代码如下:监听鼠标事件的onMouseMove。
// 鼠标移入事件 this.mouseMove = (event) => { //点击射线 let raycaster = new THREE.Raycaster(); // ⚠️⚠️⚠️ 注意此处的mouse必须设置,这样下面才能判断当前选中模型Group的单个组员 let mouse = new THREE.Vector2(); //将鼠标点击位置的屏幕坐标转成threejs中的标准坐标,具体解释见代码释义 mouse.x = (event.offsetX / width) * 2 - 1; mouse.y = -(event.offsetY / height) * 2 + 1; //新建一个三维单位向量 假设z方向就是1 //根据照相机,把这个向量转换到视点坐标系 let vector = new THREE.Vector3(mouse.x, mouse.y, 1).unproject(camera) //通过鼠标点击的位置(二维坐标)和当前相机的矩阵计算出射线位置 raycaster.setFromCamera(mouse, camera); //在视点坐标系中形成射线,射线的起点向量是照相机, 射线的方向向量是照相机到点击的点,这个向量应该归一标准化。 raycaster.set(camera.position, vector.sub(camera.position).normalize()) //射线和模型求交,选中一系列直线 // 存放旋转部分点击 let intersectsFlabellum = raycaster.intersectObjects(flabellum.children, true) // 存放旋转部分之外的点击 let intersectsObject = raycaster.intersectObjects(this.object.children, true) if (intersectsFlabellum.length && !intersectsObject.length) { if (intersectsFlabellum[0].object.name === '扇叶' && intersectsFlabellum.length < 3) { if (this.state.mouseOver !== '扇叶') { this.setState({ mouseOver: '扇叶' }) this.scene.remove(hubLineGroup) } } else if (intersectsFlabellum[0].object.name === '轮毂') { if (this.state.mouseOver !== '轮毂') { this.setState({ mouseOver: '轮毂' }) this.scene.add(hubLineGroup) } } else { this.scene.remove(hubLineGroup) if (!this.state.mouseSelect) { this.setState({ mouseOver: '', control: true }) } else { this.setState({ mouseOver: '' }) } } } else { this.scene.remove(hubLineGroup) } if (intersectsObject.length) { this.scene.remove(pitchGroup) this.scene.remove(hubLineGroup) if (intersectsObject[0].object.name === '主轴') { if (this.state.mouseOver !== '主轴') { this.setState({ mouseOver: '主轴' }) this.scene.add(mainAxleGroup) this.scene.remove(gearGroup) this.scene.remove(powerGroup) } } else if (intersectsObject[0].object.name === '齿轮结构') { if (this.state.mouseOver !== '齿轮结构') { this.setState({ mouseOver: '齿轮结构' }) this.scene.add(gearGroup) this.scene.remove(mainAxleGroup) this.scene.remove(powerGroup) } } else if (intersectsObject[0].object.name === '发电机箱') { if (this.state.mouseOver !== '发电机箱') { this.setState({ mouseOver: '发电机箱' }) this.scene.add(powerGroup) this.scene.remove(mainAxleGroup) this.scene.remove(gearGroup) } } else { if (!this.state.mouseSelect) { this.setState({ mouseOver: '', control: true }) } else { this.setState({ mouseOver: '' }) } this.scene.remove(mainAxleGroup) this.scene.remove(gearGroup) this.scene.remove(powerGroup) } } else { this.scene.remove(mainAxleGroup) this.scene.remove(gearGroup) this.scene.remove(powerGroup) } if (!intersectsObject.length && !intersectsFlabellum.length) { if (!this.state.mouseSelect) { this.setState({ mouseOver: '', control: true }) } else { this.setState({ mouseOver: '' }) } } }鼠标点击查看详细信息,鼠标按下的时候,对此时正处于选中状态的部件进行动画处理。对于信息量较少的部件,需要给一个小弹窗来显示信息即可。
代码如下:监听鼠标事件onClick。
// 点击事件 this.clickEvent = (event) => { // 点击扇叶停止动画。点击扇叶并且下一次不点击扇叶开始动画。 if (this.state.isClickLeaf) { this.setState({ isClickLeaf: false }) this.animate() } if (this.state.mouseOver) { if (this.state.mouseOver === '扇叶') { cancelAnimationFrame(this.animateId) $('.popup').css({ left: event.offsetX, top: event.offsetY - $('.popup').height(), }) } else if (this.state.mouseOver === '轮毂') { $('.popup').css({ left: event.offsetX, top: event.offsetY - $('.popup').height(), }) } else if (this.state.mouseOver === '主轴') { $('.popup').css({ left: event.offsetX, top: event.offsetY - $('.popup').height(), }) } else if (this.state.mouseOver === '齿轮结构') { this.setState({ mouseSelect: '齿轮结构', control: true }) } else if (this.state.mouseOver === '发电机箱') { this.setState({ mouseSelect: '发电机', control: true }) } else if (this.state.mouseOver === '偏航系统') { this.setState({ mouseSelect: '偏航系统', control: true }) } } else { if (this.state.mouseSelect !== '齿轮结构' && this.state.mouseSelect !== '偏航系统' && this.state.mouseSelect !== '发电机') { this.setState({ mouseSelect: '', control: true }) } } }当所选部件信息量较大时,如下显示。
三、结束语
web页面因Canvas和Three.js在2D和3D方面的支持变得丰富多彩,妙趣横生。生动丰富的数据展示,方便了我们对风机的数据的实时监测。
至此,本文和本系列文章已经告一段落了,希望可以帮助读者更加了解我们的孪生风机。
有任何问题,欢迎联系我们!关注一下,下次找我不迷路!如果觉得文章有可取之处,还请多多点赞!


 2201
2201

 被折叠的 条评论
为什么被折叠?
被折叠的 条评论
为什么被折叠?
 到【灌水乐园】发言


