


目录
(一) 简介
OAuth是一个关于授权的开放网络标准,在全世界得到的广泛的应用,目前是2.0的版本。OAuth2在“客户端”与“服务提供商”之间,设置了一个授权层(authorization layer)。“客户端”不能直接登录“服务提供商”,只能登录授权层,以此将用户与客户端分离。“客户端”登录需要OAuth提供的令牌,否则将提示认证失败而导致客户端无法访问服务。OAuth2.0是OAuth协议的延续版本,但不向后兼容OAuth 1.0即完全废止了OAuth1.0。
OAuth2为我们提供了四种授权方式:
1、授权码模式(authorization code)
2、简化模式(implicit)
3、密码模式(resource owner password credentials)
4、客户端模式(client credentials)
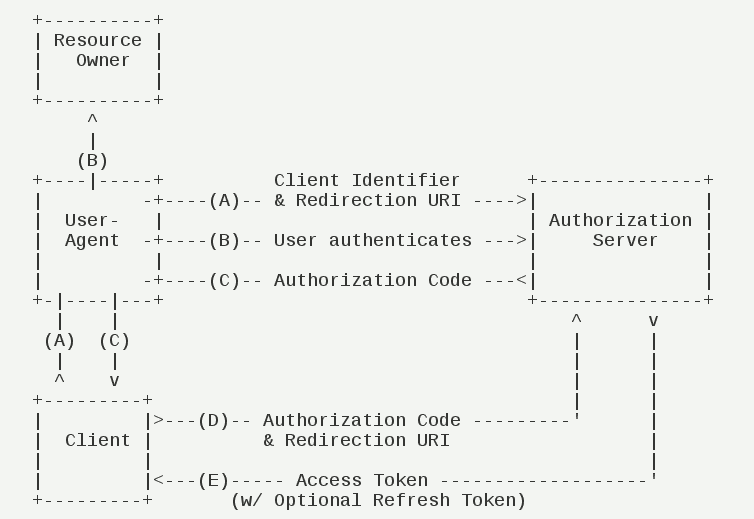
授权码模式
授权码相对其他三种来说是功能比较完整、流程最安全严谨的授权方式,通过客户端的后台服务器与服务提供商的认证服务器交互来完成。流程如下图所示:
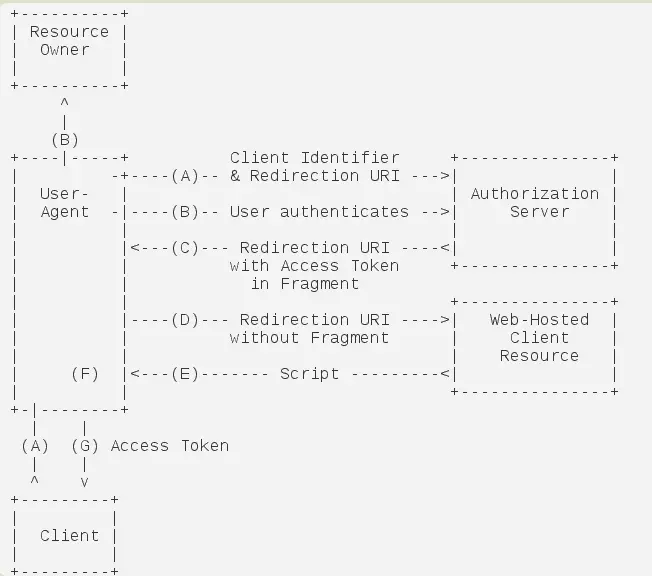
简化模式
这种模式不通过服务器端程序来完成,直接由浏览器发送请求获取令牌,令牌是完全暴露在浏览器中的,这种模式极力不推崇。流程如下图所示:
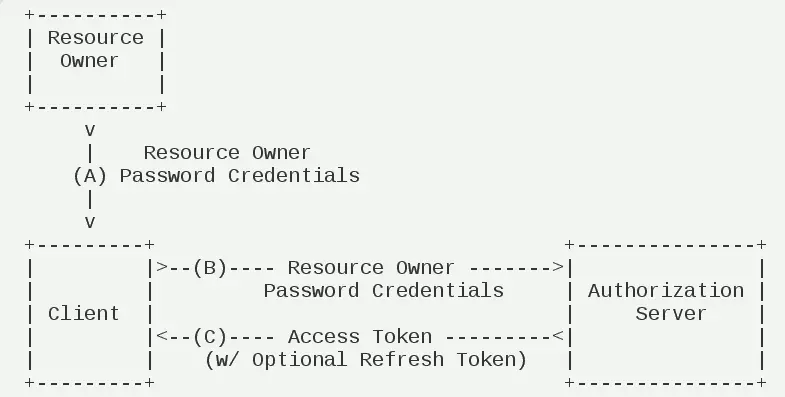
密码模式
密码模式也是比较常用到的一种,客户端向授权服务器提供用户名、密码然后得到授权令牌。这种模式不过有种弊端,我们的客户端需要存储用户输入的密码,但是对于用户来说信任度不高的平台是不可能让他们输入密码的。流程如下图所示:
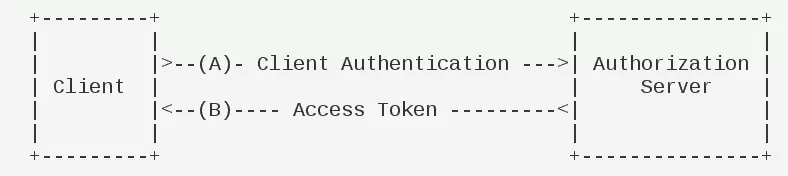
客户端模式
客户端模式是客户端以自己的名义去授权服务器申请授权令牌,并不是完全意义上的授权。如下图所示:
上述简单的介绍了OAuth2内部的四种授权方式,我们下面使用密码模式来进行测试;我们就来讲解下SpringBoot项目中是如何配置使用OAuth2服务器端,并且我们使用数据库中的用户数据来做验证处理,并让OAuth2整合SpringSecurity来保护我们的REST接口。
(二) 建表,初始化数据
Oauth2相关的5张表:
oauth_access_token:访问令牌
oauth_refresh_token:更新令牌
oauth_client_details:客户端信息
oauth_code:授权码
oauth_approvals:授权记录
oauth_client_token: 客户端用来记录token信息
只以密码模式来进行测试,不考虑管理功能,只用到了了oauth_client_details,oauth_access_token,oauth_refresh_token 三张表
DROP TABLE IF EXISTS `oauth_access_token`;
CREATE TABLE `oauth_access_token` (
`token_id` varchar(255) DEFAULT NULL COMMENT '加密的access_token的值',
`token` longblob COMMENT 'OAuth2AccessToken.java对象序列化后的二进制数据',
`authentication_id` varchar(255) DEFAULT NULL COMMENT '加密过的username,client_id,scope',
`user_name` varchar(255) DEFAULT NULL COMMENT '登录的用户名',
`client_id` varchar(255) DEFAULT NULL COMMENT '客户端ID',
`authentication` longblob COMMENT 'OAuth2Authentication.java对象序列化后的二进制数据',
`refresh_token` varchar(255) DEFAULT NULL COMMENT '加密的refresh_token的值'
) ENGINE=InnoDB DEFAULT CHARSET=utf8;
DROP TABLE IF EXISTS `oauth_approvals`;
CREATE TABLE `oauth_approvals` (
`userId` varchar(255) DEFAULT NULL COMMENT '登录的用户名',
`clientId` varchar(255) DEFAULT NULL COMMENT '客户端ID',
`scope` varchar(255) DEFAULT NULL COMMENT '申请的权限范围',
`status` varchar(10) DEFAULT NULL COMMENT '状态(Approve或Deny)',
`expiresAt` datetime DEFAULT NULL COMMENT '过期时间',
`lastModifiedAt` datetime DEFAULT NULL COMMENT '最终修改时间'
) ENGINE=InnoDB DEFAULT CHARSET=utf8;
DROP TABLE IF EXISTS `oauth_client_details`;
CREATE TABLE `oauth_client_details` (
`client_id` varchar(255) NOT NULL COMMENT '客户端ID',
`resource_ids` varchar(255) DEFAULT NULL COMMENT '资源ID集合,多个资源时用逗号(,)分隔',
`client_secret` varchar(255) DEFAULT NULL COMMENT '客户端密匙',
`scope` varchar(255) DEFAULT NULL COMMENT '客户端申请的权限范围',
`authorized_grant_types` varchar(255) DEFAULT NULL COMMENT '客户端支持的grant_type',
`web_server_redirect_uri` varchar(255) DEFAULT NULL COMMENT '重定向URI',
`authorities` varchar(255) DEFAULT NULL COMMENT '客户端所拥有的Spring Security的权限值,多个用逗号(,)分隔',
`access_token_validity` int(11) DEFAULT NULL COMMENT '访问令牌有效时间值(单位:秒)',
`refresh_token_validity` int(11) DEFAULT NULL COMMENT '更新令牌有效时间值(单位:秒)',
`additional_information` varchar(255) DEFAULT NULL COMMENT '预留字段',
`autoapprove` varchar(255) DEFAULT NULL COMMENT '用户是否自动Approval操作'
) ENGINE=InnoDB DEFAULT CHARSET=utf8;
DROP TABLE IF EXISTS `oauth_client_token`;
CREATE TABLE `oauth_client_token` (
`token_id` varchar(255) DEFAULT NULL COMMENT '加密的access_token值',
`token` longblob COMMENT 'OAuth2AccessToken.java对象序列化后的二进制数据',
`authentication_id` varchar(255) DEFAULT NULL COMMENT '加密过的username,client_id,scope',
`user_name` varchar(255) DEFAULT NULL COMMENT '登录的用户名',
`client_id` varchar(255) DEFAULT NULL COMMENT '客户端ID'
) ENGINE=InnoDB DEFAULT CHARSET=utf8;
DROP TABLE IF EXISTS `oauth_code`;
CREATE TABLE `oauth_code` (
`code` varchar(255) DEFAULT NULL COMMENT '授权码(未加密)',
`authentication` varbinary(255) DEFAULT NULL COMMENT 'AuthorizationRequestHolder.java对象序列化后的二进制数据'
) ENGINE=InnoDB DEFAULT CHARSET=utf8;
DROP TABLE IF EXISTS `oauth_refresh_token`;
CREATE TABLE `oauth_refresh_token` (
`token_id` varchar(255) DEFAULT NULL COMMENT '加密过的refresh_token的值',
`token` longblob COMMENT 'OAuth2RefreshToken.java对象序列化后的二进制数据 ',
`authentication` longblob COMMENT 'OAuth2Authentication.java对象序列化后的二进制数据'
) ENGINE=InnoDB DEFAULT CHARSET=utf8;
DROP TABLE IF EXISTS `sys_user`;
CREATE TABLE `sys_user` (
`id` bigint(20) NOT NULL AUTO_INCREMENT,
`username` varchar(50) DEFAULT NULL COMMENT '用户名',
`password` varchar(50) DEFAULT NULL COMMENT '密码',
PRIMARY KEY (`id`)
) ENGINE=InnoDB DEFAULT CHARSET=utf8 COMMENT='用户信息表';
凭证(账号)和权限表3张
authority 权限表
credentials 凭证表(相当于用户账号表)
credentials_authorities 授权表(以上2个表的关联表)
现实项目中对应的是用户,角色,权限表
DROP TABLE IF EXISTS `authority`;
CREATE TABLE `authority` (
`id` bigint(11) NOT NULL COMMENT '权限id',
`authority` varchar(255) DEFAULT NULL COMMENT '权限',
PRIMARY KEY (`id`)
) ENGINE=InnoDB DEFAULT CHARSET=utf8;
DROP TABLE IF EXISTS `credentials`;
CREATE TABLE `credentials` (
`id` bigint(11) NOT NULL COMMENT '凭证id',
`enabled` tinyint(1) NOT NULL COMMENT '是否可用',
`name` varchar(255) NOT NULL COMMENT '用户名',
`password` varchar(255) NOT NULL COMMENT '密码',
`version` int(11) DEFAULT NULL COMMENT '版本号',
PRIMARY KEY (`id`)
) ENGINE=InnoDB DEFAULT CHARSET=utf8;
DROP TABLE IF EXISTS `credentials_authorities`;
CREATE TABLE `credentials_authorities` (
`credentials_id` bigint(20) NOT NULL COMMENT '凭证id',
`authorities_id` bigint(20) NOT NULL COMMENT '权限id'
) ENGINE=InnoDB DEFAULT CHARSET=utf8;
初始化数据
定义了3个角色3个账号
以“project_api” 命名resourceServer中的api请求路径,我们定义一个客户端叫做:user-client(认证权限类型:read,write)
密码都是user,数据库中存的是加密过后的字符串
INSERT INTO authority VALUES(1,'ROLE_OAUTH_ADMIN');INSERT INTO authority VALUES(2,'ROLE_RESOURCE_ADMIN');INSERT INTO authority VALUES(3,'ROLE_PROJECT_ADMIN');INSERT INTO credentials VALUES(1,b'1','oauth_admin','$2a$10$BurTWIy5NTF9GJJH4magz.9Bd4bBurWYG8tmXxeQh1vs7r/wnCFG2','0');INSERT INTO credentials VALUES(2,b'1','resource_admin','$2a$10$BurTWIy5NTF9GJJH4magz.9Bd4bBurWYG8tmXxeQh1vs7r/wnCFG2','0');INSERT INTO credentials VALUES(3,b'1','project_admin','$2a$10$BurTWIy5NTF9GJJH4magz.9Bd4bBurWYG8tmXxeQh1vs7r/wnCFG2','0');INSERT INTO credentials_authorities VALUE (1,1);INSERT INTO credentials_authorities VALUE (2,2);INSERT INTO credentials_authorities VALUE (3,3);INSERT INTO oauth_client_details VALUES('user_client','project_api', '$2a$10$BurTWIy5NTF9GJJH4magz.9Bd4bBurWYG8tmXxeQh1vs7r/wnCFG2', 'read,write', 'password,refresh_token', 'http://127.0.0.1', 'ROLE_PROJECT_ADMIN', 7200, 1800, NULL, 'true');
(三)工程配置
创建父工程oauth2,继续建立两个子模块:
Authorization Server - 授权服务器
Resource Server - 资源服务器
具体配置下载工程源码查看
(四)Authorization Server - Spring Security配置
创建一个spring security 配置类,在配置类中注入了上面我们自定义的自定义UserDetailsService以及用户密码验证器。
package com.oauth2.authorization.config;
import org.springframework.beans.factory.annotation.Autowired;
import org.springframework.context.annotation.Bean;
import org.springframework.context.annotation.Configuration;
import org.springframework.security.authentication.AuthenticationManager;
import org.springframework.security.config.annotation.authentication.builders.AuthenticationManagerBuilder;
import org.springframework.security.config.annotation.method.configuration.EnableGlobalMethodSecurity;
import org.springframework.security.config.annotation.web.builders.HttpSecurity;
import org.springframework.security.config.annotation.web.configuration.EnableWebSecurity;
import org.springframework.security.config.annotation.web.configuration.WebSecurityConfigurerAdapter;
import org.springframework.security.core.userdetails.UserDetailsService;
import org.springframework.security.crypto.bcrypt.BCryptPasswordEncoder;
import org.springframework.security.crypto.password.PasswordEncoder;
/**
* spring security 配置类
*/
@Configuration
@EnableWebSecurity
@EnableGlobalMethodSecurity(prePostEnabled = true) //开启security注解
public class WebSecurityConfig extends WebSecurityConfigurerAdapter {
/**
* 密码编码验证器
* @return
*/
@Bean
public PasswordEncoder passwordEncoder() {
return new BCryptPasswordEncoder();
}
/**
* 自定义UserDetailsService用来从数据库中根据用户名查询用户信息以及角色信息
*/
@Autowired
public UserDetailsService userDetailsService;
@Override
@Bean
public AuthenticationManager authenticationManagerBean() throws Exception {
return super.authenticationManagerBean();
}
@Override
protected void configure(AuthenticationManagerBuilder auth) throws Exception {
auth.userDetailsService(userDetailsService)
.passwordEncoder(passwordEncoder());
}
/**
* 验证配置
* @param http
* @throws Exception
*/
@Override
protected void configure(HttpSecurity http) throws Exception {
http
.authorizeRequests()
.antMatchers("/**").authenticated()
.and()
.userDetailsService(userDetailsService);
}
}
自定义UserDetailsService
创建一个名叫JdbcUserDetails的类实现UserDetailsService接口,代码如下:
public class JdbcUserDetails implementsUserDetailsService {
@AutowiredprivateCredentialsDao credentialsDao;
@Overridepublic UserDetails loadUserByUsername(String username) throwsUsernameNotFoundException {
Credentials credentials=credentialsDao.findByName(username);if (credentials == null) {throw new UsernameNotFoundException("User '" + username + "' can not be found");
}
return new User(credentials.getName(), credentials.getPassword(), credentials.isEnabled(), true, true, true, credentials.getGrantedAuthorities());}
}
(五)Authorization Server - 授权服务器
授权服务器负责验证用户标识并提供令牌,使用@EnableAuthorizationServer注解启用授权服务器配置。
package com.oauth2.authorization.config;
import com.oauth2.authorization.userdetails.JdbcUserDetails;
import org.springframework.beans.factory.annotation.Autowired;
import org.springframework.context.annotation.Bean;
import org.springframework.context.annotation.Configuration;
import org.springframework.security.authentication.AuthenticationManager;
import org.springframework.security.core.userdetails.UserDetailsService;
import org.springframework.security.crypto.password.PasswordEncoder;
import org.springframework.security.oauth2.config.annotation.configurers.ClientDetailsServiceConfigurer;
import org.springframework.security.oauth2.config.annotation.web.configuration.AuthorizationServerConfigurerAdapter;
import org.springframework.security.oauth2.config.annotation.web.configuration.EnableAuthorizationServer;
import org.springframework.security.oauth2.config.annotation.web.configurers.AuthorizationServerEndpointsConfigurer;
import org.springframework.security.oauth2.config.annotation.web.configurers.AuthorizationServerSecurityConfigurer;
import org.springframework.security.oauth2.provider.approval.ApprovalStore;
import org.springframework.security.oauth2.provider.approval.JdbcApprovalStore;
import org.springframework.security.oauth2.provider.client.JdbcClientDetailsService;
import org.springframework.security.oauth2.provider.code.AuthorizationCodeServices;
import org.springframework.security.oauth2.provider.code.JdbcAuthorizationCodeServices;
import org.springframework.security.oauth2.provider.token.TokenStore;
import org.springframework.security.oauth2.provider.token.store.JdbcTokenStore;
import javax.sql.DataSource;
/**
* 授权服务器配置
*/
@Configuration
@EnableAuthorizationServer //注解开启了验证服务器
public class AuthorizationServerConfig extends AuthorizationServerConfigurerAdapter {
@Autowired
private DataSource dataSource;
@Autowired
private PasswordEncoder passwordEncoder;
@Autowired
private AuthenticationManager authenticationManager;
@Bean
public JdbcClientDetailsService jdbcClientDetailsService() {
return new JdbcClientDetailsService(dataSource);
}
@Bean
public TokenStore tokenStore() {
return new JdbcTokenStore(dataSource);
}
@Autowired
public UserDetailsService userDetailsService;
/**
* 配置 token 节点的安全策略
* @param security
* @throws Exception
*/
@Override
public void configure(AuthorizationServerSecurityConfigurer security) throws Exception {
security.tokenKeyAccess("permitAll()"); // 获取 token 的策略
security.checkTokenAccess("isAuthenticated()");
}
/**
* 配置客户端信息
*
* @param clients
* @throws Exception
*/
@Override
public void configure(ClientDetailsServiceConfigurer clients) throws Exception {
clients.withClientDetails(jdbcClientDetailsService()); //设置客户端的配置从数据库中读取,存储在oauth_client_details表
}
@Override
public void configure(AuthorizationServerEndpointsConfigurer endpoints) throws Exception {
endpoints.authenticationManager(authenticationManager) // 开启密码验证,来源于 WebSecurityConfigurerAdapter
.userDetailsService(userDetailsService) // 读取验证用户的信息
.tokenStore(tokenStore());
}
}
(六)Resource Server - 资源服务器
资源服务器,受OAuth2令牌保护的资源
package com.oauth2.resources.config;
import org.springframework.beans.factory.annotation.Autowired;
import org.springframework.context.annotation.Bean;
import org.springframework.context.annotation.Configuration;
import org.springframework.security.config.annotation.method.configuration.EnableGlobalMethodSecurity;
import org.springframework.security.config.annotation.web.builders.HttpSecurity;
import org.springframework.security.config.annotation.web.configuration.EnableWebSecurity;
import org.springframework.security.crypto.bcrypt.BCryptPasswordEncoder;
import org.springframework.security.oauth2.config.annotation.web.configuration.EnableResourceServer;
import org.springframework.security.oauth2.config.annotation.web.configuration.ResourceServerConfigurerAdapter;
import org.springframework.security.oauth2.config.annotation.web.configurers.ResourceServerSecurityConfigurer;
import org.springframework.security.oauth2.provider.token.TokenStore;
import org.springframework.security.oauth2.provider.token.store.JdbcTokenStore;
import org.springframework.security.web.authentication.logout.LogoutSuccessHandler;
import javax.sql.DataSource;
/**
* 资源服务器配置
*/
@Configuration
@EnableResourceServer
@EnableWebSecurity
@EnableGlobalMethodSecurity(prePostEnabled = true)
public class ResourcesServerConfig extends ResourceServerConfigurerAdapter {
@Autowired
private DataSource dataSource;
@Bean
public BCryptPasswordEncoder passwordEncoder() {
return new BCryptPasswordEncoder();
}
@Autowired
private LogoutSuccessHandler logoutSuccessHandler;
@Bean
public TokenStore tokenStore() {
return new JdbcTokenStore(dataSource);
}
@Override
public void configure(ResourceServerSecurityConfigurer resources) throws Exception {
resources.resourceId("project_api").stateless(false);
resources.tokenStore(tokenStore());
}
@Override
public void configure(HttpSecurity http) throws Exception {
http
.logout()
.logoutUrl("/logout")//虚拟的登出地址
.logoutSuccessHandler(logoutSuccessHandler)//登出做的操作
.and()
.authorizeRequests()
.antMatchers("/test/hello").permitAll()
.antMatchers("/test/**").authenticated();
}
}
我们这里设置了一个LogoutSuccessHandler,他的作用是请求/logout地址时,清空数据库中的accessToken,防止被窃取用于访问,代码如下:
packagecom.oauth2.resources.config;importorg.springframework.beans.factory.annotation.Autowired;importorg.springframework.security.core.Authentication;importorg.springframework.security.oauth2.common.OAuth2AccessToken;importorg.springframework.security.oauth2.provider.token.TokenStore;importorg.springframework.security.web.authentication.logout.LogoutSuccessHandler;importorg.springframework.stereotype.Component;importjavax.servlet.ServletException;importjavax.servlet.http.HttpServletRequest;importjavax.servlet.http.HttpServletResponse;importjava.io.IOException;/*** 登出清空accessToken*/@Componentpublic class LogoutSuccessHandlerImpl implementsLogoutSuccessHandler {private static String BEARER_AUTHENTICATION = "Bearer";private static String HEADER_AUTHENTICATION = "authorization";
@AutowiredprivateTokenStore tokenStore;
@Overridepublic void onLogoutSuccess(HttpServletRequest httpServletRequest, HttpServletResponse httpServletResponse, Authentication authentication) throwsIOException, ServletException {
String auth=httpServletRequest.getHeader(HEADER_AUTHENTICATION);
String token= httpServletRequest.getParameter("access_token");if (auth != null &&auth.startsWith(BEARER_AUTHENTICATION)) {
token= token.split(" ")[0];
}if (token != null) {
OAuth2AccessToken accessToken=tokenStore.readAccessToken(token);if (accessToken != null) {
tokenStore.removeAccessToken(accessToken);
}
}
}
}
(七)测试
资源服务器测试代码
package com.oauth2.resources.controller;
import org.springframework.security.access.prepost.PreAuthorize;
import org.springframework.security.core.Authentication;
import org.springframework.security.core.context.SecurityContextHolder;
import org.springframework.web.bind.annotation.GetMapping;
import org.springframework.web.bind.annotation.RequestMapping;
import org.springframework.web.bind.annotation.RestController;
@RestController
@RequestMapping(value= "/test")public classTestController {
@GetMapping("/hello")publicString hello(){return "Hello";
}
@GetMapping("/meet")publicString meet(){return "I meet you";
}
@GetMapping("/welcome")publicString welcome(){
Authentication authentication=SecurityContextHolder.getContext().getAuthentication();return "Welcome" +authentication.getName();
}
@GetMapping("/project")
@PreAuthorize("hasRole('ROLE_PROJECT_ADMIN')") //具有此角色
publicString project(){return "This is my project";
}
}
在ResourceServerConfig配置中,只有/test/hello不需要授权,其他都需要授权。
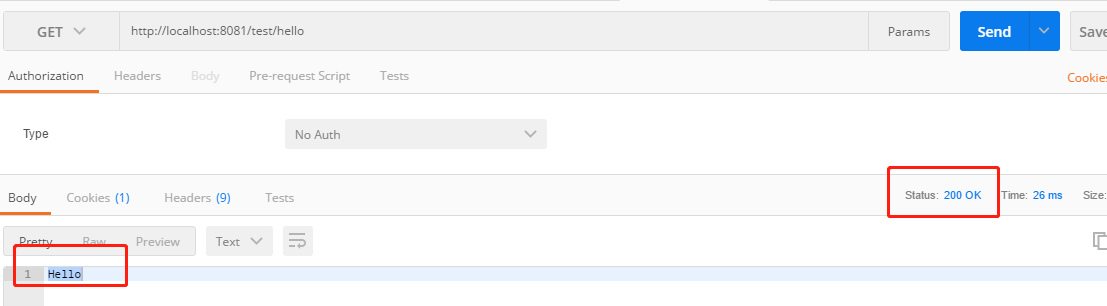
1. 直接访问 http://localhost:8081/test/hello ,无需授权,所以正常响应,输出hello字符串。
2. 访问 http://localhost:8081/test/meet
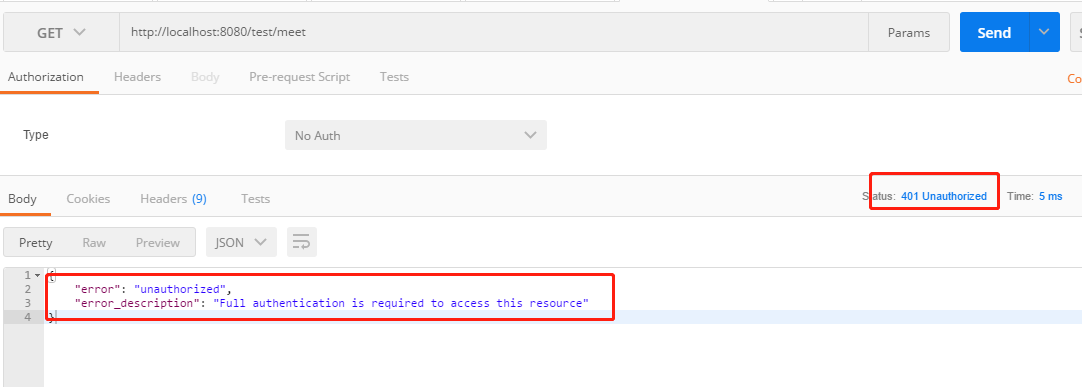
可以看到正如我们预期一样,返回了401错误以及错误信息,下面我们来获取access_token。
3. Spring Security OAuth2默认提供的四个URL:
/oauth/authorize : 授权AuthorizationEndpoint
/oauth/token : 令牌TokenEndpoint
/oauth/check_token : 令牌校验CheckTokenEndpoint
/oauth/confirm_access : 授权页面WhitelabelApprovalEndpoint
/oauth/error : 错误页面WhitelabelErrorEndpoint
在获取token之前需要在数据库表oauth_client_details添加对应的数据 ,见上方的初始化数据,初始化了一条客户端配置信息。
4.获得令牌,POST请求 http://localhost:8080/oauth/token?grant_type=password&username=project_admin&password=user
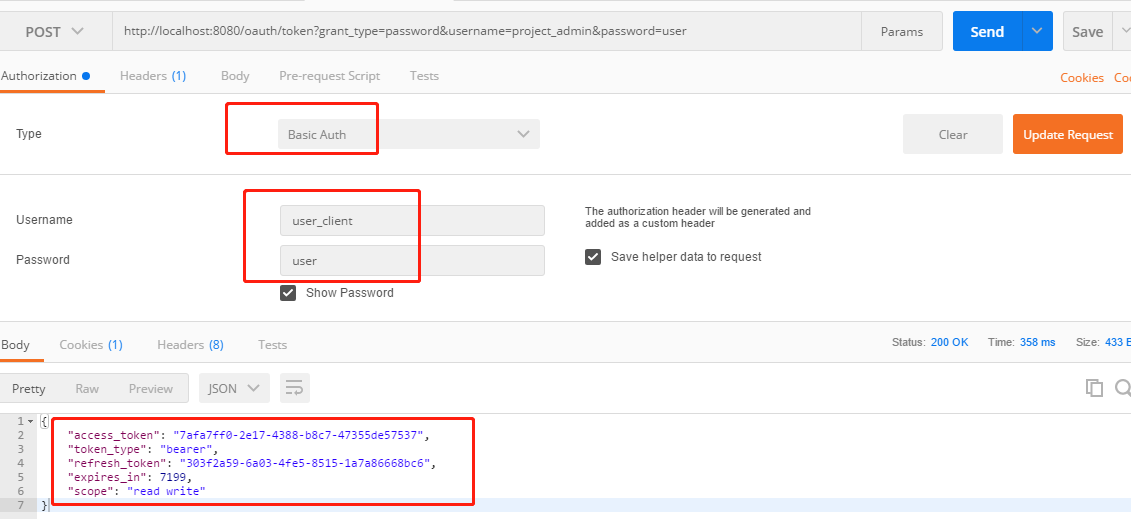
可以看到我们访问的地址,grant_type使用到了password模式,username和password即credentials表中的name和password字段值。
获取access_token需要响应头中添加客户端的授权信息,通过Postman工具的头授权信息即可输出对应的值就可以完成Basic Auth的加密串生成,clientid、secret的值存执表oauth_client_details中对应字段。
成功访问后oauth2给我们返回了几个参数:
access_token:本地访问获取到的access_token,会自动写入到数据库中。
token_type:获取到的access_token的授权方式
refersh_token:刷新token时所用到的授权
tokenexpires_in:有效期(从获取开始计时,值秒后过期)
scope:客户端的接口操作权限(read:读,write:写)
3.带上授权服务器返回的access_token发访问 http://localhost:8081/test/meet?access_token=7afa7ff0-2e17-4388-b8c7-47355de57537
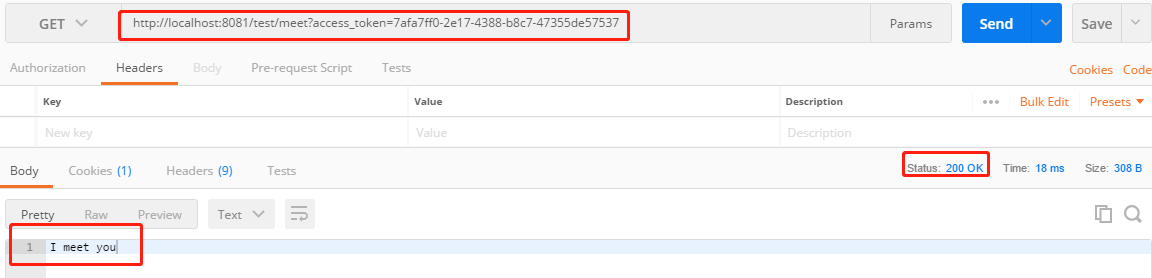
成功输出。
5. 访问http://localhost:8081/test/welcome?access_token=7afa7ff0-2e17-4388-b8c7-47355de57537

成功打印出了用户的账号。
6. 访问http://localhost:8081/test/project?access_token=7afa7ff0-2e17-4388-b8c7-47355de57537
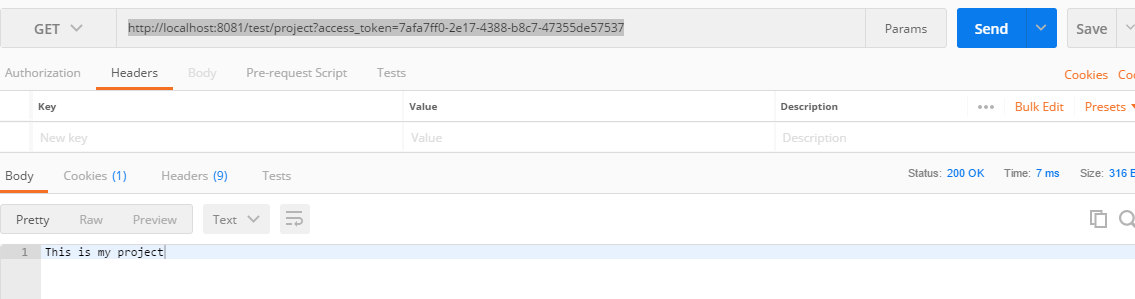
成功输出。
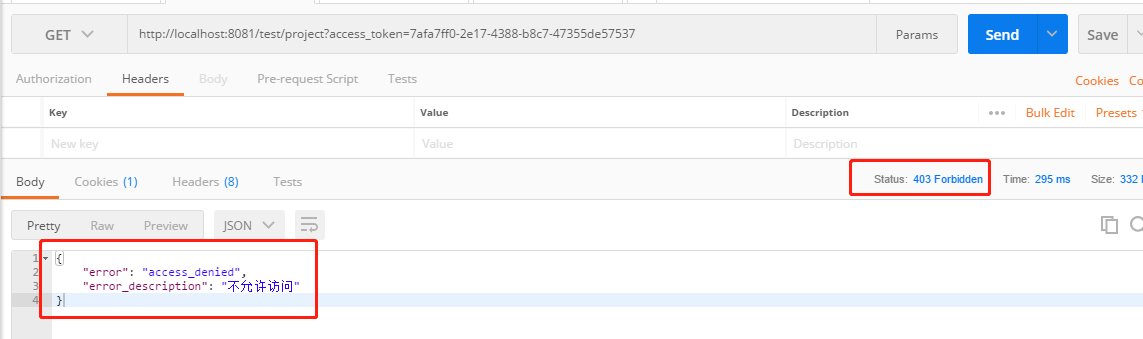
从代码上到,project方法使用了PreAuthorize注解,要求用户具有ROLE_PROJECT_ADMIN角色才能访问,如果使用一个不具有ROLE_PROJECT_ADMIN角色的账号的access_token访问,将出现下列403提示access_denied:
7. 访问 http://localhost:8081/logout?access_token=7afa7ff0-2e17-4388-b8c7-47355de57537 ,token将被从数据库中删除
再使用该token将提示invalid_token:

(八)工程下载


 2421
2421


 被折叠的 条评论
为什么被折叠?
被折叠的 条评论
为什么被折叠?
 到【灌水乐园】发言


