


Arthas是Alibaba开源的Java诊断工具,当你遇到以下类似问题而束手无策时,Arthas可以帮助你解决:
- 这个类从哪个 jar 包加载的?为什么会报各种类相关的 Exception?
- 我改的代码为什么没有执行到?难道是我没 commit?分支搞错了?
- 遇到问题无法在线上 debug,难道只能通过加日志再重新发布吗?
- 线上遇到某个用户的数据处理有问题,但线上同样无法 debug,线下无法重现!
- 是否有一个全局视角来查看系统的运行状况?
- 有什么办法可以监控到JVM的实时运行状态?
- 怎么快速定位应用的热点,生成火焰图?
Arthas提供了很多实用的诊断命令,下面我结合我实际的工作总结一些比较常用的命令,善用这些命令能大大提高我们排查问题的效率。
1.直接通过命令调用任意被Spring管理的bean的任意方法
一般我们的应用都会暴露一个静态的ApplicationContext对象供访问,如下:
@Component
public class SpringUtils implements ApplicationContextAware {

    private static ApplicationContext applicationContext;

    @Override
    public void setApplicationContext(ApplicationContext applicationContext) throws BeansException {
        SpringUtils.applicationContext = applicationContext;
    }

    public static ApplicationContext getContext() {
        return applicationContext;
    }

    public static <T> T getBean(Class<T> clazz) {
        return applicationContext.getBean(clazz);
    }

    public static <T> T getBean(String name, Class<T> clazz) {
        return applicationContext.getBean(name, clazz);
    }

}
假设想触发这个类的这个方法的调用:
@Service
public class IExamServiceImpl implements IExamService {
    @Autowired
    private ManualMicrowebsiteMapper microwebsiteMapper;
    @Autowired
    private MicrowebsiteExamMapper examMapper;

    @Override
    public List<GetExamListResVo> getExamList(GetExamListReqVo reqVo, UserDetails userDetails) throws IOException {
        // ......
        return resVos;
    }
}
那么就可以这样用这个命令:
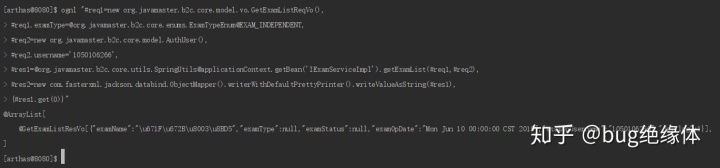
ognl "#req1=new org.javamaster.b2c.core.model.vo.GetExamListReqVo(),
#req1.examType=@org.javamaster.b2c.core.enums.ExamTypeEnum@EXAM_INDEPENDENT,
#req2=new org.javamaster.b2c.core.model.AuthUser(),
#req2.username='1050106266',
#res1=@org.javamaster.b2c.core.utils.SpringUtils@applicationContext.getBean('IExamServiceImpl').getExamList(#req1,#req2),
#res2=new com.fasterxml.jackson.databind.ObjectMapper().writerWithDefaultPrettyPrinter().writeValueAsString(#res1),
{#res1.get(0)}"
可以看到方法的返回结果:
有同学可能会说,要是应用没有暴露ApplicationContext怎么办,那也有办法,如果应用引入了dubbo,那么可以这样拿到ApplicationContext:
ognl "#context=@com.alibaba.dubbo.config.spring.extension.SpringExtensionFactory@contexts.iterator.next,
{#context}"
如果也没引入dubbo,那么可以这样:
tt -t -n 1 org.springframework.web.servlet.mvc.method.annotation.RequestMappingHandlerAdapter invokeHandlerMethod

# 拿到ApplicationContext
tt -i 1000 -w "target.getApplicationContext()"
针对类方法的:
# 观察方法调用前入参
watch org.javamaster.b2c.core.service.impl.IExamServiceImpl getExamList "{params}" -x 3 -b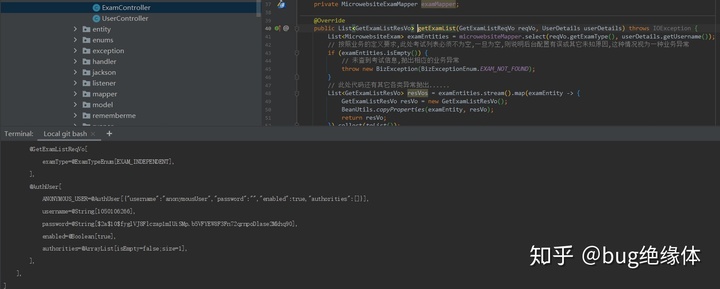
# 观察方法调用后返回值
watch org.javamaster.b2c.core.service.impl.IExamServiceImpl getExamList "{returnObj}" -x 2 -s
# 同时观察方法调用前后的入参和返回值
watch org.javamaster.b2c.core.service.impl.IExamServiceImpl getExamList "{params,returnObj}" -x 2 -b -s
# 观察方法调用前对象的属性值
watch org.javamaster.b2c.core.service.impl.IExamServiceImpl getExamList "{target}" -x 2 -b
# 输出当前方法的调用堆栈
stack org.javamaster.b2c.core.service.impl.IExamServiceImpl getExamList
# 按条件过滤
stack org.javamaster.b2c.core.service.impl.IExamServiceImpl getExamList "params[1].username.equals('1050106266')"

# 方法执行堆栈耗时
trace -E org.javamaster.b2c.core.controller.ExamController|org.javamaster.b2c.core.service.impl.IExamServiceImpl getExamList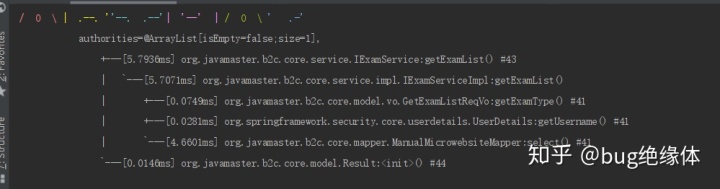
当需要做性能优化时就可以用该命令查找耗时的地方。
其他更全面的教程可查看官方文档:
Arthas 用户文档 - Arthas 3.4.4 文档arthas.aliyun.com
那么你们可能好奇了Arthas是如何实现如此强大的功能的,说到这个就不得不提JDK5开始提供的高级特性了,那就是Java Instrumentation.
- 利用java.lang.instrument(容器类) 做动态 Instrumentation(执行容器) 是 JDK5 的新特性。
- 使用 Instrumentation,开发者可以构建一个独立于应用程序的代理程序(Agent),用来监测和协助运行在 JVM 上的程序,甚至能够替换和修改某些类的定义。
- 这个功能为虚拟机监控提供了支撑。
使用 Instrumentation,开发者可以构建一个独立于应用程序的代理程序(Agent),用来监测和协助运行在 JVM 上的程序,甚至能够替换和修改某些类的定义。有了这样的功能,开发者就可以实现更为灵活的运行时虚拟机监控和 Java 类操作了,这样的特性实际上提供了一种虚拟机级别支持的 AOP 实现方式,使得开发者无需对 JDK 做任何升级和改动,就可以实现某些 AOP 的功能了。
在JDK5中,Instrument 要求在运行前利用命令行参数或者系统参数来设置代理类,在实际的运行之中,虚拟机在初始化之时(在绝大多数的 Java 类库被载入之前),instrumentation 的设置已经启动,并在虚拟机中设置了回调函数,检测特定类的加载情况,并完成实际工作。但是在实际的很多的情况下,我们没有办法在虚拟机启动之时就为其设定代理,这样实际上限制了 instrument 的应用。而 JDK6 的新特性改变了这种情况,通过 Java Tool API 中的 attach 方式,我们可以很方便地在运行过程中动态地设置加载代理类,以达到 instrumentation 的目的。
Arthas提供的强大功能都是通过Java Instrumentation实现的,为了深入了解Java Instrumentation,我这里通过仿照Arthas的watch命令实现一个同样的功能,按照Java Instrumentation的要求,我们写一个Instrumentation代理:
public class JavaAgent {
public static Instrumentation inst;
public static void premain(String agentArgs, Instrumentation inst) {
JavaAgent.inst = inst;
// ......
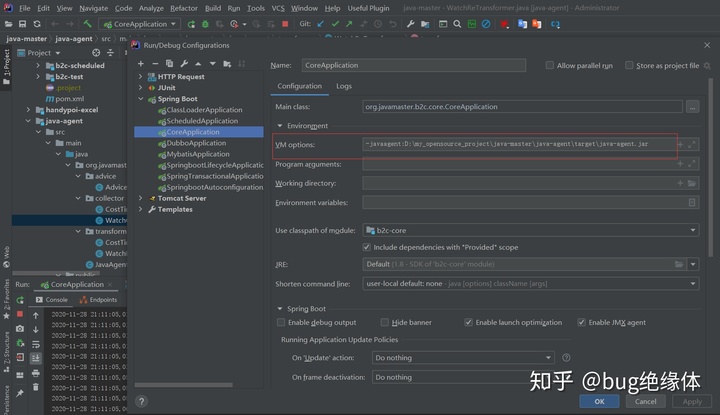
}然后在目标应用加上此JVM参数(指定编写好的Instrumentation代理的jar包所在位置):
-javaagent:D:my_opensource_projectjava-masterjava-agenttargetjava-agent.jar
当目标应用启动时,Instrumentation 代理在 main 函数运行前执行。premain方法先被执行,此方法的inst对象是一个 java.lang.instrument.Instrumentation 的实例,由 JVM 自动传入。java.lang.instrument.Instrumentation 是 instrument 包中定义的一个接口,也是这个包的核心部分,集中了其中几乎所有的功能方法,例如类定义的转换和操作等等。
为了实现监控方法出入参的功能,只需要编写一个WatchReTransformer类,此类实现了ClassFileTransformer接口,在transform方法里,我们可以拿到关于class类的所有信息,然后使用javassist修改感兴趣的类的字节码,在类的每个方法前加入监控逻辑:
public class WatchReTransformer implements ClassFileTransformer {

    private boolean watch = false;
    private String sessionId;
    private String watchClassName;
    private byte[] originalBytes;

    public void setWatch(boolean watch) {
        this.watch = watch;
    }

    public void setSessionId(String sessionId) {
        this.sessionId = sessionId;
    }

    public void setWatchClassName(String watchClassName) {
        this.watchClassName = watchClassName;
    }

    @Override
    public byte[] transform(ClassLoader loader, String className, Class<?> classBeingRedefined,
                            ProtectionDomain protectionDomain, byte[] classfileBuffer) {
        if (className == null) {
            return classfileBuffer;
        }
        String name = className.replace("/", ".");
        if (!name.equals(watchClassName)) {
            return classfileBuffer;
        }
        try {
            if (watch) {
                originalBytes = classfileBuffer;
                ClassPool cp = ClassPool.getDefault();
                cp.importPackage("org.javamaster.java.agent.collector");
                cp.importPackage("org.javamaster.java.agent.advice");
                cp.insertClassPath(new ByteArrayClassPath(name, classfileBuffer));
                CtClass cc = cp.get(name);
                cc.defrost();
                for (CtMethod declaredMethod : cc.getDeclaredMethods()) {
                    if (Modifier.toString(declaredMethod.getModifiers()).contains("static")) {
                        continue;
                    }
                    declaredMethod.insertAfter(String.format("WatchCollector.add("%s", new Advice(this.getClass().getClassLoader(), this.getClass(), this, $args, $_,new Boolean(false)));",
                            sessionId));
                    CtClass ctClass = ClassPool.getDefault().get("java.lang.Exception");
                    declaredMethod.addCatch(String.format("{WatchCollector.add("%s", new Advice(this.getClass().getClassLoader(), this.getClass(), this, $args, null,new Boolean(true)));throw $e;}",
                            sessionId), ctClass);
                }
                log.info("class:{} methods add watch aspect", className);
                return cc.toBytecode();
            } else {
                log.info("class:{} methods remove watch aspect", className);
                return originalBytes;
            }
        } catch (Exception e) {
            log.error("{},{}", className, e.getMessage());
        }
        return classfileBuffer;
    }
}

public class WatchCollector {

    private static final ConcurrentHashMap<String, WatchListener> LISTENERS = new ConcurrentHashMap<>();

    public static void add(String key, Advice advice) throws Exception {
        for (WatchListener value : LISTENERS.values()) {
            value.call(key, advice);
        }
    }

    public static void addListener(String key, WatchListener watchListener) {
        LISTENERS.put(key, watchListener);
    }

    public static void removeListener(String key) {
        LISTENERS.remove(key);
    }

    public interface WatchListener {
        void call(String key, Advice advice) throws Exception;
    }

}
然后在JavaAgent类加入如下代码(这里使用Javalin启动一个内置服务,这样就可以通过websocket来访问):
public class JavaAgent {

    public static Instrumentation inst;

    public static void premain(String agentArgs, Instrumentation inst) {
        JavaAgent.inst = inst;
        inst.addTransformer(new CostTimeTransformer());

        Javalin app = Javalin.create(
                config -> {
                    config.defaultContentType = "application/json";
                    config.autogenerateEtags = true;
                    config.addStaticFiles("/public");
                    config.asyncRequestTimeout = 10_000L;
                    config.enforceSsl = false;
                }
        ).start(7000);

        app.ws("/websocket/watchConsumer", ws -> {
            WatchReTransformer watchReTransformer = new WatchReTransformer();
            String className = "org.javamaster.b2c.core.service.impl.IExamServiceImpl";
            ws.onConnect(ctx -> {
                log.info("websocket {} connected", ctx.getSessionId());
                watchReTransformer.setWatch(true);
                watchReTransformer.setSessionId(ctx.getSessionId());
                watchReTransformer.setWatchClassName(className);
                inst.addTransformer(watchReTransformer, true);
                inst.retransformClasses(Class.forName(className));
                inst.removeTransformer(watchReTransformer);
                WatchCollector.addListener(className, (key, advice) -> {
                    if (!key.equals(ctx.getSessionId())) {
                        return;
                    }

                    OgnlContext context = new OgnlContext();
                    context.setRoot(advice);

                    Object reqExpression = Ognl.parseExpression("{params[0].toString(),params[1].toString()}");
                    Object reqValue = Ognl.getValue(reqExpression, context, context.getRoot());

                    Object resExpression = Ognl.parseExpression("{returnObj.{#this.toString()}}");
                    Object resValue = Ognl.getValue(resExpression, context, context.getRoot());

                    Map<Object, Object> map = new HashMap<>(6, 1);
                    map.put("params", reqValue);
                    map.put("returnObj", resValue);
                    map.put("clazz", advice.getClazz());
                    map.put("classLoader", advice.getLoader().getClass().getName());
                    map.put("target", advice.getTarget().toString());
                    map.put("isThrow", advice.getThrow());
                    ctx.send(JSONObject.toJSONString(map, true));
                });
            });
    }
}
还有一个简单的HTML页面用来展示监控的方法出入参结果:
<!DOCTYPE html>
<html lang="en">
<head>
    <meta charset="UTF-8">
    <title>watch</title>
</head>
<body>
<h1>模拟arthas watch命令</h1>
<ul id="content"></ul>
</body>
<script>
    var count = 1;
    var socket = new WebSocket("ws://localhost:7000/websocket/watchConsumer");
    socket.onmessage = function (event) {
        var jsonStr = event.data;
        console.log(jsonStr);
        var json = JSON.parse(jsonStr);
        var ul = document.getElementById("content");
        ul.innerHTML = "";

        var li = document.createElement("li");
        li.innerHTML = new Date().toLocaleString() + ":第" + count++ + "次调用";
        ul.appendChild(li);

        var keys = Object.keys(json);
        for (var i = 0; i < keys.length; i++) {
            li = document.createElement("li");
            li.innerHTML = keys[i] + ":" + json[keys[i]];
            ul.appendChild(li);
        }
    };
</script>
</html>
接下来我们启动目标应用b2c-core,使用postman等调用下监控中的类的方法,然后打开watch页面,结果如下:

可以看到,关于方法执行的信息都展示出来了。
源码github地址:
https://github.com/jufeng98/java-mastergithub.com


 991
991


 被折叠的 条评论
为什么被折叠?
被折叠的 条评论
为什么被折叠?
 到【灌水乐园】发言


