


1. 项目概述
本项目旨在开发一套先进的智能工厂设备监控系统,集成嵌入式技术、工业通信协议和人机界面等多项技术,实现对工厂设备的全方位实时监控、高精度数据采集和智能化分析。该系统将显著提升工厂设备的运行效率,大幅降低维护成本,并为管理层决策提供可靠的数据支持。
主要功能包括:
- 实时监控多种工业设备的运行状态
- 高精度采集和智能处理设备运行数据
- 通过标准工业协议与各类设备进行可靠通信
- 提供直观、友好的人机交互界面
- 智能异常检测、报警和处理机制
2. 系统设计
2.1 硬件设计
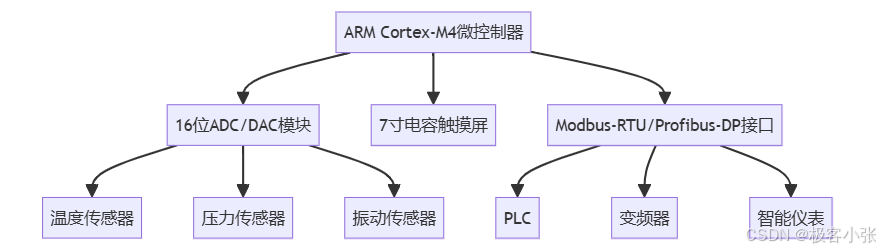
硬件系统主要包括以下组件:
- ARM Cortex-M4微控制器:选用STM32F407VGT6,主频168MHz,1MB Flash,192KB RAM,作为系统的核心处理单元。
- 16位ADC/DAC模块:利用STM32内置的12位ADC,外接16位ADC扩展芯片AD7606,实现高精度数据采集。
- 7寸电容触摸屏:分辨率800x480,提供清晰直观的人机交互界面。
- Modbus-RTU/Profibus-DP接口:集成MAX485芯片实现Modbus-RTU通信,使用Profibus-DP控制器芯片VPC3+C实现Profibus-DP通信。
- 传感器系统:包括PT100温度传感器、压力变送器和三轴加速度传感器,用于全面采集设备运行数据。
2.2 软件设计

编辑
软件系统主要包括以下模块:
- 数据采集模块:负责配置和控制ADC,实现高速数据采集,包括传感器数据的预处理和缓存。支持多通道并行采集,采样率可达1MSPS。
- 通信模块:实现Modbus-RTU和Profibus-DP协议,与各种工业设备进行数据交换。支持多设备并发通信,确保实时性和可靠性。
- 人机界面模块:基于Qt/C++开发,使用QML实现流畅的触摸屏交互和数据可视化。提供实时数据展示、历史趋势查询、报警管理等功能。
- 数据处理模块:实现数字滤波、FFT频谱分析、异常检测等算法。使用卡尔曼滤波器进行数据平滑,快速傅里叶变换进行频域分析,基于机器学习的异常检测算法实现设备故障预警。
- 系统管理模块:负责系统配置、用户权限管理、日志记录等功能。支持远程配置和固件升级。
- 数据存储模块:使用轻量级数据库SQLite存储历史数据和配置信息,支持数据导出和备份恢复。
- 网络通信模块:实现与上位机或云平台的数据交互,支持MQTT协议,实现远程监控和数据上报。
3. 代码实现
3.1 数据采集模块
说明:
ADC_Init()函数初始化ADC和DMA。它配置GPIO引脚为模拟输入,设置ADC参数(如时钟、分辨率、扫描模式等),并配置DMA以自动传输ADC转换结果。ADC_StartConversion()函数启动ADC转换,使用DMA模式连续采集数据。ADC_GetData()函数返回最新的ADC数据,包括原始数字值和转换后的电压值。
3.2 通信模块
说明:
Modbus_Init()函数初始化UART2用于Modbus-RTU通信,并启动接收中断。Modbus_CRC16()函数计算Modbus帧的CRC校验码。Modbus_SendFrame()函数发送Modbus帧,包括添加CRC校验码。Modbus_ReceiveFrame()函数处理接收到的Modbus帧,验证CRC校验码并解析帧内容。HAL_UART_RxCpltCallback()函数是UART接收中断回调,用于连续接收Modbus帧数据。
3.3 人机界面模块
由于人机界面模块使用Qt/QML开发,这里提供一个简化的QML示例:
说明:
- 这个QML文件定义了一个简单的用户界面,包含两个图表(用于显示温度和压力趋势)和一个报警列表。
- 实际应用中,数据会通过C++后端与QML前端进行交互,动态更新图表和报警列表。
3.4 数据处理模块
说明:
applyKalmanFilter()函数实现了一维卡尔曼滤波器,用于平滑传感器数据。它接受原始数据、过程噪声和测量噪声作为输入,返回滤波后的数据。卡尔曼滤波器通过预测和更新两个步骤,有效地减少了数据中的噪声。performFFT()函数实现了快速傅里叶变换(FFT),用于将时域信号转换为频域。这对于分析设备振动等周期性信号非常有用。该函数使用了递归的 Cooley-Tukey FFT 算法。fft()是一个私有辅助函数,实现了实际的 FFT 算法。它使用分治法递归地计算 FFT。detectAnomaly()函数实现了一个简单的异常检测算法。它计算数据的均值和标准差,然后检查是否有数据点偏离均值超过指定的阈值(以标准差为单位)。如果发现异常数据点,函数返回 true。
这个数据处理模块提供了基本的信号处理和异常检测功能。在实际应用中,您可能需要根据具体需求进行调整和扩展。例如,可以添加更复杂的异常检测算法,如基于机器学习的方法,或者实现更多的信号处理功能,如数字滤波器等。
3.5 系统管理模块
说明:
initialize()函数用于初始化系统组件,可以在这里添加各个模块的初始化代码。loadConfiguration()和saveConfiguration()函数分别用于加载和保存系统配置。在实际应用中,您需要实现配置文件的解析和生成逻辑。updateFirmware()函数用于更新系统固件。在实际应用中,您需要实现固件验证、写入和重启等逻辑。logEvent()函数用于记录系统事件。它将事件信息与时间戳一起存储在内存中,并限制了最大日志条目数量。getLogEntries()函数允许获取最近的日志条目,方便查看系统状态和故障诊断。
3.6 数据存储模块
为了实现数据的持久化存储,我们使用SQLite数据库。以下是一个简化的数据存储模块实现:
说明:
retrieveSensorData()函数从数据库中检索指定时间范围内特定传感器的数据。它同样使用预处理语句,并返回一个包含查询结果的向量。backupDatabase()函数创建数据库的备份副本。它使用SQLite的内置备份API来确保数据的一致性。
这个数据存储模块提供了基本的数据持久化功能,包括数据的存储、检索和备份。在实际应用中,您可能需要根据具体需求进行优化和扩展,例如:
- 添加索引以提高查询性能
- 实现数据压缩或归档功能以节省存储空间
- 添加数据完整性检查和错误恢复机制
- 实现数据加密以提高安全性
3.7 网络通信模块
为了实现与上位机或云平台的数据交互,我们可以使用MQTT协议。以下是一个简化的网络通信模块实现,使用Paho MQTT C++客户端库:
这个网络通信模块提供了基本的MQTT客户端功能,包括连接、断开、发布和订阅。在实际应用中,您需要根据具体需求进行扩展,例如:
- 实现消息回调处理
- 添加重连机制
- 实现 QoS 级别的控制
- 添加 SSL/TLS 支持以增强安全性
- 实现消息持久化,以处理网络中断情况
- 添加消息过滤和优先级处理
4. 项目总结
本智能工厂设备监控系统项目整合了多种先进技术,包括嵌入式系统、工业通信协议、数据采集与处理、人机界面设计、数据存储和网络通信等。通过这些模块的协同工作,系统能够实现对工厂设备的全面监控、数据分析和远程管理。
主要特点和优势:
- 高性能数据采集:利用 ARM Cortex-M4 微控制器和高精度 ADC,实现快速、准确的数据采集。
- 可靠的工业通信:支持 Modbus-RTU 和 Profibus-DP 协议,确保与各种工业设备的兼容性。
- 智能数据处理:应用卡尔曼滤波、FFT 分析和异常检测算法,提供深入的数据洞察。
- 直观的人机界面:基于 Qt/QML 的触摸屏界面,提供友好的用户体验。
- 灵活的数据存储:使用 SQLite 数据库,支持本地数据存储和查询。
- 远程监控能力:通过 MQTT 协议实现与云平台的数据交互,支持远程监控和控制。
5. 参考文献
- ARM. (2021). Cortex-M4 Processor. Cortex-M4
- Modbus Organization. (2021). Modbus Application Protocol Specification V1.1b3. http://www.modbus.org/docs/Modbus_Application_Protocol_V1_1b3.pdf
- The Qt Company. (2021). Qt Documentation. Qt Documentation | Home
- SQLite. (2021). SQLite Documentation. SQLite Documentation
- Eclipse Foundation. (2021). Paho MQTT C++ Client Library. Eclipse Paho | The Eclipse Foundation


 1万+
1万+


 被折叠的 条评论
为什么被折叠?
被折叠的 条评论
为什么被折叠?
 到【灌水乐园】发言


