构建C++语言VSCode开发环境

构建C++语言开发环境

系统环境

系统:window11

开发工具:Visual Studio Code

维护:vcpkg

工程:CMake工程

构建步骤

  1. 安装Visual Studio Code:

    访问Visual Studio Code官网(https://code.visualstudio.com/)并下载安装程序。运行安装程序并按照提示完成安装。

在这里插入图片描述

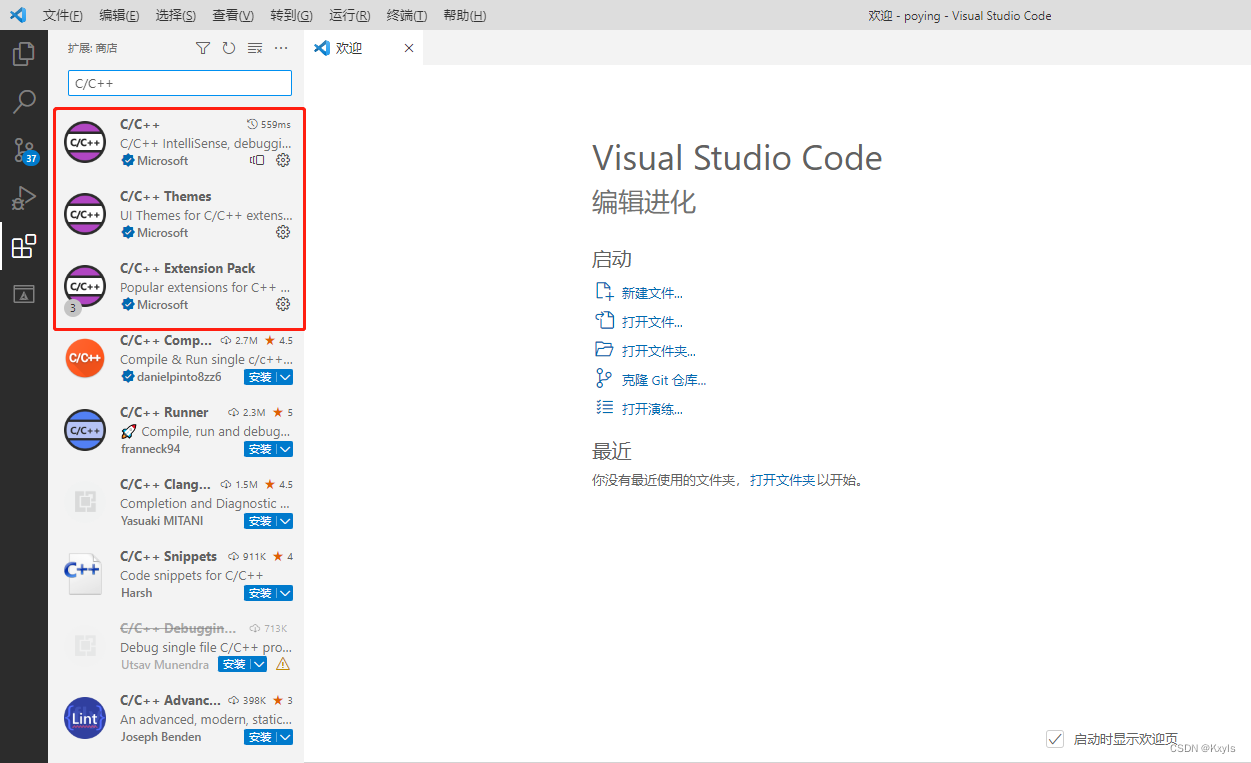
  1. 安装必要的Visual Studio Code扩展:

    打开Visual Studio Code,依次点击左侧边栏的Extensions图标,在搜索框中输入以下扩展名称,并点击安装:

    • C/C++ (by Microsoft)
    • CMake (by Microsoft)
    • CMake Tools (by Microsoft)

在这里插入图片描述

  1. 安装C++编译器(例如MSVC或MinGW):

    对于MSVC,您需要安装Visual Studio 2019或更高版本。在安装过程中,请确保选择"Desktop development with C++"工作负载。下载地址:https://visualstudio.microsoft.com/downloads/

在这里插入图片描述

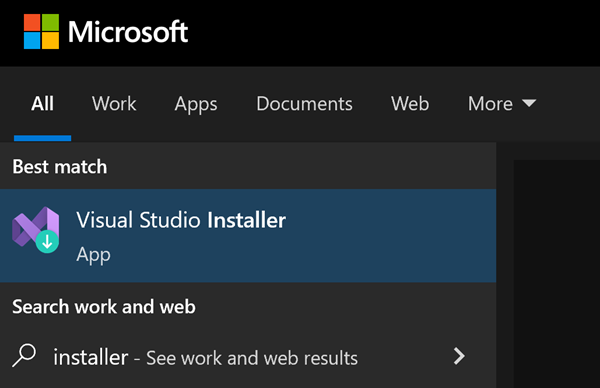
如果已经安装可以用以下方法查看工作负载的安装情况:

  • 在 Windows 的“开始”菜单中,可以搜索“安装程序”,然后从结果中选择“Visual Studio 安装程序”。

    显示 Visual Studio 安装程序的“开始”菜单搜索结果的屏幕截图。

  • 运行 Visual Studio 安装程序可执行文件,该可执行文件位于以下路径:C:\Program Files (x86)\Microsoft Visual Studio\Installer\vs_installer.exe

  • 如果你打开了 Visual Studio,请选择“工具”>“获取工具和功能…”,这会打开 Visual Studio 安装程序。

    显示 Visual Studio 2022 工具菜单的屏幕截图。

对于MinGW,您可以从其官方网站(https://www.mingw-w64.org/)下载安装程序。安装过程中,选择合适的架构和版本。

  1. 安装CMake:

    访问CMake官网(https://cmake.org/download/)并下载Windows安装程序。运行安装程序,按照提示完成安装。在安装过程中,请确保勾选"Add CMake to the system PATH for all users"或"Add CMake to the system PATH for the current user"。

    或者手动加载环境变量:

在这里插入图片描述

  1. 安装vcpkg:

    打开命令提示符,然后克隆vcpkg仓库并构建vcpkg:

    git clone https://github.com/microsoft/vcpkg.git
    cd vcpkg
    .\bootstrap-vcpkg.bat
    

    然后,将vcpkg添加到系统PATH中:

    setx PATH "%PATH%;C:\path\to\vcpkg"
    

    请将C:\path\to\vcpkg替换为实际的vcpkg目录。

  2. 使用vcpkg安装必要的库:

    使用vcpkg命令安装所需库。例如,要安装boost,您可以运行:

    vcpkg install boost
    

    如果需要为不同的平台或编译器安装库,可以使用--triplet选项。例如,要为x64平台安装库,运行:

    vcpkg install boost --triplet x64-windows
    
  3. 配置Visual Studio Code的settings.json文件:

    在项目的.vscode文件夹中创建或修改一个名为settings.json的文件。如果您还没有这个文件夹,请在项目根目录中创建它。然后,在settings.json文件中,添加以下内容:

    {
      "cmake.configureSettings": {
        "CMAKE_TOOLCHAIN_FILE": "C:/path/to/vcpkg/scripts/buildsystems/vcpkg.cmake"
      }
    }
    

    请将C:/path/to/vcpkg替换为实际的vcpkg目录。

    1. 创建或修改项目的CMakeLists.txt文件:

      在项目根目录中创建或修改一个名为CMakeLists.txt的文件。添加必要的CMake命令,例如project()find_package()以及add_executable()等,以及库的链接设置。

    2. 使用CMake Tools配置和构建项目:

      在Visual Studio Code中,点击左侧边栏的CMake图标。点击“Configure”按钮,选择一个构建目录(例如build文件夹)。CMake Tools将自动运行CMake,并使用先前配置的settings.json文件中的设置。

      构建完成后,点击“Build”按钮来编译项目。如果一切顺利,您将在构建目录下找到可执行文件。

    3. 运行和调试项目:

    要运行和调试项目,请在Visual Studio Code的Run and Debug界面中设置启动配置。在.vscode文件夹中创建一个名为launch.json的文件,并添加适当的调试配置,例如:

    {
      "version": "0.2.0",
      "configurations": [
        {
          "name": "C++ Launch",
          "type": "cppvsdbg",
          "request": "launch",
          "program": "${workspaceFolder}/build/your_executable_name.exe",
          "args": [],
          "stopAtEntry": false,
          "cwd": "${workspaceFolder}",
          "environment": [],
          "externalConsole": false,
          "preLaunchTask": "build"
        }
      ]
    }
    

    请将your_executable_name.exe替换为实际的可执行文件名。保存launch.json文件后,返回Run and Debug界面,选择刚刚创建的配置,并点击“Run”或“Debug”按钮。

    按照以上步骤,您应该已经成功地在Windows 11上使用Visual Studio Code搭建了一个C++项目,系统开发环境使用vcpkg进行维护,并采用CMake工程。祝您开发顺利!

  • 0
    点赞
  • 0
    收藏
    觉得还不错? 一键收藏
  • 0
    评论
This book helps readers build successful games with the Unity game development platform. You will use the powerful C# language, Unity's intuitive workflow tools, and a state-of-the-art rendering engine to build and deploy mobile, desktop, and console games. Unity's single codebase approach minimizes inefficient switching among development tools and concentrates your attention on making great interactive experiences. Unity in Action teaches you how to write and deploy games. You'll master the Unity toolset from the ground up, adding the skills you need to go from application coder to game developer. Each sample project illuminates specific Unity features and game development strategies. As you read and practice, you'll build up a well-rounded skill set for creating graphically driven 2D and 3D game applications. You'll need to know how to program, in C# or a similar OO language. No previous Unity experience or game development knowledge is assumed. Table of Contents Part 1 First steps Chapter 1 Getting to know Unity Chapter 2 Building a demo that puts you in 3D space Chapter 3 Adding enemies and projectiles to the 3D game Chapter 4 Developing graphics for your game Part 2 Getting comfortable Chapter 5 Building a Memory game using Unity’s new 2D functionality Chapter 6 Putting a 2D GUI in a 3D game Chapter 7 Creating a third-person 3D game: player movement and animation Chapter 8 Adding interactive devices and items within the game Part 3 Strong finish Chapter 9 Connecting your game to the internet Chapter 10 Playing audio: sound effects and music Chapter 11 Putting the parts together into a complete game Chapter 12 Deploying your game to players’ devices Appendix A Scene navigation and keyboard shortcuts Appendix B External tools used alongside Unity Appendix C Modeling a bench in Blender Appendix D Online learning resources
你想在VSCode中使用C++和Qt开发环境是吗?以下是一些步骤可以帮助你设置这个环境: 1. 首先,你需要安装Visual Studio Code(VSCode)。你可以从官方网站下载并按照安装向导进行安装。 2. 安装C/C++扩展。在VSCode中,点击左侧的扩展图标(四个方块组成的正方形),搜索并安装"ms-vscode.cpptools"扩展,这将提供C/C++开发支持。 3. 安装Qt。你可以从Qt官方网站下载Qt的安装包,并按照安装向导进行安装。确保选择与你的操作系统和VSCode兼容的版本。 4. 配置编译器路径。打开VSCode,点击菜单栏中的“文件”(File),选择“首选项”(Preferences),再选择“设置”(Settings)。在设置面板中搜索“C++”,找到“C++: Intelli Sense Override”并点击“编辑设置”。在弹出的编辑器中,添加如下代码: ``` "configurations": [ { "name": "Win32", "includePath": [ "${workspaceFolder}/**", "C:/Qt/5.15.2/mingw81_32/include" ], "defines": [ "_DEBUG", "UNICODE", "__GNUC__" ], "compilerPath": "C:/Qt/Tools/mingw810_32/bin/gcc.exe", "cStandard": "c11", "cppStandard": "c++17", "intelliSenseMode": "gcc-x64" } ] ``` 请根据你的Qt安装路径和编译器路径进行相应的更改。 5. 创建一个新的C++项目。在VSCode中,点击菜单栏的“文件”(File),选择“新建文件夹”(New Folder),并为你的项目选择合适的文件夹。然后,点击菜单栏的“文件”(File),选择“打开文件夹”(Open Folder),并在弹出的对话框中选择你刚创建的文件夹。 6. 创建一个新的C++源文件。在左侧的资源管理器中,右键点击你的项目文件夹,选择“新建文件”(New File),并为你的源文件选择合适的名称,例如"main.cpp"。 7. 编写C++代码。在你创建的源文件中,编写你的C++代码。 8. 构建和运行程序。按下快捷键"Ctrl + Shift + B",选择一个构建任务(如"Build"或"Run"),然后按下回车键。如果一切正常,你的程序将会构建并在终端窗口中运行。 希望这些步骤可以帮助你在VSCode中设置C++和Qt开发环境!如果有任何问题,请随时向我提问。

“相关推荐”对你有帮助么?

  • 非常没帮助
  • 没帮助
  • 一般
  • 有帮助
  • 非常有帮助
提交
评论
添加红包

请填写红包祝福语或标题

红包个数最小为10个

红包金额最低5元

当前余额3.43前往充值 >
需支付:10.00
成就一亿技术人!
领取后你会自动成为博主和红包主的粉丝 规则
hope_wisdom
发出的红包
实付
使用余额支付
点击重新获取
扫码支付
钱包余额 0

抵扣说明:

1.余额是钱包充值的虚拟货币,按照1:1的比例进行支付金额的抵扣。
2.余额无法直接购买下载,可以购买VIP、付费专栏及课程。

余额充值