


通过这篇文章,可以帮助你收获这些知识:
- 什么是依赖注入和控制反转?为什么要做依赖注入?
- Angular 中的依赖注入有哪些使用方式?
- 结合 ng-zorro 谈谈最佳实践
依赖注入是很多新入门 Angular 同学的困惑点之一,常见的问题包括但不限于:
- 这个东西怎么和我之前学习的前端开发模式不太一样?
- 这四个字我都认识,怎么连起来我就读不懂了呢?
- 唉?这个怎么是单例的?怎么有时候又不是单例的?
- ...
其实依赖注入并不是什么新鲜词汇,比如 Java 里大名鼎鼎的 Spring 就是个依赖注入框架。
在讲解 Angular 中的依赖注入之前,我们不妨先聊一聊依赖注入是什么?它要解决的问题又是什么?
一、依赖注入与控制反转
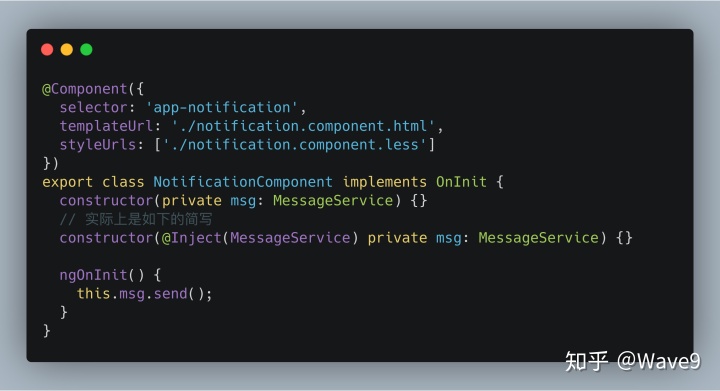
先看个例子:我们希望在通知组件(NotificationComponent)中通过消息服务(MessageService)发送一条消息。
如果不使用依赖注入的话,我们的代码大概长这样:
class NotificationComponent {
  msg: MessageService;
  constructor() {
     this.msg = new MessageService();
  }
  sendMsg(msgType: string, info: string) {
     this.msg.send(msgType, info);
  }
}
使用依赖注入时:
class NotificationComponent {
  constructor(msg: MessageService) {}  // Angular 中注入依赖的方式
  sendMsg(msgType: string, info: string) {
    this.msg.send(msgType, info);
  }
}
经过对比,可以看到使用依赖注入有两个很显然的优点:
- 代码的行数变少了
- NotificationComponent 与 MessageService 间的耦合性降低了
那么现在,我们再来谈谈依赖注入。
不过在说依赖注入之前,我们需要知道有个概念叫做 “控制反转”,简单来说它和依赖注入间的区别就是:
- 依赖注入是一种编程技巧
- 控制反转是一种设计思想
如果你对控制反转这个概念一头雾水,不用担心,请继续往下阅读。
我们把”控制反转“拆成两个部分,一部分是“控制”,一部分“反转”,那么“控制”指的是对什么的控制?”反转“又是反转了什么?
回顾第一个例子,我们在 NotificationComponent 的构造函数中引入了 MessageService 并手动实例化,在第二个例子中,我们并没有对实例化这部分做操作,或者说我们把实例化这部分流程交给了外层框架。
答案也就在这里了,在控制反转中,”控制“是指对程序流程的控制,”反转“则是将控制权从程序员的手里反转到了外层框架。
既然控制反转是一种设计思想,那么作为相应实现方式之一的依赖注入(模板模式也是种实现方式)必然也遵循此思想。
一句话来说,依赖注入就是不通过 new 这种方式来在类(NotificationComponent)的内部创建所依赖类(MessageService)的对象,而是在外部创建好需要依赖的类对象之后通过构造函数等方式注入进来就可以了。
而 Java 中的 Spring 框架就是这类帮助程序创建好依赖类的框架,或者也叫 IOC(Inversion of Control) 容器,Angular 也是为我们提供了这样一种容器,让我们轻松实现依赖注入。
说了这么多,可能你还是对依赖注入的好处感觉不深,那我们简单的通过 Angular 中依赖注入的一个小示例来体会下它的好处吧~
举个
我们的 MessageService 做了版本升级,这时我们想要将其替换为 NewMessageService,很简单,根本不需要对 NotificationComponent 做修改。
如果没有这层依赖注入的框架,就需要修改类本身,要是在大型项目里,那就相当费劲了...
二、Angular 中的依赖注入使用方式
Angular 中文文档里已经非常详细的说明了使用方式,但是阅读起来总觉得有些脱离项目,毕竟很少会有人在代码里写上 FlowerService,LeafService 这种类名...
那我们从几个问题来入手吧:
- 掌握 @Optional(),@Self(),@SkipSelf(),@Host() 修饰符的含义
- 熟悉 ClassProvider,ValueProvider,FactoryProvider 使用方法
- 掌握预定义的 token 与多提供商的巧妙使用
- 了解 ModuleInjector 与 ElementInjector 注入器层次结构
很多 Angular 新入门的开发者,可能不知道如下的常用写法其实是种简写。
修饰符
Angular 文档中帮助我们对解析修饰符做了分类:
- 如果 Angular 找不到想要的东西怎么办:
@Optional() - 到哪里开始寻找,用
@SkipSelf() - 到哪里停止寻找,用
@Host()和@Self()
我们还是通过几个示例来掌握 Angular 中常用的解析修饰符 @Optional(),@Self(),@SkipSelf(),@Host() ,并且试试组合起来的效果吧。
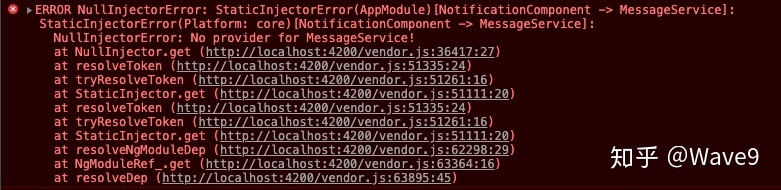
1.@Optional()
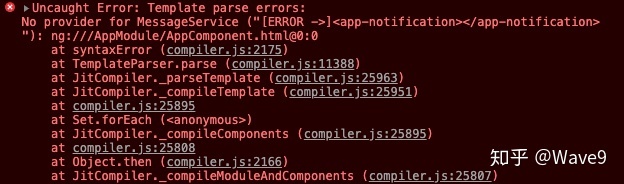
这表示该服务是可选的,有时候我们引入的服务是不一定存在的,或者说用户不一定会在提供商中配置注入器。
基本的示例:
@Injectable(
  // 注释这段代码,这样在通知组件中就无法找到 MessageService
  // { providedIn: 'root' }
)
export class MessageService {
  constructor() {}
  send() {
    console.log('msg');
  }
}
Angular 提示我们没有 MessageService 的 provider
添加 @Optional() 修饰符之后
@Component({
  selector: 'app-notification',
  templateUrl: './notification.component.html',
  styleUrls: ['./notification.component.less']
})
export class NotificationComponent implements OnInit {
  constructor(@Optional() private msg: MessageService) {}

  ngOnInit() {
    this.msg.send();
  }
}
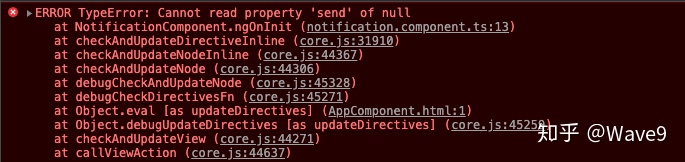
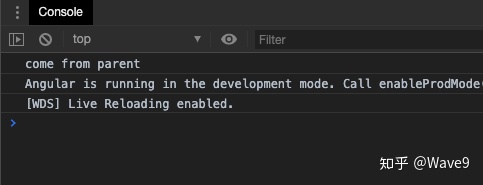
我们可以看到报错信息有了变化,Angular 将 msg 置为 null,这就是 @Optional() 的作用:
@Optional() 允许 Angular 将您注入的服务视为可选服务。这样,如果无法在运行时解析它,Angular 只会将服务解析为 null,而不会抛出错误
如果你写的业务很简单,你可能很少会用这个修饰符,但是如果你写的是组件库,你就不可避免的需要这个修饰符。例如在 ng-zorro NzAutocompleteComponent 组件中,就有对 noAnimation 的可选修饰(@Host 修饰符接下来就会提到)。
constructor(
    // ...
    @Host() @Optional() public noAnimation?: NzNoAnimationDirective
) {}
当使用 noAnimation 时都会判断是否存在
<div
  #panel
  class="ant-select-dropdown ant-select-dropdown-placement-bottomLeft"
  [class.ant-select-dropdown-hidden]="!showPanel"
  [nzNoAnimation]="noAnimation?.nzNoAnimation"
  [@.disabled]="noAnimation?.nzNoAnimation"
>
2.@Self
从字面上的意思就很好理解:
使用 @Self 让 Angular 仅查看当前组件或指令的 ElementInjector
@Component({
  selector: 'app-notification',
  templateUrl: './notification.component.html',
  styleUrls: ['./notification.component.less']
})
export class NotificationComponent implements OnInit {
  constructor(@Self() private msg: MessageService) {}

  ngOnInit() {
    this.msg.send();
  }
}
由于指明了 Angular 仅查看 Notification 组件,所以会出现如下的错误信息:
这样在组件内提供服务就不会出错了
@Component({
  selector: 'app-notification',
  templateUrl: './notification.component.html',
  styleUrls: ['./notification.component.less'],
  providers: [
    {
      provide: MessageService,
      useClass: NewMessageService
    }
  ]
})
export class NotificationComponent implements OnInit {
  constructor(@Self() private msg: MessageService) {}

  ngOnInit() {
    this.msg.send();
  }
}
然而一般我们会将 @Self 与 @Optional 一起使用,以保证不会抛出异常,ng-zorro 中也将这类写法作为一种最佳实践。例如在 nz-tab-link 指令中
@Directive({
  selector: 'a[nz-tab-link]',
  exportAs: 'nzTabLink'
})
export class NzTabLinkDirective {
  constructor(
    @Optional() @Self() public routerLink?: RouterLink,
    @Optional() @Self() public routerLinkWithHref?: RouterLinkWithHref
  ) {}
}
这样添加该指令的组件只会对自身的 routerLink 和 routerLinkWithHref 做捕获。
3.@SkipSelf
与 @Self 相反
使用 @SkipSelf(),Angular 在父 ElementInjector 中而不是当前 ElementInjector 中开始搜索服务
我们声明 ParentService 并在 container 组件中提供服务
import { Injectable } from '@angular/core';

@Injectable({
  providedIn: 'root'
})
export class ParentMessageService {
  constructor() {}

  send() {
    console.log('come from parent');
  }
}

@Component({
  selector: 'app-container',
  templateUrl: './container.component.html',
  styleUrls: ['./container.component.less'],
  providers: [
    {
      provide: MessageService,
      useClass: ParentMessageService
    }
  ]
})
export class ContainerComponent implements OnInit {
  constructor() {}

  ngOnInit() {}
}
子组件中,我们已提供了服务,但是注入时使用了 @SkipSelf() 修饰符
@Component({
  selector: 'app-notification',
  templateUrl: './notification.component.html',
  styleUrls: ['./notification.component.less'],
  providers: [
    {
      provide: MessageService,
      useClass: NewMessageService
    }
  ]
})
export class NotificationComponent implements OnInit {
  constructor(@SkipSelf() private msg: MessageService) {}

  ngOnInit() {
    this.msg.send();
  }
}
最终可以看到使用的还是父组件内的服务
4.@Host
@Host() 修饰符的效果和 @Self() 修饰符的效果很类似,但是作用域的范围,或者说 host 所明确的范围和 @Self() 并不同,
例如我们使用了 ng-content
<app-container>
  <app-notification></app-notification>
</app-container>
这时服务来源于 ContainerComponent

或者使用 directive 时也是直接拿到使用该指令的组件中的服务
<app-container appHostTest> </app-container>
在 ng-zorro 中也是大量使用 @Host() 而非 @Self(),在使用 @Host() 时最好也要与 @Optional() 搭配。
ClassProvider,ValueProvider 与 FactoryProvider
我们先来熟悉下这三个提供商,再谈谈应用。
1.替代类提供商 ClassProvider
我们常用的提供商配置
{
  // ...
  providers: [
    MessageService
  ],
  // ...
}
其实是这类提供商的简写形式
{
// ...
providers: [
{
provide: MessageService,
useClass: MessageService
}
]
// ...
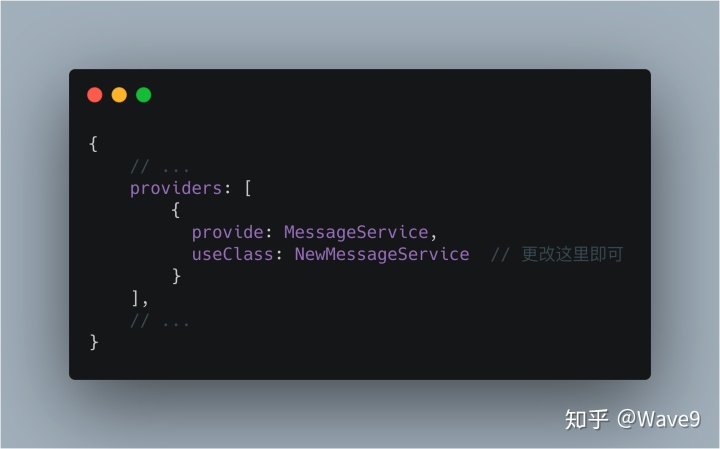
}而替代类提供商可以让不同的类提供相同的服务,例如有个信息更为丰富的 NewMessageService 就可以很方便的替换就有的 MessageService。
{
  // ...
  providers: [
    {
      provide: MessageService,
      useClass: NewMessageService
    }
  ]
  // ...
}
需要注意的是,如果你使用了下面的写法,会创建两个实例
{
  // ...
  providers: [
    NewMessageService,
    {
	provide: MessageService,
	useClass: NewMessageService
    }
  ]
  // ...
}
2.值提供商 ValueProvider
有时候不一定要从类去创建对象,直接提供一个现有的对象也可以解决问题。
const MessageServiceValue = {
  send: () => {
    console.log('send message(value provider)');
  }
};

{
  // ...
  providers: [
    {
      provide: MessageService,
      useValue: MessageServiceValue
    }
  ]
	// ...
}
需要注意的是,不要使用一个 TypeScript 中的 interface 来作为 token,因为 interface 只在设计期才会存在(打包后不会存在 interface)。
3.工厂提供商 FactoryProvider
这里的工厂就是指工厂函数,既然是函数方式创建对象,那么就拥有了在运行期动态创建的能力。例如区分是否是生产模式来创建不同的对象。
const MessageServiceFactory = () => {
  if (environment.production) {
    return new MessageService();
  } else {
    return new NewMessageService();
  }
};

{
  // ...
  providers: [
    {
      provide: MessageService,
      useFactory: MessageServiceFactory
    }
  ]
  // ...
}
预定义的 token 与多提供商(multi 参数)
这里可以理解为 Angular 应用某些操作的回调
- PLATFORM_INITIALIZER:平台初始化之后调用的回调函数
- APP_BOOTSTRAP_LISTENER:每个启动组件启动完成后的回调函数
- APP_INITIALIZER:应用初始化之前的回调函数
多提供商机制可以使用一个令牌初始化多个提供商,方法就是设置 multi 参数为 true 即可。
多提供商其实很多人都会用到,比如在设置 HTTP 拦截器时,除了使用默认拦截器之外,还希望再添加上 JWT 拦截器时,多提供商就可以很好的组织服务提供方式:
const INTERCEPTOR_PROVIDES = [
  { provide: HTTP_INTERCEPTORS, useClass: DefaultInterceptor, multi: true },
  { provide: HTTP_INTERCEPTORS, useClass: JWTInterceptor, multi: true }
];
多层级注入器 ModuleInjector 与 ElementInjector
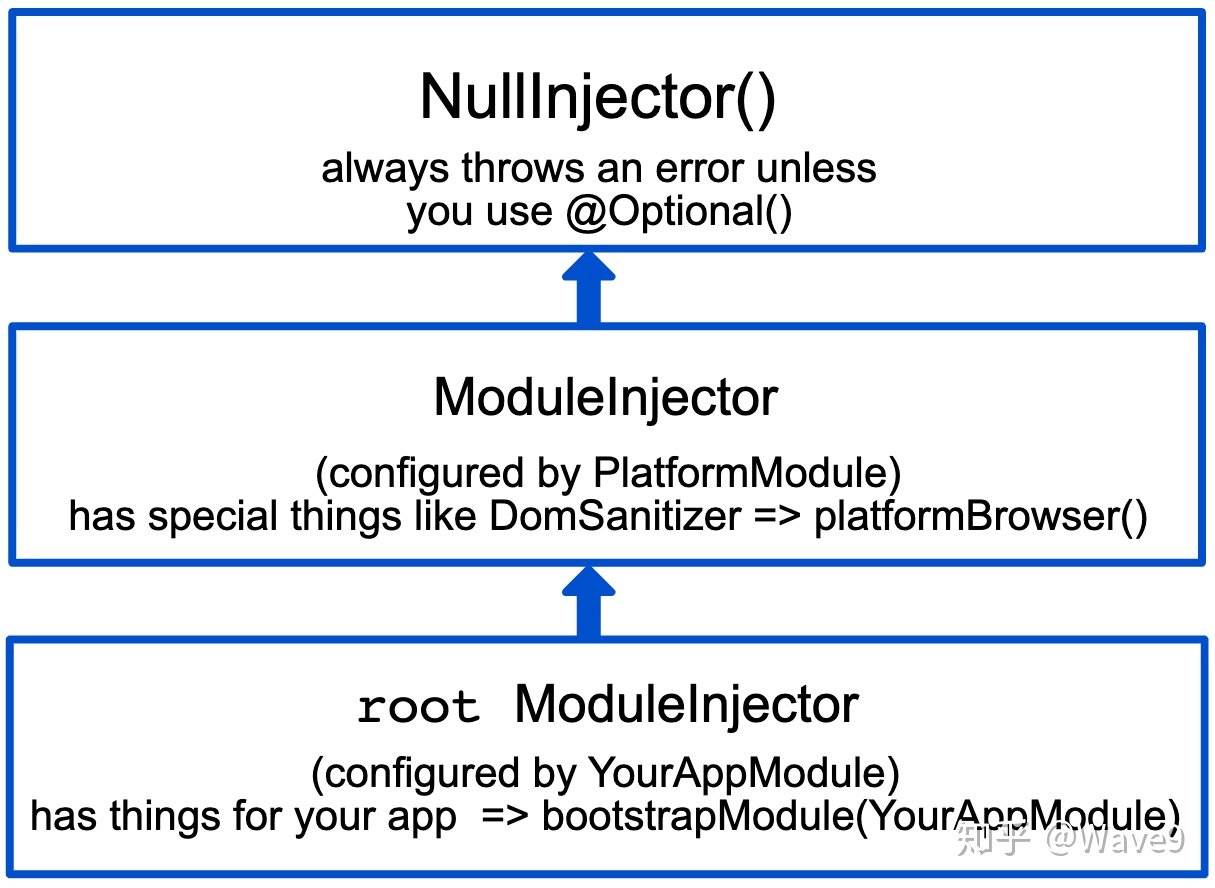
这一部分虽然在官方文档开头就详细说明了,但是我选择了放在最后一部分来介绍,一方面是因为大多数开发者对此并不陌生,另一方面是因为这部分涉及到了文档后面的一些概念,比如上图中的 @Optional() ,
ModuleInjector:通过 @NgModule() 或者 @Injectable() 配置
ElementInjector:通过 @Directive() 或 @Component() 中的 providers 属性中配置
1.ModuleInjector
这部分比较重要的是:
Injectable()的 providedIn 属性是要高于@NgModule()的 providers 数组- 当使用 Injectable() 的 providedIn 属性时,优化工具可以做 tree-shaking,比如
providedIn: 'root'
2.ElementInjector
对于 ElementInjector 来说比较重要的是:
- 如果在 NotificationComponent 中声明了 MessageService ,那么每个 NotificationComponent 中都会有一个自己的 MessageService 实例。
三、结合 ng-zorro 源码和 Angular 官方文档谈谈最佳实践
在 Angular 文档中有专门的一节内容 DI 实战,而本文的这部分内容则是通过知名开源 Angular 项目 ng-zorro 来对官方文档的实战篇做些补充,希望可以对各位有所启发。
1.使用 @Optional() 来让依赖是可选的,以及使用 @Host() 限定服务方式
这是官方推荐的 @Optional() + @Host() 的组合方式,
举个 :
ng-zorro 中关闭动画的 directive nzNoAnimation 可能会被赋予到很多包含动画效果的组件上,拿自动补全组件 NzAutocompleteComponent 来说,构造函数中就会对 noAnimation 添加 @Host() 与 @Optional() 修饰符
export class NzAutocompleteComponent {
  constructor(
    private changeDetectorRef: ChangeDetectorRef,
    private ngZone: NgZone,
    @Host() @Optional() public noAnimation?: NzNoAnimationDirective
  ) {}
}
在使用 noAnimation 时也会加上 ? 以免为 null
<div
	...
  [nzNoAnimation]="noAnimation?.nzNoAnimation"
	...
  [@.disabled]="noAnimation?.nzNoAnimation"
>
...
</div>
2.为你的 Angular 应用提供丰富的配置项
在 ng-zorro 中包含很多的配置项用于定制组件样式及行为,比如 NZ_CONFIG,我们来瞧瞧它是怎么实现和使用的吧
在 config.ts 中,我们找到 NG_CONFIG 的定义:
/**
 * User should provide an object implements this interface
 * to set global configurations.
 */
export const NZ_CONFIG = new InjectionToken<NzConfig>('nz-config');
并且在 NzConfigService 中注入 NZ_CONFIG
@Injectable({
  providedIn: 'root'
})
export class NzConfigService {
  private configUpdated$ = new Subject<keyof NzConfig>();

  /** Global config holding property. */
  private config: NzConfig;

  constructor(@Optional() @Inject(NZ_CONFIG) defaultConfig?: NzConfig) {
    this.config = defaultConfig || {};
  }

  getConfigForComponent<T extends NzConfigKey>(componentName: T): NzConfig[T] {
    return this.config[componentName];
  }

  getConfigChangeEventForComponent(componentName: NzConfigKey): Observable<void> {
    return this.configUpdated$.pipe(
      filter(n => n === componentName),
      mapTo(undefined)
    );
  }

  set<T extends NzConfigKey>(componentName: T, value: NzConfig[T]): void {
    this.config[componentName] = { ...this.config[componentName], ...value };
    this.configUpdated$.next(componentName);
  }
}
在 alert 组件中注入 NzConfigService
constructor(
  public nzConfigService: NzConfigService,
  private cdr: ChangeDetectorRef)
{
  // 组件配置发生变化时,触发视图更新
  this.nzConfigService
    .getConfigChangeEventForComponent(NZ_CONFIG_COMPONENT_NAME)
    .pipe(takeUntil(this.destroy$))
    .subscribe(() => {
      this.cdr.markForCheck();
    });
}
最后,用户想要使用时,可以通过这样来做:
import { NgZorroAntdModule, NzConfig, NZ_CONFIG } from 'ng-zorro-antd';

const ngZorroConfig: NzConfig = {
  ...
};

@NgModule({
  ...
  providers: [
    { provide: NZ_CONFIG, useValue: ngZorroConfig }
  ],
	...
})
export class AppModule {}
从而实现全局配置
上面我们用到了 InjectionToken 来生成 token,在 Angular 官方文档中,还为我们介绍了如何使用 InjectionToken 来封装浏览器内置的 API,比如 localStorage
首先将 localStorage 改为可注入的 BROWSER_STORAGE token
const BROWSER_STORAGE = new InjectionToken<Storage>('Browser Storage', {
	providedIn: 'root',
	factory: () => localStorage
})
之后声明 BrowserStorageService ,并注入 BROWSER_STORAGE
@Injectable({
  providedIn: 'root'
})
export class BrowserStorageService {
  constructor(@Inject(BROWSER_STORAGE) public storage: Storage) {}

  get(key: string) {
    this.storage.getItem(key);
  }

  set(key: string, value: string) {
    this.storage.setItem(key, value);
  }

  remove(key: string) {
    this.storage.removeItem(key);
  }

  clear() {
    this.storage.clear();
  }
}
3.使用 @Self() 和 @SkipSelf() 来修改提供商的搜索方式
@Self() 修饰符的很多作用都被 @Host() 修饰符所替代了,这里我们说一说 @SkipSelf() 在 ng-zorro 中的妙用
使用 ng-zorro 模态框组件 nz-modal 的同学应该都知道 nz-modal 可以通过调用 NzModalService 的 closeAll() 方法来关闭所有的模态框,那这在 ng-zorro 中是如何做到的呢?
我们首先看到 NzModalService 是调用了 NzModalControlService 的 closeAll()
// Closes all of the currently-open dialogs
closeAll(): void {
  this.modalControl.closeAll();
}
NzModalControlService 会去获取当前所有打开的模态框并依次关闭,这并不是通过某个全局变量来存储的,而是通过查找 injection 树来获取的
// Track singleton openModals array through over the injection tree
get openModals(): NzModalRef[] {
  return this.parentService ? this.parentService.openModals : this.rootOpenModals!;
}
来瞧瞧 NzModalControlService 的构造函数中 parentService 的注入方法:
constructor(@Optional() @SkipSelf() private parentService: NzModalControlService) {}这里就是 @SkipSelf() 的使用方式,与 @Optional() 修饰符搭配可以查找到 Injection 树上所有的注入实例。
最后
想要灵活使用依赖注入,离不开对大量业务场景的分析和对组件设计、流程设计、框架设计的思考,感兴趣的话可以尝试手动实现一个 IOC 容器,这会帮助你更好的学习和掌握依赖注入。


 407
407


 被折叠的 条评论
为什么被折叠?
被折叠的 条评论
为什么被折叠?
 到【灌水乐园】发言


