


一.mysql-proxy简介
MySQL-Proxy是处在你的MySQL数据库客户和服务端之间的程序,它还支持嵌入性脚本语言Lua。这个代理可以用来分析、监控和变换(transform)通信数据,它支持非常广泛的使用场景:
负载平衡和故障转移处理
查询分析和日志
SQL宏(SQL macros)
查询重写(query rewriting)
执行shell命令
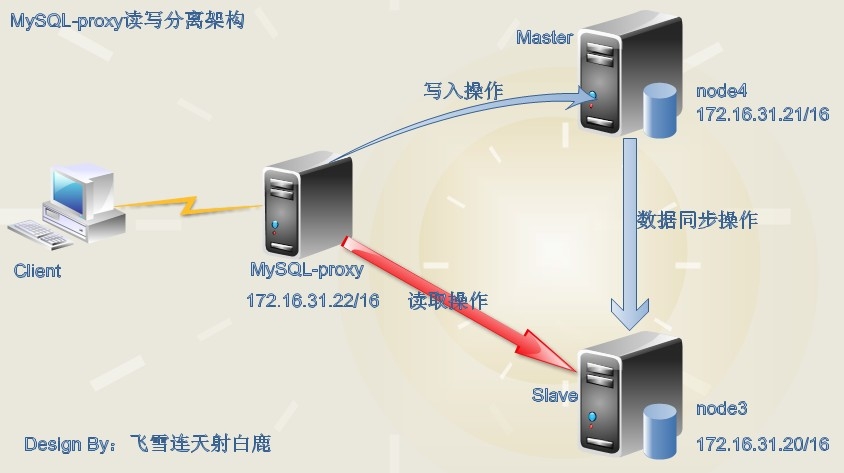
MySQL-Proxy更强大的一项功能是实现“读写分离(Read/Write Splitting)”。基本的原理是让主数据库处理事务性查询,而从数据库处理SELECT查询。数据库复制被用来把事务性查询导致的变更同步到集群中的从数据库。
简单的说,MySQL Proxy就是一个连接池,负责将前台应用的连接请求转发给后台的数据库,并且通过使用lua脚本,可以实现复杂的连接控制和过滤,从而实现读写分离和负载平衡。对于应用来说,MySQL Proxy是完全透明的,应用则只需要连接到MySQL Proxy的监听端口即可。当然,这样proxy机器可能成为单点失效,但完全可以使用多个proxy机器做为冗余,在应用服务器的连接池配置中配置到多个proxy的连接参数即可。
其实现如图所示:

二.基本环境介绍,
主数据库服务器:172.16.31.20,MariaDB已经安装
从数据库服务器:172.16.31.21,MariaDB已经安装
主从复制架构配置完毕,实现了主从复制;详细配置参考博客:
http://sohudrgon.blog.51cto.com/3088108/1608207
Mysql-proxy读写分离服务器节点:172.16.31.22,未配置;
规划架构如图:
三.mysql-proxy读写分离实现;
1.安装mysql-proxy软件
如果你有epel源,epel源收录了mysql-proxy的软件包,我们可以使用yum安装mysql-proxy,省去了编译安装的麻烦;但是EPEL源将读写分离的LUN脚本给去掉了,我们还需要从源码包中就读写分离脚本复制出来;
我这里提供mysql-proxy的下载,还提供一个读写分离的lun脚本文件:
http://down.51cto.com/data/1978347
下面就开始进行mysql-proxy的安装
查看yum源中的mysql-proxy包:[root@node5 ~]# yum list all mysql-proxy
Loaded plugins: fastestmirror, refresh-packagekit, security
base | 3.2 kB 00:00
base/primary_db | 3.3 MB 00:00
epel | 3.0 kB 00:00
epel/primary_db | 7.2 MB 00:00
extra | 2.9 kB 00:00
extra/primary_db | 1.1 MB 00:00
Available Packages
mysql-proxy.i686 0.8.5-1.el6 epel
mysql-proxy.x86_64 0.8.5-1.el6 epel
安装mysql-proxy包:[root@node5 ~]# yum install -y mysql-proxy
我们查看epel源的mysql-proxy包提供的lun脚本:[root@node5 ~]# ls /usr/share/doc/mysql-proxy-0.8.5/examples/
tutorial-basic.lua tutorial-prep-stmts.lua tutorial-states.lua
tutorial-constants.lua tutorial-query-time.lua tutorial-tokenize.lua
tutorial-inject.lua tutorial-resultset.lua tutorial-union.lua
tutorial-keepalive.lua tutorial-rewrite.lua tutorial-warnings.lua
tutorial-monitor.lua tutorial-routing.lua
tutorial-packets.lua tutorial-scramble.lua
可以发现没有rw-splitting.lua 这个读写分离脚本,我们去下载一个同版本的源码包,将其中的读写分离脚本拷贝到指定目录:[root@node5 ~]# tar xf mysql-proxy-0.8.5-linux-el6-x86-64bit.tar.gz
[root@node5 ~]# ls mysql-proxy-0.8.5-linux-el6-x86-64bit/share/doc/mysql-proxy/
active-queries.lua ro-balance.lua tutorial-resultset.lua
active-transactions.lua ro-pooling.lua tutorial-rewrite.lua
admin-sql.lua rw-splitting.lua tutorial-routing.lua
analyze-query.lua tutorial-basic.lua tutorial-scramble.lua
auditing.lua tutorial-constants.lua tutorial-states.lua
commit-obfuscator.lua tutorial-inject.lua tutorial-tokenize.lua
commit-obfuscator.msc tutorial-keepalive.lua tutorial-union.lua
COPYING tutorial-monitor.lua tutorial-warnings.lua
histogram.lua tutorial-packets.lua xtab.lua
load-multi.lua tutorial-prep-stmts.lua
README tutorial-query-time.lua
[root@node5 ~]# ls /usr/lib64/mysql-proxy/lua/proxy/
auto-config.lua balance.lua commands.lua parser.lua test.lua tokenizer.lua
[root@node5 ~]# cp mysql-proxy-0.8.5-linux-el6-x86-64bit/share/doc/mysql-proxy/rw-splitting.lua /usr/lib64/mysql-proxy/lua/
[root@node5 ~]# ls /usr/lib64/mysql-proxy/lua/
admin.lua glib2.so lpeg.so posix.so rw-splitting.lua
chassis.so lfs.so mysql.so proxy
2.配置mysql-proxy读写分离[root@node5 ~]# vim /etc/mysql-proxy.cnf
[mysql-proxy]
daemon = true
pid-file = /var/run/mysql-proxy.pid
log-file = /var/log/mysql-proxy.log
log-level = debug
max-open-files = 1024
plugins = admin,proxy
user = mysql-proxy
#
#代理配置
#Proxy Configuration
#代理的地址和端口
proxy-address = 0.0.0.0:3306
#后端的读写mysql节点服务器
proxy-backend-addresses = 172.16.31.20:3306
#后端的只读mysql服务器节点;
proxy-read-only-backend-addresses = 172.16.31.21:3306
#实现读写分离的lun脚本配置文件;
proxy-lua-script = /usr/lib64/mysql-proxy/lua/rw-splitting.lua
#proxy-skip-profiling = true
#
#管理配置
# Admin Configuration
#admin-address = 0.0.0.0:4041
admin-lua-script = /usr/lib64/mysql-proxy/lua/admin.lua
admin-username = admin
admin-password = admin
3.配置完成启动mysql-proxy服务器:[root@node5 ~]# service mysql-proxy start
Starting mysql-proxy: [ OK ]
查看监听端口:[root@node5 ~]# ss -tunl |grep tcp
tcp LISTEN 0 128 :::22 :::*
tcp LISTEN 0 128 *:22 *:*
tcp LISTEN 0 128 127.0.0.1:631 *:*
tcp LISTEN 0 128 ::1:631 :::*
tcp LISTEN 0 100 ::1:25 :::*
tcp LISTEN 0 100 127.0.0.1:25 *:*
tcp LISTEN 0 128 127.0.0.1:6010 *:*
tcp LISTEN 0 128 ::1:6010 :::*
tcp LISTEN 0 128 *:54181 *:*
tcp LISTEN 0 128 *:4041 *:*
tcp LISTEN 0 128 *:3306 *:*
tcp LISTEN 0 128 :::111 :::*
tcp LISTEN 0 128 *:111 *:*
tcp LISTEN 0 128 :::49776 :::*
3306代理端口和管理端口4041都是启动的;
5.主从服务器节点需要授权一个远程连接允许mysql-proxy服务器访问后端的主从服务器节点:
在master节点node3上授权即可:MariaDB [hellodb]> grant all on *.* to 'root'@'172.16.%.%' identified by 'oracle';
Query OK, 0 rows affected (0.00 sec)
MariaDB [hellodb]> flush privileges;
Query OK, 0 rows affected (0.00 sec)
我们在node5节点通过这个节点的代理访问数据库:[root@node5 ~]# mysql -uroot -h172.16.31.22 -poracle -e 'show databases';
+--------------------+
| Database |
+--------------------+
| binlog |
| hellodb |
| information_schema |
| mysql |
| performance_schema |
| relaylog |
| test |
+--------------------+
可以发现数据库是后端节点的数据库;
6.读写分离测试:
读写分离测试我们先查看一下管理端口:[root@node5 ~]# mysql -uadmin -padmin -P4041 -h172.16.31.22
Welcome to the MySQL monitor. Commands end with ; or \g.
Your MySQL connection id is 1
Server version: 5.0.99-agent-admin
Copyright (c) 2000, 2013, Oracle and/or its affiliates. All rights reserved.
Oracle is a registered trademark of Oracle Corporation and/or its
affiliates. Other names may be trademarks of their respective
owners.
Type 'help;' or '\h' for help. Type '\c' to clear the current input statement.
#可以发现主节点172.16.31.20是读写数据库服务器节点,状态是up,正常;
#而172.16.31.21是只读数据库服务器节点,但是状态未知,我们需要去读取一些后端只读服务器的数据;
mysql> select * from backends;
+-------------+-------------------+---------+------+------+-------------------+
| backend_ndx | address | state | type | uuid | connected_clients |
+-------------+-------------------+---------+------+------+-------------------+
| 1 | 172.16.31.20:3306 | up | rw | NULL | 0 |
| 2 | 172.16.31.21:3306 | unknown | ro | NULL | 0 |
+-------------+-------------------+---------+------+------+-------------------+
2 rows in set (0.00 sec)
我们退出管理端口去执行一些select语句:[root@node5 ~]# mysql -uroot -h172.16.31.22 -poracle -e 'select * from hellodb.teachers';
+-----+---------------+-----+--------+
| TID | Name | Age | Gender |
+-----+---------------+-----+--------+
| 1 | Song Jiang | 45 | M |
| 2 | Zhang Sanfeng | 94 | M |
| 3 | Miejue Shitai | 77 | F |
| 4 | Lin Chaoying | 93 | F |
+-----+---------------+-----+--------+
多执行一些select语句,不同的最好;
执行完成后去查看管理端口状态:[root@node5 ~]# mysql -uadmin -padmin -P 4041 -h172.16.31.22
Welcome to the MySQL monitor. Commands end with ; or \g.
Your MySQL connection id is 1
Server version: 5.0.99-agent-admin
Copyright (c) 2000, 2013, Oracle and/or its affiliates. All rights reserved.
Oracle is a registered trademark of Oracle Corporation and/or its
affiliates. Other names may be trademarks of their respective
owners.
Type 'help;' or '\h' for help. Type '\c' to clear the current input statement.
mysql> select * from backends;
+-------------+-------------------+-------+------+------+-------------------+
| backend_ndx | address | state | type | uuid | connected_clients |
+-------------+-------------------+-------+------+------+-------------------+
| 1 | 172.16.31.20:3306 | up | rw | NULL | 0 |
| 2 | 172.16.31.21:3306 | up | ro | NULL | 0 |
+-------------+-------------------+-------+------+------+-------------------+
2 rows in set (0.00 sec)
全部up了,状态正常;
至此,基于mysql-proxy实现数据库读写分类的实验就实现了。


 124
124


 被折叠的 条评论
为什么被折叠?
被折叠的 条评论
为什么被折叠?
 到【灌水乐园】发言


