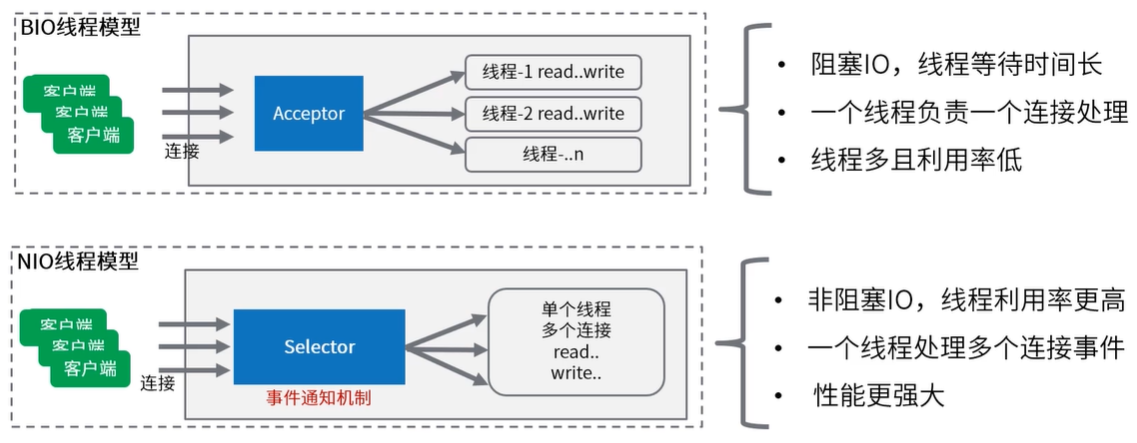
从Java1.4开始,为了替代Java IO和网络相关的API,提高程序的运行速度,Java提供了新的IO操作非阻塞的API即Java NIO。NIO中有三大核心组件:Buffer(缓冲区),Channel(通道),Selector(选择器)。NIO基于Channel(通道)和Buffer(缓冲区))进行操作,数据总是从通道读取到缓冲区中,或者从缓冲区写入到通道中,而Selector(选择器)主要用于监听多个通道的事件,实现单个线程可以监听多个数据通道。
Buffer(缓冲区)
缓冲区本质上是一个可以写入数据的内存块(类似数组),然后可以再次读取。此内存块包含在NIO Buffer对象中,该对象提供了一组方法,可以更轻松的使用内存块。
相对于直接操作数组,Buffer API提供了更加容易的操作和管理,其进行数据的操作分为写入和读取,主要步骤如下:
将数据写入缓冲区
调用buffer.flip(),转换为读取模式
缓冲区读取数据
调用buffer.clear()或buffer.compact()清楚缓冲区
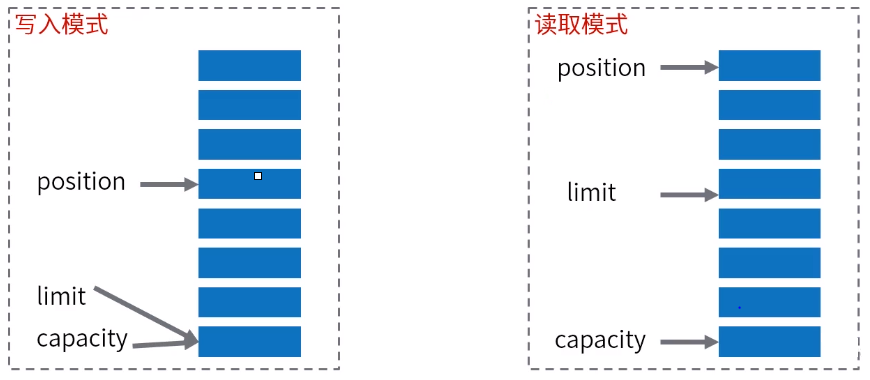
Buffer中有三个重要属性:
capacity(容量):作为一个内存块,Buffer具有一定的固定大小,也称为容量
position(位置):写入模式时代表写数据的位置,读取模式时代表读取数据的位置
limit(限制):写入模式等于Buffer的容量,读取模式时等于写入的数据量

Buffer使用代码示例:
public class BufferDemo {
public static void main(String[] args) {
// 构建一个byte字节缓冲区,容量是4
ByteBuffer byteBuffer = ByteBuffer.allocate(4);
// 默认写入模式,查看三个重要的指标
System.out.println(
String.format(
"初始化:capacity容量:%s, position位置:%s, limit限制:%s",
byteBuffer.capacity(), byteBuffer.position(), byteBuffer.limit()));
// 写入数据
byteBuffer.put((byte) 1);
byteBuffer.put((byte) 2);
byteBuffer.put((byte) 3);
// 再次查看三个重要的指标
System.out.println(
String.format(
"写入3字节后后:capacity容量:%s, position位置:%s, limit限制:%s",
byteBuffer.capacity(), byteBuffer.position(), byteBuffer.limit()));
// 转换为读取模式(不调用flip方法,也是可以读取数据的,但是position记录读取的位置不对)
System.out.println("开始读取");
byteBuffer.flip();
byte a = byteBuffer.get();
System.out.println(a);
byte b = byteBuffer.get();
System.out.println(b);
System.out.println(
String.format(
"读取2字节数据后,capacity容量:%s, position位置:%s, limit限制:%s",
byteBuffer.capacity(), byteBuffer.position(), byteBuffer.limit()));
// 继续写入3字节,此时读模式下,limit=3,position=2.继续写入只能覆盖写入一条数据
// clear()方法清除整个缓冲区。compact()方法仅清除已阅读的数据。转为写入模式
byteBuffer.compact();
// 清除了已经读取的2字节,剩余1字节,还可以写入3字节数据
// 多写的话会报java.nio.BufferOverflowException异常
byteBuffer.put((byte) 3);
byteBuffer.put((byte) 4);
byteBuffer.put((byte) 5);
System.out.println(
String.format(
"最终的情况,capacity容量:%s, position位置:%s, limit限制:%s",
byteBuffer.capacity(), byteBuffer.position(), byteBuffer.limit()));
}
}
ByteBuffer堆外内存
ByteBuffer为性能关键型代码提供了直接内存(direct,堆外)和非直接内存(heap,堆)两种实现。堆外内存实现将内存对象分配在Java虚拟机的堆以外的内存,这些内存直接受操作系统管理,而不是虚拟机,这样做的结果就是能够在一定程度上减少垃圾回收对应用程序造成的影响,提供运行的速度。
堆外内存的获取方式:ByteBuffer byteBuffer = ByteBuffer.allocateDirect(noBytes)
堆外内存的好处:
进行网络IO或者文件IO时比heap buffer少一次拷贝。(file/socket — OS memory — jvm heap)在写file和socket的过程中,GC会移动对象,JVM的实现中会把数据复制到堆外,再进行写入。
GC范围之外,降低GC压力,但实现了自动管理,DirectByteBuffer中有一个Cleaner对象(PhantomReference),Cleaner被GC执行前会执行clean方法,触发DirectByteBuffer中定义的Deallocator
堆外内存的使用建议:
性能确实可观的时候才去使用,分配给大型,长寿命的对象(网络传输,文件读写等场景)
通过虚拟机参数MaxDirectMemorySize限制大小,防止耗尽整个机器的内存
Channel(通道)
Channel用于源节点与目标节点之间的连接,Channel类似于传统的IO Stream,Channel本身不能直接访问数据,Channel只能与Buffer进行交互。
Channel的API涵盖了TCP/UDP网络和文件IO,常用的类有FileChannel,DatagramChannel,SocketChannel,ServerSocketChannel
标准IO Stream通常是单向的(InputStream/OutputStream),而Channel是一个双向的通道,可以在一个通道内进行读取和写入,可以非阻塞的读取和写入通道,而且通道始终读取和写入缓冲区(即Channel必须配合Buffer进行使用)。

SocketChannel
SocketChannel用于建立TCP网络连接,类似java.net.Socket。有两种创建SocketChannel的形式,一个是客户端主动发起和服务器的连接,还有一个就是服务端获取的新连接。SocketChannel中有两个重要的方法,一个是write()写方法,write()写方法有可能在尚未写入内容的时候就返回了,需要在循环中调用write()方法。还有一个就是read()读方法,read()方法可能直接返回根本不读取任何数据,可以根据返回的int值判断读取了多少字节。
核心代码代码示例片段:
// 客户端主动发起连接
SocketChannel socketChannel = SocketChannel.open();
// 设置为非阻塞模式
socketChannel.configureBlocking(false);
socketChannel.connect(new InetSocketAddress("127.0.0.1", 8080));
// 发生请求数据 - 向通道写入数据
socketChannel.write(byteBuffer);
// 读取服务端返回 - 读取缓冲区数据
int readBytes = socketChannel.read(requestBuffer);
// 关闭连接
socketChannel.close();
ServerSocketChannel
ServerSocketChannel可以监听新建的TCP连接通道,类似ServerSocket。ServerSocketChannel的核心方法accept()方法,如果通道处于非阻塞模式,那么如果没有挂起的连接,该方法将立即返回null,实际使用中必须检查返回的SocketChannel是否为null。
核心代码示例片段:
// 创建网络服务端
ServerSocketChannel serverSocketChannel = ServerSocketChannel.open();
// 设置为非阻塞模式
serverSocketChannel.configureBlocking(false);
// 绑定端口
serverSocketChannel.socket().bind(new InetSocketAddress(8080));
while (true) {
// 获取新tcp连接通道
SocketChannel socketChannel = serverSocketChannel.accept();
if (socketChannel != null) {
// tcp请求 读取/响应
}
}
Selector选择器
Selector也是Java NIO核心组件,可以检查一个或多个NIO通道,并确定哪些通道已经准备好进行读取或写入。实现单个线程可以管理多个通道,从而管理多个网络连接。
一个线程使用Selector可以监听多个Channel的不同事件,其中主要有四种事件,分别对应SelectionKey中的四个常量,分别为:
连接事件 SelectionKey.OP_CONNECT
准备就绪事件 SelectionKey.OP_ACCEPT
读取事件 SelectionKey.OP_READ
写入事件 SelectionKey.OP_WRITE

Selector实现一个线程处理多个通道的核心在于事件驱动机制,非阻塞的网络通道下,开发者通过Selector注册对于通道感兴趣的事件类型,线程通过监听事件来触发相应的代码执行。(更底层其实是操作系统的多路复用机制)
核心代码示例片段:
// 构建一个Selector选择器,并且将channel注册上去
Selector selector = Selector.open();
// 将serverSocketChannel注册到selector
SelectionKey selectionKey = serverSocketChannel.register(selector, 0, serverSocketChannel);
// 对serverSocketChannel上面的accept事件感兴趣(serverSocketChannel只能支持accept操作)
selectionKey.interestOps(SelectionKey.OP_ACCEPT);
while (true) {
// 用下面轮询事件的方式.select方法有阻塞效果,直到有事件通知才会有返回
selector.select();
// 获取事件
Set keys = selector.selectedKeys();
// 遍历查询结果
Iterator iterator = keys.iterator();
while (iterator.hasNext()) {
// 被封装的查询结果
SelectionKey key = iterator.next();
// 判断不同的事件类型,执行对应的逻辑处理
if (key.isAcceptable()) {
// 处理连接的逻辑
}
if (key.isReadable()) {
//处理读数据的逻辑
}
iterator.remove();
}
}
NIO网络编程完整代码
服务端代码示例:
// 结合Selector实现的非阻塞服务端(放弃对channel的轮询,借助消息通知机制)
public class NIOServer {
public static void main(String[] args) throws IOException {
// 创建网络服务端ServerSocketChannel
ServerSocketChannel serverSocketChannel = ServerSocketChannel.open();
// 设置为非阻塞模式
serverSocketChannel.configureBlocking(false);
// 构建一个Selector选择器,并且将channel注册上去
Selector selector = Selector.open();
// 将serverSocketChannel注册到selector
SelectionKey selectionKey = serverSocketChannel.register(selector, 0, serverSocketChannel);
// 对serverSocketChannel上面的accept事件感兴趣(serverSocketChannel只能支持accept操作)
selectionKey.interestOps(SelectionKey.OP_ACCEPT);
// 绑定端口
serverSocketChannel.socket().bind(new InetSocketAddress(8080));
System.out.println("启动成功");
while (true) {
// 不再轮询通道,改用下面轮询事件的方式.select方法有阻塞效果,直到有事件通知才会有返回
selector.select();
// 获取事件
Set keys = selector.selectedKeys();
// 遍历查询结果
Iterator iterator = keys.iterator();
while (iterator.hasNext()) {
// 被封装的查询结果
SelectionKey key = iterator.next();
iterator.remove();
// 关注 Read 和 Accept两个事件
if (key.isAcceptable()) {
ServerSocketChannel server = (ServerSocketChannel) key.attachment();
// 将拿到的客户端连接通道,注册到selector上面
SocketChannel clientSocketChannel = server.accept();
clientSocketChannel.configureBlocking(false);
clientSocketChannel.register(selector, SelectionKey.OP_READ, clientSocketChannel);
System.out.println("收到新连接 : " + clientSocketChannel.getRemoteAddress());
}
if (key.isReadable()) {
SocketChannel socketChannel = (SocketChannel) key.attachment();
try {
ByteBuffer byteBuffer = ByteBuffer.allocate(1024);
while (socketChannel.isOpen() && socketChannel.read(byteBuffer) != -1) {
// 长连接情况下,需要手动判断数据有没有读取结束 (此处做一个简单的判断: 超过0字节就认为请求结束了)
if (byteBuffer.position() > 0) break;
}
if (byteBuffer.position() == 0) continue;
byteBuffer.flip();
byte[] content = new byte[byteBuffer.limit()];
byteBuffer.get(content);
System.out.println(new String(content));
System.out.println("收到数据,来自:" + socketChannel.getRemoteAddress());
// 响应结果 200
String response = "HTTP/1.1 200 OK\r\n" + "Content-Length: 11\r\n\r\n" + "Hello World";
ByteBuffer buffer = ByteBuffer.wrap(response.getBytes());
while (buffer.hasRemaining()) {
socketChannel.write(buffer);
}
} catch (Exception e) {
e.printStackTrace();
key.cancel(); // 取消事件订阅
}
}
selector.selectNow();
}
}
}
}
客户端代码示例:
public class NIOClient {
public static void main(String[] args) throws IOException {
// 客户端主动发起连接
SocketChannel socketChannel = SocketChannel.open();
// 设置为非阻塞模式
socketChannel.configureBlocking(false);
socketChannel.connect(new InetSocketAddress("127.0.0.1", 8080));
while (!socketChannel.finishConnect()) {
// 没连接上,则一直等待
Thread.yield();
}
Scanner scanner = new Scanner(System.in);
System.out.println("请输入:");
// 发送内容
String msg = scanner.nextLine();
ByteBuffer byteBuffer = ByteBuffer.wrap(msg.getBytes());
while (byteBuffer.hasRemaining()) {
socketChannel.write(byteBuffer);
}
// 读取响应
System.out.println("收到服务端响应:");
ByteBuffer buffer = ByteBuffer.allocate(1024);
while (socketChannel.isOpen() && socketChannel.read(buffer) != -1) {
// 长连接情况下,需要手动判断数据有没有读取结束 (此处做一个简单的判断: 超过0字节就认为请求结束了)
if (buffer.position() > 0) break;
}
buffer.flip();
byte[] content = new byte[buffer.limit()];
buffer.get(content);
System.out.println(new String(content));
scanner.close();
socketChannel.close();
}
}
NIO与BIO的比较

如果程序需要支撑大量的连接,使用NIO是最好的方式。
Tomcat8中已经完全移除了BIO相关的网络处理代码,默认采用NIO进行网络处理。


 3840
3840


 被折叠的 条评论
为什么被折叠?


