


文章目录
一、引入spring boot -AMQP的依赖:
        <dependency>
            <groupId>org.springframework.boot</groupId>
            <artifactId>spring-boot-starter-amqp</artifactId>
        </dependency>
二、配置连接,创建交换机,队列
可以选用yml的方式 也可以选用javaConfig的方式 这里两种方式我都贴出来 你们自己选
(一)yml: 参数什么意思刚刚介绍过了 这里吧你自己的参数填进去就好了
spring:
	rabbitmq:
		host:
		port:
		username:
		password:
		virtual-host:
这样 spring boot 会帮你把rabbitmq其他相关的东西都自动装备好,
(二)javaConfig 配置连接,创建交换机,队列 :
1、配置连接
    @Bean
    public ConnectionFactory connectionFactory(){
        CachingConnectionFactory connectionFactory =
                new CachingConnectionFactory("111.231.203.94",5672);
        //我这里直接在构造方法传入了
        //        connectionFactory.setHost();
        //        connectionFactory.setPort();
        connectionFactory.setUsername("admin");
        connectionFactory.setPassword("admin");
        connectionFactory.setVirtualHost("my_vhost");
        //是否开启消息确认机制
        connectionFactory.setPublisherConfirms(true);
        return connectionFactory;
    }
2、创建交换机 队列 并绑定
    /**
     * 创建direct交换机
     * @return
     */
    @Bean
    public DirectExchange defaultExchange() {
        return new DirectExchange("directExchange");
    }

    /**
     *创建queue
     * @return
     */
    @Bean
    public Queue queue() {
        //名字 是否持久化
        return new Queue("directQueue", true);
    }

    /**
     *  directQueue 绑定路由建
     * @return
     */
    @Bean
    public Binding binding() {
        //绑定一个队列 to: 绑定到哪个交换机上面 with:绑定的路由建(routingKey)
        return BindingBuilder.bind(queue()).to(defaultExchange()).with("direct.key");
    }
3、发送消息: 发送消息比较简单, spring 提供了一个RabbitTemplate 来帮助我们完成发送消息的操作
    @Bean
    //@Scope("prototype")
    public RabbitTemplate rabbitTemplate(ConnectionFactory connectionFactory) {
        //注意 这个ConnectionFactory 是使用javaconfig方式配置连接的时候才需要传入的
        //如果是yml配置的连接的话是不需要的
        RabbitTemplate rabbitTemplate = new RabbitTemplate(connectionFactory);
        return  rabbitTemplate;
    }
RabbitmqMessageSend:
@Component
public class RabbitmqMessageSend {

    @Autowired
    RabbitTemplate rabbitTemplate;

    public void  sendMessage(String message){
        CorrelationData correlationData = new CorrelationData("订单ID direct");
        //direct.key
        Map<String,Object> map = new HashMap<>();
        map.put("name","123");
        map.put("direct","123456");
        //至于为什么调用这个API 后面会解释
        //参数介绍: 交换机名字,路由建, 消息内容,CorrelationData参数
        rabbitTemplate.convertAndSend("directExchange", "direct.key", message,correlationData);
    }
}
三、如何确保消息一定发送到Rabbitmq了?
在正常情况下发送是没问题的, 但是实际开发中我们往往要考虑一些非正常的情况, 我们从
消息的发送开始:
(一)失败回调
默认情况下,我们不知道我们的消息到底有没有发送到rabbitmq当中, 这肯定是不可取的, 假设我们是一个电商项目的话 用户下了订单 订单发送消息给库存 结果这个消息没发送到rabbitmq当中 但是订单还是下了,这时候因为没有消息库存不会去减少库存, 这种问题是非常严重的, 所以接下来就讲一种解决方案: 失败回调;
更改RabbitmqTemplate:
    @Bean
    //@Scope("prototype")
    public RabbitTemplate rabbitTemplate(ConnectionFactory connectionFactory) {
        //注意 这个ConnectionFactory 是使用javaconfig方式配置连接的时候才需要传入的
        //如果是yml配置的连接的话是不需要的
        RabbitTemplate rabbitTemplate = new RabbitTemplate(connectionFactory);
		//添加发送方确认模式方法
        //rabbitTemplate.setConfirmCallback(new MyConfirmCallback());
        //开启mandatory模式(开启失败回调)
        rabbitTemplate.setMandatory(true);
        //添加失败回调方法
        rabbitTemplate.setReturnCallback(new MyReturnCallback());
        return  rabbitTemplate;
    }
失败回调, 顾名思义 就是消息发送失败的时候会调用我们事先准备好的回调函数,并且把失败的消息 和失败原因等 返回过来。
回调接口的实现类:
实现RabbitTemplate.ReturnCallback里面的returnedMessage方法即可 他会把相关的参数都传给你;
@Component
public class MyReturnCallback implements RabbitTemplate.ReturnCallback{
    @Override
    public void returnedMessage(Message message, int replyCode, String replyText,
                                String exchange, String routingKey) {
        System.out.println("MyReturnCallback 1");
        System.out.println(message);
        System.out.println(replyCode);
        System.out.println(replyText);
        System.out.println(exchange);
        System.out.println(routingKey);
    }
}
这里模拟一个失败的发送 : 当指定的交换机不能吧消息路由到队列时(没有指定路由建或者指定的路右键没有绑定对应的队列 或者压根就没有绑定队列都会失败) 消息就会发送失败 效果:
将sendMessage方法中的direct.key换成direct.key1
测试结果:
分别打印的是发送的消息,错误状态码,错误原因(这里的原因是不能路由) 交换机名字 和路由健
(二)发送方确认模式
rabbitmq其实还提供了一种解决方案, 叫:发送方确认模式 这种方式 对性能的影响非常小 而且也能确定消息是否发送成功;
而且 发送方确认模式一般也会和失败回调一起使用 这样 就能确保消息100%投递了
发送方确认开启:
其实代码在上面配置连接的时候已经放出来了 就是在连接工厂中的一行代码 :
connectionFactory.setPublisherConfirms(true);
如果是yml配置的话:
spring:
	rabbitmq:
		publisher-confirms: true
和失败回调一样 实现一个RabbitTemplate.ConfirmCallback接口:
@Component
public class MyConfirmCallback implements RabbitTemplate.ConfirmCallback {
    @Override
    public void confirm(CorrelationData correlationData, boolean ack, String cause) {
        System.out.println("MyConfirmCallback 1");
        System.out.println(correlationData);
        System.out.println(ack);
        System.out.println(cause);
    }
}
在RabbitmqTemplate 设置一下:
rabbitTemplate.setConfirmCallback(new MyConfirmCallback());
而且我们可以在发送消息的时候附带一个CorrelationData参数 这个对象可以设置一个id,可以是你的业务id 方便进行对应的操作;
上诉RabbitmqMessageSend方法中已添加!
测试效果:
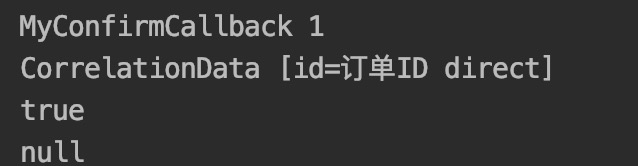
这里会吧我们传入的那个业务id 以及ack(是否发送成功) 以及原因 返回回来。
但是 要注意的是 confirm模式的发送成功 的意思是发送到RabbitMq(Broker)成功 而不是发送到队列成功。所以才有了上面我所说的那句 要和失败回调结合使用 这样才能确认消息投递成功了
可能这里有点绕, 简单的总结一下就是 confirm机制是确认我们的消息是否投递到了RabbitMq(Broker)上面而mandatory是在我们的消息进入队列失败时候不会被遗弃(让我们自己进行处理)那么上面 就是rabbitmq在发送消息时我们可以做的一些处理, 接下来我们会讲到rabbitmq在接收(消费)消息时的一些特性。
发送方确认模式confirm机制可以根据不同的业务实现不同RabbitTemplate.ConfirmCallback中的方法,但要求RabbitTemplate bean的作用域为非单例模式;而失败回调方法则不行;
(三)为什么不用:事务
没错事务的确能解决这个问题, 而且 恰巧rabbitmq刚好也支持事物, 但是! 事物非常影响rabbitmq的性能 有多严重? 据我所查到的资料 (当然 只是我所了解的 同学们也可以自己去尝试测试结果) 开启rabbitmq事物的话;
对性能的影响超过100倍之多 也就是说 开启事物后处理一条消息的时间 不开事物能处理100条(姑且这样认为吧), 那么 这样是非常不合理的, 因为消息中间件的性能其实非常关键的(参考双11) 如果这样子做的话 虽然能确保消息100%投递成功 但是代价太大了!
那么除了事物还有什么解决方案吗?
rabbitmq其实还提供了一种解决方案, 叫:发送方确认模式 这种方式 对性能的影响非常小 而且也能确定消息是否发送成功
而且 发送方确认模式一般也会和失败回调一起使用 这样 就能确保消息100%投递了
四、设置消息json格式和字符集
这里使用alibaba的fastjson工具
导入依赖:
        <dependency>
            <groupId>com.alibaba</groupId>
            <artifactId>fastjson</artifactId>
            <version>1.2.54</version>
        </dependency>
在RabbitmqTemplate 设置一下:
        //设置消息格式
        rabbitTemplate.setMessageConverter(new MessageConverter() {
            @Override
            public Message toMessage(Object o, MessageProperties messageProperties) throws MessageConversionException {
                messageProperties.setContentType("text/xml");
                messageProperties.setContentEncoding("UTF-8");
                Message message = new Message(JSON.toJSONBytes(o),messageProperties);
                System.out.println("调用了消息解析器");
                return message;
            }

            @Override
            public Object fromMessage(Message message) throws MessageConversionException {
                return null;
            }
        });
五、根据业务不同的消息失效不同的发送方确认模式方法
将RabbitmqConfig配置中的rabbitTemplate作用域设置为原型@Scope(“prototype”);
并将rabbitTemplate中的rabbitTemplate.setConfirmCallback(new MyConfirmCallback());注释掉,否则启动时会报错!
然后在不同方法自动注入RabbitTemplate对象时;利用生命回调周期中的@PostConstruct将Confirm实现的方法set到RabbitTemplate对象中。即我上面RabbitmqMessageSend中注视掉的init方法。
在启动运行发送消息时,RabbitmqMessageSend和RabbitmqMessageSendTopic就会调用各自的Confirm方法MyConfirmCallback和MyConfirmCallbackTopic;
失败回调方法只能有一种,所以无法像Confirm方法那样根据业务各自实现;
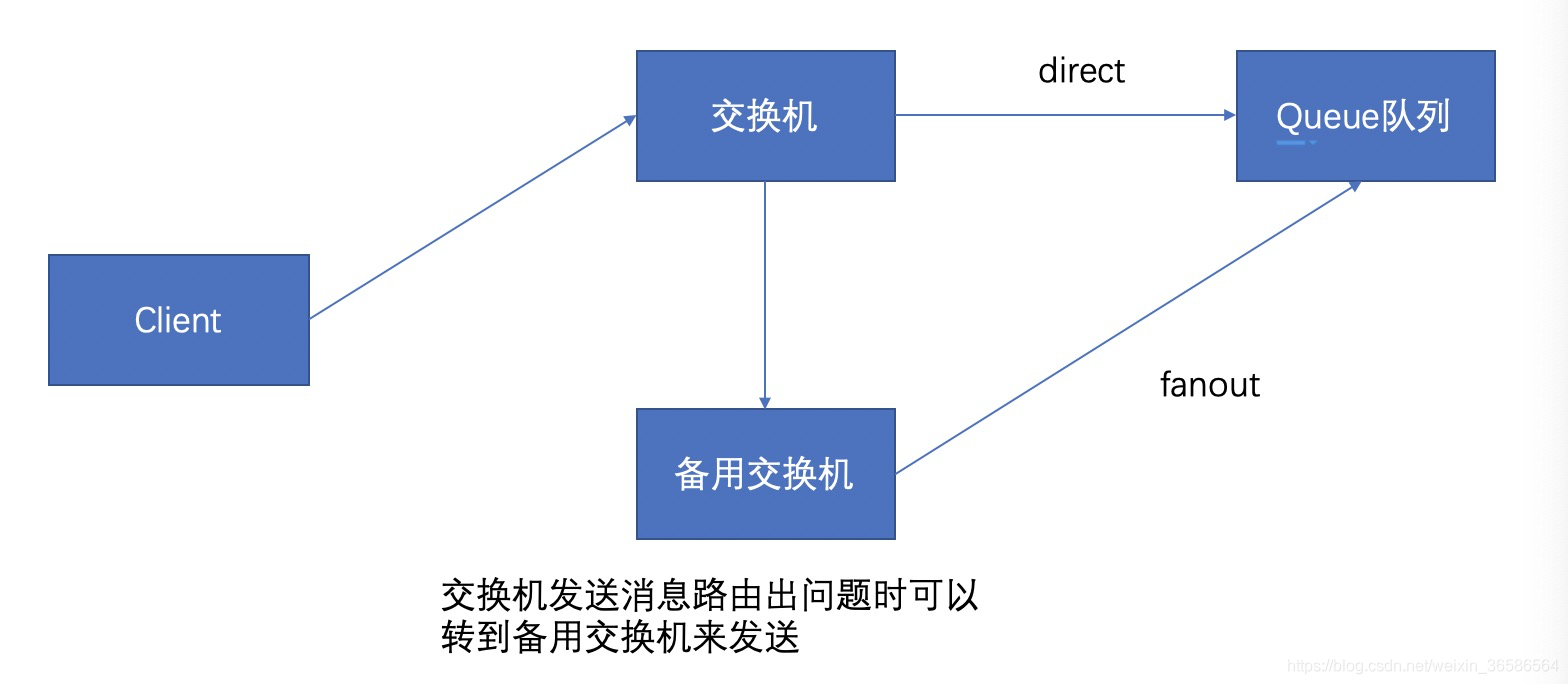
六、备用交换机
    /**
     * 备用交换机
     * @return
     */
    @Bean
    public DirectExchange alternateExchange() {
        Map<String, Object> map = new HashMap<>();
        map.put("alternate-exchange","directExchangeTest_backup");
        return  new DirectExchange("directExchangeTest",false,false,map);
    }

    @Bean
    public Queue queueTest() {
        //名字 是否持久化
        return new Queue("queueTest", true);
    }

    @Bean
    public Binding bindingTest() {
        //绑定一个队列 to: 绑定到哪个交换机上面 with:绑定的路由建(routingKey)
        return BindingBuilder.bind(queueTest()).to(alternateExchange()).with("direct.test");
    }

    /**
     * 创建备用交换机
     * @return
     */
    @Bean
    public FanoutExchange directExchangeTest_backup() {
        return new FanoutExchange("directExchangeTest_backup");
    }

    /**
     * 绑定备用交换机和队列
     * @return
     */
    @Bean
    public Binding bindingQueue() {
        //绑定一个队列 to: 绑定到哪个交换机上面 with:绑定的路由建(routingKey)
        return BindingBuilder.bind(queueTest()).to(directExchangeTest_backup());
    }
测试方法:
    /**
     * 备用交换机测试
     */
    public void  sendMessageBackUp(){
        CorrelationData correlationData = new CorrelationData("订单ID direct");
        //direct.key
        Map<String,Object> map = new HashMap<>();
        map.put("name","123");
        map.put("direct","123456");
        //至于为什么调用这个API 后面会解释
        //参数介绍: 交换机名字,路由建, 消息内容,CorrelationData参数
        rabbitTemplate.convertAndSend("directExchangeTest", "direct.waefsdf", map,correlationData);
    }
当发送消息到directExchangeTest交换机时,发现路由健direct.waefsdf没有,则将信息转发给备用交换机directExchangeTest_backup处理,然后该备用交换机为fanout类型;指可以直接将消息发送到其绑定的队列中。
七、完整案例
RabbitmqConfig配置类:
package com.server.mq.config;

import com.alibaba.fastjson.JSON;
import com.server.mq.callBack.MyConfirmCallback;
import com.server.mq.callBack.MyReturnCallback;
import org.springframework.amqp.core.*;
import org.springframework.amqp.rabbit.connection.CachingConnectionFactory;
import org.springframework.amqp.rabbit.connection.ConnectionFactory;
import org.springframework.amqp.rabbit.core.RabbitTemplate;
import org.springframework.amqp.support.converter.MessageConversionException;
import org.springframework.amqp.support.converter.MessageConverter;
import org.springframework.context.annotation.Bean;
import org.springframework.context.annotation.ComponentScan;
import org.springframework.context.annotation.Configuration;
import org.springframework.context.annotation.Scope;

import java.util.HashMap;
import java.util.Map;

@Configuration
@ComponentScan("com.server.mq")
public class RabbitmqConfig {

    /**
     * 配置连接
     * @return
     */
    @Bean
    public ConnectionFactory connectionFactory(){
        CachingConnectionFactory connectionFactory =
                new CachingConnectionFactory("111.111.223.94",5672);
        //我这里直接在构造方法传入了
        //        connectionFactory.setHost();
        //        connectionFactory.setPort();
        connectionFactory.setUsername("admin");
        connectionFactory.setPassword("admin");
        connectionFactory.setVirtualHost("my_vhost");
        //是否开启消息确认机制
        connectionFactory.setPublisherConfirms(true);
        return connectionFactory;
    }

    /**
     * 创建direct交换机
     * @return
     */
    @Bean
    public DirectExchange defaultExchange() {
        return new DirectExchange("directExchange");
    }

    /**
     * 创建topic交换机
     * @return
     */
    @Bean
    public TopicExchange topicExchange() {
        return new TopicExchange("topicExchange");
    }

    /**
     *创建queue
     * @return
     */
    @Bean
    public Queue queue() {
        //名字 是否持久化
        return new Queue("directQueue", true);
    }


    /**
     *创建queue
     * @return
     */
    @Bean
    public Queue queue2() {
        //名字 是否持久化
        return new Queue("topicQueue", true);
    }

    /**
     *  directQueue 绑定路由建
     * @return
     */
    @Bean
    public Binding binding() {
        //绑定一个队列 to: 绑定到哪个交换机上面 with:绑定的路由建(routingKey)
        return BindingBuilder.bind(queue()).to(defaultExchange()).with("direct.key");
    }

    /**
     * topicQueue 绑定路由建
     * @return
     */
    @Bean
    public Binding binding2() {
        //绑定一个队列 to: 绑定到哪个交换机上面 with:绑定的路由建(routingKey)
        return BindingBuilder.bind(queue2()).to(topicExchange()).with("topic.#");
    }

    /**
     * 设置 RabbitTemplate
     * @param connectionFactory
     * @return
     */
    @Bean
    //@Scope("prototype")
    public RabbitTemplate rabbitTemplate(ConnectionFactory connectionFactory) {
        //注意 这个ConnectionFactory 是使用javaconfig方式配置连接的时候才需要传入的
        //如果是yml配置的连接的话是不需要的
        RabbitTemplate rabbitTemplate = new RabbitTemplate(connectionFactory);
        //添加发送方确认模式方法
        rabbitTemplate.setConfirmCallback(new MyConfirmCallback());
        //开启mandatory模式(开启失败回调)
        rabbitTemplate.setMandatory(true);
        //添加失败回调方法
        rabbitTemplate.setReturnCallback(new MyReturnCallback());

        //设置消息格式
        rabbitTemplate.setMessageConverter(new MessageConverter() {
            @Override
            public Message toMessage(Object o, MessageProperties messageProperties) throws MessageConversionException {
                messageProperties.setContentType("text/xml");
                messageProperties.setContentEncoding("UTF-8");
                Message message = new Message(JSON.toJSONBytes(o),messageProperties);
                System.out.println("调用了消息解析器");
                return message;
            }

            @Override
            public Object fromMessage(Message message) throws MessageConversionException {
                return null;
            }
        });
        return  rabbitTemplate;
    }

    //------------备用交换机-------------


    /**
     * 备用交换机
     * @return
     */
    @Bean
    public DirectExchange alternateExchange() {
        Map<String, Object> map = new HashMap<>();
        map.put("alternate-exchange","directExchangeTest_backup");
        return  new DirectExchange("directExchangeTest",false,false,map);
    }

    @Bean
    public Queue queueTest() {
        //名字 是否持久化
        return new Queue("queueTest", true);
    }

    @Bean
    public Binding bindingTest() {
        //绑定一个队列 to: 绑定到哪个交换机上面 with:绑定的路由建(routingKey)
        return BindingBuilder.bind(queueTest()).to(alternateExchange()).with("direct.test");
    }

    /**
     * 创建备用交换机
     * @return
     */
    @Bean
    public FanoutExchange directExchangeTest_backup() {
        return new FanoutExchange("directExchangeTest_backup");
    }

    /**
     * 绑定备用交换机和队列
     * @return
     */
    @Bean
    public Binding bindingQueue() {
        //绑定一个队列 to: 绑定到哪个交换机上面 with:绑定的路由建(routingKey)
        return BindingBuilder.bind(queueTest()).to(directExchangeTest_backup());
    }


    //-----------死信交换机----------

    @Bean
    public Queue queueNormal() {
        Map<String,Object> map = new HashMap<>();
        //设置消息的过期时间 单位毫秒
        map.put("x-message-ttl",10000);
        //设置附带的死信交换机
        map.put("x-dead-letter-exchange","deadExchange");
        //指定重定向的路由建 消息作废之后可以决定需不需要更改他的路由建 如果需要 就在这里指定
        map.put("x-dead-letter-routing-key","dead.key");
        return new Queue("queueNormal", true,false,false,map);
    }

    /**
     * 创建direct交换机
     * @return
     */
    @Bean
    public DirectExchange normalExchange() {
        return new DirectExchange("normalExchange");
    }

    @Bean
    public Binding bindingNormal() {
        //绑定一个队列 to: 绑定到哪个交换机上面 with:绑定的路由建(routingKey)
        return BindingBuilder.bind(queueNormal()).to(normalExchange()).with("normal.key");
    }

    /**
     * 创建死信交换机
     * @return
     */
    @Bean
    public DirectExchange deadExchange() {
        return new DirectExchange("deadExchange");
    }

    /**
     * 创建死信交换机对应的对列
     * @return
     */
    @Bean
    public Queue queueDead() {
        return new Queue("queueDead", true,false,false);
    }

    /**
     * 绑定死信交换机和队列
     * @return
     */
    @Bean
    public Binding bindingDead() {
        //绑定一个队列 to: 绑定到哪个交换机上面 with:绑定的路由建(routingKey)
        return BindingBuilder.bind(queueDead()).to(deadExchange()).with("dead.key");
    }

}
失败回调方法MyReturnCallback:
@Component
public class MyReturnCallback implements RabbitTemplate.ReturnCallback{
    @Override
    public void returnedMessage(Message message, int replyCode, String replyText,
                                String exchange, String routingKey) {
        System.out.println("MyReturnCallback 1");
        System.out.println(message);
        System.out.println(replyCode);
        System.out.println(replyText);
        System.out.println(exchange);
        System.out.println(routingKey);
    }
}
发送方确认模式方法一:MyConfirmCallback
@Component
public class MyConfirmCallback implements RabbitTemplate.ConfirmCallback {
    @Override
    public void confirm(CorrelationData correlationData, boolean ack, String cause) {
        System.out.println("MyConfirmCallback 1");
        System.out.println(correlationData);
        System.out.println(ack);
        System.out.println(cause);
    }
}
发送方确认模式方法二:MyConfirmCallbackTopic
@Component
public class MyConfirmCallbackTopic implements RabbitTemplate.ConfirmCallback {
    @Override
    public void confirm(CorrelationData correlationData, boolean ack, String cause) {
        System.out.println("MyConfirmCallbackTopic 2");
        System.out.println(correlationData);
        System.out.println(ack);
        System.out.println(cause);
    }
}
发送消息service: RabbitmqMessageSend
@Component
public class RabbitmqMessageSend {

    @Autowired
    RabbitTemplate rabbitTemplate;

//    @PostConstruct
//    public void init(){
//        rabbitTemplate.setConfirmCallback(new MyConfirmCallback());
//    }
    public void  sendMessage(String message){
        CorrelationData correlationData = new CorrelationData("订单ID direct");
        //direct.key
        Map<String,Object> map = new HashMap<>();
        map.put("name","123");
        map.put("direct","123456");
        //至于为什么调用这个API 后面会解释
        //参数介绍: 交换机名字,路由建, 消息内容,CorrelationData参数
        rabbitTemplate.convertAndSend("directExchange", "direct.key1", message,correlationData);
    }
}
发送消息service: RabbitmqMessageSendTopic
@Component
public class RabbitmqMessageSendTopic {

    @Autowired
    RabbitTemplate rabbitTemplate;


//    @PostConstruct
//    public void init(){
//        rabbitTemplate.setConfirmCallback(new MyConfirmCallbackTopic());
//    }

    public void  sendMessage(String message){
        CorrelationData correlationData = new CorrelationData("订单ID topic");
        //topic.key
        Map<String,Object> map = new HashMap<>();
        map.put("name","123");
        map.put("topic","123456");
        rabbitTemplate.convertAndSend("topicExchange", "topic.b", message,correlationData);
    }

    /**
     * 备用交换机测试
     */
    public void  sendMessageBackUp(){
        CorrelationData correlationData = new CorrelationData("订单ID direct");
        //direct.key
        Map<String,Object> map = new HashMap<>();
        map.put("name","123");
        map.put("direct","123456");
        //至于为什么调用这个API 后面会解释
        //参数介绍: 交换机名字,路由建, 消息内容,CorrelationData参数
        rabbitTemplate.convertAndSend("directExchangeTest", "direct.waefsdf", map,correlationData);
    }
}
Controller:
@RestController
public class OrderController {
    @Autowired
    RabbitmqMessageSend rabbitmqMessageSend;
    @Autowired
    RabbitmqMessageSendTopic rabbitmqMessageSendTopic;

    @RequestMapping("/order.do")
    public  Object order(String message,String rouingKey,String name){
        rabbitmqMessageSend.sendMessage(message);
        rabbitmqMessageSendTopic.sendMessage(message);
        return "ok";
    }

    @RequestMapping("/order2.do")
    public  Object order2(){
        rabbitmqMessageSend.sendMessageBackUp();

        //rabbitmqMessageSendTopic.sendMessage(message);
        return "ok2";
    }
}
以上均为鲁班学院学习资料,欢迎大家报班学习,真心推荐!


 9098
9098


 被折叠的 条评论
为什么被折叠?
被折叠的 条评论
为什么被折叠?
 到【灌水乐园】发言


