


Hystrix服务容错
官方文档地址:Home · Netflix/Hystrix Wiki · GitHub
1、什么是Hystrix
Hystrix源自Netflix团队于2011开始研发,2012年Hystrix不断发展成熟,Netflix内部的许多团队都采用了它,如今,每天在Netflix上通过Hystrix执行数百亿个线程隔离和数千亿个信号量隔离的调用,极大地提高了系统的稳定性。
在分布式环境中,不可避免会有很多服务依赖项中的某些服务失败导致雪崩效应,Hystrix是一个库,可以通过添加等待时间容限和容错逻辑来帮助您控制这些分布式服务之间的交互。Hystrix通过隔离服务之间的访问点,停止服务之间的级联故障并提供后备选项来实现此目的,所有这些都可以提高系统整体稳定性。
2、雪崩效应
在微服务架构中,一个请求要调用多个服务是非常常见的。如客户端访问A服务,A服务访问B服务,B服务调用C服务,由于网络原因或者自身的原因,如果B服务或者C服务不能及时响应,A服务将处于阻塞状态,直到B服务C服务响应。此时若有大量的请求涌入,容器的线程资源会被消耗完毕,导致服务瘫痪。服务与服务之间的依赖性,故障会传播,造成连锁反应,会对整个微服务系统造成灾难性的严重后果,这就是服务故障的“雪崩效应”。以下图完美解释了雪崩效应。
一切服务正常时,请求看起来是这样的:

当其中一个服务有延迟时,它可能阻塞整个用户请求:

在高并发的情况下,一个服务的延迟可能导致所有服务器上的所有资源在数秒内饱和。比起服务故障,更糟糕的是这些应用程序还可能导致服务之间的延迟增加,从而备份队列,线程和其他系统资源,从而导致整个系统出现更多级联故障。

总结:
造成服务雪崩的原因可以归结为以下三点:
- 服务提供者不可用(硬件故障,程序bug,缓存击穿,用户大量请求等)
- 重试加大流量(用户重试,代码逻辑重试)
- 服务消费者不可用(同步等待造成的资源耗尽)
最终的结果就是:一个服务不可用,导致一系列服务的不可用。
3、解决方案
雪崩是系统中的蝴蝶效应导致,其发生的原因多种多样,从源头我们无法完全杜绝雪崩的发生,但是雪崩的根本原因源于服务之间的强依赖,所以我们可以提前评估做好服务容错,解决方案大概可以分为以下几种:
- 请求缓存:支持将一个请求与返回结果缓存处理
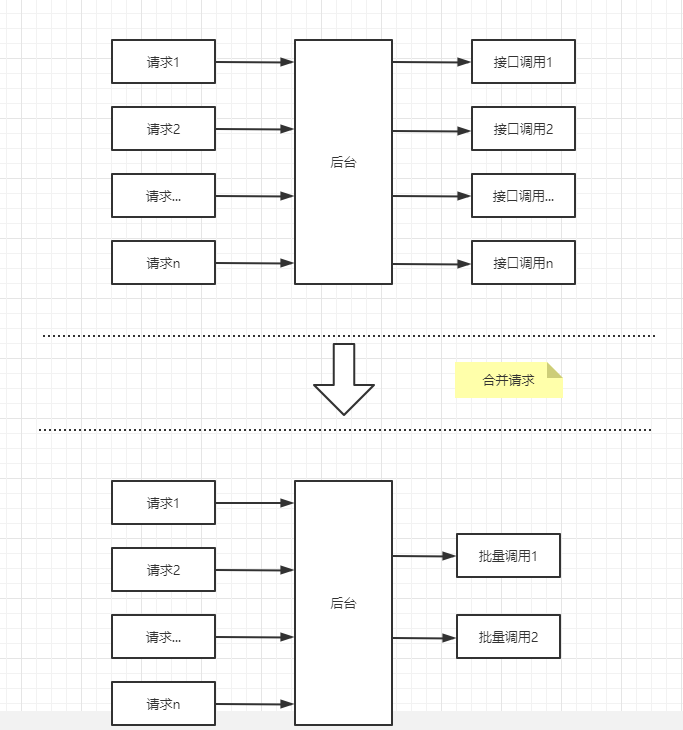
- 请求合并:将相同的请求进行合并让后调用批处理接口
- 服务隔离:限制调用分布式服务的资源,某一个调用的服务出现问题不会影响到其他服务调用
- 服务熔断:牺牲局部服务,保全整体系统稳定性
- 服务降级:服务熔断以后,客户端调用自己本地方法返回缺省值
4、模拟高并发场景
示例代码地址:https://gitee.com/junweihu/eureka-demo
服务提供者接口增加Thread.sleep(2000),模拟服务处理时长
    @GetMapping("/{id}")
    public Product selectProductById(@PathVariable Integer id) {
        try {
            TimeUnit.MILLISECONDS.sleep(2000);
        } catch (InterruptedException e) {
            e.printStackTrace();
        }
        return productService.selectProductById(id);
    }
服务消费者降低Tomcat最大线程数方便模拟高并发
server:
  port: 9090
  tomcat:
    max-connections: 200     # 降低最大线程数
JMeter

下载地址:https://jmeter.apache.org/download_jmeter.cgi
修改配置
进入/bin目录编辑jmeter.properties文件,修改
- language=zh_CN 显示中文
- sampleresult.default.encoding=UTF-8 字符编码使用UTF-8
运行
运行/bin/jmeter.jar
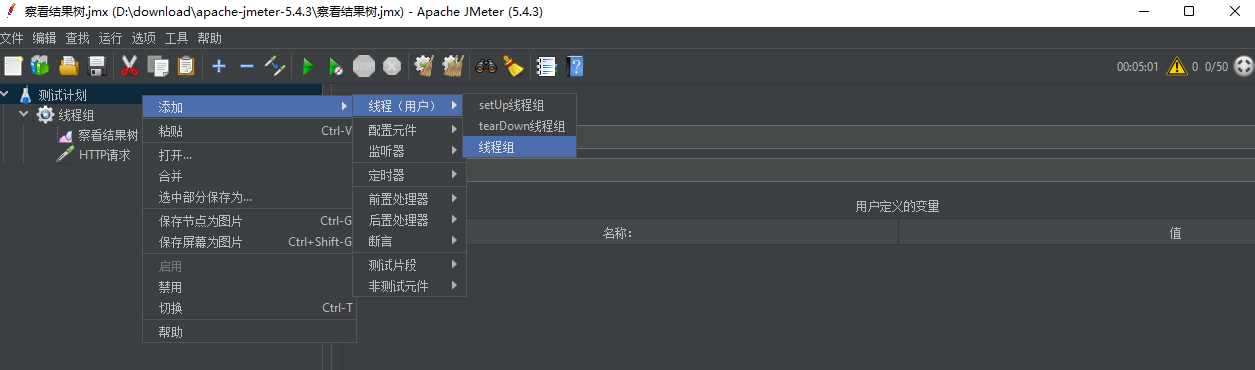
添加线程组,设置线程属性
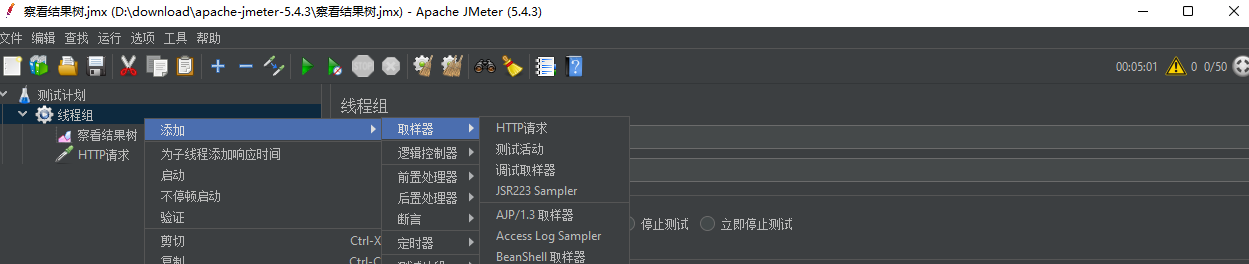
添加HTTP请求,设置请求基本信息
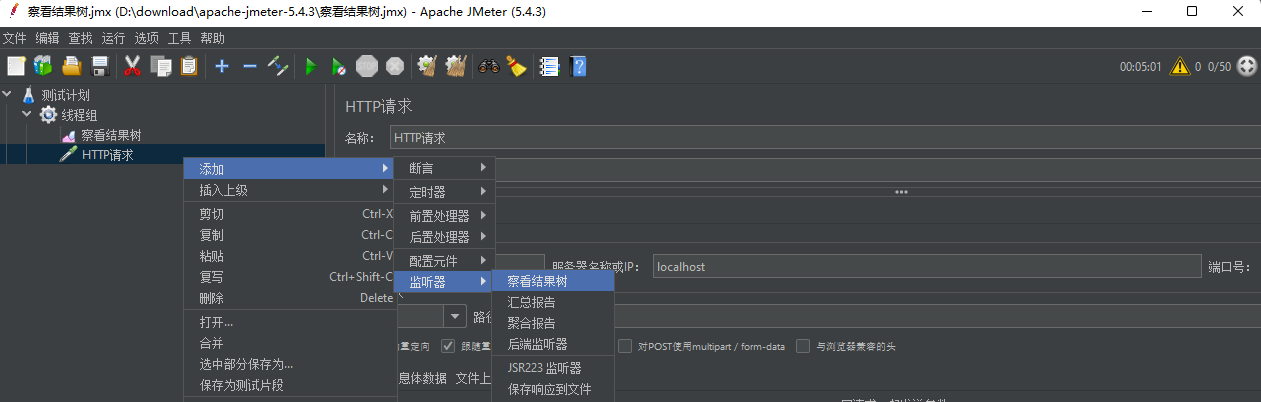
添加结果数,查看结果
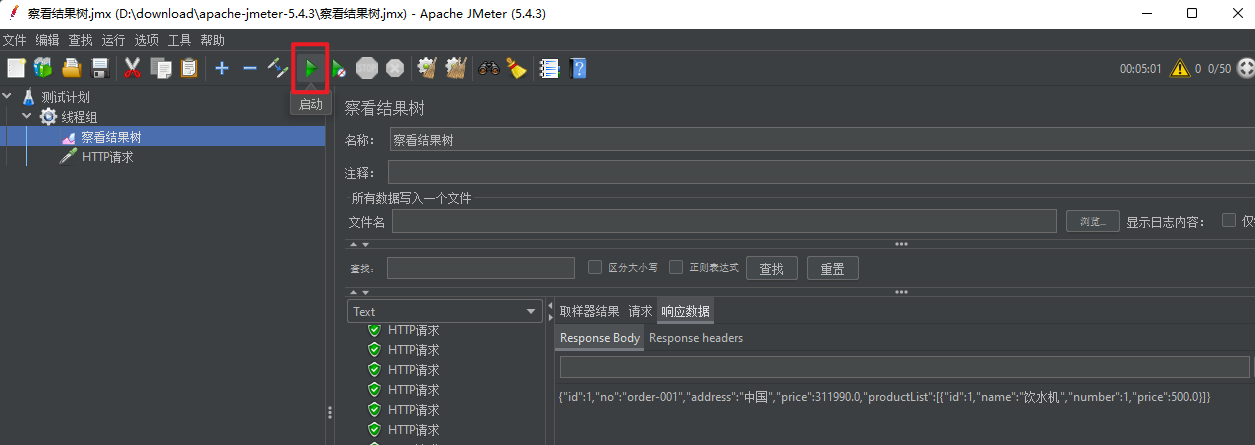
启动执行
5、请求缓存
Hystrix为了降低访问服务的频率,支持将一个请求与返回结果做缓存处理。如果再次请求的URL没有变化,那么Hystrix不会请求服务,而是直接从缓存中将结果返回。这样可以大大降低访问服务的压力。
Hystrix自带缓存有两个缺点:
- 本地缓存,集群情况下无法同步
- 不支持第三方缓存,如Redis,MemCache
这里使用Spring的缓存集成方案,NoSql使用Redis来实现。
添加依赖
        <!--        spring boot data redis-->
        <dependency>
            <groupId>org.springframework.boot</groupId>
            <artifactId>spring-boot-starter-data-redis</artifactId>
            <version>2.5.6</version>
        </dependency>

        <!--        对象池-->
        <dependency>
            <groupId>org.apache.commons</groupId>
            <artifactId>commons-pool2</artifactId>
            <version>2.9.0</version>
        </dependency>
添加配置
spring:
  application:
    name: service-consumer
  redis:
    host: localhost
    port: 6379
    password: root
    database: 0
    timeout: 10000         # 连接超时时间
    lettuce:
      pool:               # 连接池配置
        max-active: 1024  # 最大连接数
        max-wait: 10000   # 最大连接阻塞等待时间,单位毫秒
        max-idle: 200     # 最大空闲连接
        min-idle: 5       # 最小空闲连接
添加配置类
    /**
     * 重写redisTemplate序列化
     * @param redisConnectionFactory
     * @return
     */
    @Bean
    public RedisTemplate<String, Object> redisTemplate(RedisConnectionFactory redisConnectionFactory) {
        RedisTemplate<String, Object> template = new RedisTemplate<>();
        // 为String类型key设置序列化器
        template.setKeySerializer(new StringRedisSerializer());
        template.setValueSerializer(new GenericJackson2JsonRedisSerializer());
        // 为hash类型key设置序列化器
        template.setHashKeySerializer(new StringRedisSerializer());
        template.setHashValueSerializer(new GenericJackson2JsonRedisSerializer());
        template.setConnectionFactory(redisConnectionFactory);
        return template;
    }

    /**
     * 重写cache序列化
     * @param redisTemplate
     * @return
     */
    @Bean
    public RedisCacheManager redisCacheManager(RedisTemplate redisTemplate) {
        RedisCacheWriter redisCacheWriter = RedisCacheWriter.nonLockingRedisCacheWriter(redisTemplate.getConnectionFactory());
        RedisCacheConfiguration redisCacheConfiguration = RedisCacheConfiguration.defaultCacheConfig()
                // 设置默认过期时间
                .entryTtl(Duration.ofMinutes(30))
                // 设置key value的序列化
                .serializeKeysWith(RedisSerializationContext.SerializationPair.fromSerializer(new StringRedisSerializer()))
                .serializeValuesWith(RedisSerializationContext.SerializationPair.fromSerializer(new GenericJackson2JsonRedisSerializer()));

        return new RedisCacheManager(redisCacheWriter, redisCacheConfiguration);
    }
再需要缓存的方法上添加@Cacheable注解
    @Cacheable(cacheNames = "orderService:selectOrder")
    @GetMapping("/product/{id}")
    Product selectProductById(@PathVariable Integer id);
启动类添加@EnableCaching注解
// 开启缓存注解
@EnableCaching
@EnableFeignClients
@SpringBootApplication
public class ServiceConsumerApplication
{
    public static void main( String[] args )
    {
        SpringApplication.run(ServiceConsumerApplication.class);
    }
}
缓存结果

6、请求合并
在微服务架构中,我们将多个项目拆分成很多独立的模块,这些独立的模块通过远程调用来互相配合工作,但是,在搞并发情况下,通信次数的增加会导致总的通信时间增加,同时,线程池的资源是有限的,高并发环境会导致大量的线程处于等待状态,进而导致响应延时,为了解决这些问题,我们需要了解Hystrix的请求合并。
请求合并的缺点
设置请求合并之后,本来一个请求可能5ms就返回了,但是现在必须再等10ms看看还有没有其他的请求一起,这样一个请求的耗时就可能从5m增加到10ms。
如果我们要发起的请求本身就是一个高延时的请求,那么这个时候就可以使用请求合并了,因为这个时候时间消耗就显得微不足道了,另外高并发也是请求合并的一个非常重要的场景。
请求合并的实现
添加依赖
服务消费者添加hystrix依赖
<dependency>
    <groupId>org.springframework.cloud</groupId>
    <artifactId>spring-cloud-starter-netflix-hystrix</artifactId>
</dependency>
添加配置
feign:
  hystrix:
    enabled: true
将多次调用selectById方法合并成一次调用selectByIds方法
    @GetMapping("/phones")
    public List<Product> selectPhoneList(@RequestParam List<Integer> ids) {
        ArrayList<Product> products = new ArrayList<>();
        ArrayList<Future<Product>> futures = new ArrayList<>();
        for (Integer id : ids) {
            Future<Product> productFuture = productService.selectById(id);
            futures.add(productFuture);
        }

        for (Future<Product> future : futures) {
            try {
                products.add(future.get());
            } catch (InterruptedException e) {
                e.printStackTrace();
            } catch (ExecutionException e) {
                e.printStackTrace();
            }
        }

        return products;
    }
合并请求
    // 合并请求
    // 处理合并请求的方法一定要支持异步,返回值必须是Future<T>
    @HystrixCollapser(batchMethod = "selectByIds", // 合并请求方法
            scope = com.netflix.hystrix.HystrixCollapser.Scope.GLOBAL,
            collapserProperties = {
                    // 间隔多久的请求会合并
                    @HystrixProperty(name = "timerDelayInMilliseconds", value = "200"),
                    // 批处理中允许的最大请求书
                    @HystrixProperty(name = "maxRequestsInBatch", value = "200")
            }
    )
    @Override
    public Future<Product> selectById(Integer id) {
        System.out.println("==call method selectById==");
        return null;
    }

    // 声明需要服务容错的方法
    @HystrixCommand
    @Override
    public List<Product> selectByIds(List<Integer> ids) {
        System.out.println("==call method selectByIds==");
        return productClient.selectPhoneList(ids);
    }
@HystrixCollapser注解说明
| 参数 | 作用 | 默认值 | 备注 |
|---|---|---|---|
| @HystrixCollapser | 被@HystrixCollapser标注的方法,返回类型必须为Future,使用异步方法,否则无法进行请求合并 | ||
| batchMethod | 合并请求的方法 | 方法只能接受一个参数,如果需要传递多个参数,可以将它们封装成一个参数 | |
| scope | 请求方式 | REQUEST | 请求方式分为REQUEST和GLOBAL。REQUEST只对一个request请求的多次服务调用进行合并;GLOBAL是对应用中的所有线程的请求中的多次调用进行请求合并 |
| timerDelayInMilliseconds | 请求时间间隔在10ms之内的请求会被合并为一个请求 | 10ms | 建议尽量设置的小一点,如果并发量不大的话,其实也没有必要使用HystrixCollapser来处理 |
| maxRequestsInBatch | 设置触发批处理之前,在批处理中允许的最大请求数 | Integer.MAX_VALUE |
启动类添加@EnableHystrix注解
// 开启熔断器
@EnableHystrix
// 开启缓存注解
@EnableCaching
@EnableFeignClients
@SpringBootApplication
public class ServiceConsumerApplication
{
    public static void main( String[] args )
    {
        SpringApplication.run(ServiceConsumerApplication.class);
    }
}
7、服务隔离
7.1、线程池隔离
没有线程池隔离的项目所有接口都运行在一个ThreadPool中,当某一个接口压力过大或者出现故障,会导致资源耗尽从而影响到其他接口的调用而引发服务雪崩效应。线程池隔离方式,等于多了一层保护措施,可以通过hystrix设置超时,超时后直接返回。
优点:
- 使用线程池隔离可以安全隔离依赖的服务,减少所依赖的服务发生故障时的影响面。比如A服务发生异常,导致请求大量超时,对应的线程池被打满,这时并不影响在其他线程池中的C、D服务的调用。
- 当失败的服务再次变得可用时,线程池将清理并立即恢复,而不需要一个长时间的恢复。
- 独立的线程池提高了并发性。
缺点:
- 请求在线程池中执行,肯定会带来任务调度、排队个上下文切换带来的CPU开销。
- 因为涉及到跨线程,那么就存在ThreadLocal数据传递的问题,比如在主线程初始化的ThreadLocal变量,在线程池中无法获取。
实现线程池隔离
添加@HystrixCommand注解实现线程隔离
    // 线程池隔离
    @HystrixCommand(groupKey = "productServiceSinglePool", // 服务名称,相同名称使用同一个线程池
            commandKey = "selectProductById",              // 接口名称,默认为方法名
            threadPoolKey = "productServiceSinglePool",    // 线程池名称,相同名称使用同一个线程池
            commandProperties = {
                    // 超时时间,默认1000ms
                    @HystrixProperty(name = "execution.isolation.thread.timeoutInMilliseconds", value = "5000")
            },
            threadPoolProperties = {
                    @HystrixProperty(name = "coreSize", value = "5"),  // 线程池大小
                    @HystrixProperty(name = "maxQueueSize", value = "100"),  // 等待队列长度(最大队列长度,默认值-1)
                    @HystrixProperty(name = "keepAliveTimeMinutes", value = "2"), // 线程存活时间,默认1min
                    @HystrixProperty(name = "queueSizeRejectionThreshold", value = "100") // 超出等待队列阈值执行拒绝策略
            },
            fallbackMethod = "selectProductByIdFallBack"
    )
    @Override
    public Product selectProductById(Integer id) {
        System.out.println(Thread.currentThread().getName());
        return productClient.selectProductById(id);
    }

    private Product selectProductByIdFallBack(Integer id) {
        return new Product(888, "未知商品", 0, 0d);
    }

    // 线程池隔离
    @HystrixCommand(groupKey = "productServiceListPool", // 服务名称,相同名称使用同一个线程池
            commandKey = "selectByIds",              // 接口名称,默认为方法名
            threadPoolKey = "productServiceListPool",    // 线程池名称,相同名称使用同一个线程池
            commandProperties = {
            // 超时时间,默认1000ms
            @HystrixProperty(name = "execution.isolation.thread.timeoutInMilliseconds", value = "5000")
            },
            threadPoolProperties = {
            @HystrixProperty(name = "coreSize", value = "10"),  // 线程池大小
                    @HystrixProperty(name = "maxQueueSize", value = "100"),  // 等待队列长度(最大队列长度,默认值-1)
                    @HystrixProperty(name = "keepAliveTimeMinutes", value = "2"), // 线程存活时间,默认1min
                    @HystrixProperty(name = "queueSizeRejectionThreshold", value = "100") // 超出等待队列阈值执行拒绝策略
            },
            fallbackMethod = "selectByIdsFallback"
    )
    @Override
    public List<Product> selectByIds(List<Integer> ids) {
        System.out.println(Thread.currentThread().getName());
        return productClient.selectPhoneList(ids);
    }

    private List<Product> selectByIdsFallback(List<Integer> ids) {
        System.out.println("==call method selectByIdsFallback==");
        return Arrays.asList(new Product(999, "未知商品", 0, 0d));
    }
分别调用两个线程池里的方法

可以通过修改服务提供者使接口超时,触发服务降级
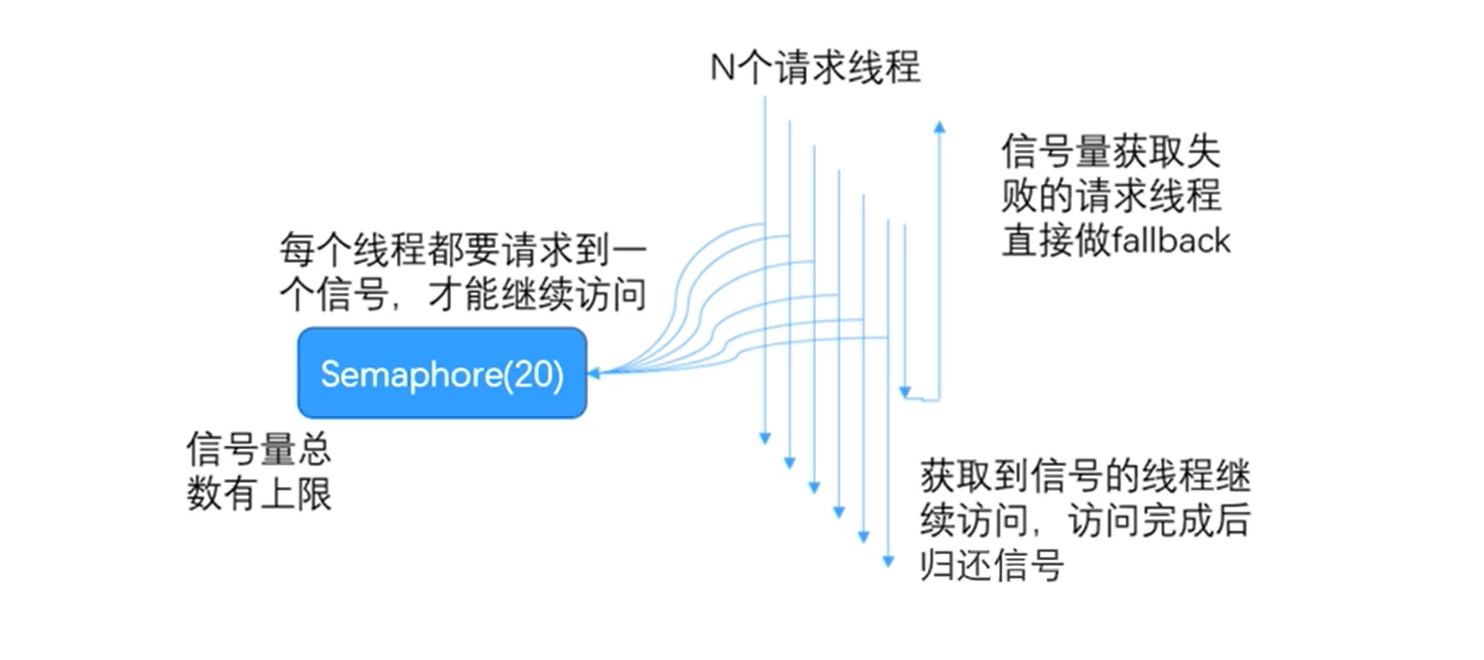
7.2、信号量隔离
每个请求线程通过计数信号进行限制,当信号量大于了最大请求数maxConcurrentRequest时,进行限制,调用fallback接口快速返回。信号量的调用是同步的,也就是说,每次调用都得阻塞调用方的线程,直到结果返回。这样就导致了无法对访问做超时处理(只能依靠协议超时,无法主动释放)。
实现信号量隔离
// 信号量隔离
@HystrixCommand(
        commandProperties = {
                // 超时时间,默认1000ms
                @HystrixProperty(name = HystrixPropertiesManager.EXECUTION_ISOLATION_THREAD_TIMEOUT_IN_MILLISECONDS, value = "5000"),
                // 信号量隔离
                @HystrixProperty(name = HystrixPropertiesManager.EXECUTION_ISOLATION_STRATEGY, value = "SEMAPHORE"),
                // 信号量最大并发
                @HystrixProperty(name = HystrixPropertiesManager.EXECUTION_ISOLATION_SEMAPHORE_MAX_CONCURRENT_REQUESTS, value = "5")
        },
        fallbackMethod = "selectProductByIdFallBack"
)
@Override
public Product selectProductById(Integer id) {
    System.out.println(Thread.currentThread().getName());
    return productClient.selectProductById(id);
}
@HystrixCommand注解说明
| 参数 | 作用 | 默认值 | 备注 |
|---|---|---|---|
| execution.isolation.strategy | 隔离策略配置项 | THREAD | 只有两种THREAD和SEMAPHORE |
| execution.isolation.thread.timeoutInMilliseconds | 超时时间 | 1000ms | 在THREAD模式下,达到超时时间,自动终断;SEMAPHORE模式下,会等待执行完成后,再去判断是否超时; |
| execution.isolation.thread.interruptOnTimeout | 是否打开超时线程终断 | TRUE | THREAD模式有效 |
| execution.isolation.semaphore.maxConcurrentRequests | 信号量最大并发度 | 10 | SEMAPHORE模式有效 |
| fallback.isolation.semaphore.maxConcurrentRequests | fallback最大并发度· | 10 | SEMAPHORE模式有效 |
7.3、线程池隔离VS信号量隔离
7.3.1、线程池隔离
- 处理请求线程和调用provider线程不是同一个线程
- 支持超时,可以直接返回
- 支持熔断,当线程池达到最大线程数后,再请求会触发fallback接口熔断
- 隔离原理:每个服务使用单独线程池
- 支持异步和同步方式
- 资源消耗大,大量的线程上下文切换、排队、调度等,容易造成机器负载高
- 无法传递http header
7.3.2、信号量隔离
- 请求线程和调用provider线程是同一线程
- 不支持超时
- 支持熔断,当信号量达到maxConcurrentRequests后,再请求会触发fallback接口熔断
- 隔离原理:通过信号量计数器
- 仅支持同步调用,不支持异步
- 资源消耗小,只是个计数器
- 可以传递http header
7.3.4、总结
- 请求并发大,耗时长,采用线程池隔离策略。这样可以保证大量的线程可用,不会由于服务原因一直处于阻塞或等待状态,快速失败返回。还有就是对依赖服务的网络请求涉及超时问题的都使用线程隔离。
- 请求并发大,耗时短,采用信号量隔离,因为这类服务的返回通常很快,不会占用线程太长时间,而且也减少了线程切换的开销。
8、服务熔断
服务熔断一般是指软件系统中,由于某些原因使得服务出现了过载现象,为了防止造成整个系统故障,从而采用的一种保护措施,所以很多地方也把熔断称为过载保护。

断路器的打开和关闭流程官网解释如下:

- 请求次数是否达到阈值
- 错误百分比是否超过阈值
- 断路器状态从关闭到开启
- 断路器打开时所有请求短路
- 一定时间后,让下一个请求通过(此时是半开状态),如果请求失败断路器还是开启状态,如果请求成功了断路器关闭,回到第一步
服务熔断实现
@HystrixProperty注解
name:HystrixPropertiesManager
defaultValue:HystrixCommandProperties
    // 服务熔断
    @HystrixCommand(
            commandProperties = {
                    // 请求数阈值:在快照时间窗口内,必须满足请求阈值数才有资格熔断。打开断路器的最少请求数,默认20个请求。意味着在时间窗口内,如果调用次数少于20次,即使所有的请求都超时或者失败,断路器都不会打开
                    @HystrixProperty(name = HystrixPropertiesManager.CIRCUIT_BREAKER_REQUEST_VOLUME_THRESHOLD, value = "10"),
                    // 错误百分比阈值:当请求总数在快照内超过了阈值,且有一半的请求失败,这时断路器将会打开。默认50%
                    @HystrixProperty(name = HystrixPropertiesManager.CIRCUIT_BREAKER_ERROR_THRESHOLD_PERCENTAGE, value = "50"),
                    // 快照时间窗口:断路器开启时需要统计一些请求和错误数据,统计的时间范围就是快照时间窗口,默认5秒
                    @HystrixProperty(name = HystrixPropertiesManager.CIRCUIT_BREAKER_SLEEP_WINDOW_IN_MILLISECONDS, value = "5000")
            },
            fallbackMethod = "selectProductByIdFallBack"
    )
    @Override
    public Product selectProductById(Integer id) {
        System.out.println(Thread.currentThread().getName()+ LocalDateTime.now().format(DateTimeFormatter.ISO_LOCAL_TIME));
        if (id == 1) {
            throw new RuntimeException("模拟查询ID为1导致异常");
        }
        return productClient.selectProductById(id);
    }
可以看到熔断以后相同的请求5秒调用一次selectProductById,其他时间直接调用fallback方法

9、服务降级
9.1、开启条件
- 方法抛出HystrixBadRequestException异常
- 方法调用超时
- 熔断器开启拦截调用
- 线程池、队列、信号量跑满
9.2、服务降级实现
9.2.1、方法服务降级
// 服务降级
@HystrixCommand(fallbackMethod = "selectProductByIdFallBack")
@Override
public Product selectProductById(Integer id) {
    System.out.println(Thread.currentThread().getName()+ LocalDateTime.now().format(DateTimeFormatter.ISO_LOCAL_TIME));
    if (id == 1) {
        throw new RuntimeException("模拟查询ID为1导致异常");
    }
    return productClient.selectProductById(id);
}
9.2.2、类全局服务降级
在类中添加注解
@DefaultProperties(defaultFallback = "selectProductByIdFallback")

在需要降级的方法上添加注解
@HystrixCommand

创建一个全局fallbakc方法
public Product selectProductByIdFallback(){
    return new Product(999, "undefined", 0, 0d);
}
10、Feign实现服务容错
@FeignClient注解申明的接口实现fallbackFactory,在类中new 一个接口的实现类,在方法中重写异常处理相关逻辑
@Slf4j
@Component
public class ProductFallbackFactory implements FallbackFactory<ProductClient> {
    @Override
    public ProductClient create(Throwable throwable) {
        return new ProductClient() {
            @Override
            public List<Product> selectProductList() {
                // 异常处理 todo
                log.error("ProductFallbackFactory-selectProductList异常",throwable);
                return null;
            }

            @Override
            public Product selectProductById(Integer id) {
                // 异常处理 todo
                log.error("ProductFallbackFactory-selectProductById异常", throwable);
                return null;
            }

            @Override
            public Map addProduct(Product product) {
                // 异常处理 todo
                log.error("ProductFallbackFactory-addProduct异常",throwable);
                return null;
            }

            @Override
            public Product selectByProduct(Product product) {
                // 异常处理 todo
                log.error("ProductFallbackFactory-selectByProduct异常",throwable);
                return null;
            }

            @Override
            public List<Product> selectPhoneList(List<Integer> ids) {
                // 异常处理 todo
                log.error("ProductFallbackFactory-selectPhoneList异常",throwable);
                return null;
            }
        };
    }
}
@FeignClient注解添加fallbackFactory配置
@FeignClient(value = "service-provider", fallbackFactory = ProductFallbackFactory.class)
public interface ProductClient {

    @GetMapping("/product/list")
    List<Product> selectProductList();

    @GetMapping("/product/{id}")
    Product selectProductById(@PathVariable Integer id);

    @PostMapping("/product/add")
    Map addProduct(@RequestBody Product product);

    @GetMapping("/product/pojo")
    Product selectByProduct(Product product);

    @GetMapping("/product/phoneList")
    List<Product> selectPhoneList(@RequestParam List<Integer> ids);
}
关闭provider服务,此时调用接口,服务降级,打印异常信息

11、Hystrix服务监控
除了实现服务容错之外,Hystrix还提供了近乎实时的监控功能,将服务执行结果、运行指标、请求数量、成功数量等这些状态通过Actuator进行收集,然后访问/actuator/hystrix.stream即可看到实时的监控数据。
11.1、添加依赖
<dependency>
    <groupId>org.springframework.boot</groupId>
    <artifactId>spring-boot-starter-actuator</artifactId>
</dependency>
11.2、添加配置
management:
  endpoints:
    web:
      exposure:
        include: hystrix.stream
11.3、启动类
添加@EnableHystrix注解
11.4、访问
http://localhost:9090/actuator/hystrix.stream
11.5、查看数据

11.6、监控中心
所谓的监控中心就是Hystrix提供的一套可视化系统,Hystrix-Dashboard,可以非常友好的看到当前环境中服务运行的状态。Hystrix-Dashboard是一款针对Hystrix进行实时监控的工具,通过Hystrix-Dashboard我们可以直观地看到各Hystrix Command的请求响应时间,请求成功率等数据。
11.6.1、添加依赖
在需要开启数据监控的项目中添加dashboard依赖
<dependency>
    <groupId>org.springframework.cloud</groupId>
    <artifactId>spring-cloud-starter-netflix-hystrix</artifactId>
</dependency>

<dependency>
    <groupId>org.springframework.cloud</groupId>
    <artifactId>spring-cloud-starter-netflix-hystrix-dashboard</artifactId>
</dependency>

<dependency>
    <groupId>org.springframework.boot</groupId>
    <artifactId>spring-boot-starter-actuator</artifactId>
</dependency>
启动类
添加注解@EnableHystrixDashboard
// 开启数据监控
@EnableHystrixDashboard
// 开启熔断器
@EnableHystrix
// 开启缓存注解
@EnableCaching
@EnableFeignClients
@SpringBootApplication
public class ServiceConsumerApplication
{
    public static void main( String[] args )
    {
        SpringApplication.run(ServiceConsumerApplication.class);
    }
}
访问
访问:http://localhost:9090/hystrix,控制中心界面如下:


11.7、聚合监控中心搭建
Turbine是聚合服务器发送事件流数据的一个工具,dashboard只能监控单个节点,实际生产环境中都为集群,因此可以通过Turbine来监控集群服务。
新建一个聚合监控项目,添加依赖
<dependency>
  <groupId>org.springframework.cloud</groupId>
  <artifactId>spring-cloud-starter-netflix-hystrix</artifactId>
</dependency>

<dependency>
  <groupId>org.springframework.cloud</groupId>
  <artifactId>spring-cloud-starter-netflix-hystrix-dashboard</artifactId>
</dependency>

<dependency>
  <groupId>org.springframework.cloud</groupId>
  <artifactId>spring-cloud-starter-netflix-turbine</artifactId>
</dependency>
添加配置文件
server:
  port: 8181

spring:
  application:
    name: eureka-turbine

eureka:
  instance:
    prefer-ip-address: true
    instance-id: ${spring.cloud.client.ip-address}:${server.port}
  client:
    service-url:
      defaultZone: http://localhost:8761/eureka/,http://localhost:8762/eureka/


turbine:                                            # 聚合监控
  app-config: service-consumer,service-provider     # 监控的服务列表
  cluster-name-expression: "'default'"              # 指定集群名称
启动类添加注解
@EnableTurbine
@EnableHystrix
@EnableHystrixDashboard
@SpringBootApplication
public class App
{
    public static void main( String[] args )
    {
        SpringApplication.run(App.class);
    }
}
访问http://localhost:8181/hystrix


12、Hystrix工作流程总结

- 构造一个HystrixCommand或者HystrixObservableCommand对象
- 执行command命令
- 结果是否缓存
- 熔断器是否打开
- 线程池、队列、信号量是否打满
- 执行对应的构造方法或者run方法
- 计算熔断器状态开启还是关闭
- 获取fallback返回
- 返回成功响应


 425
425

 被折叠的 条评论
为什么被折叠?
被折叠的 条评论
为什么被折叠?
 到【灌水乐园】发言


