


在RocketMQ的底层通信是依靠它的rocketmq-remoting模块去支持的,而rocketmq-remoting这个模块的底层实现则是基于Netty去实现的,下面我们就把rocketmq-remoting模块剥离出来,去深挖下其实底层是如何通过Netty去实现支撑RocketMQ的通信
设计体系
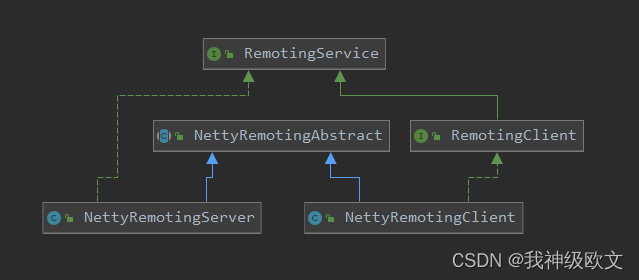
(1)NettyRemotingAbstract
该类是一个抽象类,客户端和服务端都需要依赖于这个类进行消息的发送,主要提供了三个核心方法,分别是同步发送invokeSyncImpl,异步发送invokeAsyncImpl以及单向发送invokeOnewayImpl,三个方法的内容很单一,就是使用不同的方式去发送消息。并且该类中还定义了processRequestCommand方法和processResponseCommand方法,processRequestCommand方法就是用来处理主动发送的普通请求,多数是客户端发送给服务端的请求,而processResponseCommand方法则是用来处理作为响应的请求,多数是服务端发送给客户端作为响应的请求
(2)NettyRemotingClient
该类继承于NettyRemotingAbstract,是专门提供给客户端所使用的,在RocketMQ中生产者,消费者,以及broker都会担任客户端的角色,所以三者在进行与对应的服务端进行通信的时候都会使用这个类,而这个类提供三个发送消息的核心方法,分别是invokeSync,invokeAsync,invokeOneway,这三个方法会分别对NettyRemotingAbstract自身的三个核心方法进行一层包装,比如说创建与服务端的连接channel对象,执行发送消息前后的钩子方法等
(3)NettyRemotingServer
该类也是继承于NettyRemotingAbstract,是专门提供给服务端所使用的,在RocketMQ中NameServer和broker都会担任服务端的角色
编解码协议
(1)请求载体对象RemotingCommand
熟知Netty的都知道要使用Netty第一件事就是需要去定义协议,在RocketMQ中客户端与服务端进行通过的载体是使用RemotingCommand对象,我们来看一下这个对象有哪些属性
/**
 * 请求码,不同的请求码对应着需要处理不同的逻辑
 */
private int code;

private LanguageCode language = LanguageCode.JAVA;

/**
 * 版本号
 */
private int version = 0;

/**
 * 请求ID
 */
private int opaque = requestId.getAndIncrement();

/**
 * 判断请求类型是request类型还是response类型
 * 0 -> request类型
 * 1 -> response类型
 */
private int flag = 0;

/**
 * 备注信息
 */
private String remark;

/**
 * 在发起请求的时候会经过netty编码把customHeader对象中所有非static的字段和对应的值作为key-value存放在这个map中
 * 在接收请求的时候可以调用decodeCommandCustomHeader方法传入对应的请求头类型,此时decodeCommandCustomHeader方法就会把这个map的所有key-value都映射到指定的请求头对象中
 */
private HashMap<String, String> extFields;

/**
 * 请求头对象(注意这里使用了transient关键字修饰,在使用json或者其他序列化当前对象的时候该字段会被忽略)
 */
private transient CommandCustomHeader customHeader;

/**
 * 序列化方式(json或者rocketmq自带)
 */
private SerializeType serializeTypeCurrentRPC = serializeTypeConfigInThisServer;

/**
 * 请求体内容(注意这里使用了transient关键字修饰,在使用json或者其他序列化当前对象的时候该字段会被忽略)
 */
private transient byte[] body;
有几个属性我们需要重点关注的,一个是code请求码,该属性主要是用来标识服务端需要处理什么业务的请求,比如说生产者向broker发送消息,则生产者对这次请求的需要带上发送消息的请求码,当服务端接收到这个请求然后解析之后发现是发送消息的请求码则会去执行发送消息的代码逻辑;另一个是customHeader,这是表示自定义的请求头对象(注意的是它不是完整的请求头,完整的请求头应该是除body之后的所有数据,下面会细说这一点);还有一个是body,它表示请求体的数据内容
(2)对RemotingCommand对象进行编码
编码的过程是在Netty的编码器中,在RocketMQ中处理编码的组件是NettyEncoder
@ChannelHandler.Sharable
public class NettyEncoder extends MessageToByteEncoder<RemotingCommand> {
    private static final InternalLogger log = InternalLoggerFactory.getLogger(RemotingHelper.ROCKETMQ_REMOTING);

    @Override
    public void encode(ChannelHandlerContext ctx, RemotingCommand remotingCommand, ByteBuf out)
        throws Exception {
        try {
            // 把请求头+请求体的长度(占4个byte)+请求头数据写到堆积区
            ByteBuffer header = remotingCommand.encodeHeader();
            out.writeBytes(header);

            // 再把请求体的数据写到堆积区
            byte[] body = remotingCommand.getBody();
            if (body != null) {
                out.writeBytes(body);
            }
        } catch (Exception e) {
            log.error("encode exception, " + RemotingHelper.parseChannelRemoteAddr(ctx.channel()), e);
            if (remotingCommand != null) {
                log.error(remotingCommand.toString());
            }
            RemotingUtil.closeChannel(ctx.channel());
        }
    }
}
在编码器中会把要发送的RemotingCommand对象进行编码,首先会调用RemotingCommand对象的encodeHeader方法对请求头进行编码,然后再把body放入到堆积区中
public ByteBuffer encodeHeader() {
    return encodeHeader(this.body != null ? this.body.length : 0);
}

public ByteBuffer encodeHeader(final int bodyLength) {
    // 1> header length size
    // 给存放请求头长度的分配4个byte
    int length = 4;

    // 2> header data length
    byte[] headerData;
    headerData = this.headerEncode();

    length += headerData.length;

    // 3> body data length
    length += bodyLength;

    ByteBuffer result = ByteBuffer.allocate(4 + length - bodyLength);

    // length
    result.putInt(length);

    // header length
    result.put(markProtocolType(headerData.length, serializeTypeCurrentRPC));

    // header data
    result.put(headerData);

    result.flip();

    return result;
}
在encodeHeader方法会创建一个ByteBuffer,然后分配4个bit去存放整个RemotingCommand请求对象的长度,再使用4个bit去存放请求头的长度,最后把请求头放进ByteBuffer,而这里在把请求头放进ByteBuffer之前调用了headerEncode方法
private byte[] headerEncode() {
    // 把请求头对象中的非static字段都放到extFields这个map中,key等于请求头对象每一个字段的名称,value等于对应的值
    this.makeCustomHeaderToNet();
    if (SerializeType.ROCKETMQ == serializeTypeCurrentRPC) {
        return RocketMQSerializable.rocketMQProtocolEncode(this);
    } else {
        // 把当前RemotingCommand对象序列化成json字符串,这里注意的是customHeader字段和body字段都加了transient关键字,所以这两字段会被忽略json序列化
        return RemotingSerializable.encode(this);
    }
}
headerEncode方法中做的主要就是把整个RemotingCommand对象进行序列化染回返回序列化之后的byte数组,可能有人这里会有疑问,就是这不就是相当于把整个RemotingCommand对象都作为请求头了吗?但是当我们仔细去看customHeader字段和body字段就会发现,这两个字段加了一个transient关键字,这个关键字的作用就是在序列化的时候会自动忽略掉当前字段,也就是说customHeader和body这两个字段不参与序列化。而body不参与请求头序列化完全可以理解的,但是customHeader也不参与吗?其实并不是,在headerEncode方法中还调用了一个makeCustomHeaderToNet方法
/**
 * 把请求头对象中的非static字段都放到extFields这个map中,key等于请求头对象每一个字段的名称,value等于对应的值
 */
public void makeCustomHeaderToNet() {
    if (this.customHeader != null) {
        Field[] fields = getClazzFields(customHeader.getClass());
        if (null == this.extFields) {
            this.extFields = new HashMap<String, String>();
        }

        for (Field field : fields) {
            if (!Modifier.isStatic(field.getModifiers())) {
                String name = field.getName();
                if (!name.startsWith("this")) {
                    Object value = null;
                    try {
                        field.setAccessible(true);
                        value = field.get(this.customHeader);
                    } catch (Exception e) {
                        log.error("Failed to access field [{}]", name, e);
                    }

                    if (value != null) {
                        this.extFields.put(name, value.toString());
                    }
                }
            }
        }
    }
}
该方法的作用就是把customHeader对象的所有非static字段和对应的值作为key-value放到extFileds这个map字段中。这样的话headerEncode方法返回的请求头序列化数据其实就是除开body之后的序列化数据,所以就对应到上面说的customHeader字段并不代表整个请求头的结论了。最终RemotingCommand对象编码之后如图所示:

(3)对RemotingCommand对象进行解码
RocketMQ中的解码器是NettyDecoder
public class NettyDecoder extends LengthFieldBasedFrameDecoder {
    private static final InternalLogger log = InternalLoggerFactory.getLogger(RemotingHelper.ROCKETMQ_REMOTING);

    private static final int FRAME_MAX_LENGTH =
        Integer.parseInt(System.getProperty("com.rocketmq.remoting.frameMaxLength", "16777216"));

    public NettyDecoder() {
        super(FRAME_MAX_LENGTH, 0, 4, 0, 4);
    }

    @Override
    public Object decode(ChannelHandlerContext ctx, ByteBuf in) throws Exception {
        ByteBuf frame = null;
        try {
            // 根据设置的解码规则获取到完整的frame
            frame = (ByteBuf) super.decode(ctx, in);
            if (null == frame) {
                return null;
            }

            // 转换成ByteBuffer
            ByteBuffer byteBuffer = frame.nioBuffer();

            return RemotingCommand.decode(byteBuffer);
        } catch (Exception e) {
            log.error("decode exception, " + RemotingHelper.parseChannelRemoteAddr(ctx.channel()), e);
            RemotingUtil.closeChannel(ctx.channel());
        } finally {
            if (null != frame) {
                frame.release();
            }
        }

        return null;
    }
}
该解码器继承于Netty自带的定长解码器LengthFieldBasedFrameDecoder,可以看到LengthFieldBasedFrameDecoder的lengthFieldLength属性传的是4,表示使用4个bit去存放整个请求的长度,这一点和我们上面编码的时候对应上了,并且initialBytesToStrip属性传的也是4,表示在最后解码完成的时候丢弃掉前面4个bit,也就是不要整个请求的长度。最终解码到的完整frame通过RemotingCommand的decode方法转换成RemotingCommand对象
/**
 * 把经过netty解码器之后的得到byteBuffer转换成RemotingCommand对象
 * @param byteBuffer    经过netty解码器之后得到的数据
 * @return  转换后的RemotingCommand对象
 */
public static RemotingCommand decode(final ByteBuffer byteBuffer) {
    int length = byteBuffer.limit();
    // 获取到请求头的长度
    int oriHeaderLen = byteBuffer.getInt();
    int headerLength = getHeaderLength(oriHeaderLen);

    // 把byteBuffer中请求头的数据放到headerData数组中
    byte[] headerData = new byte[headerLength];
    byteBuffer.get(headerData);

    // 根据序列化方式去创建RemotingCommand对象
    RemotingCommand cmd = headerDecode(headerData, getProtocolType(oriHeaderLen));

    // 获取到请求体的长度
    int bodyLength = length - 4 - headerLength;
    byte[] bodyData = null;
    if (bodyLength > 0) {
        // 把byteBuffer中请求体的数据放到bodyData数组中
        bodyData = new byte[bodyLength];
        byteBuffer.get(bodyData);
    }

    // 把请求体数据赋值给RemotingCommand对象的body属性中
    cmd.body = bodyData;

    return cmd;
}
RemotingCommand的decode方法很简单,就是把解码器解析到的完整frame转换成RemotingCommand对象,首先根据请求头的长度去把frame中的header根据对应的序列化方式转换成RemotingCommand对象,然后再把frame剩余的字节,也就是请求体字节数组赋值给RemotingCommand的body字段。上面我们说了在发送消息的时候会把customHeader对象的字段映射到extFileds中,那么在接收到这个RemotingCommand对象的时候是怎么把extFields转换成对应的customHeader呢?
/**
 * 把当前RemotingCommand对象的extFields这个map映射到指定类型的请求头对象中,然后返回这个请求头对象
 * @param classHeader   指定类型的请求头
 * @return  请求头对象
 * @throws RemotingCommandException
 */
public CommandCustomHeader decodeCommandCustomHeader(
    Class<? extends CommandCustomHeader> classHeader) throws RemotingCommandException {
    CommandCustomHeader objectHeader;
    try {
        // 通过反射创建出请求头对象
        objectHeader = classHeader.newInstance();
    } catch (InstantiationException e) {
        return null;
    } catch (IllegalAccessException e) {
        return null;
    }

    // 如果当前请求对象中的扩展信息不为空
    if (this.extFields != null) {
        // 先获取指定的请求头对象中所有的fields
        Field[] fields = getClazzFields(classHeader);
        // 遍历所有的fields
        for (Field field : fields) {
            // 如果该field不是静态的
            if (!Modifier.isStatic(field.getModifiers())) {
                // 获取field的名称
                String fieldName = field.getName();
                // 如果该field的名称不是以 this 开头的
                if (!fieldName.startsWith("this")) {
                    try {
                        // 从扩展信息中根据 field 的名称去获取对应的 value
                        String value = this.extFields.get(fieldName);
                        if (null == value) {
                            // 如果value是null, 并且该 filed 有@CFNotNull注解就会抛异常
                            if (!isFieldNullable(field)) {
                                throw new RemotingCommandException("the custom field <" + fieldName + "> is null");
                            }
                            continue;
                        }

                        field.setAccessible(true);
                        String type = getCanonicalName(field.getType());
                        Object valueParsed;

                        if (type.equals(STRING_CANONICAL_NAME)) {
                            valueParsed = value;
                        } else if (type.equals(INTEGER_CANONICAL_NAME_1) || type.equals(INTEGER_CANONICAL_NAME_2)) {
                            valueParsed = Integer.parseInt(value);
                        } else if (type.equals(LONG_CANONICAL_NAME_1) || type.equals(LONG_CANONICAL_NAME_2)) {
                            valueParsed = Long.parseLong(value);
                        } else if (type.equals(BOOLEAN_CANONICAL_NAME_1) || type.equals(BOOLEAN_CANONICAL_NAME_2)) {
                            valueParsed = Boolean.parseBoolean(value);
                        } else if (type.equals(DOUBLE_CANONICAL_NAME_1) || type.equals(DOUBLE_CANONICAL_NAME_2)) {
                            valueParsed = Double.parseDouble(value);
                        } else {
                            throw new RemotingCommandException("the custom field <" + fieldName + "> type is not supported");
                        }
                        // 把value赋值给请求头对象对应的field
                        field.set(objectHeader, valueParsed);

                    } catch (Throwable e) {
                        log.error("Failed field [{}] decoding", fieldName, e);
                    }
                }
            }
        }

        objectHeader.checkFields();
    }

    return objectHeader;
}
我们可以通过decodeCommandCustomHeader方法,指定对应的请求头对象,然后就可以把extFileds中的key-value重新映射到这个请求头对象中了,此时就可以方便地获取到这个请求头对象的每一个字段值了
发送消息
(1)同步发送
org.apache.rocketmq.remoting.netty.NettyRemotingClient#invokeSync
/**
 * 发送同步消息
 * @param addr  目的地址
 * @param request   请求载体
 * @param timeoutMillis 超时时间
 * @return
 * @throws InterruptedException
 * @throws RemotingConnectException
 * @throws RemotingSendRequestException
 * @throws RemotingTimeoutException
 */
@Override
public RemotingCommand invokeSync(String addr, final RemotingCommand request, long timeoutMillis)
    throws InterruptedException, RemotingConnectException, RemotingSendRequestException, RemotingTimeoutException {
    long beginStartTime = System.currentTimeMillis();

    // 获取或者创建与服务端的channel通道
    final Channel channel = this.getAndCreateChannel(addr);
    if (channel != null && channel.isActive()) {
        try {
            // 执行RPCHook的doBeforeRequest钩子方法
            doBeforeRpcHooks(addr, request);
            // 判断此时是否超时
            long costTime = System.currentTimeMillis() - beginStartTime;
            if (timeoutMillis < costTime) {
                throw new RemotingTimeoutException("invokeSync call timeout");
            }

            // 向服务端发送同步请求
            RemotingCommand response = this.invokeSyncImpl(channel, request, timeoutMillis - costTime);
            // 执行RPCHook的doAfterResponse钩子方法
            doAfterRpcHooks(RemotingHelper.parseChannelRemoteAddr(channel), request, response);
            // 返回response请求结果
            return response;
        } catch (RemotingSendRequestException e) {
            log.warn("invokeSync: send request exception, so close the channel[{}]", addr);
            this.closeChannel(addr, channel);
            throw e;
        } catch (RemotingTimeoutException e) {
            if (nettyClientConfig.isClientCloseSocketIfTimeout()) {
                this.closeChannel(addr, channel);
                log.warn("invokeSync: close socket because of timeout, {}ms, {}", timeoutMillis, addr);
            }
            log.warn("invokeSync: wait response timeout exception, the channel[{}]", addr);
            throw e;
        }
    } else {
        this.closeChannel(addr, channel);
        throw new RemotingConnectException(addr);
    }
}- 获取目标地址channel
首先会调用getAndCreateChannel方法获取到与目标地址的channel通道对象
/**
 * 根据IP地址从channelTables获取对应的channel通道,如果获取不到,创建一个channel通道
 * @param addr  IP地址
 * @return  要获取的地址对应的连接channel
 * @throws RemotingConnectException
 * @throws InterruptedException
 */
private Channel getAndCreateChannel(final String addr) throws RemotingConnectException, InterruptedException {
    // 条件成立:addr == null,说明要获取与NameServer之间的连接channel
    if (null == addr) {
        return getAndCreateNameserverChannel();
    }

    // 代码执行到这里说明不是获取NameServer的接连channel
    // 从本地缓存channelTables表中获取对应地址的channel
    ChannelWrapper cw = this.channelTables.get(addr);
    if (cw != null && cw.isOK()) {
        return cw.getChannel();
    }

    // 代码执行到这里说明本地缓存中不存在这个地址对应的连接channel
    // 此时需要去创建与这个地址之间的连接channel
    return this.createChannel(addr);
}
getAndCreateChannel中先去channelTables本地缓存中获取channel对象,如果有则返回,没有则会调用createChannel方法去创建
/**
 * 对指定的netty服务端地址发起连接,创建出一个channel通道,并保存到本地缓存channelTables表中
 * @param addr  该地址对应的连接channel
 * @return  创建的连接channel
 * @throws InterruptedException
 */
private Channel createChannel(final String addr) throws InterruptedException {
    ChannelWrapper cw = this.channelTables.get(addr);
    if (cw != null && cw.isOK()) {
        return cw.getChannel();
    }

    // 加锁
    if (this.lockChannelTables.tryLock(LOCK_TIMEOUT_MILLIS, TimeUnit.MILLISECONDS)) {
        try {
            boolean createNewConnection;
            cw = this.channelTables.get(addr);
            if (cw != null) {

                if (cw.isOK()) {
                    return cw.getChannel();
                } else if (!cw.getChannelFuture().isDone()) {
                    createNewConnection = false;
                } else {
                    this.channelTables.remove(addr);
                    createNewConnection = true;
                }
            } else {
                createNewConnection = true;
            }

            // 在这里,客户端对服务端发起连接请求,并且把ChannelFuture保存在channelTables表中,下一次可直接从channelTables中找到该channel
            if (createNewConnection) {
                ChannelFuture channelFuture = this.bootstrap.connect(RemotingHelper.string2SocketAddress(addr));
                log.info("createChannel: begin to connect remote host[{}] asynchronously", addr);
                cw = new ChannelWrapper(channelFuture);
                this.channelTables.put(addr, cw);
            }
        } catch (Exception e) {
            log.error("createChannel: create channel exception", e);
        } finally {
            this.lockChannelTables.unlock();
        }
    } else {
        log.warn("createChannel: try to lock channel table, but timeout, {}ms", LOCK_TIMEOUT_MILLIS);
    }

    if (cw != null) {
        ChannelFuture channelFuture = cw.getChannelFuture();
        if (channelFuture.awaitUninterruptibly(this.nettyClientConfig.getConnectTimeoutMillis())) {
            if (cw.isOK()) {
                log.info("createChannel: connect remote host[{}] success, {}", addr, channelFuture.toString());
                return cw.getChannel();
            } else {
                log.warn("createChannel: connect remote host[" + addr + "] failed, " + channelFuture.toString(), channelFuture.cause());
            }
        } else {
            log.warn("createChannel: connect remote host[{}] timeout {}ms, {}", addr, this.nettyClientConfig.getConnectTimeoutMillis(),
                channelFuture.toString());
        }
    }

    return null;
}
createChannel方法的核心其实就是调用BootStrap的connect方法与目标地址进行连接,返回一个channel对象,然后把这个channel对象缓存到channelTables中,这样的话下次就可以直接从channelTables中获取到对应的channel对象了
- 回调发送消息前后的钩子方法
protected void doBeforeRpcHooks(String addr, RemotingCommand request) {
    if (rpcHooks.size() > 0) {
        for (RPCHook rpcHook: rpcHooks) {
            rpcHook.doBeforeRequest(addr, request);
        }
    }
}
protected void doAfterRpcHooks(String addr, RemotingCommand request, RemotingCommand response) {
if (rpcHooks.size() > 0) {
for (RPCHook rpcHook: rpcHooks) {
rpcHook.doAfterResponse(addr, request, response);
}
}
}在获取到channel之后,就是去真正地发送消息了,而在发送消息的前后,RocketMQ留了两个口子给我们进行扩展,一个是发送消息前,一个是发送消息后,这两个扩展我们可以去做我们自定义的一些会去调用注册的RPCHook的doBeforeRequest方法,我们可以在这里去做一些发送消息前的处理
- 真正发送消息
org.apache.rocketmq.remoting.netty.NettyRemotingAbstract#invokeSyncImpl
/**
 * 同步发送请求,当发送方发起请求之后会阻塞一段时间,直到接收方返回response请求阻塞才会解除
 * @param channel   channel通道
 * @param request   请求载体
 * @param timeoutMillis 超时时间
 * @return
 * @throws InterruptedException
 * @throws RemotingSendRequestException
 * @throws RemotingTimeoutException
 */
public RemotingCommand invokeSyncImpl(final Channel channel, final RemotingCommand request,
    final long timeoutMillis)
    throws InterruptedException, RemotingSendRequestException, RemotingTimeoutException {
    final int opaque = request.getOpaque();

    try {
        // 创建一个ResponseFuture对象
        final ResponseFuture responseFuture = new ResponseFuture(channel, opaque, timeoutMillis, null, null);
        // 把requestId与responseFuture保存到responseTable表内,方便接收方发送请求响应的时候能够根据opaque找到responseFuture从而解除阻塞
        this.responseTable.put(opaque, responseFuture);
        // 获取接收方地址
        final SocketAddress addr = channel.remoteAddress();
        // 往channel写数据,并添加了写数据的监听器
        channel.writeAndFlush(request).addListener(new ChannelFutureListener() {
            @Override
            public void operationComplete(ChannelFuture f) throws Exception {
                // 条件成立:说明写刷数据到socket写缓冲区成功
                if (f.isSuccess()) {
                    responseFuture.setSendRequestOK(true);
                    // 直接返回
                    return;
                }
                // 条件成立:说明写刷数据失败
                else {
                    responseFuture.setSendRequestOK(false);
                }

                // 代码执行到这里说明写刷数据失败了,那么就把requestId对应的responseFuture从responseTable表移除
                responseTable.remove(opaque);
                responseFuture.setCause(f.cause());
                responseFuture.putResponse(null);
                log.warn("send a request command to channel <" + addr + "> failed.");
            }
        });

        // 当接收到response请求之后,会经过netty的InboundHandler然后进入处理response请求的processResponseCommand()方法,
        // 在这个方法中会根据requestId去找到对应的responseFuture,然后调用responseFuture.putResponse(cmd)方法,responseFuture.putResponse(cmd)里面会间接调用countDownLatch.countDown(),所以线程就不再阻塞了
        // 也就是说invokeSyncImpl()方法发送请求之后需要等待对端返回response请求,这个request请求线程才能解除阻塞,否则将会阻塞直到超时
        RemotingCommand responseCommand = responseFuture.waitResponse(timeoutMillis);

        // 条件成立:说明responseCommand服务端响应超时或客户端写刷数据失败
        if (null == responseCommand) {
            // 条件成立:表示客户端写刷数据成功了,但是服务器响应超时了,抛出超时异常
            if (responseFuture.isSendRequestOK()) {
                throw new RemotingTimeoutException(RemotingHelper.parseSocketAddressAddr(addr), timeoutMillis,
                    responseFuture.getCause());
            }
            // 条件成立:表示客户端写刷数据就已经失败了,所以抛出发送消息异常
            else {
                throw new RemotingSendRequestException(RemotingHelper.parseSocketAddressAddr(addr), responseFuture.getCause());
            }
        }

        // 返回broker请求响应对象
        return responseCommand;
    } finally {
        // 最后把responseFuture移除
        this.responseTable.remove(opaque);
    }
}
invokeSyncImpl方法是父类NettyRemotingAbstract实现的,该方法中主要就是实现同步发送消息的。首先会创建一个ResponseFuture,这个对象的作用就是去阻塞发送消息线程的,然后调用channel的writeAndFlush方法把要发送的数据写刷到socket的写缓冲区,接着就是执行ResponseFuture的waitResponse方法
public RemotingCommand waitResponse(final long timeoutMillis) throws InterruptedException {
    this.countDownLatch.await(timeoutMillis, TimeUnit.MILLISECONDS);
    return this.responseCommand;
}
可以看到waitResponse方法通过CountDownLatch把当前发送消息的线程阻塞了,那么什么时候会解除阻塞呢?因为是同步发送,所以肯定是在接收到接收方响应的时候才会解除阻塞,那么我们现在来到处理接收方响应的方法
**
 * 处理response类型的请求
 * @param ctx channel handler context.
 * @param cmd response command instance.
 */
public void processResponseCommand(ChannelHandlerContext ctx, RemotingCommand cmd) {
    final int opaque = cmd.getOpaque();
    // 根据requestId从responseTable表中找到对应的ResponseFuture
    final ResponseFuture responseFuture = responseTable.get(opaque);

    // 条件成立:说明找到了对应的ResponseFuture
    if (responseFuture != null) {
        // 把response请求的请求载体放到这个ResponseFuture中
        responseFuture.setResponseCommand(cmd);
        // 此时已经接收到request请求对应的response请求,所以可以根据requestId把该request请求的responseFuture移除
        responseTable.remove(opaque);

        // 条件成立:说明是异步请求,主要针对发送方发起了异步请求的情况,如果异步回调接口不为空,那么当执行异步接口回调
        if (responseFuture.getInvokeCallback() != null) {
            executeInvokeCallback(responseFuture);
        }
        // 条件成立:说明是同步请求
        else {
            // 这里会解除在同步request请求中的阻塞
            responseFuture.putResponse(cmd);
            responseFuture.release();
        }
    } else {
        log.warn("receive response, but not matched any request, " + RemotingHelper.parseChannelRemoteAddr(ctx.channel()));
        log.warn(cmd.toString());
    }
processResponseCommand方法就是处理接收方发送过来的响应,首先会根据请求id从responseTable中找到对应的ResponseFuture,这里需要说明一下,就是发送的请求的请求id和响应请求的请求id是相同的,所以这里找到的ResponseFuture对象和在一开始发送消息时创建的ResponseFuture对象是同一个对象,获取到ResponseFuture对象之后,如果是同步请求的话就直接调用它的putResponse方法,传进响应请求的请求载体
public void putResponse(final RemotingCommand responseCommand) {
    this.responseCommand = responseCommand;
    this.countDownLatch.countDown();
}
在putResponse方法中就是调用CountDownLatch的countdown方法,此时发送消息的线程就会被唤醒了
- 发送消息失败如何处理?
如果发送消息失败了,那么发送线程会一直阻塞吗?答案是肯定不会的,因为调用CountDownLatch的wait方法传入了超时时间,如果一直没有收到接收方的响应则会超时唤醒发送线程;那么就发送消息失败一定要等待超时才能唤醒发送线程吗?答案也是否定的,在调用channel的writeAndFlush方法发送消息的时候还设置了一个监听器用来监听数据是否写刷成功
channel.writeAndFlush(request).addListener(new ChannelFutureListener() {
    @Override
    public void operationComplete(ChannelFuture f) throws Exception {
        // 条件成立:说明写刷数据到socket写缓冲区成功
        if (f.isSuccess()) {
            responseFuture.setSendRequestOK(true);
            // 直接返回
            return;
        }
        // 条件成立:说明写刷数据失败
        else {
            responseFuture.setSendRequestOK(false);
        }

        // 代码执行到这里说明写刷数据失败了,那么就把requestId对应的responseFuture从responseTable表移除
        responseTable.remove(opaque);
        responseFuture.setCause(f.cause());
        responseFuture.putResponse(null);
        log.warn("send a request command to channel <" + addr + "> failed.");
    }
});
如果数据写刷到socket写缓冲区成功,则会把ResponseFuture的sendRequestOK属性标记为true并且直接return,否则就标记为false并且会调用putResponse方法解除发送线程的阻塞
RemotingCommand responseCommand = responseFuture.waitResponse(timeoutMillis);

// 条件成立:说明responseCommand服务端响应超时或客户端写刷数据失败
if (null == responseCommand) {
    // 条件成立:表示客户端写刷数据成功了,但是服务器响应超时了,抛出超时异常
    if (responseFuture.isSendRequestOK()) {
        throw new RemotingTimeoutException(RemotingHelper.parseSocketAddressAddr(addr), timeoutMillis,
            responseFuture.getCause());
    }
    // 条件成立:表示客户端写刷数据就已经失败了,所以抛出发送消息异常
    else {
        throw new RemotingSendRequestException(RemotingHelper.parseSocketAddressAddr(addr), responseFuture.getCause());
    }
}
此时获取到的RemotingCommand对象就是null,而RemotingCommand等于null也会有两种情况,一种就是把数据写刷到socket写缓冲区成功了,但是并没有收到接收方的响应(可能是发送方数据发送不到给接收方,也可能是网络原因接收方没及时响应),这种情况会抛出RemotingTimeoutException异常,另一种就是数据写刷到socket写缓冲区都失败了,那么此时就抛出RemotingSendRequestException异常
(2)异步发送
异步发送的创建channel,回调钩子的过程和同步发送一样,这里主要讲异步发送的过程
org.apache.rocketmq.remoting.netty.NettyRemotingAbstract#invokeAsyncImpl
/**
 * 异步发送请求
 * @param channel   channel通道
 * @param request   请求载体
 * @param timeoutMillis 超时时间
 * @param invokeCallback    异步回调
 * @throws InterruptedException
 * @throws RemotingTooMuchRequestException
 * @throws RemotingTimeoutException
 * @throws RemotingSendRequestException
 */
public void invokeAsyncImpl(final Channel channel, final RemotingCommand request, final long timeoutMillis,
    final InvokeCallback invokeCallback)
    throws InterruptedException, RemotingTooMuchRequestException, RemotingTimeoutException, RemotingSendRequestException {
    long beginStartTime = System.currentTimeMillis();
    // 获取request请求的requestId
    final int opaque = request.getOpaque();
    // 使用信号量限制发送异步消息的并发线程数
    boolean acquired = this.semaphoreAsync.tryAcquire(timeoutMillis, TimeUnit.MILLISECONDS);
    if (acquired) {
        final SemaphoreReleaseOnlyOnce once = new SemaphoreReleaseOnlyOnce(this.semaphoreAsync);
        // 判断此时消耗的时间是否超过了指定的超时时间
        long costTime = System.currentTimeMillis() - beginStartTime;
        if (timeoutMillis < costTime) {
            // 发送超时了,释放锁并且抛出异常
            once.release();
            throw new RemotingTimeoutException("invokeAsyncImpl call timeout");
        }

        final ResponseFuture responseFuture = new ResponseFuture(channel, opaque, timeoutMillis - costTime, invokeCallback, once);
        // 把requestId与responseFuture保存到responseTable表
        this.responseTable.put(opaque, responseFuture);
        try {
            channel.writeAndFlush(request).addListener(new ChannelFutureListener() {
                @Override
                public void operationComplete(ChannelFuture f) throws Exception {
                    if (f.isSuccess()) {
                        responseFuture.setSendRequestOK(true);
                        return;
                    }
                    // 执行到这里说明写刷socket写缓冲区失败
                    requestFail(opaque);
                    log.warn("send a request command to channel <{}> failed.", RemotingHelper.parseChannelRemoteAddr(channel));
                }
            });
        } catch (Exception e) {
            responseFuture.release();
            log.warn("send a request command to channel <" + RemotingHelper.parseChannelRemoteAddr(channel) + "> Exception", e);
            throw new RemotingSendRequestException(RemotingHelper.parseChannelRemoteAddr(channel), e);
        }
    }
    // 如果此时发送异步消息的线程并发数太多会导致该线程抢不到锁,那么就会抛出异常
    else {
        if (timeoutMillis <= 0) {
            throw new RemotingTooMuchRequestException("invokeAsyncImpl invoke too fast");
        } else {
            String info =
                String.format("invokeAsyncImpl tryAcquire semaphore timeout, %dms, waiting thread nums: %d semaphoreAsyncValue: %d",
                    timeoutMillis,
                    this.semaphoreAsync.getQueueLength(),
                    this.semaphoreAsync.availablePermits()
                );
            log.warn(info);
            throw new RemotingTimeoutException(info);
        }
    }
}
与同步发送不一样的是方法参数多了一个异步回调对象,并起异步发送是有限流的,具体是使用Semaphore去限制发送线程的并发数,如果超过了发送线程的并发数则会抛出RemotingTooMuchRequestException异常,然后还是创建一个ResponseFuture对象,只不过它的作用就不是阻塞发送线程了,而是保存异步回调对象,以便收到接收方响应的时候能够执行这个回调,接着就是把这个ResponseFuture对象与请求id绑定在一起存放到responseTable中,再调用channel的writeAndFlush方法写刷数据,写刷完之后,当收到接收方的响应的时候就会去回调方法参数传入的回调对象,代码如下:
/**
 * 执行请求结果的回调
 */
private void executeInvokeCallback(final ResponseFuture responseFuture) {
    boolean runInThisThread = false;
    // 获取执行异步回调方法的线程池
    // 对于客户端来说需要用户自己去设置,如果没有就取公共线程池publicExecutor
    // 对于服务端来说直接去公共线程池publicExecutor
    ExecutorService executor = this.getCallbackExecutor();
    // 条件成立:说明线程池不为空
    if (executor != null) {
        try {
            // 公共线程池执行异步回调任务
            executor.submit(new Runnable() {
                @Override
                public void run() {
                    try {
                        responseFuture.executeInvokeCallback();
                    } catch (Throwable e) {
                        log.warn("execute callback in executor exception, and callback throw", e);
                    } finally {
                        responseFuture.release();
                    }
                }
            });
        } catch (Exception e) {
            runInThisThread = true;
            log.warn("execute callback in executor exception, maybe executor busy", e);
        }
    }
    // 条件成立:说明线程池为空
    else {
        runInThisThread = true;
    }

    // 如果没有线程池去执行回调则在当前线程执行
    if (runInThisThread) {
        try {
            responseFuture.executeInvokeCallback();
        } catch (Throwable e) {
            log.warn("executeInvokeCallback Exception", e);
        } finally {
            responseFuture.release();
        }
    }
}
/**
* 执行异步回调
*/
public void executeInvokeCallback() {
if (invokeCallback != null) {
if (this.executeCallbackOnlyOnce.compareAndSet(false, true)) {
// 在这里会去回调异步发送请求定义的SendCallback回调接口对象
invokeCallback.operationComplete(this);
}
}
}如果设置了回调线程池,那么就在回调线程池中去执行回调,如果没有手动设置回调线程池,那么就会使用公共线程池去执行回调
(3)单向发送
org.apache.rocketmq.remoting.netty.NettyRemotingAbstract#invokeOnewayImpl
/**
 * 发送单向请求
 * @param channel   channel通道
 * @param request   请求载体
 * @param timeoutMillis 超时时间
 * @throws InterruptedException
 * @throws RemotingTooMuchRequestException
 * @throws RemotingTimeoutException
 * @throws RemotingSendRequestException
 */
public void invokeOnewayImpl(final Channel channel, final RemotingCommand request, final long timeoutMillis)
    throws InterruptedException, RemotingTooMuchRequestException, RemotingTimeoutException, RemotingSendRequestException {
    request.markOnewayRPC();
    boolean acquired = this.semaphoreOneway.tryAcquire(timeoutMillis, TimeUnit.MILLISECONDS);
    // 当前线程抢到了锁
    if (acquired) {
        final SemaphoreReleaseOnlyOnce once = new SemaphoreReleaseOnlyOnce(this.semaphoreOneway);
        try {
            // 写刷数据
            channel.writeAndFlush(request).addListener(new ChannelFutureListener() {
                @Override
                public void operationComplete(ChannelFuture f) throws Exception {
                    // 不管写刷数据是否成功,写刷数据完成后直接返回,并且释放锁
                    once.release();
                    // 写刷数据失败,打印下日志
                    if (!f.isSuccess()) {
                        log.warn("send a request command to channel <" + channel.remoteAddress() + "> failed.");
                    }
                }
            });
        } catch (Exception e) {
            once.release();
            log.warn("write send a request command to channel <" + channel.remoteAddress() + "> failed.");
            throw new RemotingSendRequestException(RemotingHelper.parseChannelRemoteAddr(channel), e);
        }
    }
    // 当前线程抢不到锁
    else {
        if (timeoutMillis <= 0) {
            throw new RemotingTooMuchRequestException("invokeOnewayImpl invoke too fast");
        } else {
            String info = String.format(
                "invokeOnewayImpl tryAcquire semaphore timeout, %dms, waiting thread nums: %d semaphoreAsyncValue: %d",
                timeoutMillis,
                this.semaphoreOneway.getQueueLength(),
                this.semaphoreOneway.availablePermits()
            );
            log.warn(info);
            throw new RemotingTimeoutException(info);
        }
    }
}
单向发送的意思就是生产者发送了消息之后就不管消息的发送是否成功,也没有任何回调。单向发送也会限制发送消息的线程并发数,在调用channel的writeAndFlush方法之后就会直接返回了,并且可以看到在监听器中并不会去判断消息是否发送成功,不管成功还是失败,都只会做一件事,那就是释放信号量的锁


 3389
3389

 被折叠的 条评论
为什么被折叠?
被折叠的 条评论
为什么被折叠?
 到【灌水乐园】发言


