


整理总结自:https://blog.csdn.net/qq_27828675/article/details/82388555
文章目录
源码:
https://github.com/2578197547/security-Oauth2.0
1.Springboot整合security
1.1.介绍
Spring Security是为基于Spring的应用程序提供声明式安全保护的安全性框架,它提供了完整的安全性解决方案,能够在web请求级别和方法调用级别处理身份证验证和授权。因为基于Spring框架,所以Spring Security充分利用了依赖注入和面向切面的技术
Spring Security主要是从两个方面解决安全性问题:
(1)web请求级别:使用Servlet规范中的过滤器(Filter)保护Web请求并限制URL级别的访问
(2)方法调用级别:使用Spring AOP保护方法调用,确保具有适当权限的用户才能访问安全保护的方法
使用SpringSecurity主要是通过重写WebSecurityConfigurerAdapter这个配置类来自定义我们的个性化需求,该类包含了如下3个方法:
1)configure(AuthenticationManagerBuilder)(身份验证管理生成器)
通过重载该方法,可配置user-detail(用户详细信息)服务(身份验证管理生成器)
2)configure(HttpSecurity)(HTTP请求安全处理):
通过重载该方法,可配置如何通过拦截器保护请求(WEB安全),该构造器接口,采用了链式调用风格
3)configure(WebSecurity)(WEB安全):
通过重载该方法,可配置Spring Security的Filter链(HTTP请求安全处理)
1.2.Springboot整合security
Demo:
https://github.com/2578197547/security-Oauth2.0/tree/master/security
- 创建spring boot项目用的最新的2.0.4.RELEASE版本,在pom.xml中加入security依赖
<dependency>
		<groupId>org.springframework.boot</groupId>
		<artifactId>spring-boot-starter-security</artifactId>
</dependency>
2.security 自定义
spring security 中提供了专门的配置类WebSecurityConfigurerAdapter,通过重写以下三个方法来自定义security配置
    /**
     * 配置用户签名服务 主要是user-details 机制,身份验证管理生成器
     * @param auth 签名管理器构造器,用于构建用户具体权限控制
     * @throws Exception
     */
protected void configure(AuthenticationManagerBuilder auth) throws Exception;
  /**
     * 用来构建 Filter 链
     * @param web
     * @throws Exception
     */
public void configure(WebSecurity web) throws Exception;
/**
     * 用来配置拦截保护的请求, HTTP请求安全处理
     * @param http
     * @throws Exception
     */
protected void configure(HttpSecurity http) throws Exception;
3.创建 security 自定义配置类WebSecurityConfig
@Configuration
@EnableWebSecurity
public class WebSecurityConfig extends WebSecurityConfigurerAdapter {

@Bean
public PasswordEncoder passwordEncoder() {//用于注入PasswordEncoder,定义加密方式
return new BCryptPasswordEncoder();
}

   @Override
    protected void configure(HttpSecurity http) throws Exception {
        super.configure(http);
    }

    @Override
    protected void configure(AuthenticationManagerBuilder auth) throws Exception {
        super.configure(auth);
    }

    @Override
    public void configure(WebSecurity web) throws Exception {
        super.configure(web);
    }
}

}
4.自定义用户服务信息,这里直接使用数据库签名服务(还有一种内存签名服务,不过只适用于测试开发用,这里直接跳过)。
加入数据源配置:
spring.datasource.url=jdbc:mysql://localhost:3306/springboot?useUnicode=true&characterEncoding=utf-8&useSSL=false
spring.datasource.username=root
spring.datasource.password=000000
spring.datasource.driver-class-name=com.mysql.jdbc.Driver

spring.jpa.database=mysql
spring.jpa.show-sql=true
加入依赖
<dependency>
	<groupId>mysql</groupId>
	<artifactId>mysql-connector-java</artifactId>
	<scope>runtime</scope>
</dependency>
<dependency>
	<groupId>org.springframework.boot</groupId>
	<artifactId>spring-boot-starter-data-jpa</artifactId>
</dependency>
创建表(可以根据具体需求调整)
sys_user(用户表),sys_role_user(用户角色表),sys_role(角色表),sys_permission_role(角色权限表),sys_permission(权限表),
DROP TABLE IF EXISTS `sys_permission`;

CREATE TABLE `sys_permission` (
  `id` int(11) NOT NULL AUTO_INCREMENT,
  `name` varchar(10) DEFAULT '',
  `descritpion` varchar(10) DEFAULT '',
  `url` varchar(10) DEFAULT '',
  `pid` int(11) DEFAULT NULL,
  PRIMARY KEY (`id`)
) ENGINE=InnoDB AUTO_INCREMENT=5 DEFAULT CHARSET=utf8mb4;

/*Data for the table `sys_permission` */

insert  into `sys_permission`(`id`,`name`,`descritpion`,`url`,`pid`) values (3,'ADMIN','','',NULL),(4,'USER','','',NULL);

/*Table structure for table `sys_permission_role` */

DROP TABLE IF EXISTS `sys_permission_role`;

CREATE TABLE `sys_permission_role` (
  `id` int(11) NOT NULL AUTO_INCREMENT,
  `role_id` int(11) DEFAULT NULL,
  `permission_id` int(11) DEFAULT NULL,
  PRIMARY KEY (`id`)
) ENGINE=InnoDB AUTO_INCREMENT=3 DEFAULT CHARSET=utf8mb4;

/*Data for the table `sys_permission_role` */

insert  into `sys_permission_role`(`id`,`role_id`,`permission_id`) values (1,2,4),(2,1,3);

/*Table structure for table `sys_role` */

DROP TABLE IF EXISTS `sys_role`;

CREATE TABLE `sys_role` (
  `id` int(11) NOT NULL AUTO_INCREMENT,
  `name` varchar(10) DEFAULT '',
  PRIMARY KEY (`id`)
) ENGINE=InnoDB AUTO_INCREMENT=3 DEFAULT CHARSET=utf8mb4;

/*Data for the table `sys_role` */

insert  into `sys_role`(`id`,`name`) values (1,'ADMIN'),(2,'USER');

/*Table structure for table `sys_role_user` */

DROP TABLE IF EXISTS `sys_role_user`;

CREATE TABLE `sys_role_user` (
  `id` int(11) NOT NULL AUTO_INCREMENT,
  `Sys_user_id` int(11) DEFAULT NULL,
  `sys_role_id` int(11) DEFAULT NULL,
  PRIMARY KEY (`id`)
) ENGINE=InnoDB AUTO_INCREMENT=3 DEFAULT CHARSET=utf8mb4;

/*Data for the table `sys_role_user` */

insert  into `sys_role_user`(`id`,`Sys_user_id`,`sys_role_id`) values (1,2,1),(2,3,2);

/*Table structure for table `sys_user` */

DROP TABLE IF EXISTS `sys_user`;

CREATE TABLE `sys_user` (
  `id` int(11) NOT NULL AUTO_INCREMENT,
  `name` varchar(10) DEFAULT NULL,
  `password` varchar(100) DEFAULT NULL,
  PRIMARY KEY (`id`)
) ENGINE=InnoDB AUTO_INCREMENT=4 DEFAULT CHARSET=utf8mb4;

/*Data for the table `sys_user` */

insert  into `sys_user`(`id`,`name`,`password`) values (2,'admin','$2a$10$Yks2LoqzBUHEWjyLCnsdtepI4oCNip9yNdf67y19ewF8geORNAO5m'),(3,'xuweichao','$2a$10$kmFQOKZw8l776qXp00Lq9e2drL5MUSpG9YHnQtQwbVzyUjJQwHNha');
密码是通过密码编辑器生成的(MD5)
创建提提对象和Repository
@Entity
@Table(name = "sys_permission")
public class Permission {

    @Id
    @Column(name="id")
    @GeneratedValue(strategy = GenerationType.IDENTITY)
    private int id;

    //权限名称
    @Column(name="name")
    private String name;

    //权限描述
    @Column(name = "descritpion")
    private String descritpion;

    //授权链接
    @Column(name = "url")
    private String url;

    //父节点id
    @Column(name = "pid")
    private int pid;

    public int getId() {
        return id;
    }

    public void setId(int id) {
        this.id = id;
    }

    public String getName() {
        return name;
    }

    public void setName(String name) {
        this.name = name;
    }

    public String getDescritpion() {
        return descritpion;
    }

    public void setDescritpion(String descritpion) {
        this.descritpion = descritpion;
    }

    public String getUrl() {
        return url;
    }

    public void setUrl(String url) {
        this.url = url;
    }

    public int getPid() {
        return pid;
    }

    public void setPid(int pid) {
        this.pid = pid;
    }
}
@Entity
@Table(name="sys_role")
public class SysRole {

    @Id
    @Column(name = "id")
    @GeneratedValue(strategy = GenerationType.IDENTITY)
    private Integer id;

    @Column(name = "name")
    private String name;
    public Integer getId() {
        return id;
    }
    public void setId(Integer id) {
        this.id = id;
    }
    public String getName() {
        return name;
    }
    public void setName(String name) {
        this.name = name;
    }
}

@Entity
@Table(name = "sys_user")
public class SysUser {

    @Id
    @Column(name="id")
    @GeneratedValue(strategy = GenerationType.IDENTITY)
    private Integer id;
    @Column(name = "name")
    private String name;
    @Column(name = "password")
    private String password;

    @Transient
    private List<SysRole> roles;

    public Integer getId() {
        return id;
    }

    public void setId(Integer id) {
        this.id = id;
    }

    public String getName() {
        return name;
    }

    public void setName(String name) {
        this.name = name;
    }

    public String getPassword() {
        return password;
    }

    public void setPassword(String password) {
        this.password = password;
    }

    public List<SysRole> getRoles() {
        return roles;
    }

    public void setRoles(List<SysRole> roles) {
        this.roles = roles;
    }

    @Override
    public String toString() {
        return "SysUser{" +
                "id=" + id +
                ", name='" + name + '\'' +
                ", password='" + password + '\'' +
                ", roles=" + roles +
                '}';
    }
}


@Repository
public interface PermissionRepository extends CrudRepository<Permission,Integer> {

}

public interface SysRoleRepository extends CrudRepository<SysRole,Integer> {
}

@Repository
public interface SysUserRepository extends CrudRepository<SysUser,Integer> {

    @Query("select a from SysUser a where a.name=:name")
    public SysUser getUserByName(@Param("name") String name);
}
业务接口及实现
public interface PermissionService {
    public List<Permission> findAll();
    public List<Permission> findByAdminUserId(int userId);
}


@Service
public class PermissionServiceImpl implements PermissionService {

    @Autowired
    PermissionRepository permissionRepository ;

    @PersistenceContext
    private EntityManager entityManager;

    @Override
    public List<Permission> findAll() {
        return null;
    }

    //通过用户id获取该用户的所有权限
    @Override
    public List<Permission> findByAdminUserId(int userId) {

        List<Permission> list = new ArrayList<Permission>();
        List<Object[]> abcs = entityManager.createNativeQuery("select p.* \n" +
                "        from Sys_User u\n" +
                "        LEFT JOIN sys_role_user sru on u.id= sru.Sys_User_id\n" +
                "        LEFT JOIN Sys_Role r on sru.Sys_Role_id=r.id\n" +
                "        LEFT JOIN Sys_permission_role spr on spr.role_id=r.id\n" +
                "        LEFT JOIN Sys_permission p on p.id =spr.permission_id\n" +
                "        where u.id="+userId).getResultList();
        for (Object[] abc : abcs) {
            Permission permission = new Permission();
            permission.setId(Integer.valueOf(abc[0]+""));
            permission.setName(abc[1]+"");
            permission.setDescritpion(abc[2]+"");
            permission.setUrl(abc[3]+"");
//            permission.setPid(Integer.valueOf(abc[4]+""));
            list.add(permission);
        }
        return list;
    }
}
5.设置用户权限方式,spring 提供了一个 UserDetailService 接口,通过它可以获取用户信息
1)重写loadUserByUsername(用户名),
2)权限类:GrantedAuthority grantedAuthority = new SimpleGrantedAuthority(“ROLE_”+权限名)
“ROLE_权限名”与”权限名对应”
3)返回org.springframework.security.core.userdetails.User
<构造函数User(String username, String password, Collection<? extends GrantedAuthority> authorities) >)
自定义用户服务类
//自定义userdetailservice
@Service
public class UserDetailServiceImpl implements UserDetailsService {

    @Autowired
    SysUserRepository sysUserRepository;
    @Autowired
    PermissionService permissionService;
    @Autowired
    PasswordEncoder passwordEncoder;

    @Transactional
    @Override
    public UserDetails loadUserByUsername(String username) throws UsernameNotFoundException {
        SysUser sysUser = sysUserRepository.getUserByName(username);
        List<GrantedAuthority> grantedAuthorities = new ArrayList<>();
        if (sysUser != null) {
            System.err.println("sysUser===============" + sysUser);
            //获取用户的授权
            List<Permission> permissions = permissionService.findByAdminUserId(sysUser.getId());
            //声明授权文件
            for (Permission permission : permissions) {
                if (permission != null && permission.getName() != null) {
                    GrantedAuthority grantedAuthority = new SimpleGrantedAuthority("ROLE_"+permission.getName());
                    grantedAuthorities.add(grantedAuthority);
                }
            }
        }
        System.err.println("grantedAuthorities===============" + grantedAuthorities);
        return new User(sysUser.getName(), sysUser.getPassword(), grantedAuthorities);
    }
}
重写protected void configure(AuthenticationManagerBuilder auth) throws Exception 方法
@Autowired
    private UserDetailsService userDetailsService;

    @Bean
    public PasswordEncoder passwordEncoder() {
        return new BCryptPasswordEncoder();
    }

    /**
     * 配置用户签名服务 主要是user-details 机制,
     * @param auth 签名管理器构造器,用于构建用户具体权限控制
     * @throws Exception
     */
    @Override
    protected void configure(AuthenticationManagerBuilder auth) throws Exception {
        auth.userDetailsService(userDetailsService)
                .passwordEncoder(passwordEncoder());
}
6.限制请求 重写 protected void configure(HttpSecurity http) throws Exception
http.csrf().disable()//禁用了 csrf 功能
                .authorizeRequests()//限定签名成功的请求
                .antMatchers("/decision/**","/govern/**").hasAnyRole("USER","ADMIN")//对decision和govern 下的接口 需要 USER 或者 ADMIN 权限
                .antMatchers("/admin/login").permitAll()///admin/login 不限定
                .antMatchers("/admin/**").hasRole("ADMIN")//对admin下的接口 需要ADMIN权限
                .antMatchers("/oauth/**").permitAll()//不拦截 oauth 开放的资源
                .anyRequest().permitAll()//其他没有限定的请求,允许访问
                .and().anonymous()//对于没有配置权限的其他请求允许匿名访问
                .and().formLogin()//使用 spring security 默认登录页面
                .and().httpBasic();//启用http 基础验证
}
创建几个接口,进行测试
@RestController
@RequestMapping("admin")
public class MainController {


    @RequestMapping("/")
    public String index(){

        return "index" ;
    }

    @RequestMapping("/detail")
    public String hello(){
        return "hello" ;
    }

    @RequestMapping("/login")
    public String login() {
        return "login";
}
整合完成
1.3.eureka(springcloud)添加security用户验证
1、添加依赖
<dependency>
     <groupId>org.springframework.boot</groupId>
     <artifactId>spring-boot-starter-security</artifactId>
</dependency>
2、application.yml 文件增加管理的用户名密码配置
spring:
  security:
    basic:
      enabled: true
    user:
      name: admin
      password: admin123456
(注:在新版本中没有basic:enabled: true这个配置属性)
3、eureka.client.serviceUrl.defaultZone 修改,增加账号密码
http://${spring.security.user.name}:${spring.security.user.password}@${eureka.instance.hostname}:${server.port}/eureka/
4、完整的application.yml
server:
  port: 8082

spring:
  security:
    user:
      name: admin
      password: admin123456

eureka:
  instance:
    hostname: localhost
  client:
    registerWithEureka: false
    fetchRegistry: false
    serviceUrl:
      defaultZone: http://${spring.security.user.name}:${spring.security.user.password}@${eureka.instance.hostname}:${server.port}/eureka/
5、Eureka Server端关闭security的csrf检验
import org.springframework.security.config.annotation.web.builders.HttpSecurity;
import org.springframework.security.config.annotation.web.configuration.EnableWebSecurity;
import org.springframework.security.config.annotation.web.configuration.WebSecurityConfigurerAdapter;

@EnableWebSecurity
public class WebSecurityConfigurer extends WebSecurityConfigurerAdapter {
    @Override
    protected void configure(HttpSecurity http) throws Exception {
        http.csrf().disable();
        super.configure(http);
    }
}
6、eureka client端eureka.client.serviceUrl.defaultZone 修改,增加账号密码
http://${security.username}:${security.password}@localhost:8082/eureka/
并添加
    security.username=admin
    security.password=admin123456
2.Spring Security+Oauth2.0
2.1.介绍
OAuth是一个关于授权(authorization)的开放网络标准,在全世界得到广泛应用,目前的版本是2.0版
实现思路:OAuth在"客户端"与"服务提供商"之间,设置了一个授权层(authorization layer)。“客户端"不能直接登录"服务提供商”,只能登录授权层,以此将用户与客户端区分开来。"客户端"登录授权层所用的令牌(token),与用户的密码不同。用户可以在登录的时候,指定授权层令牌的权限范围和有效期。"客户端"登录授权层以后,"服务提供商"根据令牌的权限范围和有效期,向"客户端"开放用户储存的资料
使用OAuth2.0需要配置授权服务器和资源服务器,虽然这两个提供者有时候可能存在同一个应用程序中,但在Spring Security OAuth中你可以把他它们各自放在不同的应用上,而且你可以有多个资源服务,它们共享同一个中央授权服务
1授权服务器
配置一个授权服务,你需要考虑几种授权类型(Grant Type),不同的授权类型为客户端(Client)提供了不同的获取令牌(Token)方式,为了实现并确定这几种授权,需要配置使用 ClientDetailsService 和 TokenService 来开启或者禁用这几种授权机制
OAuth2中定义了四种许可类型以扩展OAuth2的机制(见:https://blog.csdn.net/weixin_37769855/article/details/103066524)
授权码模式(authorization code)
简化模式(implicit)
密码模式(resource owner password credentials)
客户端模式(client credentials)
添加@EnableAuthorizationServe注解,继承AuthorizationServerConfigurer/AuthorizationServerConfigurerAdapter重写configure(3)来配置OAuth2.0授权服务机制
配置(configure)如下:
(1)ClientDetailsServiceConfigurer:用来配置客户端详情服(ClientDetailsService),客户端详情信息在这里进行初始化,你能够把客户端详情信息写死在这里或者是通过数据库来存储调取详情信息
(2)AuthorizationServerSecurityConfigurer:用来配置令牌端点(Token Endpoint)的安全约束
(3)AuthorizationServerEndpointsConfigurer:用来配置授权(authorization)以及令牌(token)的访问端点和令牌服务(token services)
2一个资源服务(可以和授权服务在同一个应用中,当然也可以分离开成为两个不同的应用程序)提供一些受token令牌保护的资源
可以通过 @EnableResourceServer 注解到一个 @Configuration 配置类上,并且必须使用 ResourceServerConfigurer 这个配置对象来进行配置(可以选择继承自 ResourceServerConfigurerAdapter 然后覆写其中的方法,参数就是这个对象的实例),下面是一些可以配置的属性:
@Configuration
@EnableResourceServer
public class ResourceServerConfig extends ResourceServerConfigurerAdapter{
    @Override
    public void configure(HttpSecurity http) throws Exception {
        http.
                csrf().disable()
                .authorizeRequests().anyRequest().authenticated()
                .and()
                .httpBasic();
    }

    @Override
    public void configure(ResourceServerSecurityConfigurer resources) throws Exception {
        super.configure(resources);
    }
}
2.2.密码模式(用户和配置客户端的账号密码访问)
Demo:
https://github.com/2578197547/security-Oauth2.0/tree/master/Oauth2PasswordClient
spring boot 集成oauth2.0(在Springboot整合security的基础上进行修改)
1.加入依赖
<dependency>
	<groupId>org.springframework.security.oauth</groupId>
	<artifactId>spring-security-oauth2</artifactId>
	<version>2.3.3.RELEASE</version>
</dependency>
替换原来的
<dependency>
	<groupId>org.springframework.boot</groupId>
	<artifactId>spring-boot-starter-security</artifactId>
</dependency>
创建Oauth2.0需要创建三个相关的表,直接使用官方的SQL脚本即可生成(不要修改表名和字段名).
OAuth2 官方的项目:
https://github.com/spring-projects/spring-security-oauth/blob/master/spring-security-oauth2/src/test/resources/schema.sql
-- ----------------------------
-- Table structure for oauth_access_token
-- ----------------------------
DROP TABLE IF EXISTS `oauth_access_token`;
CREATE TABLE `oauth_access_token`  (
  `token_id` varchar(256) CHARACTER SET utf8 COLLATE utf8_general_ci NULL DEFAULT NULL,
  `token` blob NULL,
  `authentication_id` varchar(250) CHARACTER SET utf8 COLLATE utf8_general_ci NOT NULL,
  `user_name` varchar(256) CHARACTER SET utf8 COLLATE utf8_general_ci NULL DEFAULT NULL,
  `client_id` varchar(256) CHARACTER SET utf8 COLLATE utf8_general_ci NULL DEFAULT NULL,
  `authentication` blob NULL,
  `refresh_token` varchar(256) CHARACTER SET utf8 COLLATE utf8_general_ci NULL DEFAULT NULL,
  PRIMARY KEY (`authentication_id`) USING BTREE
) ENGINE = InnoDB CHARACTER SET = utf8 COLLATE = utf8_general_ci ROW_FORMAT = Dynamic;

-- ----------------------------
-- Table structure for oauth_client_details
-- ----------------------------
DROP TABLE IF EXISTS `oauth_client_details`;
CREATE TABLE `oauth_client_details`  (
  `client_id` varchar(250) CHARACTER SET utf8 COLLATE utf8_general_ci NOT NULL,
  `resource_ids` varchar(256) CHARACTER SET utf8 COLLATE utf8_general_ci NULL DEFAULT NULL,
  `client_secret` varchar(256) CHARACTER SET utf8 COLLATE utf8_general_ci NULL DEFAULT NULL,
  `scope` varchar(256) CHARACTER SET utf8 COLLATE utf8_general_ci NULL DEFAULT NULL,
  `authorized_grant_types` varchar(256) CHARACTER SET utf8 COLLATE utf8_general_ci NULL DEFAULT NULL,
  `web_server_redirect_uri` varchar(256) CHARACTER SET utf8 COLLATE utf8_general_ci NULL DEFAULT NULL,
  `authorities` varchar(256) CHARACTER SET utf8 COLLATE utf8_general_ci NULL DEFAULT NULL,
  `access_token_validity` int(11) NULL DEFAULT NULL,
  `refresh_token_validity` int(11) NULL DEFAULT NULL,
  `additional_information` varchar(4096) CHARACTER SET utf8 COLLATE utf8_general_ci NULL DEFAULT NULL,
  `autoapprove` varchar(256) CHARACTER SET utf8 COLLATE utf8_general_ci NULL DEFAULT NULL,
  PRIMARY KEY (`client_id`) USING BTREE
) ENGINE = InnoDB CHARACTER SET = utf8 COLLATE = utf8_general_ci ROW_FORMAT = Dynamic;

-- ----------------------------
-- Table structure for oauth_refresh_token
-- ----------------------------
DROP TABLE IF EXISTS `oauth_refresh_token`;
CREATE TABLE `oauth_refresh_token`  (
  `token_id` varchar(256) CHARACTER SET utf8 COLLATE utf8_general_ci NULL DEFAULT NULL,
  `token` blob NULL,
  `authentication` blob NULL
) ENGINE = InnoDB CHARACTER SET = utf8 COLLATE = utf8_general_ci ROW_FORMAT = Dynamic;
- 配置资源服务器 配置认证服务器
A、配置认证服务器(配置授权模式,客户端权限)
注意:在configure(ClientDetailsServiceConfigurer clients)第一次配置完启动后第二次重启将会报错,提示Duplicate entry ‘client’ for key ‘PRIMARY’,因为运行完第一次后会向oauth_client_details表插入该描述的数据,第二次运行可以把clients.jdbc(dataSource)后面的代码注释掉直接使用数据库获取客户端数据
@Configuration
@EnableAuthorizationServer // 这个注解告诉 Spring 这个应用是 OAuth2 的授权服务器//
// 提供/oauth/authorize,/oauth/token,/oauth/check_token,/oauth/confirm_access,/oauth/error
public class AuthorizationServerConfig extends AuthorizationServerConfigurerAdapter {

    @Autowired
    @Qualifier("authenticationManagerBean")
    private AuthenticationManager authenticationManager;

    @Autowired
    @Qualifier("dataSource")
    private DataSource dataSource;

    @Autowired
    private UserDetailsService userDetailsService;


    @Bean
    public TokenStore tokenStore() {
//        return new InMemoryTokenStore(); //使用内存中的 token store
        return new JdbcTokenStore(dataSource); ///使用Jdbctoken store
    }

    @Override
    public void configure(ClientDetailsServiceConfigurer clients) throws Exception {

        clients.jdbc(dataSource)
                .withClient("client")
                .secret(new BCryptPasswordEncoder().encode("123456"))
                .authorizedGrantTypes("password", "refresh_token")//允许授权范围
                .authorities("ROLE_ADMIN","ROLE_USER")//客户端可以使用的权限
                .scopes( "read", "write")
                .accessTokenValiditySeconds(7200)
                .refreshTokenValiditySeconds(7200);
    }

    @Override
    public void configure(AuthorizationServerEndpointsConfigurer endpoints) throws Exception {
        endpoints.tokenStore(tokenStore())
                .authenticationManager(authenticationManager)
                .userDetailsService(userDetailsService);//必须设置 UserDetailsService 否则刷新token 时会报错
    }

    @Override
    public void configure(AuthorizationServerSecurityConfigurer security) throws Exception {
        security
                .tokenKeyAccess("permitAll()")
                .checkTokenAccess("isAuthenticated()")
                .allowFormAuthenticationForClients();//允许表单登录

    }
}
B、配置资源服务器(配置受保护资源,认证服务器和资源服务器可以分开,这里配置到一起了)
@Configuration
@EnableResourceServer //这个类表明了此应用是OAuth2 的资源服务器,此处主要指定了受资源服务器保护的资源链接
public class ResourceServerConfig extends ResourceServerConfigurerAdapter {
    @Override
    public void configure(HttpSecurity http) throws Exception {

        http.csrf().disable()//禁用了 csrf 功能
                .authorizeRequests()//限定签名成功的请求
                .antMatchers("/decision/**","/govern/**").hasAnyRole("USER","ADMIN")
                .antMatchers("/admin/**").hasRole("ADMIN")
                .antMatchers("/test/**").authenticated()//必须认证过后才可以访问
                .anyRequest().permitAll()//其他没有限定的请求,允许随意访问
                .and().anonymous();//对于没有配置权限的其他请求允许匿名访问


    }

}
3、对WebSecurityConfig 进行修改,因为加入了oauth 2.0 的配置,所以该文件之前的权限设置可以删掉,访问控制交给资源服务器只保留“/oauth/,"/login/”,"/logout/**",修改后的WebSecurityConfig
@Configuration
@EnableWebSecurity
public class WebSecurityConfig extends WebSecurityConfigurerAdapter {

    @Autowired
    private UserDetailsService userDetailsService;

    @Bean
    public PasswordEncoder passwordEncoder() {
        return new BCryptPasswordEncoder();
    }

    @Bean
    public AuthenticationManager authenticationManagerBean() throws Exception {
        return super.authenticationManagerBean() ;
    }

    /**
     * 配置用户签名服务 主要是user-details 机制,
     *
     * @param auth 签名管理器构造器,用于构建用户具体权限控制
     * @throws Exception
     */
    @Override
    protected void configure(AuthenticationManagerBuilder auth) throws Exception {
        auth.userDetailsService(userDetailsService)
                .passwordEncoder(passwordEncoder());
    }


  /**
     * 用来配置拦截保护的请求
     *
     * @param http
     * @throws Exception
     */
    @Override
    protected void configure(HttpSecurity http) throws Exception {

        //接受请求
        http.csrf().disable();

        http.requestMatchers()//使HttpSecurity接收以"/login/","/oauth/"开头请求。
                .antMatchers("/oauth/**", "/login/**", "/logout/**")
                .and()
                .authorizeRequests()
                .antMatchers("/oauth/**").authenticated()
                .and()
                .formLogin();
    }

}
4、测试
1)获取token :
Username:用户,password:密码,grant_type:授权类型,
client_id:客户端id,client_secret:客户端密码
http://localhost:8080/oauth/token?username=admin&password=admin&grant_type=password&client_id=client&client_secret=123456
返回:
{
    "access_token": "624d8e84-e981-484b-a064-1d8f5997e4fb",
    "token_type": "bearer",
    "refresh_token": "ca0d41c8-d808-4211-8cab-5da5bfe6c6db",
    "expires_in": 5696,
    "scope": "read write"
}
2)刷新令牌:
http://localhost:8080/oauth/token?grant_type=refresh_token&client_id=client&client_secret=123456&refresh_token=ca0d41c8-d808-4211-8cab-5da5bfe6c6db
返回数据:
{
    "access_token": "75b23bfc-c0d5-425f-b780-df8fff60d256",
    "token_type": "bearer",
    "refresh_token": "ca0d41c8-d808-4211-8cab-5da5bfe6c6db",
    "expires_in": 7199,
    "scope": "all read write"
}
3)访问其他资源
http://localhost:8080/admin/?access_token=bfc97ec9-8255-4db6-b045-3802453a6099
返回数据:
index
2.3.客户端模式(客户端的账号密码访问)
Demo:
https://github.com/2578197547/security-Oauth2.0/tree/master/Oauth2PasswordClient
授权服务器增加配置如下:
        .and().withClient("client_1")
        .secret(passwordEncoder().encode("123456"))
        .authorizedGrantTypes("client_credentials")
        .scopes("read", "write")
        .authorities("client_credentials")
        .accessTokenValiditySeconds(7200)
资源服务器做相应的修改,授权成功后即可访问:
@Override
    public void configure(HttpSecurity http) throws Exception {

        http.csrf().disable()//禁用了 csrf 功能
                .authorizeRequests()//限定签名成功的请求
                .antMatchers("/test/**","/admin/**").authenticated()//签名成功后可访问
//               .antMatchers("/admin/login","/oauth/**").permitAll()
                .anyRequest().permitAll()//其他没有限定的请求,允许访问
                .and().anonymous()//对于没有配置权限的其他请求允许匿名访问
                .and().formLogin()//使用 spring security 默认登录页面
                .and().httpBasic();//启用http 基础验证


    }
请求授权:
http://localhost:8080/oauth/token?grant_type=client_credentials&client_id=client_1&client_secret=123456
返回:
{
    "access_token": "47c31bff-fd5c-42de-879f-c3ddcec5c7c7",
    "token_type": "bearer",
    "expires_in": 4674,
    "scope": "read write"
}
请求其他资源:
http://localhost:8080/test/detail?access_token=47c31bff-fd5c-42de-879f-c3ddcec5c7c7
2.4.授权码模式
Demo:
https://github.com/2578197547/security-Oauth2.0/tree/master/Oauth2Authorization(在原来2.2的代码上进行修改)
授权码模式(authorization code)是功能最完整、流程最严密的授权模式
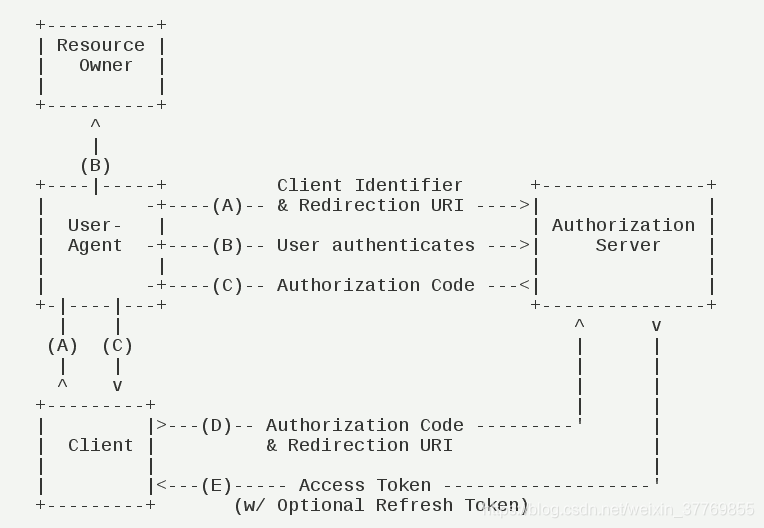
流程如下:
(A)用户访问客户端,后者将前者导向认证服务器。
(B)用户选择是否给予客户端授权。
(C)假设用户给予授权,认证服务器将用户导向客户端事先指定的"重定向URI"(redirection URI),同时附上一个授权码。
(D)客户端收到授权码,附上早先的"重定向URI",向认证服务器申请令牌。这一步是在客户端的后台的服务器上完成的,对用户不可见。
(E)认证服务器核对了授权码和重定向URI,确认无误后,向客户端发送访问令牌(access token)和更新令牌(refresh token)。
在原来项目的基础上进行修改
1.修改认证服务器,创建授权码客户端
@Configuration
@EnableAuthorizationServer // 这个注解告诉 Spring 这个应用是 OAuth2 的授权服务器//
// 提供/oauth/authorize,/oauth/token,/oauth/check_token,/oauth/confirm_access,/oauth/error
public class AuthorizationServerConfig extends AuthorizationServerConfigurerAdapter {
 	……
    @Override
    public void configure(ClientDetailsServiceConfigurer clients) throws Exception {
        clients.jdbc(dataSource)
        		//授权码模式
                .withClient("client_code")
                .secret(passwordEncoder.encode("123456"))
                .authorizedGrantTypes("authorization_code", "refresh_token",
                        "password", "implicit")
                .scopes("all")
                .authorities("ROLE_ADMIN")
                .redirectUris("https://www.baidu.com")
                .accessTokenValiditySeconds(1200)
                .refreshTokenValiditySeconds(50000);

    }
	……
}
2、修改Security配置和资源服务器
WebSecurityConfig
@Order(2)
@Configuration
@EnableWebSecurity
//@EnableGlobalMethodSecurity(prePostEnabled = true)//这个注解,可以开启security的注解,我们可以在需要控制权限的方法上面使用@PreAuthorize,@PreFilter这些注解
public class WebSecurityConfig extends WebSecurityConfigurerAdapter{
		……
		//通过重载该方法,可配置如何通过拦截器保护请求(WEB安全)
	    @Override
	    protected void configure(HttpSecurity http) throws Exception {
	    	//不拦截/oauth/**,/login/**,/logout/**(requestMatchers用于但需要过滤多个HttpSecurity的情况)
	        http.requestMatchers().antMatchers("/oauth/**", "/login/**", "/logout/**")//使HttpSecurity接收以"/login/","/oauth/","/logout/"开头请求。
	                .and().authorizeRequests().antMatchers("/oauth/**").authenticated()
	                .and().formLogin();
	    }
		……
}
ResourceServerConfig
@Order(6)
@Configuration
@EnableResourceServer //这个类表明了此应用是OAuth2 的资源服务器,此处主要指定了受资源服务器保护的资源链接
public class ResourceServerConfig extends ResourceServerConfigurerAdapter {
	/*
	 * 配置受资源服务器保护的资源链接,仅接受签名校验
	 * */
    @Override
    public void configure(HttpSecurity http) throws Exception {
    	http.csrf().disable();
        http.authorizeRequests()
        //.antMatchers("/admin/**").authenticated();
        .anyRequest().authenticated();//校验所有请求
        }
}
ResourceServerConfiguration 和 SecurityConfiguration上配置的顺序,因为spring实现安全是通过添加过滤器(Filter)来实现的,基本的安全过滤应该在oauth过滤之前, 所以SecurityConfiguration过滤一定要在ResourceServerConfiguration 之前,在SecurityConfiguration设置@Order(2), 在ResourceServerConfiguration上设置@Order(6)
3、测试
1)
http://localhost:8080/oauth/authorize?client_id=client_code&response_type=code&scope=all&redirect_uri=https://www.baidu.com&state=111
response_type:表示授权类型,必选项,此处的值固定为"code"
client_id:表示客户端的ID,必选项
redirect_uri:表示重定向URI,可选项(redirect_uri必须与配置的一致)
scope:表示申请的权限范围,可选项
state:可选项,表示客户端的当前状态,可以指定任意值,认证服务器会原封不动地返回这个值。
2)跳转
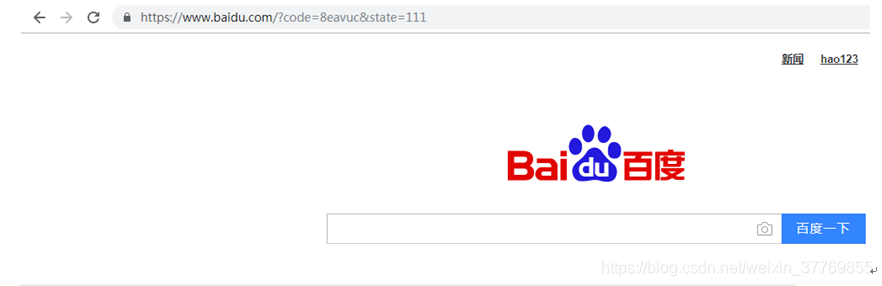
https://www.baidu.com/?code=8eavuc&state=111
3)使用code去请求access_token
http://localhost:8080/oauth/token?client_id=client_code&grant_type=authorization_code&redirect_uri=https://www.baidu.com&client_secret=123456&code=8eavuc
返回:
{"access_token":"5cbc18d8-8643-41f6-aad6-995dd617342a","token_type":"bearer","refresh_token":"6419488a-622f-45bc-a17b-cc156b461bec","expires_in":1199,"scope":"all"}
4)获取资源
http://localhost:8080/admin/?access_token=5cbc18d8-8643-41f6-aad6-995dd617342a
或者在请求头带上token,key:Authorization value: bearer + " "+token

或者在请求头带上token,key:Authorization value: bearer + " "+token
注意:一个code 只能使用一次否则会报错
5)刷新令牌
http://localhost:8080/oauth/token?grant_type=refresh_token&refresh_token=6419488a-622f-45bc-a17b-cc156b461bec&client_id=client_code&client_secret=123456
备注:该模式下密码模式和客户端模式也能使用
2.4.OAuth2.0使用JWT
2.4.1.介绍
Jwt:
JSON Web Token(JWT)是一个开放的行业标准(RFC 7519),它定义了一种简介的、自包含的协议格式,用于 在通信双方传递json对象,传递的信息经过数字签名可以被验证和信任。JWT可以使用HMAC算法或使用RSA的公 钥/私钥对来签名,防止被篡改
令牌的优点:
1、jwt基于json,非常方便解析
2、可以在令牌中自定义丰富的内容,易扩展
3、通过非对称加密算法及数字签名技术,JWT防止篡改,安全性高
4、资源服务使用JWT可不依赖认证服务即可完成授权。
缺点:
1、JWT令牌较长,占存储空间比较大
2.4.2.OAuth2.0使用JWT
Demo:
https://github.com/2578197547/security-Oauth2.0/tree/master/Oauth2Jwt
1、添加依赖
<dependency>
     <groupId>org.springframework.security</groupId>
     <artifactId>spring-security-jwt</artifactId>
     <version>1.0.9.RELEASE</version>
</dependency>
2、jwt 配置类(如果授权服务器和资源服务器不在同一个项目则各在两边各配置一个)
@Configuration
public class JwtConfig {

    @Bean
    public JwtAccessTokenConverter accessTokenConverter() {//jwt配置
        JwtAccessTokenConverter converter = new JwtAccessTokenConverter();
        converter.setSigningKey("111");
        return converter;
    }

    @Bean
    public TokenStore tokenStore() {//配置token模式
        return new JwtTokenStore(accessTokenConverter());
    }

    @Bean
    @Primary//@Primary:自动装配时当出现多个Bean候选者时,被注解为@Primary的Bean将作为首选者,否则将抛出异常
    public DefaultTokenServices tokenServices() {//用于资源服务器
        DefaultTokenServices defaultTokenServices = new DefaultTokenServices();
        defaultTokenServices.setTokenStore(tokenStore());
        return defaultTokenServices;
    }
}
3、修改授权服务器配置(移除原来的tokenStore())
@Configuration
@EnableAuthorizationServer // 这个注解告诉 Spring 这个应用是 OAuth2 的授权服务器//
// 提供/oauth/authorize,/oauth/token,/oauth/check_token,/oauth/confirm_access,/oauth/error
public class AuthorizationServerConfig extends AuthorizationServerConfigurerAdapter {
    ……
    @Autowired
    TokenStore tokenStore;//token模式
    @Autowired
    JwtAccessTokenConverter accessTokenConverter;//jwt配置
    @Override
    public void configure(AuthorizationServerEndpointsConfigurer endpoints) throws Exception {
        endpoints.tokenStore(tokenStore)
                .authenticationManager(authenticationManager)
                .userDetailsService(userDetailsService)//必须设置 UserDetailsService 否则刷新token 时会报错
                .allowedTokenEndpointRequestMethods(HttpMethod.GET, HttpMethod.POST);
        endpoints.accessTokenConverter(accessTokenConverter);

        //自定义授权页
        endpoints.pathMapping("/oauth/confirm_access", "/confirm");
    }

}
4、修改资源服务器
@Order(6)
@Configuration
@EnableResourceServer //这个类表明了此应用是OAuth2 的资源服务器,此处主要指定了受资源服务器保护的资源链接
public class ResourceServerConfig extends ResourceServerConfigurerAdapter {

    @Autowired
	DefaultTokenServices tokenServices;//token模式
……
    @Override
    public void configure(ResourceServerSecurityConfigurer resources) {
        resources.tokenServices(tokenServices);
    }

}
5、测试
与密码模式/授权码模式相同
最后返回
{"access_token":"eyJhbGciOiJIUzI1NiIsInR5cCI6IkpXVCJ9.eyJ1c2VyX25hbWUiOiJhZG1pbiIsInNjb3BlIjpbImFsbCJdLCJyb2xlcyI6W3siYXV0aG9yaXR5IjoiUk9MRV9BRE1JTiJ9XSwib3JnYW5pemF0aW9uIjoiYWRtaW4iLCJleHAiOjE1NzIyMzEyNzMsInVzZXJOYW1lIjoiYWRtaW4iLCJhdXRob3JpdGllcyI6WyJST0xFX0FETUlOIl0sImp0aSI6ImJjMTVkZDFmLTVjMGQtNGM4OC1hNTU4LTUyOWRmZmNmZDBhMSIsImNsaWVudF9pZCI6ImNsaWVudF9jb2RlIn0.kl1R2YlUKvhAPLAIw9ziv76L7t7xASPRxNBVk-bRsPE","token_type":"bearer","refresh_token":"eyJhbGciOiJIUzI1NiIsInR5cCI6IkpXVCJ9.eyJ1c2VyX25hbWUiOiJhZG1pbiIsInNjb3BlIjpbImFsbCJdLCJyb2xlcyI6W3siYXV0aG9yaXR5IjoiUk9MRV9BRE1JTiJ9XSwib3JnYW5pemF0aW9uIjoiYWRtaW4iLCJhdGkiOiJiYzE1ZGQxZi01YzBkLTRjODgtYTU1OC01MjlkZmZjZmQwYTEiLCJleHAiOjE1NzIyODAwNzMsInVzZXJOYW1lIjoiYWRtaW4iLCJhdXRob3JpdGllcyI6WyJST0xFX0FETUlOIl0sImp0aSI6ImQyY2IxNjg2LThjYjItNDA4OC04MGU3LWVlNGIyYjY2ZGJiZiIsImNsaWVudF9pZCI6ImNsaWVudF9jb2RlIn0.ESfGZpNaOvqnJfy8XBdC8lqe57O5euI9cZpXhN19558","expires_in":1199,"scope":"all","roles":[{"authority":"ROLE_ADMIN"}],"organization":"admin","userName":"admin","jti":"bc15dd1f-5c0d-4c88-a558-529dffcfd0a1"}
2.4.3.令牌中添加自定义信息
新建CustomTokenEnhancer 用于在返回token中 添加自定义的信息
注意:该配置不支持客户端模式,因为使用了用户名称,角色,权限名称等数据,而客户端模式是直接使用客户端进行登录会提示异常
public class CustomTokenEnhancer implements TokenEnhancer {
    @Override
    public OAuth2AccessToken enhance(OAuth2AccessToken accessToken,OAuth2Authentication authentication) {
        Map<String, Object> additionalInformation = new HashMap<>();

        String userName = authentication.getUserAuthentication().getName();
        User user = (User) authentication.getUserAuthentication().getPrincipal();
        additionalInformation.put("userName", userName);
        additionalInformation.put("roles", user.getAuthorities());
        additionalInformation.put("organization", authentication.getName()
//                + randomAlphabetic(4)
        );
        ((DefaultOAuth2AccessToken) accessToken).setAdditionalInformation(additionalInformation);
        return accessToken;
    }
}
在授权服务中进行配置
@Configuration
@EnableAuthorizationServer // 这个注解告诉 Spring 这个应用是 OAuth2 的授权服务器//
// 提供/oauth/authorize,/oauth/token,/oauth/check_token,/oauth/confirm_access,/oauth/error
public class AuthorizationServerConfig extends AuthorizationServerConfigurerAdapter {
    ……
    @Autowired
    TokenStore tokenStore;//token模式

    @Autowired
    JwtAccessTokenConverter accessTokenConverter;//jwt配置

	@Bean
	public TokenEnhancer tokenEnhancer() {
		return new CustomTokenEnhancer();
	}

    @Override
    public void configure(AuthorizationServerEndpointsConfigurer endpoints) throws Exception {
        TokenEnhancerChain tokenEnhancerChain = new TokenEnhancerChain();
        tokenEnhancerChain.setTokenEnhancers(
                Arrays.asList(tokenEnhancer(), accessTokenConverter));//令牌中添加自定义信息

        endpoints.tokenStore(tokenStore)
        		.tokenEnhancer(tokenEnhancerChain)//令牌配置
                .authenticationManager(authenticationManager)
                .userDetailsService(userDetailsService)//必须设置 UserDetailsService 否则刷新token 时会报错
                .allowedTokenEndpointRequestMethods(HttpMethod.GET, HttpMethod.POST);
        endpoints.accessTokenConverter(accessTokenConverter);

        //自定义授权页
        endpoints.pathMapping("/oauth/confirm_access", "/confirm");
	}
……
}
测试
与密码模式/授权码模式相同
这里使用的是对称秘钥的方式签署令牌,实际生产中一般使用非对称加密的方式
2.4.4.使用非对称加密的方式
1、生成JKS Java KeyStore文件
下边命令生成密钥证书,采用RSA 算法每个证书包含公钥和私钥
keytool -genkeypair -alias mytest -keyalg RSA -keypass mypass -keystore mytest.jks -storepass mypass
Keytool 是一个java提供的证书管理工具
-alias:密钥的别名
-keyalg:使用的hash算法
-keypass:密钥的访问密码 -keystore:密钥库文件名,mytest.jks保存了生成的证书
-storepass:密钥库的访问密码
将生成的mytest.jks复制到我们的认证服务器src / main / resources /下(-keypass 如果不配置具体的地址jks文件将会默认生成在C:\Users\Administrator目录下)
查询证书信息:
keytool -list -keystore mytest.jks
删除别名:
keytool -delete -alias mytest -keystore mytest.jks
2、导出公钥
openssl是一个加解密工具包,这里使用openssl来导出公钥信息。
安装 openssl:http://slproweb.com/products/Win32OpenSSL.html
安装资料目录下的Win64OpenSSL-1_1_0g.exe
配置openssl的path环境变量,这里配置在D:\OpenSSL-Win64\bin
cmd进入mytest.jks文件所在目录执行如下命令:
keytool -list -rfc --keystore mytest.jks | openssl x509 -inform pem –pubkey
生成:
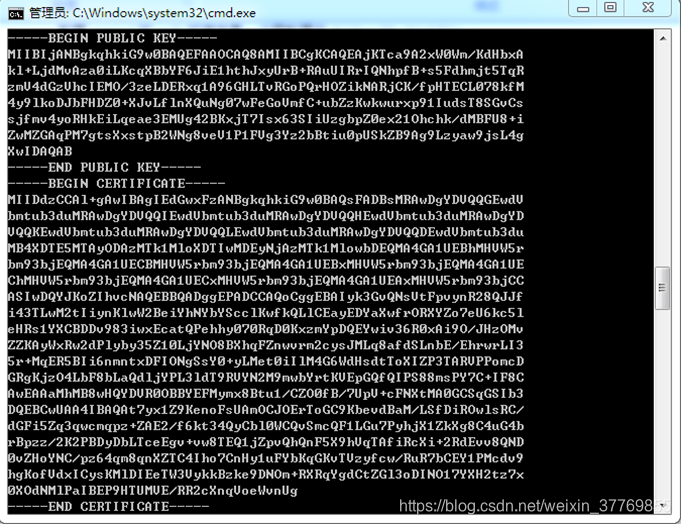
下边这一段就是公钥内容:
-----BEGIN PUBLIC KEY-----
MIIBIjANBgkqhkiG9w0BAQEFAAOCAQ8AMIIBCgKCAQEAjKTca9A2xW0Wm/KdHbxA
kl+LjdMvAza0iLKcqXBbYF6JiE1hthJxyUrB+RAuUIRrIQNhpfB+s5Fdhmjt5TqR
zmV4dGzVhcIEMO/3zeLDERxq1A96GHLTvRGoPQrHOZikNARjCK/fpHTECL078kfM
4y9lkoDJbFHDZ0+XJvLflnXQuNg07wFeGoVmfC+ubZzKwkwurxp91IudsT8SGvCs
sjfmv4yoRHkEiLqeae3EMUg42BKxjT7Isx63SIiUzgbpZ0ex21Ohchk/dMBFU8+i
ZwMZGAqPM7gtsXxstpB2WNg8veV1P1FVg3Yz2bBtiu0pUSkZB9Ag9Lzyaw9jsL4g
XwIDAQAB
-----END PUBLIC KEY-----
复制到我们的资源服务器src / main / resources / public.txt中
3、Maven 配置
在项目以war包导出时我们不希望JMS文件被maven过滤进程拾取 - 所以我们将确保将其排除在pom.xml中:
如果我们使用Spring Boot,我们需要确保我们的JKS文件通过Spring Boot Maven插件添加到应用程序classpath - addResources:
<build>
    <plugins>
        <plugin>
            <groupId>org.springframework.boot</groupId>
            <artifactId>spring-boot-maven-plugin</artifactId>
            <configuration>
                <addResources>true</addResources>
            </configuration>
        </plugin>
    </plugins>
</build>
4、授权服务器
配置JwtAccessTokenConverter使用mytest.jks中的KeyPair
  @Bean
    public JwtAccessTokenConverter jwtAccessTokenConverter() {
        KeyStoreKeyFactory keyStoreKeyFactory = new KeyStoreKeyFactory(new ClassPathResource("mytest.jks"), "mypass".toCharArray());//证书路径和密钥库密码
        JwtAccessTokenConverter converter = new JwtAccessTokenConverter();
        converter.setKeyPair(keyStoreKeyFactory.getKeyPair("mytest"));//密钥别名
        return converter;
}
这里为了区分授权服务器和资源服务器的不同将原来从JwtConfig注入的TokenStore和JwtAccessTokenConverter改为自定义的bean(注意:因为在AuthorizationServerConfig和JwtConfig定义有名称相同的bean,所以需要在配置文件中配置
spring.main.allow-bean-definition-overriding=true #当遇到同样名字bean的时候,是否允许覆盖注册)
5、资源服务器(demo中授权服务器和资源服务器在同一个项目所以只要修改一次就可以)
配置JwtAccessTokenConverter使用mytest.jks中的KeyPair
  @Bean
    public JwtAccessTokenConverter accessTokenConverter() {
        JwtAccessTokenConverter converter = new JwtAccessTokenConverter();
        Resource resource =  new ClassPathResource("public.txt");
        String publicKey;
        try {
            publicKey = new String(FileCopyUtils.copyToByteArray(resource.getInputStream()));
        }catch (IOException e) {
            throw new RuntimeException(e);
        }
        converter.setVerifierKey(publicKey);
        return converter;
    }
6、测试
与密码模式/授权码模式相同
2.4.5.SpringCloud整合Oauth2+jwt
Demo:(授权服务器与资源服务器独立工程)
https://github.com/2578197547/security-Oauth2.0/tree/master/test-security-oauth2-master-jwt
or
传送门


 6343
6343


 被折叠的 条评论
为什么被折叠?
被折叠的 条评论
为什么被折叠?
 到【灌水乐园】发言


