


mysql主从复制 及读写分离
数据库对于任何企业都是至关重要的,数据库的备份冗灾非常重要。
MySQL的主从架构模型可以用来进行备份、故障迁移、或者读写分离来分担负载。
采用读写分离时,在程序中通过封装数据库访问层可以实现写操作连接主库,读操作连接从库。但是当从库较多时,程序中对多个从库做切换比较麻烦。
MySQL官方为我们提供了mysql-proxy这个代理组件,对于读写的sql操作,选择连接主库还是从库由mysql-proxy帮助我们完成。
mysql的主从复制原理如下图:
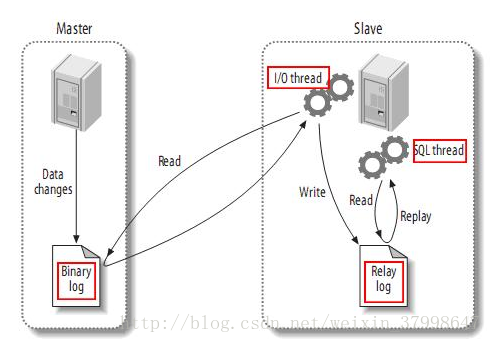
作为主服务器Master, 会把自己的每一次改动都记录到 二进制日志 Binarylog 中。 (从服务器会负责来读取这个log, 然后在自己那里再执行一遍。)
作为从服务器Slave, 会用master上的账号登陆到 master上, 读取master的Binarylog, 写入到自己的中继日志 Relaylog, 然后自己的sql线程会负责读取这个中继日志,并执行一遍。 到这里主服务器上的更改就同步到从服务器上了。
该过程的第一部分就是master记录自己的二进制日志。在每个事务更新数据完成之前,master在二日志记录这些改变。MySQL将事务串行的写入二进制日志,即使事务中的语句都是交叉执行的。在事件写入二进制日志完成后,master通知存储引擎提交事务。
下一步就是slave将master的binary log拷贝到它自己的中继日志。首先,slave开始一个工作线程——I/O线程。I/O线程在master上打开一个普通的连接,然后开始binlog dump process。Binlog dump process从master的二进制日志中读取事件,如果已经跟上master,它会睡眠并等待master产生新的事件。I/O线程将这些事件写入中继日志。
SQL slave thread(SQL从线程)处理该过程的最后一步。SQL线程从中继日志读取事件,并重放其中的事件而更新slave的数据,使其与master中的数据一致。只要该线程与I/O线程保持一致,中继日志通常会位于OS的缓存中,所以中继日志的开销很小。
此外,在master中也有一个工作线程:和其它MySQL的连接一样,slave在master中打开一个连接也会使得master开始一个线程。复制过程有一个很重要的限制——复制在slave上是串行化的,也就是说master上的并行更新操作不能在slave上并行操作。
首先实现主从复制:
实验环境:
两台rhel6.5虚拟机:
server2 172.25.95.2 (master)
server3 172.25.95.3 (slave)
防护墙,selinux处在disable状态。
rhel6.5的镜像本身带有mysql-server.x86_64 0:5.1.71-1.el6
所以直接用yum install 安装就可以,
需要注意的是:server2 server3需要安装相同版本的mysql
下面直接开干:
1:安装并启动:
[root@server2 ~]# yum install -y mysql-server
[root@server2 ~]# /etc/init.d/mysqld start
Initializing MySQL database:  Installing MySQL system tables...
OK
Filling help tables...
OK

To start mysqld at boot time you have to copy
support-files/mysql.server to the right place for your system

PLEASE REMEMBER TO SET A PASSWORD FOR THE MySQL root USER !
To do so, start the server, then issue the following commands:

/usr/bin/mysqladmin -u root password 'new-password'
/usr/bin/mysqladmin -u root -h server2 password 'new-password'

Alternatively you can run:
/usr/bin/mysql_secure_installation

which will also give you the option of removing the test
databases and anonymous user created by default.  This is
strongly recommended for production servers.

See the manual for more instructions.

You can start the MySQL daemon with:
cd /usr ; /usr/bin/mysqld_safe &

You can test the MySQL daemon with mysql-test-run.pl
cd /usr/mysql-test ; perl mysql-test-run.pl

Please report any problems with the /usr/bin/mysqlbug script!

                                                           [  OK  ]
Starting mysqld:                                           [  OK  ]
server3上作同样的操作。
2:编写配置文件
[root@server2 ~]# vim /etc/my.cnf
[root@server2 mysql]# cat /etc/my.cnf
[mysqld]
datadir=/var/lib/mysql
socket=/var/lib/mysql/mysql.sock
user=mysql
# Disabling symbolic-links is recommended to prevent assorted security risks
symbolic-links=0

server-id=1
log-bin=mysql-bin
binlog-do-db=test
binlog-ignore-db=mysql
[root@server2 ~]# /etc/init.d/mysqld restart
Stopping mysqld:                                           [  OK  ]
Starting mysqld:                                           [  OK  ]
server3的配置文件需要改以下server-id改称跟server2不一样即可。
[root@server3 ~]# vim /etc/my.cnf
[root@server3 mysql]# cat /etc/my.cnf
[mysqld]
datadir=/var/lib/mysql
socket=/var/lib/mysql/mysql.sock
user=mysql
# Disabling symbolic-links is recommended to prevent assorted security risks
symbolic-links=0

server-id=2
log-bin=mysql-bin
binlog-do-db=test
binlog-ignore-db=mysql


[mysqld_safe]
log-error=/var/log/mysqld.log
pid-file=/var/run/mysqld/mysqld.pid

[root@server3 ~]# /etc/init.d/mysqld restart
Stopping mysqld:                                           [  OK  ]
Starting mysqld:                                           [  OK  ]
3进入数据库查看状态:
server2:
[root@server2 mysql]# mysql
Welcome to the MySQL monitor.  Commands end with ; or \g.
Your MySQL connection id is 3
Server version: 5.1.71-log Source distribution

Copyright (c) 2000, 2013, Oracle and/or its affiliates. All rights reserved.

Oracle is a registered trademark of Oracle Corporation and/or its
affiliates. Other names may be trademarks of their respective
owners.

Type 'help;' or '\h' for help. Type '\c' to clear the current input statement.

mysql> grant replication slave on *.* to xiaoyao@'172.25.95.%' identified by 'redhat';
Query OK, 0 rows affected (0.00 sec)            ##授权给xiaoyao用户,可以在172.25.95这个网段登陆,以redhat为密码。

mysql> show master status ;     ##查看master状态。
+------------------+----------+--------------+------------------+
| File             | Position | Binlog_Do_DB | Binlog_Ignore_DB |
+------------------+----------+--------------+------------------+
| mysql-bin.000001 |      259 | test         | mysql            |
+------------------+----------+--------------+------------------+
1 row in set (0.00 sec)

mysql> quit
Bye
server3:
[root@server3 ~]# mysql
Welcome to the MySQL monitor.  Commands end with ; or \g.
Your MySQL connection id is 2
Server version: 5.1.71-log Source distribution

Copyright (c) 2000, 2013, Oracle and/or its affiliates. All rights reserved.

Oracle is a registered trademark of Oracle Corporation and/or its
affiliates. Other names may be trademarks of their respective
owners.

Type 'help;' or '\h' for help. Type '\c' to clear the current input statement.

mysql> show slave status;
Empty set (0.00 sec)                ##此时因为没有指定master所以slave的状态为空。

mysql> change master to master_host='172.25.95.2',master_user='xiaoyao',master_password='redhat',master_log_file='mysql-bin.000001';
Query OK, 0 rows affected (0.53 sec)        ##指定master ,用户,密码 等
mysql> show slave status ;
+----------------+-------------+-------------+-------------+---------------+------------------+---------------------+-------------------------+---------------+-----------------------+------------------+-------------------+-----------------+---------------------+--------------------+------------------------+-------------------------+-----------------------------+------------+------------+--------------+---------------------+-----------------+-----------------+----------------+---------------+--------------------+--------------------+--------------------+-----------------+-------------------+----------------+-----------------------+-------------------------------+---------------+---------------+----------------+----------------+
| Slave_IO_State | Master_Host | Master_User | Master_Port | Connect_Retry | Master_Log_File | Read_Master_Log_Pos | Relay_Log_File | Relay_Log_Pos | Relay_Master_Log_File | Slave_IO_Running | Slave_SQL_Running | Replicate_Do_DB | Replicate_Ignore_DB | Replicate_Do_Table | Replicate_Ignore_Table | Replicate_Wild_Do_Table | Replicate_Wild_Ignore_Table | Last_Errno | Last_Error | Skip_Counter | Exec_Master_Log_Pos | Relay_Log_Space | Until_Condition | Until_Log_File | Until_Log_Pos | Master_SSL_Allowed | Master_SSL_CA_File | Master_SSL_CA_Path | Master_SSL_Cert | Master_SSL_Cipher | Master_SSL_Key | Seconds_Behind_Master | Master_SSL_Verify_Server_Cert | Last_IO_Errno | Last_IO_Error | Last_SQL_Errno | Last_SQL_Error |
+----------------+-------------+-------------+-------------+---------------+------------------+---------------------+-------------------------+---------------+-----------------------+------------------+-------------------+-----------------+---------------------+--------------------+------------------------+-------------------------+-----------------------------+------------+------------+--------------+---------------------+-----------------+-----------------+----------------+---------------+--------------------+--------------------+--------------------+-----------------+-------------------+----------------+-----------------------+-------------------------------+---------------+---------------+----------------+----------------+
| | 172.25.95.2 | xiaoyao | 3306 | 60 | mysql-bin.000001 | 4 | mysqld-relay-bin.000001 | 4 | mysql-bin.000001 | No | No | | | | | | | 0 | | 0 | 4 | 106 | None | | 0 | No | | | | | | NULL | No | 0 | | 0 | |
+----------------+-------------+-------------+-------------+---------------+------------------+---------------------+-------------------------+---------------+-----------------------+------------------+-------------------+-----------------+---------------------+--------------------+------------------------+-------------------------+-----------------------------+------------+------------+--------------+---------------------+-----------------+-----------------+----------------+---------------+--------------------+--------------------+--------------------+-----------------+-------------------+----------------+-----------------------+-------------------------------+---------------+---------------+----------------+----------------+
1 row in set (0.00 sec)
mysql> show slave status\G ; ###如果不加/G 就会显示陈上面的样子,很难看的的董
*************************** 1. row ***************************
Slave_IO_State:
Master_Host: 172.25.95.2
Master_User: xiaoyao
Master_Port: 3306
Connect_Retry: 60
Master_Log_File: mysql-bin.000001
Read_Master_Log_Pos: 4
Relay_Log_File: mysqld-relay-bin.000001
Relay_Log_Pos: 4
Relay_Master_Log_File: mysql-bin.000001
Slave_IO_Running: No ##此处为YES才表示进程OK
Slave_SQL_Running: No ##此处为YES才表示进程OK
Replicate_Do_DB:
Replicate_Ignore_DB:
Replicate_Do_Table:
Replicate_Ignore_Table:
Replicate_Wild_Do_Table:
Replicate_Wild_Ignore_Table:
Last_Errno: 0
Last_Error:
Skip_Counter: 0
Exec_Master_Log_Pos: 4
Relay_Log_Space: 106
Until_Condition: None
Until_Log_File:
Until_Log_Pos: 0
Master_SSL_Allowed: No
Master_SSL_CA_File:
Master_SSL_CA_Path:
Master_SSL_Cert:
Master_SSL_Cipher:
Master_SSL_Key:
Seconds_Behind_Master: NULL
Master_SSL_Verify_Server_Cert: No
Last_IO_Errno: 0
Last_IO_Error:
Last_SQL_Errno: 0
Last_SQL_Error:
1 row in set (0.00 sec)
ERROR:
No query specified
mysql> start slave ; ##因为 Slave_IO_Running: No Slave_SQL_Running: No 所以检查slave。需要启动slave.
Query OK, 0 rows affected (0.00 sec)
mysql> show slave status\G ;
*************************** 1. row ***************************
Slave_IO_State: Waiting for master to send event
Master_Host: 172.25.95.2
Master_User: xiaoyao
Master_Port: 3306
Connect_Retry: 60
Master_Log_File: mysql-bin.000001
Read_Master_Log_Pos: 259
Relay_Log_File: mysqld-relay-bin.000002
Relay_Log_Pos: 404
Relay_Master_Log_File: mysql-bin.000001
Slave_IO_Running: Yes ##IO进程没有问题
Slave_SQL_Running: Yes ##SQL进程没有问题
Replicate_Do_DB:
Replicate_Ignore_DB:
Replicate_Do_Table:
Replicate_Ignore_Table:
Replicate_Wild_Do_Table:
Replicate_Wild_Ignore_Table:
Last_Errno: 0
Last_Error:
Skip_Counter: 0
Exec_Master_Log_Pos: 259
Relay_Log_Space: 560
Until_Condition: None
Until_Log_File:
Until_Log_Pos: 0
Master_SSL_Allowed: No
Master_SSL_CA_File:
Master_SSL_CA_Path:
Master_SSL_Cert:
Master_SSL_Cipher:
Master_SSL_Key:
Seconds_Behind_Master: 0
Master_SSL_Verify_Server_Cert: No
Last_IO_Errno: 0
Last_IO_Error:
Last_SQL_Errno: 0
Last_SQL_Error:
1 row in set (0.00 sec)
ERROR:
No query specified
mysql>
4:测试:
server2:写入数据,在server3上看能不能看到。
[root@server2 mysql]# mysql
Welcome to the MySQL monitor.  Commands end with ; or \g.
Your MySQL connection id is 7
Server version: 5.1.71-log Source distribution

Copyright (c) 2000, 2013, Oracle and/or its affiliates. All rights reserved.

Oracle is a registered trademark of Oracle Corporation and/or its
affiliates. Other names may be trademarks of their respective
owners.

Type 'help;' or '\h' for help. Type '\c' to clear the current input statement.

mysql> show databases;
+--------------------+
| Database           |
+--------------------+
| information_schema |
| mysql              |
| test               |
+--------------------+
3 rows in set (0.00 sec)

mysql> use test;
Database changed
mysql> create table test (
    -> name varchar(50) not null,
    -> pass varchar(50) not null
    -> );                   ##master的test种创建'test'表。用来验证主从复制是否成功。
Query OK, 0 rows affected (0.11 sec)
server3:验证:查看
[root@server3 mysql]#
mysql> use test
Reading table information for completion of table and column names
You can turn off this feature to get a quicker startup with -A

Database changed
mysql> show tables;             ##slave没有作过操作,但是显示出了名称为'test'的table此时其实已经说明主从复制成功。
+----------------+
| Tables_in_test |
+----------------+
| test           |
+----------------+
1 row in set (0.00 sec)

mysql>
为进一步验证,在master的‘test’表种插入value,在去看slave的test种会不会出现‘这些value’
server2:插入数据
[root@server2 mysql]# mysql
mysql> insert into test value ('user1','111');          ##为进一步验证,在master的‘test’表种插入value,在去看slave的test种会不会出现‘这些value’
Query OK, 1 row affected (0.00 sec)

mysql> insert into test value ('user2','222');
Query OK, 1 row affected (0.00 sec)
server3:查看
[root@server3 mysql]# mysql
mysql> selet * from test;
ERROR 1064 (42000): You have an error in your SQL syntax; check the manual that corresponds to your MySQL server version for the right syntax to use near 'selet * from test' at line 1
mysql> select * from test;
+-------+------+
| name  | pass |
+-------+------+
| user1 | 111  |
| user2 | 222  |
+-------+------+
2 rows in set (0.00 sec)        ##再次验证,主从复制已经成功。
此处顺便说一下,mysql的内部不支持补齐功能,如果sql语句写错的话,执行Enter后,会报错。看到这种错误不要慌张,检查自己的sql语句并修改正确即可。
已经实现了主从复制,那现在来做一下读写分离:
通常岁数据库的操作包括读写两件事,当select很多时,update,insert和delete会被这些select访问中的数据堵塞,等待select结束才可以执行,并发性能不高,如果可以读写分离,就会解决很多问题,比如:(1).增加冗余(2).增加了服务器的处理能力(3).对于读操作为主的应用,使用读写分离是最好的场景,因为可以确保写的服务器压力更小,而读又可以减少时间上的延迟。
再开两rhel6.5的主机:
server4 172.25.95.4 (mysql-proxy)
物理机 用来远程登陆proxy数据库,处在统一体网段即可
server4:
[root@server4 ~]# mv mysql-proxy-0.8.5-linux-el6-x86-64bit /usr/local/mysql-proxy
[root@server4 ~]# cd /usr/local/mysql-proxy
[root@server4 mysql-proxy]# ls
bin  include  lib  libexec  licenses  share
[root@server4 mysql-proxy]# vim /etc/mysql-proxy.cnf
[root@server4 mysql-proxy]# cat /etc/mysql-proxy.cnf
[mysql-proxy]
user=root
daemon=true
log-file=/usr/local/mysql-proxy/logs/mysql-proxy.log
log-leve=info
keepalive=true
proxy-lua-script=/usr/local/mysql-proxy/share/doc/mysql-proxy/rw-splitting.lua
proxy-address=172.25.95.4
proxy-read-only-backend-addresses=172.25.95.3
proxy-backend-addresses=172.25.95.2
需要保证/etc/mysql-proxy.cnf里面写写的文件存在,没有的路径要创建:
[root@server4 mysql-proxy]# cd share/
[root@server4 share]# ls
doc
[root@server4 share]# cd doc/
[root@server4 doc]# ls
mysql-proxy
[root@server4 doc]# cd mysql-proxy/
[root@server4 mysql-proxy]# ls
active-queries.lua       ro-pooling.lua           tutorial-rewrite.lua
active-transactions.lua  rw-splitting.lua         tutorial-routing.lua
admin-sql.lua            tutorial-basic.lua       tutorial-scramble.lua
analyze-query.lua        tutorial-constants.lua   tutorial-states.lua
auditing.lua             tutorial-inject.lua      tutorial-tokenize.lua
commit-obfuscator.lua    tutorial-keepalive.lua   tutorial-union.lua
commit-obfuscator.msc    tutorial-monitor.lua     tutorial-warnings.lua
histogram.lua            tutorial-packets.lua     xtab.lua
load-multi.lua           tutorial-query-time.lua
ro-balance.lua           tutorial-resultset.lua                 ###找到lua脚本的位置。
创建mysql-proxy.log里面定义的日志文件目录
[root@server4 mysql-proxy]# mkdir /usr/local/mysql-proxy/logs
###建立mysql-proxy.log里面定义的日志文件目录。
正常情况下rhel6的启动脚本都放在/etc/init.d/下面。但是这个mysql-proxy的启动及在/usr/local/mysql-proxy/bin/mysql-proxy这里。启动时,还可以定义一些参数:
root@server4 mysql-proxy]# /usr/local/mysql-proxy/bin/mysql-proxy --plugins=admin --plugins=proxy --defaults-file=/etc/mysql-proxy.cnf

2017-08-02 09:03:38: (critical) mysql-proxy-cli.c:326: loading config from '/etc/mysql-proxy.cnf' failed: permissions of /etc/mysql-proxy.cnf aren't secure (0660 or stricter required)
2017-08-02 09:03:38: (message) Initiating shutdown, requested from mysql-proxy-cli.c:328
2017-08-02 09:03:38: (message) shutting down normally, exit code is: 1
有报错,是权限问题,修改权限:
[root@server4 mysql-proxy]# chmod  660 /etc/mysql-proxy.cn
[root@server4 mysql-proxy]# /usr/local/mysql-proxy/bin/mysql-proxy --defaults-file=/etc/mysql-proxy.cnf
再启动没有报错了。
[root@server4 mysql-proxy]# netstat -antlp |grep mysql-proxy
tcp        0      0 172.25.95.4:3306            0.0.0.0:*                   LISTEN      1153/mysql-proxy
这里就要注意了,mysql-proxy的默认端口是3306.跟mysql的默认端口一样。所以不能同时启动起来,这台代理机也不需要mysql,如果有mysql在运行,关闭之后就可以启动了。
[root@server4 mysql-proxy]# vim /etc/mysql-proxy.cnf
[root@server4 mysql-proxy]# cat /etc/mysql-proxy.cnf [mysql-proxy]
admin-username=xiaoyao
admin-password=redhat
daemon=true
log-file=/usr/local/mysql-proxy/logs/mysql-proxy.log
log-leve=info
keepalive=true
proxy-lua-script=/usr/local/mysql-proxy/share/doc/mysql-proxy/rw-splitting.lua
proxy-address=172.25.95.4
proxy-read-only-backend-addresses=172.25.95.3
proxy-backend-addresses=172.25.95.2
admin-address=172.25.95.4:8080
admin-lua-script=/usr/local/mysql-proxy/share/doc/mysql-proxy/admin-sql.lua

root@server4 mysql-proxy]# /usr/local/mysql-proxy/bin/mysql-proxy --plugins=admin --plugins=proxy --defaults-file=/etc/mysql-proxy.cnf
server2上要授权了:
[root@server2 ~]# mysql
mysql> grant all on *.* to root@'%' identified by 'redhat';
Query OK, 0 rows affected (0.00 sec)ql
物理机登陆mysql代理(server4):
root@xy95 ~]# mysql -uroot -p -h 172.25.95.4
Enter password:
Welcome to the MariaDB monitor.  Commands end with ; or \g.
Your MySQL connection id is 13
Server version: 5.1.71-log Source distribution

Copyright (c) 2000, 2016, Oracle, MariaDB Corporation Ab and others.

Type 'help;' or '\h' for help. Type '\c' to clear the current input statement.

MySQL [(none)]> show master status;
+------------------+----------+--------------+------------------+
| File             | Position | Binlog_Do_DB | Binlog_Ignore_DB |
+------------------+----------+--------------+------------------+
| mysql-bin.000001 |      724 | test         | mysql            |
+------------------+----------+--------------+------------------+
1 row in set (0.00 sec)

MySQL [(none)]> show databases;
+--------------------+
| Database           |
+--------------------+
| information_schema |
| mysql              |
| test               |
+--------------------+
3 rows in set (0.00 sec)

MySQL [(none)]> use test;
Reading table information for completion of table and column names
You can turn off this feature to get a quicker startup with -A

Database changed
MySQL [test]> select * from test;
+-------+------+
| name  | pass |
+-------+------+
| user1 | 111  |
| user2 | 222  |
+-------+------+
2 rows in set (0.00 sec)
此时在test里面insert数据:
MySQL [test]> insert into test value ('user3','333');
Query OK, 1 row affected (0.00 sec)

MySQL [test]> insert into test value ('user4','444');
Query OK, 1 row affected (0.00 sec)
在server2和server3上分别查看:
server2:
mysql> select * from test;
+-------+------+
| name  | pass |
+-------+------+
| user1 | 111  |
| user2 | 222  |
| user3 | 333  |
| user4 | 444  |
+-------+------+
4 rows in set (0.00 sec)
server3:
server3(slave):
mysql> select * from test;
+-------+------+
| name  | pass |
+-------+------+
| user1 | 111  |
| user2 | 222  |
| user3 | 333  |
| user4 | 444  |
+-------+------+
4 rows in set (0.00 sec)
这说明master和slave 都有读的功能。
此时将server2(master)的数据库关闭,测试是否还可以写入。
[root@server2 ~]# /etc/init.d/mysqld stop
Stopping mysqld: [ OK ]
物理机:
MySQL [test]> insert into test value ('user8','888');
ERROR 2013 (HY000): Lost connection to MySQL server during query
报错,不能写入数据。
再将将server2(master)的数据库开启:
[root@server2 ~]# /etc/init.d/mysqld start
Starting mysqld: [ OK ]
物理机:
MySQL [test]> insert into test value ('user8','888');
ERROR 2013 (HY000): Lost connection to MySQL server during query
报错,不能写入数据。
再将将server2(master)的数据库开启:
[root@server2 ~]# /etc/init.d/mysqld start
物理机:
MySQL [test]> insert into test value ('user8','888');
ERROR 2006 (HY000): MySQL server has gone away
No connection. Trying to reconnect...
Connection id:    2
Current database: test

Query OK, 1 row affected (0.01 sec)         ###太快了,显示整在连接还没有写入成功

MySQL [test]> insert into test value ('user8','888');   ###重新写入,显示成功。
Query OK, 1 row affected (0.01 sec)
此时再将server3(slave)的数据库关闭,测试是否还可以写入。
[root@server3 ~]# /etc/init.d/mysqld stop
Stopping mysqld: [ OK ]
物理机:
MySQL [test]> insert into test value ('user9','999');
Query OK, 1 row affected (0.00 sec)
显示没有问题,写入成功
这就实现了读写分离:写在master上,读在master和slave上。


 1248
1248


 被折叠的 条评论
为什么被折叠?
被折叠的 条评论
为什么被折叠?
 到【灌水乐园】发言


