


一、 下载相关文件
  1. fastdfs: https://github.com/happyfish100/fastdfs/tags
  2. Libfastcommon: https://github.com/happyfish100/libfastcommon/tags
  3. Libserverframe: https://github.com/happyfish100/libserverframe/tags
上传相关文件如下图

二、 安装 libfastcommon Libserverframe 解压下载的文件
- 进入 libfastcommon 目录 执行 执行 1 ./make 然后执行2 ./make install

2. 进入Libserverframe目录 执行 1 ./make 然后执行2 ./make install

三、安装 fastdfs
- 进入fastdfs解压目录 执行 1 ./make 然后执行2 ./make install

四、 配置 tracker、storage、client
- 进入 /etc/fdfs目录 有相关文件如下
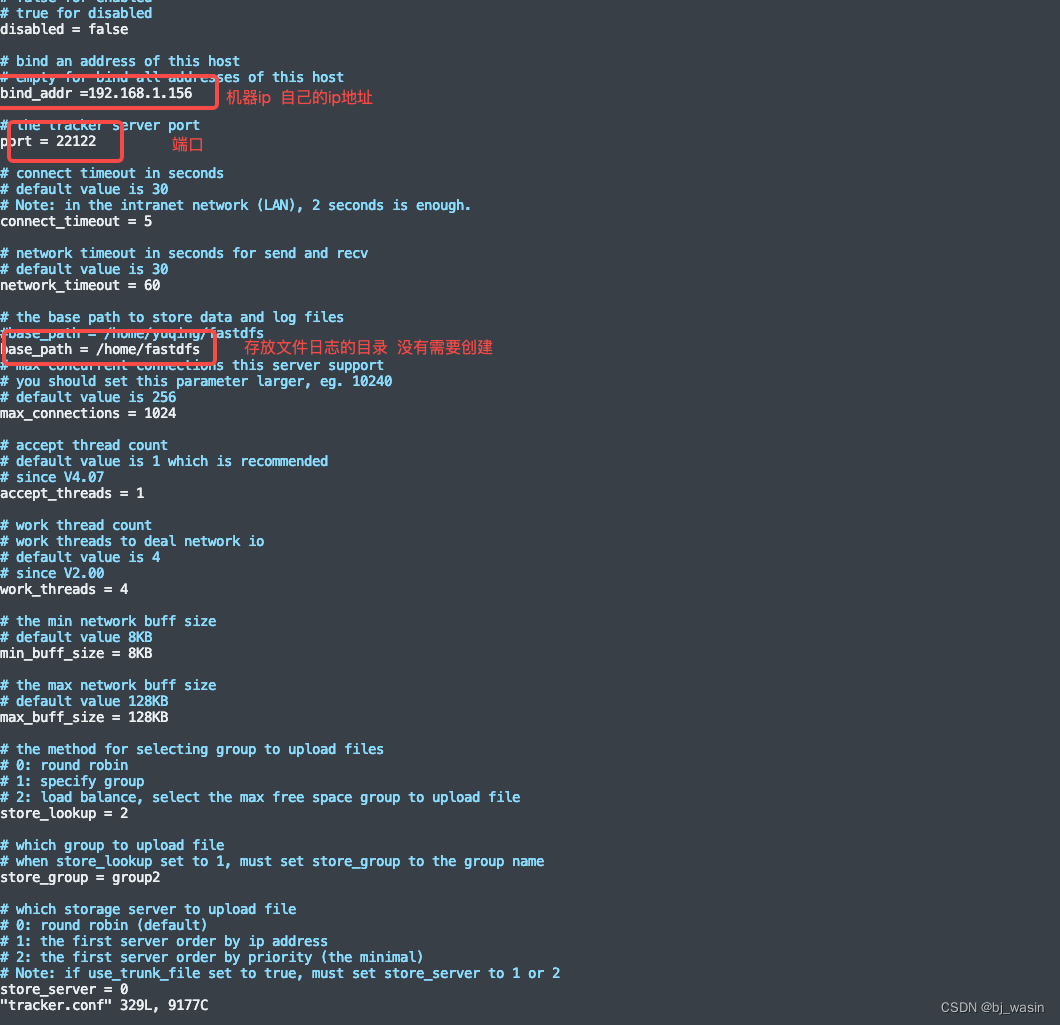
1. client.conf storage.conf storage_ids.conf tracker.conf - 配置 tracker
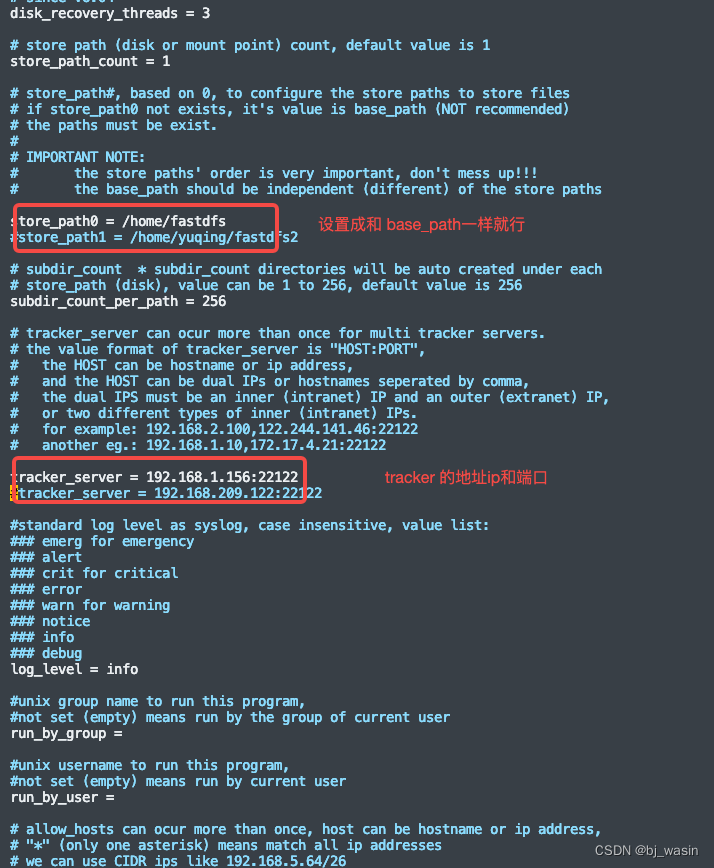
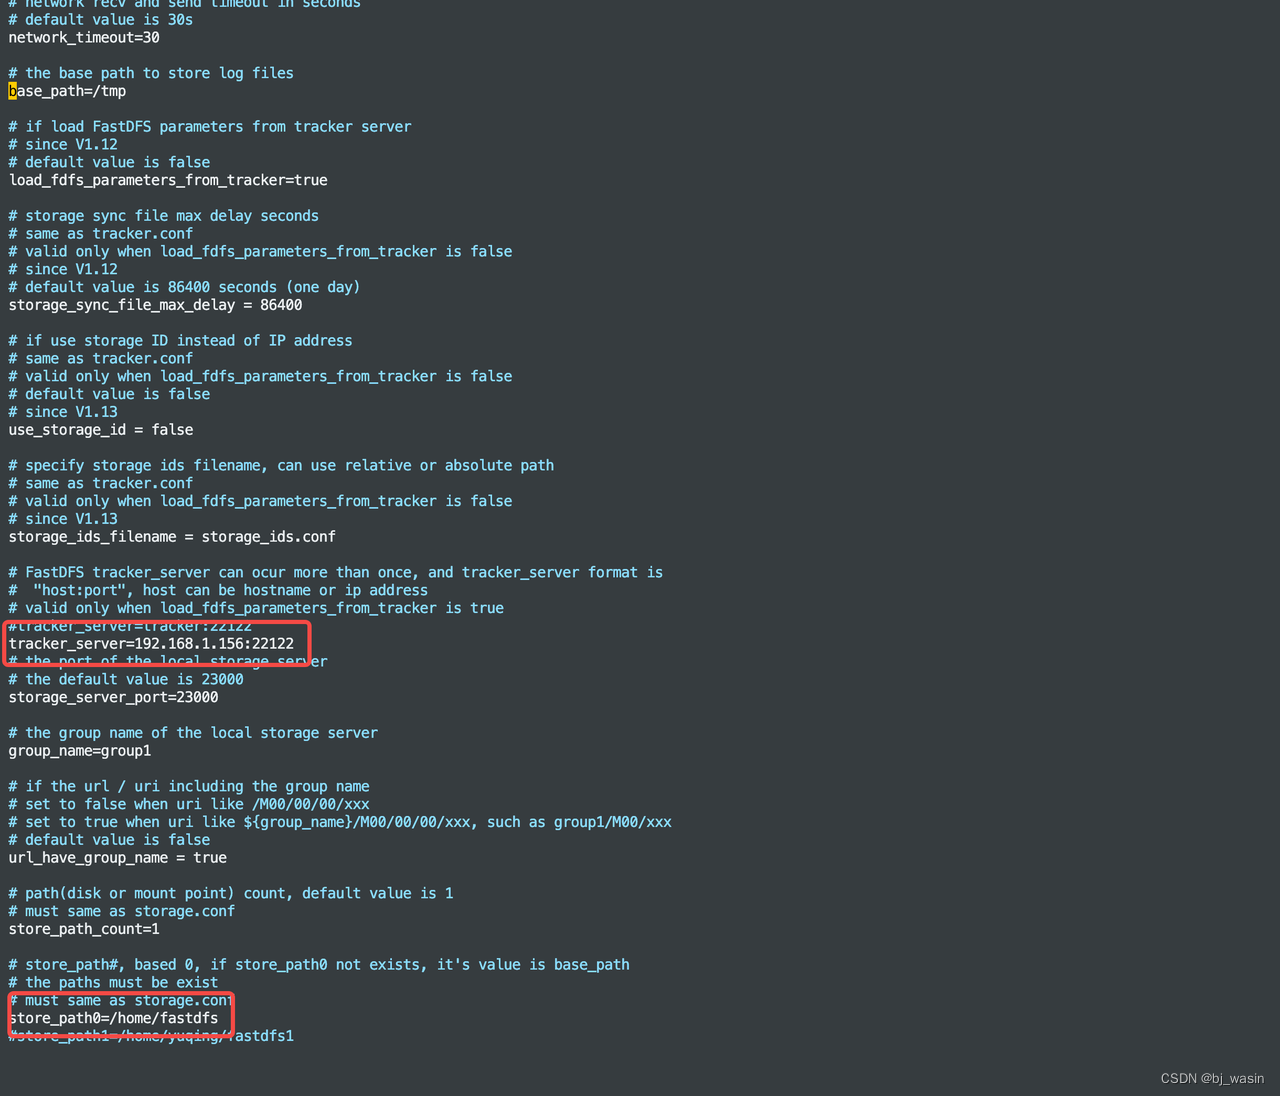
3. 配置 storage
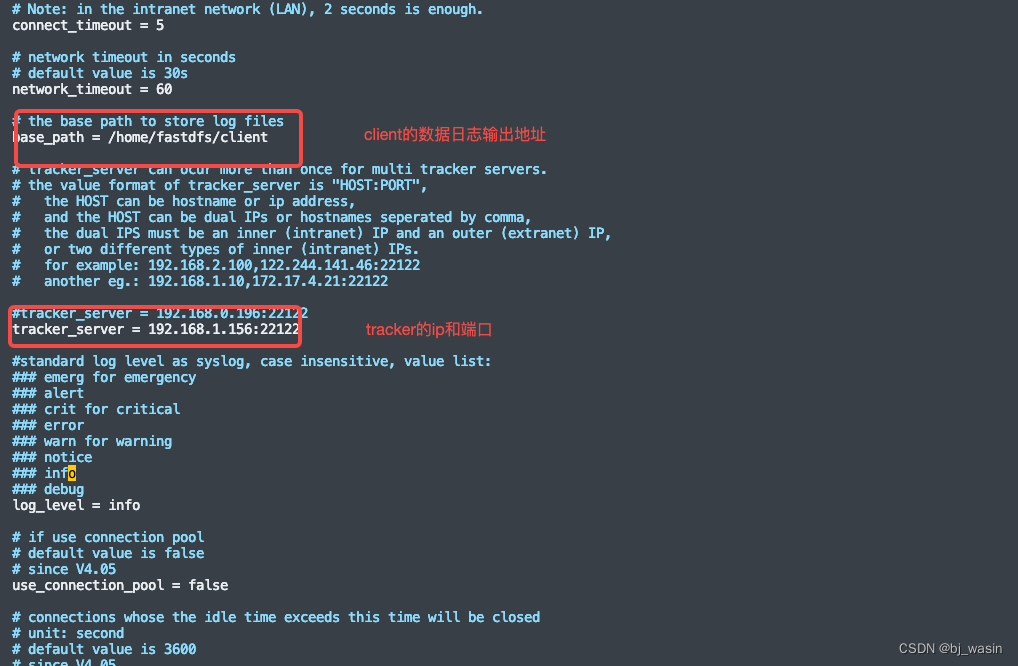
4. 配置client
五、 启动服务
- 启动 trackerd fdfs_trackerd /etc/fdfs/tracker.conf
- 启动 storaged fdfs_storaged /etc/fdfs/storage.conf
- 查看启动信息 ps aux | grep fdfs*
- 如下则启动成功

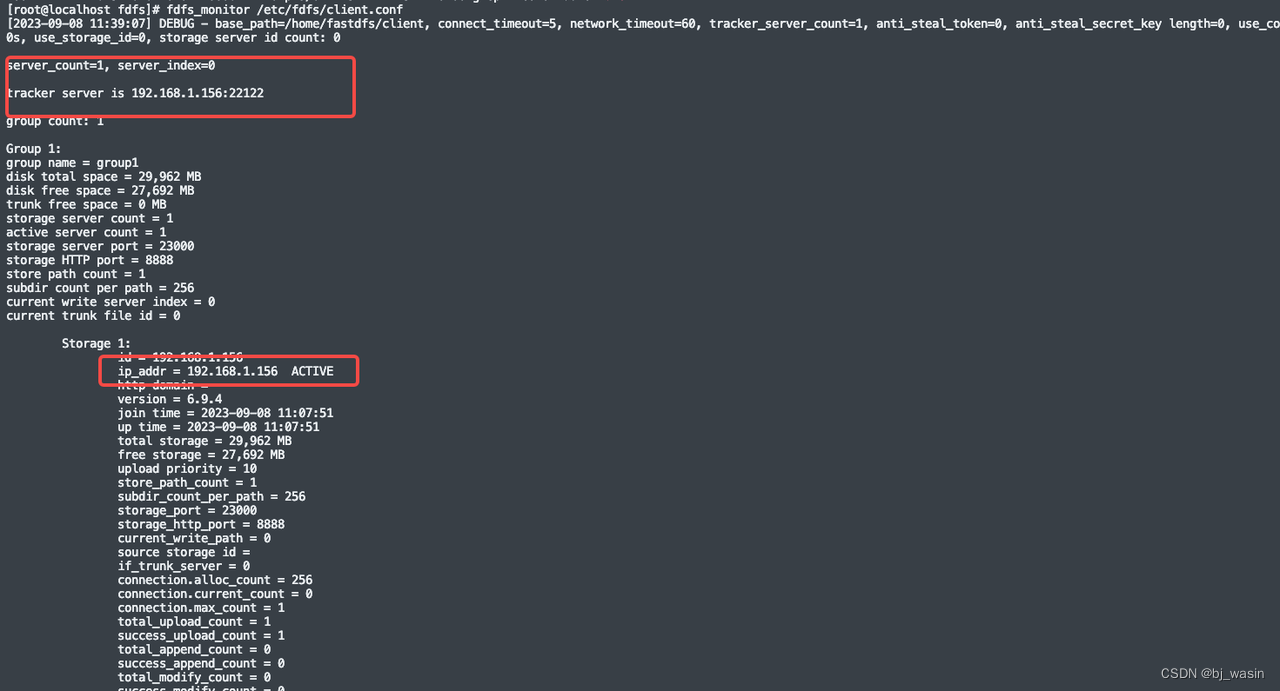
5. 检测是否可连接 fdfs_monitor /etc/fdfs/client.conf
六、测试上传
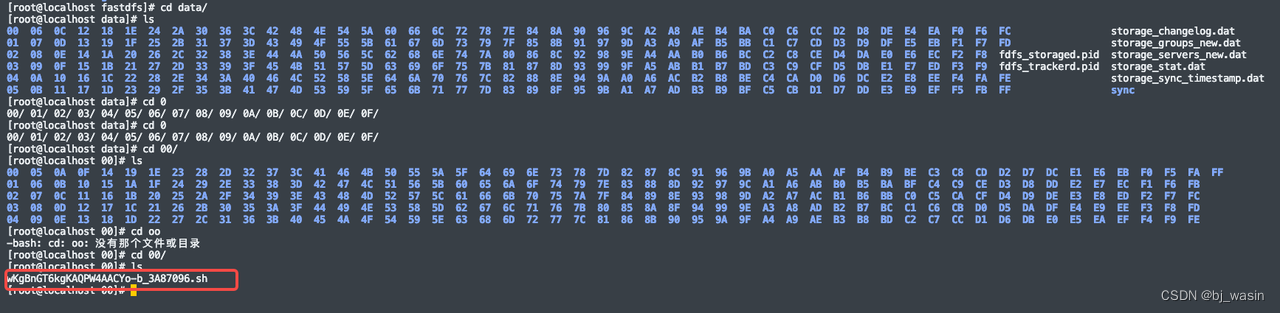
- 执行 /usr/bin/fdfs_upload_file /etc/fdfs/client.conf /home/zkcy/install.sh
- 如下图即上传成功 /home/zkcy/install.sh 上传的文件

查看
七、 nginx配置
- 下载 fastdfs-nginx-module 模块 :https://github.com/happyfish100/fastdfs-nginx-module/tags
- 解压完成后如下:

3. 配置nginx如下
# 先停掉nginx服务
 /usr/local/nginx/sbin/nginx -s stop
# 进入解压包目录
cd /usr/local/nginx-1.12.1/
# 添加模块
./configure --add-module=/usr/local/fastdfs/fastdfs-nginx-module-1.23/src
#重新编译、安装
make && make install
- 查看 nginx模块 /usr/local/nginx/sbin/nginx -V 如下则成功

5. 复制 fastdfs-nginx-module 源码中的配置文件到/etc/fdfs 目录, 并修改
 cd /usr/local/fastdfs/fastdfs-nginx-module-1.23/  /src
 cp mod_fastdfs.conf /etc/fdfs/
- 修改如下配置,其它默认
- 复制 FastDFS 的部分配置文件到/etc/fdfs 目录
cd /usr/local/fastdfs/fastdfs-6.9.4/
cp anti-steal.jpg http.conf mime.types /etc/fdfs/
- 配置nginx,修改nginx.conf 如下
在8089端口下添加fastdfs-nginx模块
location ~/group([0-9])/M00 {
    ngx_fastdfs_module;
}
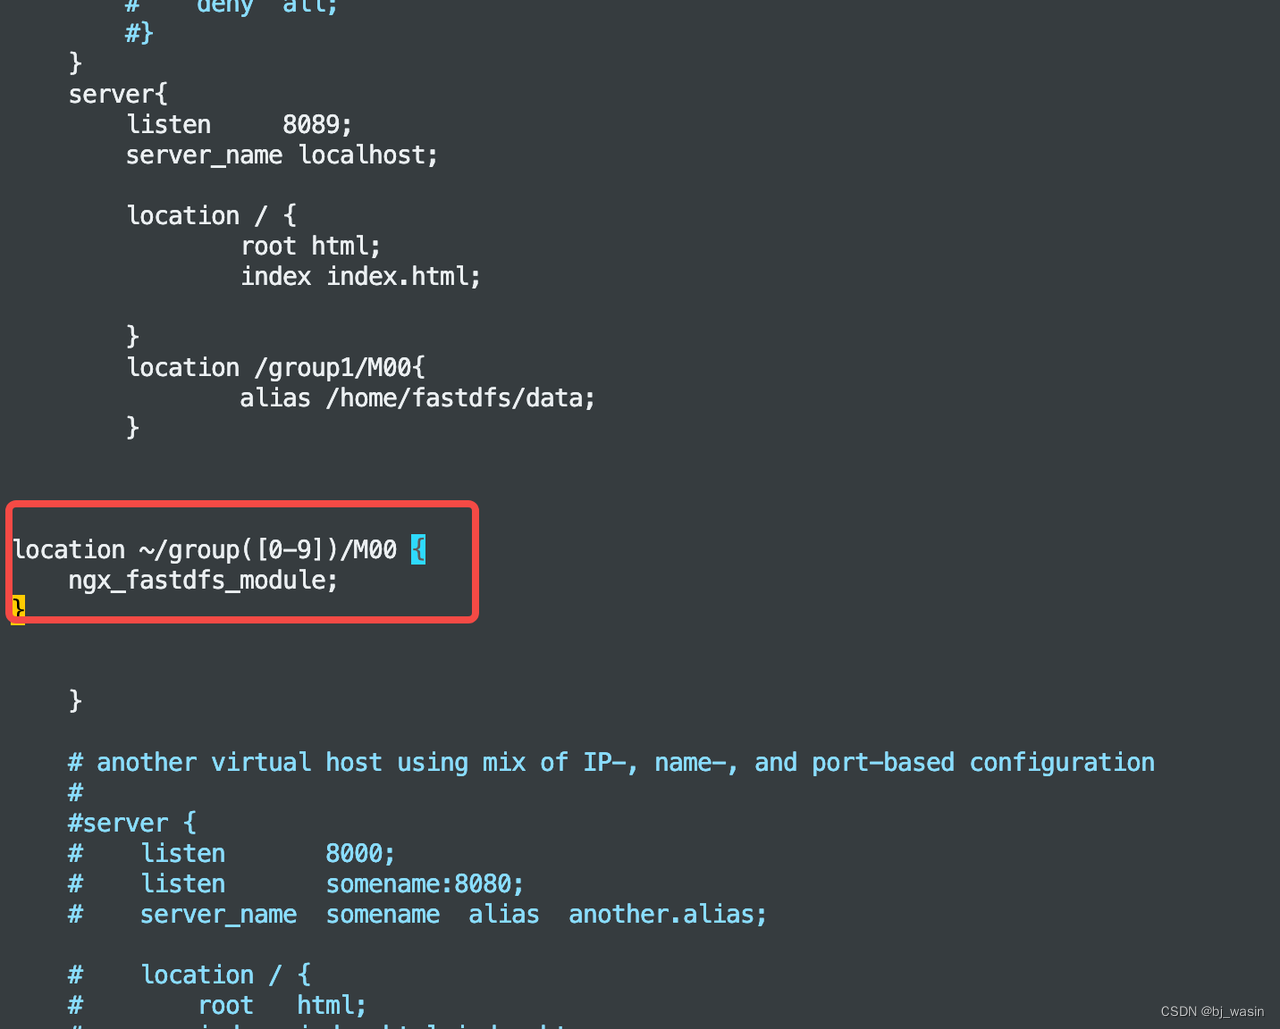
listen 8089 端口值是要与 /etc/fdfs/storage.conf 中的 http.server_port=8089 相对应。如果改成其它端口,则需要统一,同时在防火墙中打开该端口。location 的配置,如果有多个group则配置location ~/group([0-9])/M00 ,没有则不用配group。
I. 启动nginx 打印如下则成功

八、 java客户端连接
远程访问需要开通相关端口 如示例配置中端口
Nginx 8089
tracker 22122
storage 23000
- 引入maven
<dependency>
    <groupId>com.github.tobato</groupId>
    <artifactId>fastdfs-client</artifactId>
    <version>1.27.2</version>
</dependency>
- 添加yml配置
fdfs:
  connect-timeout: 60
  tracker-list:
    - 192.168.1.156:22122     #f服务地址
  pool:
    max-total: 200
    max-total-per-key: 50
    max-wait-millis: 5000
  thumb-image:
    height: 300
    width: 300
- 接口示例
@RestController
public class FastDFSController {
@Autowired
private FastFileStorageClient fastFileStorageClient;
@PostMapping("/upload")
public StorePath upload(MultipartFile file) throws Exception {
String originalFilename = file.getOriginalFilename();
String fileName = originalFilename.substring(originalFilename.lastIndexOf(".") + 1);
StorePath storePath = fastFileStorageClient.uploadFile(file.getInputStream(), file.getSize(), fileName, null);
String fullPath = storePath.getFullPath();
return storePath;
}
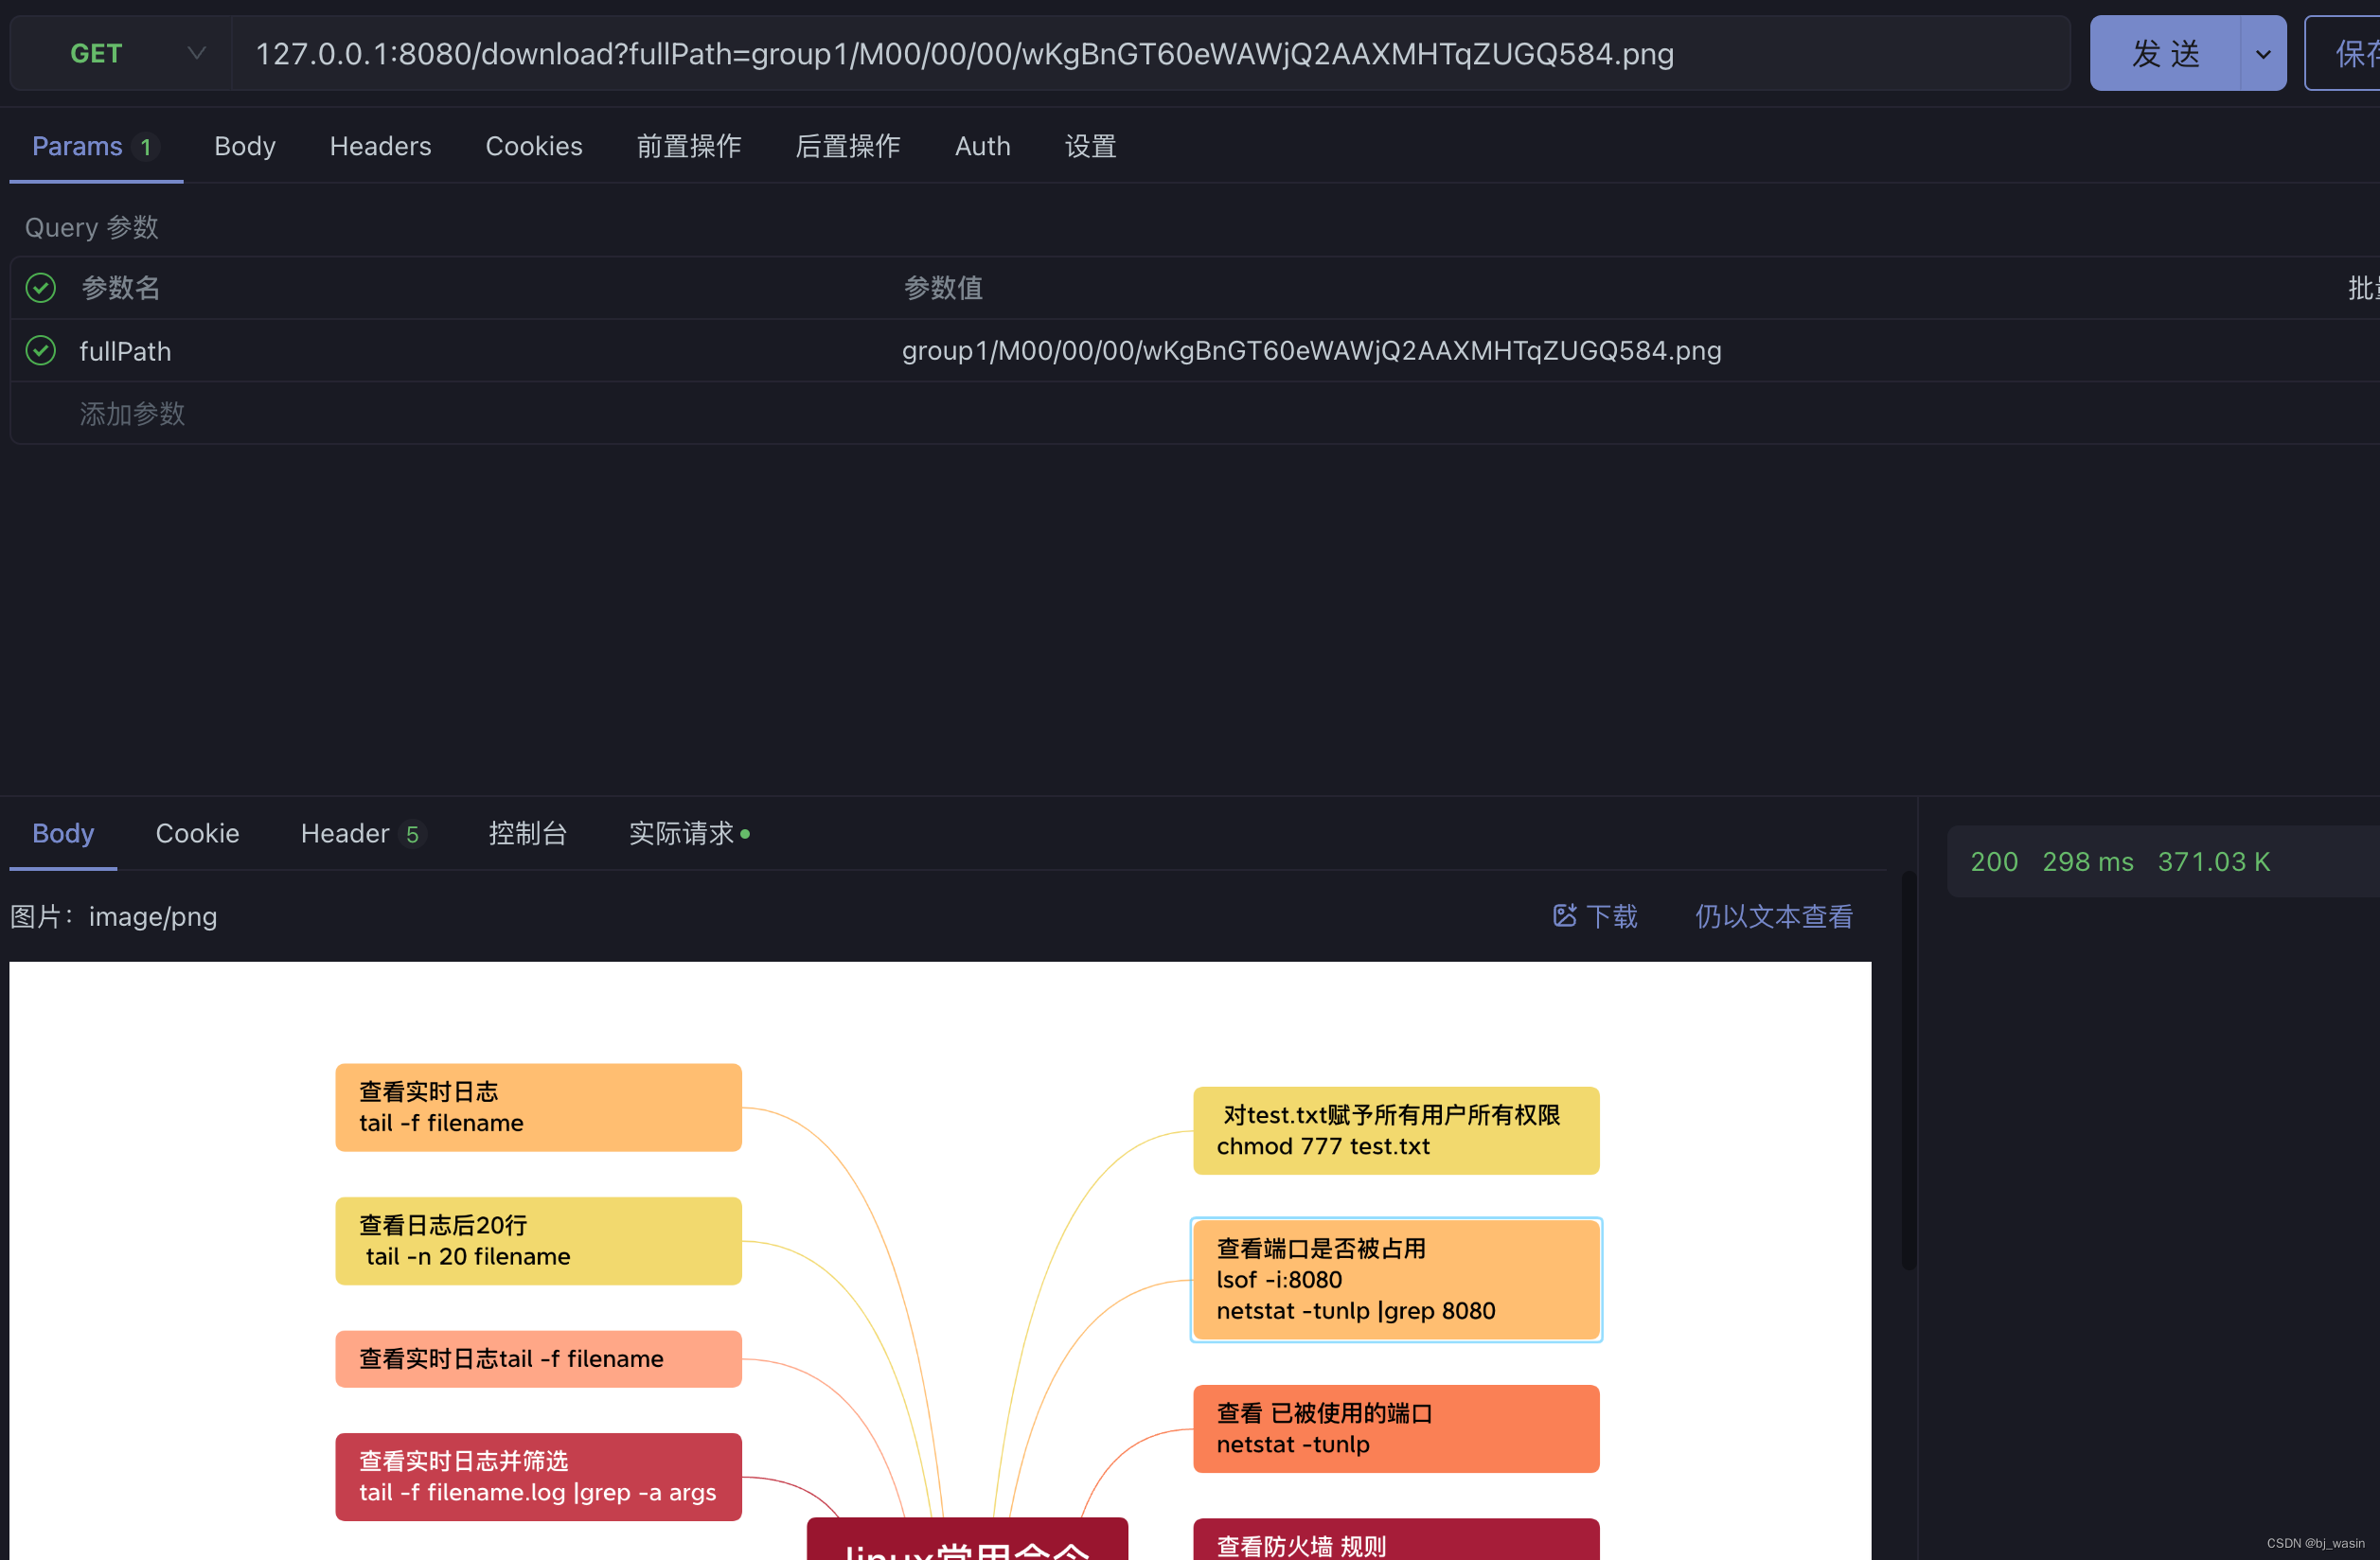
@GetMapping("/download")
public void download(String fullPath, HttpServletRequest request, HttpServletResponse response) throws Exception {
int index = fullPath.indexOf("/");
String groupName = fullPath.substring(0, index);
String path = fullPath.substring(index + 1);
byte[] bytes = fastFileStorageClient.downloadFile(groupName, path, new DownloadByteArray());
response.setCharacterEncoding("UTF-8");
response.setHeader("Content-disposition", "attachment;filename=" + URLEncoder.encode("下载文件名.jpg", "UTF-8"));
ServletOutputStream outputStream = response.getOutputStream();
IOUtils.write(bytes, outputStream);
}
}
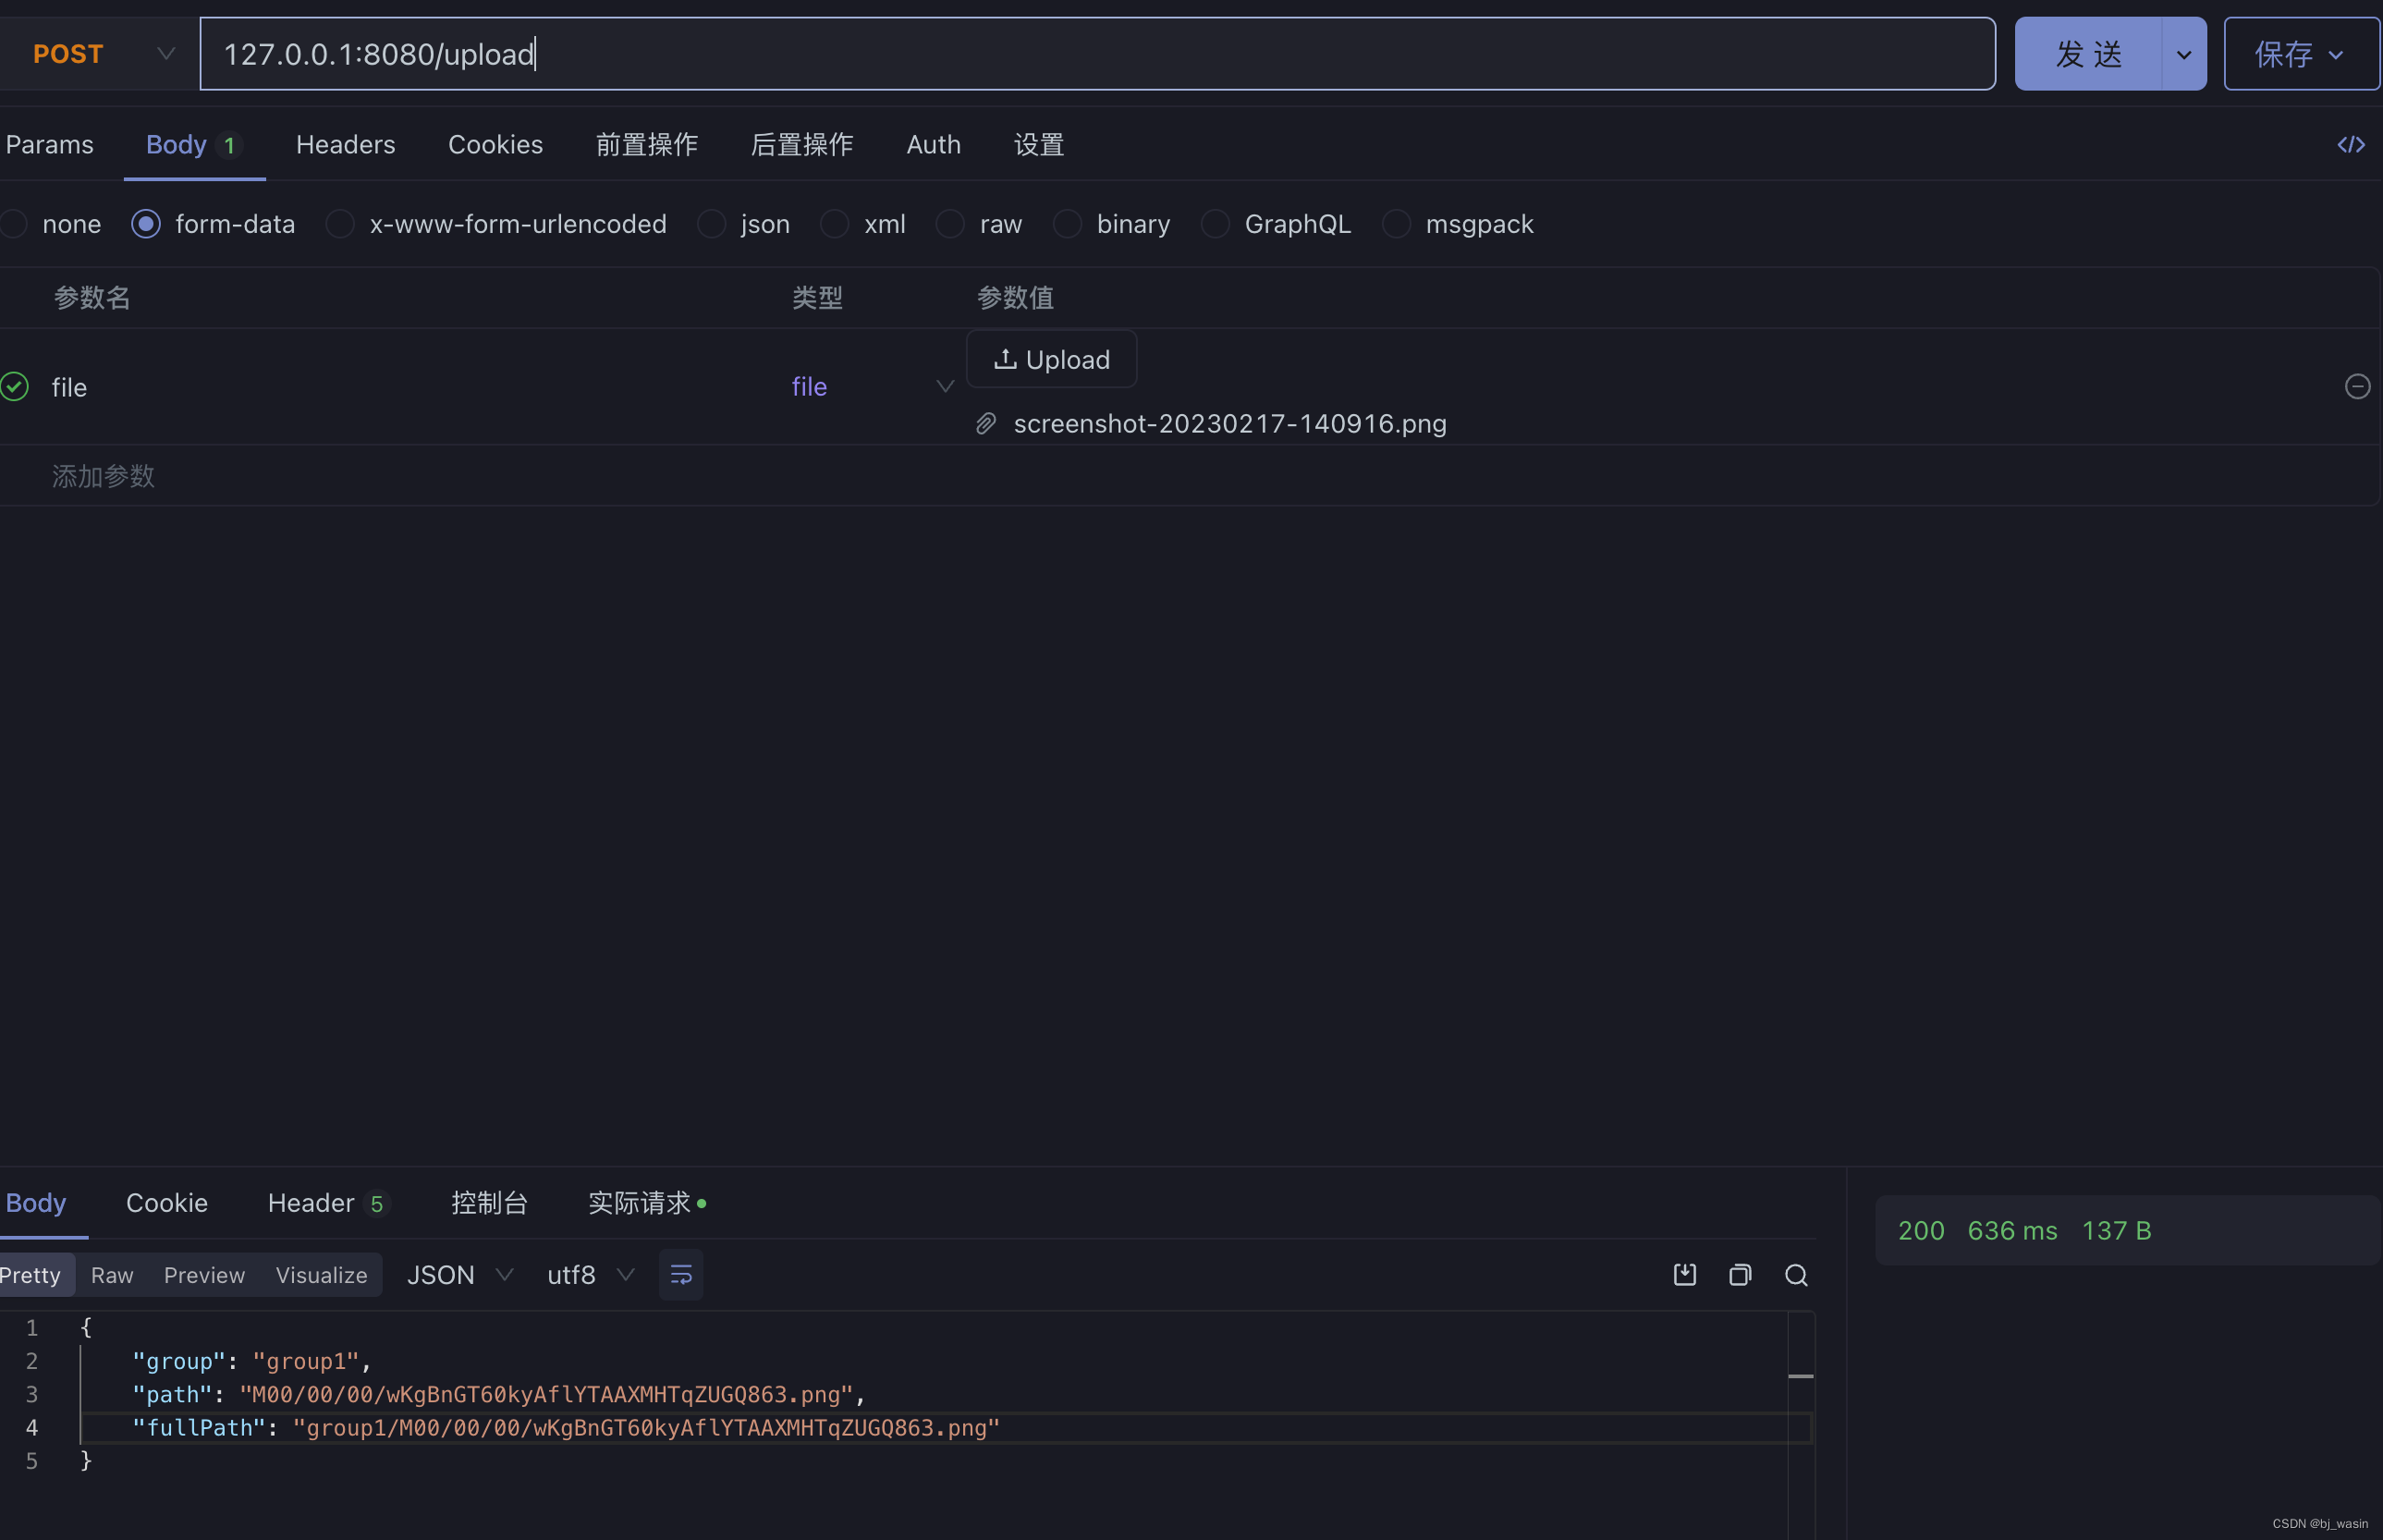
- 测试
参考:
https://www.cnblogs.com/chiangchou/p/fastdfs.html
https://blog.csdn.net/qq_64011418/article/details/132226771


 935
935


 被折叠的 条评论
为什么被折叠?
被折叠的 条评论
为什么被折叠?
 到【灌水乐园】发言


