


 本文介绍了H2数据库如何使用后台线程BackgroundWriterThread定期刷新内存中的B+树数据到磁盘,以确保数据持久化。当数据更改后,H2会在满足特定延迟时间(默认500ms)后将脏页写入磁盘。文章详细阐述了启动线程、运行过程、Chunk和Page的结构,以及数据的序列化和写入流程。同时,讨论了数据安全性和可能的数据丢失风险,以及如何通过参数调整刷新频率。
概述
h2的表、索引、undo log都是使用B+树存储的,这些数据存储到B+树上之后,需要将树从内存再刷新到磁盘上。
因为树刷新到磁盘,涉及到磁盘的随机访问,所以一般的数据库实现上,都是有一个后台线程以一定的频率将脏页面刷新到磁盘上。h2也是这么实现的,它是借助于BackgroundWriterThread后台线程完成脏页面的刷新。
这里需要注意一点,h2与mysql等数据库不同,mysql数据库当事务提交的时候会将redo log写入磁盘,这样可以保证数据库崩溃的时候借助redo log恢复,h2没有这样的机制,如果B+树没有刷新到磁盘,而此时数据库崩溃了,那么数据就会丢失,h2刷新磁盘的频率默认是DEFAULT_WRITE_DELAY常量指定的,可以通过参数“WRITE_DELAY”修改执行频率:
    /**
     * The default delay in milliseconds before the transaction log is written.
     */
    public static final int DEFAULT_WRITE_DELAY = 500;
这一点在h2的官方文档里面也得到了印证:

上面的文档中提到了两个命令:
SET WRITE_DELAY:用于设置BackgroundWriterThread线程的执行频率;
CHECKPOINT SYNC:要求h2立即发起一次磁盘刷新,该命令的执行逻辑和BackgroundWriterThread类似,在文章的最后介绍两者的不同。
启动线程
该线程是在数据库启动的时候创建的,调用下面的方法启动线程:
    public final void setAutoCommitDelay(int millis) {
        if (autoCommitDelay != millis) {
            autoCommitDelay = millis;
            //判断数据库是否只读
            if (!isReadOnly()) {
            	//停止当前正在运行的后台线程,并且关闭两个线程池serializationExecutor和bufferSaveExecutor
                stopBackgroundThread(millis >= 0);
                // start the background thread if needed
                if (millis > 0 && mvStore.isOpen()) {
                    int sleep = Math.max(1, millis / 10);
                    //创建后台线程
                    BackgroundWriterThread t = new BackgroundWriterThread(this, sleep, toString());
                    if (backgroundWriterThread.compareAndSet(null, t)) {
                        t.start();//启动线程
                        //下面是创建两个线程池,其作用后文介绍
                        serializationExecutor = Utils.createSingleThreadExecutor("H2-serialization");
                        bufferSaveExecutor = Utils.createSingleThreadExecutor("H2-save");
                    }
                }
            }
        }
    }
其实SET WRITE_DELAY命令也是执行上面的方法。
运行线程
下面代码是线程的run()方法,该方法不断的在后台执行,主要是调用FileStore.writeInBackground()完成刷新的:
        public void run() {
            while (store.isBackgroundThread()) {
                synchronized (sync) {
                    try {
                        sync.wait(sleep);
                    } catch (InterruptedException ignore) {/**/}
                }
                if (!store.isBackgroundThread()) {
                    break;
                }
                store.writeInBackground();
            }
        }
下面代码是FileStore.writeInBackground():
    void writeInBackground() {
        try {
            if (mvStore.isOpen() && !isReadOnly()) {

                long time = getTimeSinceCreation();
                //如果最后一次磁盘刷新到现在为止超过了autoCommitDelay,那么执行一次tryCommit()
                //autoCommitDelay就是后台线程的执行频率,默认为500ms
                if (time > lastCommitTime + autoCommitDelay) {
                    mvStore.tryCommit();
                }
                doHousekeeping(mvStore);
                autoCompactLastFileOpCount = getWriteCount() + getReadCount();
            }
        } catch (InterruptedException ignore) {
        } catch (Throwable e) {
            if (!mvStore.handleException(e)) {
                throw e;
            }
        }
    }
所有的刷新逻辑都在tryCommit()方法中,而在tryCommit()中,又会调用MVStore.store()方法,下面看下store()方法都做了什么。
store()
该方法首先检查当前是否有页面发生了变化,h2检测页面变化是通过版本号实现的,在RootReference对象里面有一个version属性,如果发生了变化,便会修改version值,,每修改一次增加1。store()方法会保存最后一次刷新磁盘时的version值,比较两个version值是否一致便可以判断出页面是否发生了变化。因此通过比较version的不同,便可以统计出所有当前打开的表、索引是否发生了变化。之后遍历这些发生变化的表或者索引即可。
在遍历开始前,会用属性lastCommitTime记录当前系统时间,lastCommitTime表示最后一次刷新磁盘的时间,这个属性在FileStore.writeInBackground()方法里面使用到。
在上文的setAutoCommitDelay()方法里面启动了两个线程池,store()方法接下来便是提交一个任务到serializationExecutor线程池里面,代码如下:
		//lastCommitTime:记录当前系统时间
		lastCommitTime = getTimeSinceCreation();
		//serializationExecutor:表示线程池
		//changed:是一个ArrayList<Page<?,?>>对象,里面记录了所有发生变化的B+树根页面,也就是记录了发生变化的表或者索引
		//version:最新的版本号
        serializationExecutorHWM = submitOrRun(serializationExecutor,
                () -> serializeAndStore(syncWrite, changed, lastCommitTime, version),
                syncWrite, PIPE_LENGTH, serializationExecutorHWM);
主要的逻辑放在了serializeAndStore()方法里面,在介绍serializeAndStore()方法之前,先介绍下h2里面的chunk。
Chunk
Chunk的结构如下图所示,一个Chunk是一个写入单位,也就是说h2每次写入的时候如果有多个页面变更,那么这些页面都组织到一个Chunk里面,然后一次性写入磁盘。

通过对代码分析,每个Page在写入chunk的时候,不是按照每页4096 byte要求写入的,而是有多少写多少,如果每页的内容非常少,可能多个页面写到Chunk后还不够4096,那么此时h2就要对Chunk进行填充了,代码如下,这要求每个Chunk占用空间大小必须是4096的倍数,不够的话使用空白填充。
        // add the store header and round to the next block
        //FileStore.BLOCK_SIZE=4096
        //chunkLength表示已经写入内容的大小,也就是header和page的总大小
        int length = MathUtils.roundUpInt(chunkLength + Chunk.FOOTER_LENGTH, FileStore.BLOCK_SIZE);
        buff.limit(length);
下面是Chunk的header和footer的格式:
chunk:1,block:2,len:1,map:6,max:1c0,next:3,pages:2,root:4000004f8c,time:1fc,version:1
chunk:1,block:2,len:1,block:2,version:1,fletcher:aed9a4f6
各个字段含义如下(下面内容来自官网,因为我懒没有做翻译,具体可以参加代码Chunk.getHeaderBytes()和getFooterBytes()):
chunk: The chunk id.
block: 当前chunk里面第一个block在整个数据库文件里面是第几个block,一个block大小是4096,block只是用于统计占用空间大小,相当于一个计量单位
len: The size of the chunk in number of blocks.
map: The id of the newest map; incremented when a new map is created.
max: The sum of all maximum page sizes
next: The predicted start block of the next chunk.也就是chunk中第一个page的位置
pages: The number of pages in the chunk.
root: The position of the metadata root page(以后介绍metadata的时候再介绍)
time: The time the chunk was written, in milliseconds after the file was created.
version: The version this chunk represents.
fletcher: The checksum of the footer.
Page
一个Page表示一个B+树页面,在写入磁盘时,Page的格式如下:
length (int): Length of the page in bytes.
checksum (short): Checksum (chunk id xor offset within the chunk xor page length).
mapId (variable size int): The id of the map this page belongs to.
len (variable size int): The number of keys in the page.
type (byte): The page type (0 for leaf page, 1 for internal node; plus 2 if the keys and values are compressed with the LZF algorithm, or plus 6 if the keys and values are compressed with the Deflate algorithm).
children (array of long; internal nodes only): The position of the children.
childCounts (array of variable size long; internal nodes only): The total number of entries for the given child page.
keys (byte array): All keys, stored depending on the data type.
values (byte array; leaf pages only): All values, stored depending on the data type.
向磁盘写入B+树时,先写入根页面,之后是非叶子节点,最后是叶子节点。
写入数据
根据上面介绍的Page和Chunk,下面的代码应该会比较好理解。
serializeAndStore()方法首先会获取新的chunk id,每新建一个chunk,chunk id会增加1,之后创建一个Chunk对象,默认是SFChunk,然后再创建一个写缓冲对象WriteBuffer,该写缓冲对象底层使用ByteBuffer存储数据 ,之后调用serializeToBuffer()对Page对象进行序列化,也就是按照Chunk的格式要求将数据写入到WriteBuffer中,之后将WriteBuffer的ByteBuffer赋值到Chunk对象中。最后调用线程池bufferSaveExecutor执行storeBuffer()将WriteBuffer中的数据写入到磁盘上,写入的动作比较简单,因为序列化动作已经完成,那么直接将ByteBuffer的数据写入文件即可。
private void serializeAndStore(boolean syncRun, ArrayList<Page<?,?>> changed, long time, long version) {
serializationLock.lock();//加锁,防止并发
try {
C lastChunk = null;
//lastChunkId用于记录当前最新的chunk id,
//该值在数据库启动的时候会从磁盘上加载出来,以后每增加一个chunk,chunk id加1
int chunkId = lastChunkId;
if (chunkId != 0) {
//下面的代码主要是获取最大的时间,防止时间回退
chunkId &= Chunk.MAX_ID;
lastChunk = chunks.get(chunkId);
assert lastChunk != null : lastChunkId + " ("+chunkId+") " + chunks;
// never go backward in time
time = Math.max(lastChunk.time, time);
}
//创建一个chunk对象,默认情况下,创建的是SFChunk对象
C c = createChunk(time, version);
//WriteBuffer里面使用ByteBuffer存储数据
//WriteBuffer是一个写缓存,B+树的数据都会写到该对象,而这些数据最终使用ByteBuffer保存
WriteBuffer buff = getWriteBuffer();
//将修改的B+树页面序列化到WriteBuffer中
serializeToBuffer(buff, changed, c, lastChunk);
//记录下该最新的chunk
chunks.put(c.id, c);
//使用线程池将WriteBuffer同步到磁盘上
bufferSaveExecutorHWM = submitOrRun(bufferSaveExecutor, () -> storeBuffer(c, buff),
syncRun, 5, bufferSaveExecutorHWM);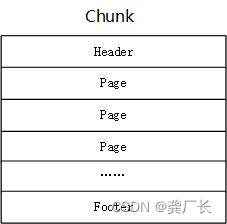
for (Page<?, ?> p : changed) {
//将已经保存到磁盘上的页面从内存中删除,防止占用内存过多
p.releaseSavedPages();
}
} catch (MVStoreException e) {
mvStore.panic(e);
} catch (Throwable e) {
mvStore.panic(DataUtils.newMVStoreException(DataUtils.ERROR_INTERNAL, "{0}", e.toString(), e));
} finally {
serializationLock.unlock();
}
}
在文章的开始提到了两个线程池,从上面的代码可以看出,这两个线程池一个负责将数据序列化到ByteBuffer,另一个负责将ByteBuffer的数据刷新到磁盘上。


 1712
1712

 被折叠的 条评论
为什么被折叠?
被折叠的 条评论
为什么被折叠?
 到【灌水乐园】发言


