


怎样自己实现数据绑定
数据劫持
vuex数据流
单向数据流指只能从一个方向来修改状态
取值:this.
s
t
o
r
e
.
s
t
a
t
e
修
改
:
t
h
i
s
.
store.state 修改:this.
store.state修改:this.store.dispatch(SET_IS_LOGIN, {flag})
State
State 用来存状态。在根实例中注册了store 后,用 this.
s
t
o
r
e
.
s
t
a
t
e
来
访
问
。
G
e
t
t
e
r
s
G
e
t
t
e
r
s
从
s
t
a
t
e
上
派
生
出
来
的
状
态
。
可
以
理
解
为
基
于
S
t
a
t
e
的
计
算
属
性
。
很
多
时
候
,
不
需
要
G
e
t
t
e
r
s
,
直
接
用
S
t
a
t
e
即
可
。
M
u
t
a
t
i
o
n
s
M
u
t
a
t
i
o
n
s
用
来
改
变
状
态
。
需
要
注
意
的
是
,
M
u
t
a
t
i
o
n
s
里
的
修
改
状
态
的
操
作
必
须
是
同
步
的
。
在
根
实
例
中
注
册
了
s
t
o
r
e
后
,
可
以
用
t
h
i
s
.
store.state 来访问。 Getters Getters 从 state 上派生出来的状态。可以理解为基于 State 的计算属性。很多时候,不需要 Getters,直接用 State 即可。 Mutations Mutations 用来改变状态。需要注意的是,Mutations 里的修改状态的操作必须是同步的。在根实例中注册了 store 后, 可以用 this.
store.state来访问。GettersGetters从state上派生出来的状态。可以理解为基于State的计算属性。很多时候,不需要Getters,直接用State即可。MutationsMutations用来改变状态。需要注意的是,Mutations里的修改状态的操作必须是同步的。在根实例中注册了store后,可以用this.store.commit(‘xxx’, data) 来通知 Mutations 来改状态。
Actions
Actions 通过调用 Mutations 来改状态。Actions 可以包含异步操作。在根实例中注册了 store 后, 可以用 this.$store.dispatch(‘xxx’, data) 来存触发 Action。
vuex实现业务
待办事项中的一个事件,它可能拥有几个状态,未完成、已完成、已取消或被删除等。
登录状态
账户切换后页面的显示
mapState是state的语法糖,
首先 .vue 文件
import { mapState } from ‘vuex’
computed: {
…mapState([‘isLogin’])
},
this.$store.dispatch(SET_IS_LOGIN, {flag})
触发action
[SET_IS_LOGIN] ({commit}, {flag}) {
commit(SET_IS_LOGIN, {flag})
},
提醒mutations 修改state
[SET_IS_LOGIN] (state, {flag}) {
state.isLogin = flag
},
state: 定义变量
isLogin: true,
组件传数据
prop $emit
prop:
父组件:
<mobileOperator :layer="headerInfo.layer" :page="headerInfo.page" ref="mobileOperator"/>
子组件:
props: ['layer', 'page'],
emit:
父组件:
<download v-if='isDownLoad' @showDialog="showDialog"/>
子组件:
this.$emit('showDialog', false)
路由配置``
export default new Router({
mode: 'history', //路由模式,取值为history与hash
base: '/', //打包路径,默认为/,可以修改
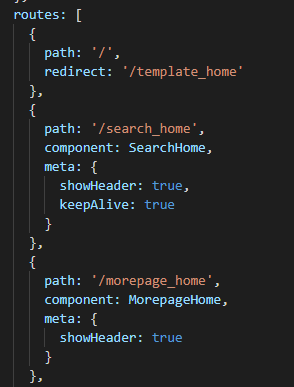
routes: [
{
path: string, //路径
ccomponent: Component; //页面组件
name: string; // 命名路由-路由名称
components: { [name: string]: Component }; // 命名视图组件
redirect: string | Location | Function; // 重定向
props: boolean | string | Function; // 路由组件传递参数
alias: string | Array<string>; // 路由别名
children: Array<RouteConfig>; // 嵌套子路由
beforeEnter?: (to: Route, from: Route, next: Function) => void; // 路由单独钩子
**meta: any; // 自定义标签属性,比如:是否需要登录, keep-alive, 权限**
icon: any; // 图标
// 2.6.0+
caseSensitive: boolean; // 匹配规则是否大小写敏感?(默认值:false)
pathToRegexpOptions: Object; // 编译正则的选项
}
]
})
路由传数据
router:
$router : 是路由操作对象,只写对象
$route : 路由信息对象,只读对象
操作 路由跳转
this.$router.push({
      name:'hello',
      params:{
          name:'word',
          age:'11'
     }
})
读取 路由参数接收
this.name = this.$route.params.name;
this.age = this.$route.params.age;
params和query的区别
query:
//query传参,使用name跳转
this.$router.push({
    name:'second',
    query: {
        queryId:'20180822',
        queryName: 'query'
    }
})
//query传参,使用path跳转
this.$router.push({
    path:'second',
    query: {
        queryId:'20180822',
        queryName: 'query'
    }
})
//query传参接收
this.queryName = this.$route.query.queryName;
this.queryId = this.$route.query.queryId;
params:
//params传参 使用name
this.$router.push({
  name:'second',
  params: {
    id:'20180822',
     name: 'query'
  }
})
this.id = this.$route.params.id ;
this.name = this.$route.params.name ;
router 一些用法
router.go(n)
这个方法的参数是一个整数,意思是在 history 记录中向前或者后退多少步,类似 window.history.go(n)

router.push(location)
想要导航到不同的 URL,则使用 router.push 方法。这个方法会向 history 栈添加一个新的记录,所以,当用户点击浏览器后退按钮时,则回到之前的 URL
router.replace(location) 跟 router.push 很像,唯一的不同就是,它不会向 history 添加新记录,而是跟它的方法名一样 —— 替换掉当前的 history 记录。
router.resolve 实现新页面打开路由
const {href} = this.$router.resolve({
        name: 'foo',
        query: {
          bar
        }
      })
window.open(href, '_blank')
keep-alive是什么
是Vue的内置组件,能在组件切换过程中将状态保留在内存中,防止重复渲染DOM
// 引用
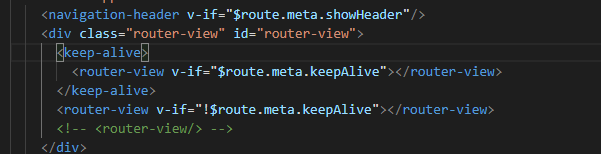
// 路由配置
keep-alive会造成哪些问题
详情页面不更新
使用exclude属性不缓存模板组件即可,没有上面那么复杂了。
//不缓存detail组件
<keep-alive>
      <router-view exclude="detail"></router-view>
</keep-alive>
<template>
<div class=''></div>
</template>

<script>
//这里可以导入其他文件(比如:组件,工具js,第三方插件js,json文件,图片文件等等)
//例如:import 《组件名称》 from '《组件路径》';

export default {
//import引入的组件需要注入到对象中才能使用
components: {},
data() {
//这里存放数据
return {

};
},
//监听属性 类似于data概念
computed: {},
//监控data中的数据变化
watch: {},
//方法集合
methods: {

},
//生命周期 - 创建完成(可以访问当前this实例)
created() {

},
//生命周期 - 挂载完成(可以访问DOM元素)
mounted() {

},
beforeCreate() {}, //生命周期 - 创建之前
beforeMount() {}, //生命周期 - 挂载之前
beforeUpdate() {}, //生命周期 - 更新之前
updated() {}, //生命周期 - 更新之后
beforeDestroy() {}, //生命周期 - 销毁之前
destroyed() {}, //生命周期 - 销毁完成
activated() {}, //如果页面有keep-alive缓存功能,这个函数会触发
}
</script>
<style scoped>

</style>


 3550
3550


 被折叠的 条评论
为什么被折叠?
被折叠的 条评论
为什么被折叠?
 到【灌水乐园】发言


