


前言:Mybatis-Plus的强大之处在于结合JPA、Mybatis两者特性,通俗点来说就是结合了Hibernate和Mybatis两者的特性,达到快速开发的目的
优缺点对比:Hibernate不够灵活,但是不用编写SQL,Mybatis够灵活,但是要编写大量的SQL语句。只有充分两者的长处,才能提高开发效率。(ps:JPA的一种实现就是Hibernate,这里说法不做区分)
持久层开发一般选用的策略:
(1)Mybatis+逆向工程(若字段改变,就需要重新生成逆向工程代码,也不够灵活)
(2)Mybatis+JPA (这种比较常用,Mybatis操作联表以及复杂的SQL,JPA操作单表)
(3)Mybatis-Plus:一站式开发
下面就以Mybatis-Plus的开发模式给大家做出一些讲解(基于spring boot):
项目目录结构:
entity:带有注解的实体类
pojo:最简单的实体类
mapper:DAO层

department表结构

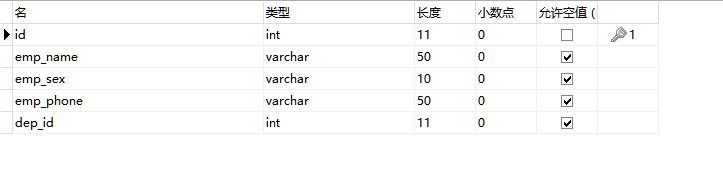
employee表结构(dep_id是外键)
首先添加Mybatis-Plus依赖
<!-- mybatis-plus -->
<dependency>
	<groupId>com.baomidou</groupId>
	<artifactId>mybatis-plus-boot-starter</artifactId>
	<version>2.3.3</version>
</dependency>application.properties配置文件相关配置(这里最好不要去掉serverTimezone=GMT,有可能报会错)
#配置mysql数据库
spring.datasource.url= jdbc:mysql://localhost:3306/mybatisplus?serverTimezone=GMT
spring.datasource.driver-class-name=com.mysql.jdbc.Driver
spring.datasource.username=root
spring.datasource.password=123456
#配置mybatis-plus的配置文件以及映射文件
mybatis-plus.config-location=classpath:/mybatis/mybatis-config.xml
mybatis-plus.mapper-locations=classpath:/mybatis/mapper/*.xml
#显示sql语句
logging.level.cn.zdxh.mp.mapper=debug
Employee实体类
@TableName:指定表名,如果表名和实体类一致,可以省略(可选)
@TableId:指定主键名,以及主键生成策略,这里是自动增长(必选)
@TableField:指定字段名,同理,一致可省略(可选)
ps:mybatis-plus2.3以后,自动开启驼峰命名法
//表名
@TableName("employee")
public class Employee {
    //主键,以及生成策略
    @TableId(value = "id",type = IdType.AUTO)
    private Integer id;
    //员工姓名
    @TableField //可省略
    private String empName;
    //员工性别
    private String empSex;
    //员工电话
    private String empPhone;
    //员工对应部门的外键id
    private Integer depId;

    public Integer getId() {
        return id;
    }

    public void setId(Integer id) {
        this.id = id;
    }

    public String getEmpName() {
        return empName;
    }

    public void setEmpName(String empName) {
        this.empName = empName;
    }

    public String getEmpSex() {
        return empSex;
    }

    public void setEmpSex(String empSex) {
        this.empSex = empSex;
    }

    public String getEmpPhone() {
        return empPhone;
    }

    public void setEmpPhone(String empPhone) {
        this.empPhone = empPhone;
    }

    public Integer getDepId() {
        return depId;
    }

    public void setDepId(Integer depId) {
        this.depId = depId;
    }

    @Override
    public String toString() {
        return "Employee{" +
                "id=" + id +
                ", empName='" + empName + '\'' +
                ", empSex='" + empSex + '\'' +
                ", empPhone='" + empPhone + '\'' +
                ", depId=" + depId +
                '}';
    }
}
Department实体类
//表名
@TableName("department")
public class Department {
    //主键,以及生成策略
    @TableId(value = "id",type = IdType.AUTO)
    private Integer id;
    //部门名称
    private String departmentName;

    public Integer getId() {
        return id;
    }

    public void setId(Integer id) {
        this.id = id;
    }

    public String getDepartmentName() {
        return departmentName;
    }

    public void setDepartmentName(String departmentName) {
        this.departmentName = departmentName;
    }

    @Override
    public String toString() {
        return "Department{" +
                "id=" + id +
                ", departmentName='" + departmentName + '\'' +
                '}';
    }
}
EmployeeCustomer实体类(普通的pojo,没做注解)
public class EmployeeCustomer {
    //主键
    private Integer id;
    //员工姓名
    private String empName;
    //员工性别
    private String empSex;
    //员工电话
    private String empPhone;
    //一个员工对应一个部门
    private Department department;

    public Integer getId() {
        return id;
    }

    public void setId(Integer id) {
        this.id = id;
    }

    public String getEmpName() {
        return empName;
    }

    public void setEmpName(String empName) {
        this.empName = empName;
    }

    public String getEmpSex() {
        return empSex;
    }

    public void setEmpSex(String empSex) {
        this.empSex = empSex;
    }

    public String getEmpPhone() {
        return empPhone;
    }

    public void setEmpPhone(String empPhone) {
        this.empPhone = empPhone;
    }

    public Department getDepartment() {
        return department;
    }

    public void setDepartment(Department department) {
        this.department = department;
    }

    @Override
    public String toString() {
        return "EmployeeCustomer{" +
                "id=" + id +
                ", empName='" + empName + '\'' +
                ", empSex='" + empSex + '\'' +
                ", empPhone='" + empPhone + '\'' +
                ", department=" + department +
                '}';
    }
}
EmployeeMapper接口
只需要继承一个标记接口BaseMapper<T>,并指定目的对象的泛型,即可进行简单增删改查
public interface EmployeeMapper extends BaseMapper<Employee> {
    //通过员工id查询员工的信息,以及所在部门的信息
    public EmployeeCustomer selectEmployeeDetailById(Integer id);
}
DepartmentMapper接口
public interface DepartmentMapper  extends BaseMapper<Department>{
}
来看看BaseMapper接口究竟为我们准备了哪些通用方法
多达20个,足以满足一般的增删改查

其中在EmployeeMapper.xml中自定义了联表查询的方法
<?xml version="1.0" encoding="UTF-8" ?>
<!DOCTYPE mapper
PUBLIC "-//mybatis.org//DTD Mapper 3.0//EN"
"http://mybatis.org/dtd/mybatis-3-mapper.dtd">
<mapper namespace="cn.zdxh.mp.mapper.EmployeeMapper">
    <resultMap id="selectEmpDet" type="cn.zdxh.mp.pojo.EmployeeCustomer">
        <id property="id" column="id"/>
        <result property="empName" column="emp_name"/>
        <result property="empSex" column="emp_sex"/>
        <result property="empPhone" column="emp_phone"/>
        <association property="department" javaType="cn.zdxh.mp.entity.Department">
            <id property="id" column="id"/>
            <result property="departmentName" column="department_name"/>
        </association>
    </resultMap>
    <select id="selectEmployeeDetailById" parameterType="integer" resultMap="selectEmpDet">
        SELECT
          e.id,
          e.emp_name,
          e.emp_sex,
          e.emp_phone,
          d.id,
          d.department_name
        FROM employee e
        LEFT JOIN department d
        ON e.dep_id=d.id
        WHERE e.id=#{id}
    </select>
</mapper>
最后不要忘记了添加mapper包扫描

下面就可以用测试类进行测试了
测试xml中自定义的方法:
     	@Test
	public void testXmlSelect() {
		EmployeeCustomer employeeCustomer = employeeMapper.selectEmployeeDetailById(1);
		System.out.println(employeeCustomer);
	}
测试BaseMapper中提供的方法:
        @Test
	public void testBaseSelect(){
		Employee employee = employeeMapper.selectById(1);
		System.out.println(employee);
	}

	@Test
	public void testBaseInsert(){
		Department department=new Department();
		department.setDepartmentName("市场部");
		departmentMapper.insert(department);
	}
以上测试方法统统没问题
不仅如此,还可以进行有条件的查询、分页查询
条件查询:EntityWrapper条件构造器
        @Test
	public void testBaseSelect2(){
		List<Employee> employees = employeeMapper.selectList(
				new EntityWrapper<Employee>()
						.eq("emp_name", "ning")//注意是列名
		);
		System.out.println(employees);
	}
条件构造器有相当多的构造方法可以调用,具体使用请参照官方文档

分页查询同理:Page<>对象
注意:默认的分页查询是逻辑分页,若要进行物理分页,还要添加分页插件PaginationInterceptoer才行
总结:Mybatis-Plus真的好用


 1960
1960


 被折叠的 条评论
为什么被折叠?
被折叠的 条评论
为什么被折叠?
 到【灌水乐园】发言


