


下载 Anaconda3
地址:https://www.anaconda.com/download/ 这里我下载的是 Anaconda3-2023.09-0-Linux-x86_64.sh

- 安装Anaconda环境
1. 进入root用户, 安装Anconda。
2. 注意下面安装路径不要放在默认的/root/anaconda3 否则其他用户没有访问权限,这里我选择的是/export/apps/anaconda3
Do you accept the license terms? [yes|no]
Please answer 'yes' or 'no':'
yes
Anaconda3 will now be installed into this location:
/root/anaconda3
• Press ENTER to confirm the location
• Press CTRL-C to abort the installation
• Or specify a different location below
[/root/anaconda3] >>> /export/apps/anaconda3
PREFIX=/export/apps/anaconda3
installing: python-3.8.3-h0371630_0 ...- 创建anaconda用户组
groupadd anaconda- 添加用户到用户组
usermod -a -G anaconda <username>

将一个用户添加到用户组中,千万不能直接用: usermod -G groupA这样做会使你离开其他用户组,仅仅做为 这个用户组 groupA 的成员。
应该用 加上 -a 选项: usermod -a -G groupA user,-a 代表 append, 也就是 将自己添加到 用户组groupA 中,而不必离开 其他用户组。添加结束通过 vim /etc/group 在最后可以查看用户组和用户。- 移交目录管理权
chgrp -R anaconda /export/apps/anaconda3- 设置读写权限
chmod 770 -R /export/apps/anaconda3- 设置组继承
chmod g+s /export/apps/anaconda3- 设置子目录组继承
chmod g+s `find /export/apps/anaconda3/ -type d`
或者
find /export/apps/anaconda3/ -type d | xargs chmod g+s- 关闭共享环境的写入权限
chmod g-w /export/apps/anaconda3/envs- root用户下启动anaconda环境
source /export/apps/anaconda3/bin/activate- 创建共享环境

conda create -n hisense pythnotallow=3.8配置环境变量
vim /etc/profile
添加:export PATH=/export/apps/anaconda3/bin:$PATH
source /etc/profile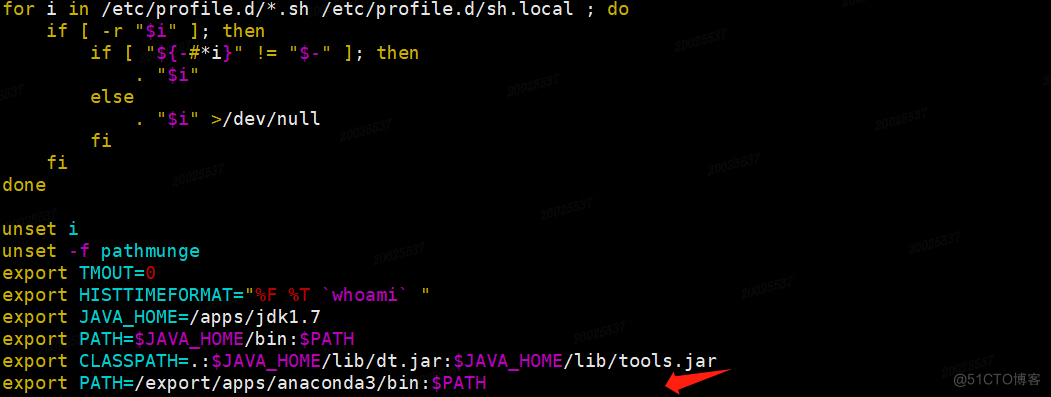
其他用户激活Anaconda环境:
- 切换用户
su - lishilong- 查看conda环境
[hisense@Master wx]$ conda info --env
WARNING: The conda.compat module is deprecated and will be removed in a future release.
# conda environments:
#
base            *  /export/apps/anaconda3
lishilong /export/apps/anaconda3/envs/lishilong- 激活环境
[hisense@Master /]$ /export/apps/anaconda3/bin/conda init bash
WARNING: The conda.compat module is deprecated and will be removed in a future release.
no change     /export/apps/anaconda3/condabin/conda
no change     /export/apps/anaconda3/bin/conda
no change     /export/apps//anaconda3/bin/conda-env
no change     /export/apps/anaconda3/bin/activate
lishilong      /home//.bashrc

==> For changes to take effect, close and re-open your current shell. <==

[hisense@Master /]$ source ~/.bashrc
(base) [hisense@Master /]$ conda activate hisense
4.激活成功
(hisense) [hisense@Master /]$参考:
在UBuntu服务器上anaconda创建的虚拟环境如何多用户共享访问使用? - 张兴远的回答 - 知乎 https://www.zhihu.com/question/277053071/answer/946713532
Linux添加用户(user)到用户组(group):https://blog.csdn.net/weixin_41282397/article/details/81113014
内容总结
以上是为您收集整理的 多用户共用Anaconda环境 全部内容,希望文章能够帮你解决 多用户共用Anaconda环境 所遇到的程序开发问题。 如果觉得互联网集市技术教程内容还不错,欢迎推荐给程序员好友。


 1193
1193


 被折叠的 条评论
为什么被折叠?
被折叠的 条评论
为什么被折叠?
 到【灌水乐园】发言


