


目录
2.2. 在 reactive 对象中访问 ref 创建的响应式数据
5.1. 通过 set()、get()方法创建一个可读可写的计算属性
11. vuex, router, vue 初始化写法的变化
基础素材
印记中文|印记中文 - 深入挖掘国外前端新领域,为中国 Web 前端开发人员提供优质文档!
vue3官网 | 简介 | Vue.js
pina|介绍 | Pinia 中文文档
vue3的优化
- 对虚拟 DOM 进行了重写、模板编译速度的提升,对静态数据的跳过处理
- 对数组的监控
- 对ts有了很好的支持
- 对2.x版本的完全兼容
- 可以有多个根节点(也有bug,比如外层开了display:flex 那么里面会收到影响,也就是说布局更灵活但也更要小心,总之请对自己与他人的代码负责) 6. 支持Source map,虽然没演示但是这点真的重要 7. vue2 大量的 API 挂载在 Vue 对象的原型上,难以实现 TreeShaking
使用CompositionAPI理由
- 更好的Typescript支持
- 在复杂功能组件中可以实现根据特性组织代码 - 代码内聚性。比如:排序和搜索逻辑内聚
- 组件间代码复用
经过了漫长的迭代,Vue 3.0 终于在上 2020-09-18 发布了,带了翻天覆地的变化,使用了 Typescript 进行了大规模的重构,带来了 Composition API RFC 版本,类似 React Hook 一样的写 Vue,可以自定义自己的 hook ,让使用者更加的灵活。
- setup()
- ref()
- reactive()
- isRef()
- toRefs()
- computed()
- watch()
- LifeCycle Hooks(新的生命周期)
- Template refs
- globalProperties
- Suspense
1. reactive() 函数
reactive() 函数接收一个普通对象,返回一个响应式的数据对象,想要使用创建的响应式数据也很简单,创建出来之后,在 setup 中 return 出去,在 template 中调用即可
<template>
  {{state.name}} // test
<template>
<script>
import { defineComponent, reactive, ref, toRefs } from 'vue';
export default defineComponent({
  setup(props, context) {
    let state = reactive({
      name: 'test'
    });
    return state
  }
});
</script>
2. ref() 函数
2.1. ref的使用
ref() 函数用来根据给定的值创建一个响应式的数据对象,ref() 函数调用的返回值是一个对象,这个对象上只包含一个 value 属性,只在 setup 函数内部访问 ref 函数需要加 .value
<template>
    <div class="mine">
        {{count}} // 10
    </div>
</template>
<script>
import { defineComponent, ref } from 'vue';
export default defineComponent({
  setup() {
    const count = ref(10)
    // 在js 中获取ref 中定义的值, 需要通过value属性
    console.log(count.value);
    return {
       count
    }
   }
});
</script>
2.2. 在 reactive 对象中访问 ref 创建的响应式数据
通过reactive 来获取ref 的值时,不需要使用.value属性
<template>
    <div class="mine">
        {{count}} -{{t}} // 10 -100
    </div>
</template>
<script>
import { defineComponent, reactive, ref, toRefs } from 'vue';
export default defineComponent({
  setup() {
    const count = ref<number>(10)
    const obj = reactive({
      t: 100,
      count
    })
    // 通过reactive 来获取ref 的值时,不需要使用.value属性
    console.log(obj.count);
    return {
       ...toRefs(obj)
    }
   }
});
</script>
3. isRef() 函数
isRef() 用来判断某个值是否为 ref() 创建出来的对象
<script>
import { defineComponent, isRef, ref } from 'vue';
export default defineComponent({
  setup(props, context) {
    const name = 'vue'
    const age = ref(18)
    console.log(isRef(age)); // true
    console.log(isRef(name)); // false
    return {
      age,
      name
    }
  }
});
</script>
4. toRefs() 函数
toRefs() 函数可以将 reactive() 创建出来的响应式对象,转换为普通的对象,只不过,这个对象上的每个属性节点,都是 ref() 类型的响应式数据
<template>
  <div class="mine">
    {{name}} // test
    {{age}} // 18
  </div>
</template>
<script>
import { defineComponent, reactive, ref, toRefs } from 'vue';
export default defineComponent({
  setup(props, context) {
    let state = reactive({
      name: 'test'
    });
    const age = ref(18)
    return {
      ...toRefs(state),
      age
    }
  }
});
</script>
5. computed()
该函数用来创造计算属性,和过去一样,它返回的值是一个 ref 对象。
里面可以传方法,或者一个对象,对象中包含 set()、get()方法。
<script>
import { computed, defineComponent, ref } from 'vue';
export default defineComponent({
  setup(props, context) {
    const age = ref(18)
    // 根据 age 的值,创建一个响应式的计算属性 readOnlyAge,它会根据依赖的 ref 自动计算并返回一个新的 ref
    const readOnlyAge = computed(() => age.value++) // 19
    return {
      age,
      readOnlyAge
    }
  }
});
</script>

// 组合式
<script setup>
import { reactive, computed } from 'vue'

const author = reactive({
  name: 'John Doe',
  books: [
    'Vue 2 - Advanced Guide',
    'Vue 3 - Basic Guide',
    'Vue 4 - The Mystery'
  ]
})

// 一个计算属性 ref
const publishedBooksMessage = computed(() => {
  return author.books.length > 0 ? 'Yes' : 'No'
})
</script>
<template>
  <p>Has published books:</p>
  <span>{{ publishedBooksMessage }}</span>
</template>
5.1. 通过 set()、get()方法创建一个可读可写的计算属性
<script>
import { computed, defineComponent, ref } from 'vue';
export default defineComponent({
  setup(props, context) {
    const age = ref(18)
    const computedAge = computed({
      get: () => age.value + 1,
      set: value => age.value + value
    })
    // 为计算属性赋值的操作,会触发 set 函数, 触发 set 函数后,age 的值会被更新
    age.value = 100
    return {
      age,
      computedAge
    }
  }
});
</script>
6. watch() 函数
watch 函数用来侦听特定的数据源,并在回调函数中执行副作用。
默认情况是懒执行的,也就是说仅在侦听的源数据变更时才执行回调。
6.1. 监听用 reactive 声明的数据源
<script>
import { computed, defineComponent, reactive, toRefs, watch } from 'vue';

export default defineComponent({
  setup(props, context) {
    const state = reactive({ name: 'vue', age: 10 })
    watch(
      () => state.age,
      (age, preAge) => {
        console.log(age); // 100
        console.log(preAge); // 10
      }
    )
    // 修改age 时会触发 watch 的回调, 打印变更前后的值
    state.age = 100
    return {
      ...toRefs(state)
    }
  }
});
</script>
6.2. 监听用 ref 声明的数据源
<script>
import { defineComponent, ref, watch } from 'vue';
export default defineComponent({
  setup(props, context) {
    const age = ref(10);
    watch(age, () => console.log(age.value)); // 100
    // 修改age 时会触发watch 的回调, 打印变更后的值
    age.value = 100
    return {
      age
    }
  }
});
</script>
6.3. 同时监听多个值
<script>
import { computed, defineComponent, reactive, toRefs, watch } from 'vue';

export default defineComponent({
  setup(props, context) {
    const state = reactive({ name: 'vue', age: 10 })
    watch(
      [() => state.age, () => state.name],
      ([newName, newAge], [oldName, oldAge]) => {
        console.log(newName);
        console.log(newAge);
        console.log(oldName);
        console.log(oldAge);
      }
    )
    // 修改age 时会触发watch 的回调, 打印变更前后的值, 此时需要注意, 更改其中一个值, 都会执行watch的回调
    state.age = 100
    state.name = 'vue3'
    return {
      ...toRefs(state)
    }
  }
});
</script>
6.4. stop 停止监听
在 setup() 函数内创建的 watch 监视,会在当前组件被销毁的时候自动停止。
如果想要明确地停止某个监视,可以调用 watch() 函数的返回值即可,语法如下:
<script>
import { set } from 'lodash';
import { computed, defineComponent, reactive, toRefs, watch } from 'vue';
export default defineComponent({
setup(props, context) {
const state = reactive({ name: 'vue', age: 10 })
const stop = watch(
[() => state.age, () => state.name],
([newName, newAge], [oldName, oldAge]) => {
console.log(newName);
console.log(newAge);
console.log(oldName);
console.log(oldAge);
}
)
// 修改age 时会触发 watch 的回调, 打印变更前后的值, 此时需要注意, 更改其中一个值, 都会执行watch的回调
state.age = 100
state.name = 'vue3'
setTimeout(()=> {
stop()
// 此时修改时, 不会触发watch 回调
state.age = 1000
state.name = 'vue3-'
}, 1000) // 1秒之后将取消watch的监听
return {
...toRefs(state)
}
}
});
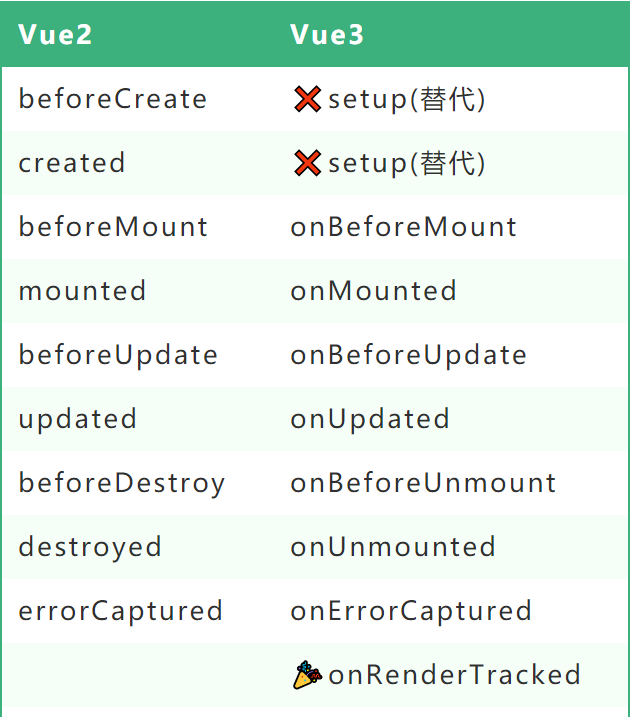
</script>7. LifeCycle Hooks(新的生命周期)
新版的生命周期函数,可以按需导入到组件中,且只能在 setup() 函数中使用,但是也可以在 setup 外定义,在 setup 中使用\
<script>
import { set } from 'lodash';
import { defineComponent, onBeforeMount, onBeforeUnmount, onBeforeUpdate, onErrorCaptured, onMounted, onUnmounted, onUpdated } from 'vue';
export default defineComponent({
  setup(props, context) {
    onBeforeMount(()=> {
      console.log('beformounted!')
    })
    onMounted(() => {
      console.log('mounted!')
    })
    onBeforeUpdate(()=> {
      console.log('beforupdated!')
    })
    onUpdated(() => {
      console.log('updated!')
    })
    onBeforeUnmount(()=> {
      console.log('beforunmounted!')
    })
    onUnmounted(() => {
      console.log('unmounted!')
    })
    onErrorCaptured(()=> {
      console.log('errorCaptured!')
    })
    return {}
  }
});
</script>
8. Template refs
通过 refs 来获取真实 dom 元素,这个和 react 的用法一样,为了获得对模板内元素或组件实例的引用,我们可以像往常一样在 setup()中声明一个 ref 并返回它
<div>
    <div ref="content">第一步, 在dom上面定义, 他会有一个回调</div>
  </div>
  <ul>
    <li>v-for 出来的ref</li>
    <li>可以写为表达式的形式, 可以推导出vue是如何实现的</li>
    <li>vue2.x的时候v-for不用这么麻烦, 直接写上去会被组装成数组</li>
    <li :ref="el => { items[index] = el }" v-for="(item,index) in 6" :key="item">{{item}}</li>
  </ul>
9. vue 的全局配置
通过 vue 实例上 config 来配置,包含 Vue 应用程序全局配置的对象。您可以在挂载应用程序之前修改下面列出的属性:
您可以在挂载应用程序之前修改下面列出的属性:
const app = Vue.createApp({})
app.config = {...}

//为组件渲染功能和观察程序期间的未捕获错误分配处理程序。

//错误和应用程序实例将调用处理程序:
app.config.errorHandler = (err, vm, info) => {}
可以在应用程序内的任何组件实例中访问的全局属性,组件的属性将具有优先权。
这可以代替 Vue 2.xVue.prototype 扩展:
const app = Vue.createApp({})
app.config.globalProperties.$http = 'xxxxxxxxs'
可以在组件用通过 getCurrentInstance() 来获取全局 globalProperties 中配置的信息,getCurrentInstance() 方法获取当前组件的实例,然后通过 ctx 属性获得当前上下文,这样我们就能在 setup 中使用 router 和 vuex,通过这个属性我们就可以操作变量、全局属性、组件属性等等。
setup( ) { const { ctx } = getCurrentInstance(); ctx.$http }10. Suspense组件
在开始介绍 Vue 的 Suspense 组件之前,我们有必要先了解一下 React 的 Suspense 组件,因为他们的功能类似。
React.lazy 接受一个函数,这个函数需要动态调用 import()。
它必须返回一个 Promise,该 Promise 需要 resolve 一个 default export 的 React 组件。
import React, { Suspense } from 'react';
const myComponent = React.lazy(() => import('./Component'));
function MyComponent() {
  return (
    <div>
      <Suspense fallback={<div>Loading...</div>}>
        <myComponent />
      </Suspense>
    </div>
  );
}
Vue3 也新增了 React.lazy 类似功能的 defineAsyncComponent 函数,处理动态引入(的组件)。
defineAsyncComponent 可以接受返回承诺的工厂函数。
当您从服务器检索到组件定义时,应该调用 Promise 的解析回调。
您还可以调用 reject(reason) 来指示负载已经失败。
import { defineAsyncComponent } from 'vue'
const AsyncComp = defineAsyncComponent(() =>
  import('./components/AsyncComponent.vue')
)
app.component('async-component', AsyncComp)
Vue3 也新增了 Suspense 组件:
- 异步组件加载状态管理:可以通过 Suspense 组件来指定一个 loading 插槽,在异步组件加载过程中
- 错误处理:可以在 Suspense 组件中使用 error 插槽来处理异步组件加载过程中可能发生的错误,并展示相关信息
- 多个异步组件加载状态管理:能够同时管理多个异步组件的加载状态,在任意一个异步组件加载时展示 loading 状态,而其他未加载的组件仍然保持正常
<template>
  <Suspense>
    <template #default>
      <my-component />
    </template>
    <template #fallback>
      Loading ...
    </template>
  </Suspense>
</template>
<script>
 import { defineComponent, defineAsyncComponent } from "vue";
 const MyComponent = defineAsyncComponent(() => import('./Component'));
export default defineComponent({
   components: {
     MyComponent
   },
   setup() {
     return {}
   }
})
</script>
11. vuex, router, vue 初始化写法的变化
11.1. vue
import { createApp } from 'vue';
import App from './App.vue'
import router from './router'
import store from './store'

// 方法一. 创建实例变成了链式, 直接写下去感觉语义与结构有点模糊, 但是我们要理解vue这样做的良苦用心, 前端趋近于函数化。
// createApp(App).use(router).use(store).mount('#app')

// 方法二.
const app = createApp(App);
app.use(router);
app.use(store);
app.mount('#app');
11.2. router
history 关键字:createWebHistory
history模式直接指向history对象,它表示当前窗口的浏览历史,history对象保存了当前窗口访问过的所有页面网址。URL中没有#,它使用的是传统的路由分发模式,即用户在输入一个URL时,服务器会接收这个请求,并解析这个URL,然后做出相应的逻辑处理。
11.2.1. 特点:
当使用history模式时,URL就像这样:hhh.com/user/id。相比hash模式更加好看。
虽然history模式不需要#。但是,它也有自己的缺点,就是在刷新页面的时候,如果没有相应的路由或资源,就会刷出404来。
history api可以分为两大部分,切换历史状态 和 修改历史状态:
import { createRouter, createWebHistory } from 'vue-router';
import Home from '../views/Home.vue'

const routes = [
  {
    path: '/',
    name: 'Home',
    component: Home
  }
]

const router = createRouter({
  // 专门创建history的函数
  history: createWebHistory(process.env.BASE_URL),
  routes
})

export default router
11.2.2. 使用
<template>
  <div>
    {{id}}
  </div>
</template>

<script>
import { getCurrentInstance, ref } from 'vue';
export default {
  setup(){
    const { ctx } = getCurrentInstance()
    // 1. 这样也是为了去掉this
    // 2. 方便类型推导
    console.log(ctx.$router); // push等方法
    console.log(ctx.$router.currentRoute.value); // 路由实例
    // 这个其实没有必要变成ref因为这个值没必要动态
    // 但是他太长了, 这个真的不能忍
    const id = ref(ctx.$router.currentRoute.value.query.id)

    // 4: 页面拦截器
    ctx.$router.beforeEach((to, from,next)=>{
      console.log('路由的生命周期')
      next()
    })
    return {
      id
    }
  }
}
</script>
12. vuex
import { createStore } from 'vuex'
// 专门创建实例的一个方法
export default createStore({
  state: {
  },
  mutations: {
  },
  actions: {
  },
  modules: {
  }
});
12.1. 使用
import { createStore } from 'vuex'

// 难道前端趋势只有函数这一种吗
export default createStore({
  state: {
    name:'牛逼, 你拿到我了',
    age: 24,
    a:'白',
    b:'黑'
  },
  mutations: {
    updateName(state, n){
      state.name += n
    }
  },
  actions: {
    deferName(store) {
     setTimeout(()=>{
       // 必须只有commit可以修改值, 这个设定我比较反对, 可以讨论
       // vuex本身结构就很拖沓, 定义域使用个人都不喜欢
      store.state.name = '牛逼, 你改回来了'
     },1000)
    }
  },
  getters: {
    fullName(state){ return `${state.a} - + -${state.b}` }
  },
  modules: {
  }
});
<template>
<div>
<p>{{name}}</p>
<button @click="updateName('+')">点击改变名字</button>
<button @click="deferName('+')">改回来</button>
<p>{{fullName}}</p>
</div>
</template>
<script>
import { useStore } from "vuex";
import { computed } from "vue";
export default {
setup() {
const store = useStore();
// 1: 单个引入
const name = computed(() => store.state.name);
// 2: 引入整个state
const state = computed(() => store.state);
console.log("vuex的实例", state.value); // 别忘了.value
// 3: 方法其实就直接从本体上取下来了
const updateName = newName => store.commit("updateName", newName);
// 4: action一个意思
const deferName = () => store.dispatch("deferName");
// 5: getter 没变化
const fullName = computed(() => store.getters.fullName);
return {
name,
fullName,
deferName,
updateName,
};
}
};
</script>13. 组件注入
13.1. 父组件
<template>
  <div>
    组件:
    <zj :type="type" @ok="wancheng"></zj>
  </div>
</template>

<script>
import zj from "../components/子组件.vue";
import { ref } from 'vue';
import { provide } from 'vue'

export default {
  components: {
    zj
  },
  setup() {
    provide('name','向下传值'); // 基础值
    provide('name2', ref('向下传值')); // 监控值
    const type = ref('大多数');

    function wancheng(msg){
      console.log('子组件-->',msg)
      setTimeout(()=>{
        type.value = 'xxxxxxx'
      },2000)
    }
    return {
      type,
      wancheng
    }
  }
};
</script>
13.2. 子组件
<template>
  <div>props的属性不用setup去return --- {{type}}</div>
</template>

<script>
import { inject, ref } from 'vue'
export default {
  props: {
    type: String
  },
  // 1: props也是不可以解构的, 会失去响应式
  // 2: context是上下文, 我们可以获取到slots emit 等方法
  // 3: props, context 分开也是为了ts更明确的类型推导
  // setup({type}){
  setup(props, context) {
    // 1: props
    console.log("props", props.type);
    console.log("上下文", context);
    context.emit('ok','传递完成');

    // 2: 注入
    console.log('inject',inject('name'));
    console.log('inject',inject('xxxx','我是默认值'))
    inject('name1', ref('默认值')) // 接收方也可以这样
  }
};
</script>
14. vue 3.x 完整组件模版结构
一个完成的 vue 3.x 完整组件模版结构包含了:组件名称、 props、components、setup(hooks、computed、watch、methods 等)
<template>
  <div class="mine" ref="elmRefs">
    <span>{{name}}</span>
    <br>
    <span>{{count}}</span>
    <div>
      <button @click="handleClick">测试按钮</button>
    </div>
    <ul>
      <li v-for="item in list" :key="item.id">{{item.name}}</li>
    </ul>
  </div>
</template>
<script lang="ts">
import { computed, defineComponent, getCurrentInstance, onMounted, PropType, reactive, ref, toRefs } from 'vue';
interface IState {
  count: 0,
  name: string,
  list: Array<object>
}
export default defineComponent({
  name: 'demo',
  // 父组件传子组件参数
  props: {
    name: {
      type: String as PropType<null | ''>,
      default: 'vue3.x'
    },
    list: {
      type: Array as PropType<object[]>,
      default: () => []
    }
  },
  components: {
    /// TODO 组件注册
  },
  emits: ["emits-name"], // 为了提示作用
  setup (props, context) {
    console.log(props.name)
    console.log(props.list)
    const state = reactive<IState>({
      name: 'vue 3.0 组件',
      count: 0,
      list: [
        {
          name: 'vue',
          id: 1
        },
        {
          name: 'vuex',
          id: 2
        }
      ]
    })
    const a = computed(() => state.name)
    onMounted(() => {
    })
    function handleClick () {
      state.count ++
      // 调用父组件的方法
      context.emit('emits-name', state.count)
    }
    return {
      ...toRefs(state),
      handleClick
    }
  }
});
</script>
在通往幸福道路上,并没有什么捷径可走,唯有付出努力和拼搏


 5273
5273


 被折叠的 条评论
为什么被折叠?
被折叠的 条评论
为什么被折叠?
 到【灌水乐园】发言


